Introduction
Welcome to the world of Roku, where entertainment meets convenience! Roku has become one of the most popular streaming devices, providing users with access to a vast array of movies, TV shows, music, and more. One of the key components of a Roku device is the remote control, which allows you to navigate through the various channels and settings effortlessly.
However, there may be instances when your Roku remote is not able to connect to your Wi-Fi network. This can be frustrating, especially if you’re looking forward to enjoying your favorite shows or movies. But don’t worry, there are alternative methods to connect your Roku remote without Wi-Fi.
In this article, we will explore a few different ways to connect your Roku remote when you don’t have access to a Wi-Fi network. Whether you have misplaced your Wi-Fi password, don’t have a Wi-Fi network, or your Roku device is experiencing connectivity issues, these methods will come in handy.
We will discuss how to use the Roku mobile app, which allows you to control your Roku device from your smartphone, without the need for a Wi-Fi connection. Additionally, we will cover how to directly enter the IP address of your Roku device on your smartphone or computer to establish a connection.
If you’re in a pinch and don’t have access to a smartphone or computer, we’ll also show you how to enable the mobile hotspot feature on your smartphone and use it as a Wi-Fi connection for your Roku remote. Lastly, for those who have an Ethernet connection available, we’ll explain how to connect your Roku remote through an Ethernet cable.
So, whether your Wi-Fi is acting up, you’re on-the-go without access to a network, or you simply prefer a different method of connecting your Roku remote, we’ve got you covered. Let’s dive into these alternative solutions and get your Roku remote connected without Wi-Fi!
Using Roku Mobile App
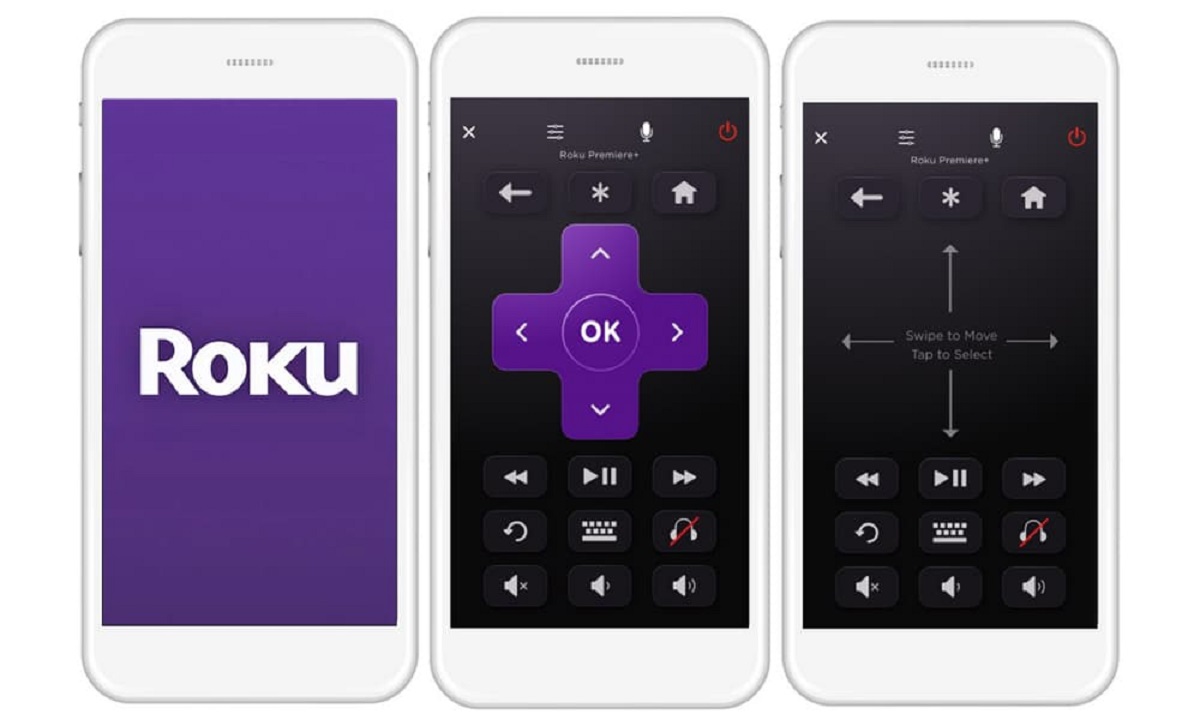
A convenient way to connect your Roku remote without relying on a Wi-Fi network is by utilizing the Roku mobile app. The Roku mobile app is available for both iOS and Android devices and allows you to control your Roku device using your smartphone.
To get started, you’ll need to download and install the Roku mobile app from the App Store or Google Play Store. Once installed, follow these steps:
- Open the Roku mobile app on your smartphone.
- Tap on the remote icon at the bottom of the screen to access the Roku remote control.
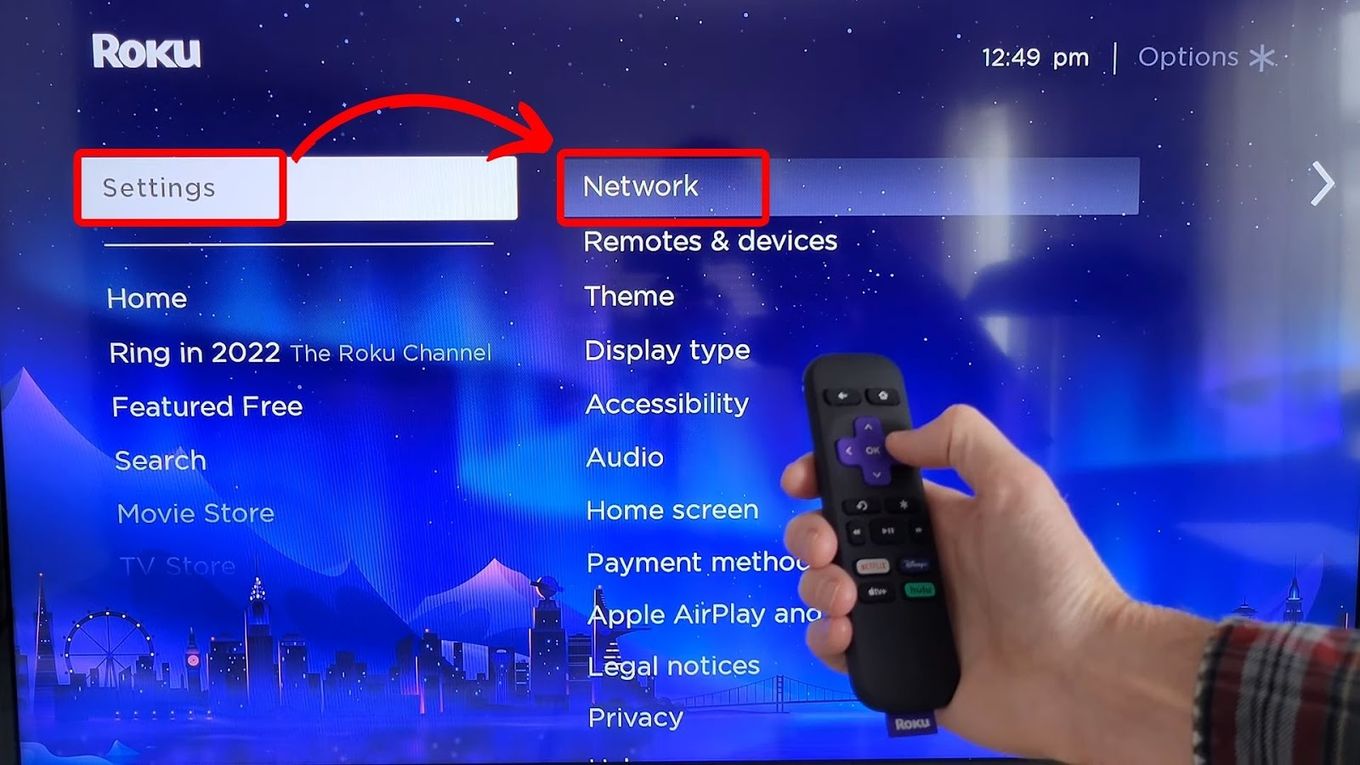
- On your Roku device, press the Settings option from the home screen.
- Navigate to System and then Advanced system settings.
- Choose Device connect and then Enable control by mobile apps.
- On the Roku mobile app, tap on the remote icon again to establish a connection between your phone and your Roku device.
Once connected, you can use the mobile app as a remote control for your Roku device. You can navigate through the Roku menu, browse channels, and control playback using the touchscreen controls on your smartphone.
The Roku mobile app also offers additional features, such as a keyboard for easier text entry and voice search, allowing you to search for movies or TV shows by simply speaking into your phone’s microphone.
Using the Roku mobile app is a great solution for situations where your Roku device is not able to connect to Wi-Fi, but you still want to enjoy your favorite content. It provides a seamless and convenient way to control your Roku device without the need for a physical remote or a Wi-Fi connection.
So, if you find yourself in a situation where your Roku remote is not able to connect to Wi-Fi, simply download the Roku mobile app and follow the steps mentioned above to regain control of your Roku device using your smartphone.
Directly Entering the IP Address
If you are unable to connect your Roku remote to Wi-Fi, another method you can try is directly entering the IP address of your Roku device. This method allows you to establish a connection between your smartphone or computer and the Roku device, bypassing the need for a Wi-Fi network.
Here’s how you can connect your Roku remote by directly entering the IP address:
- On your Roku device, press the Settings option from the home screen.
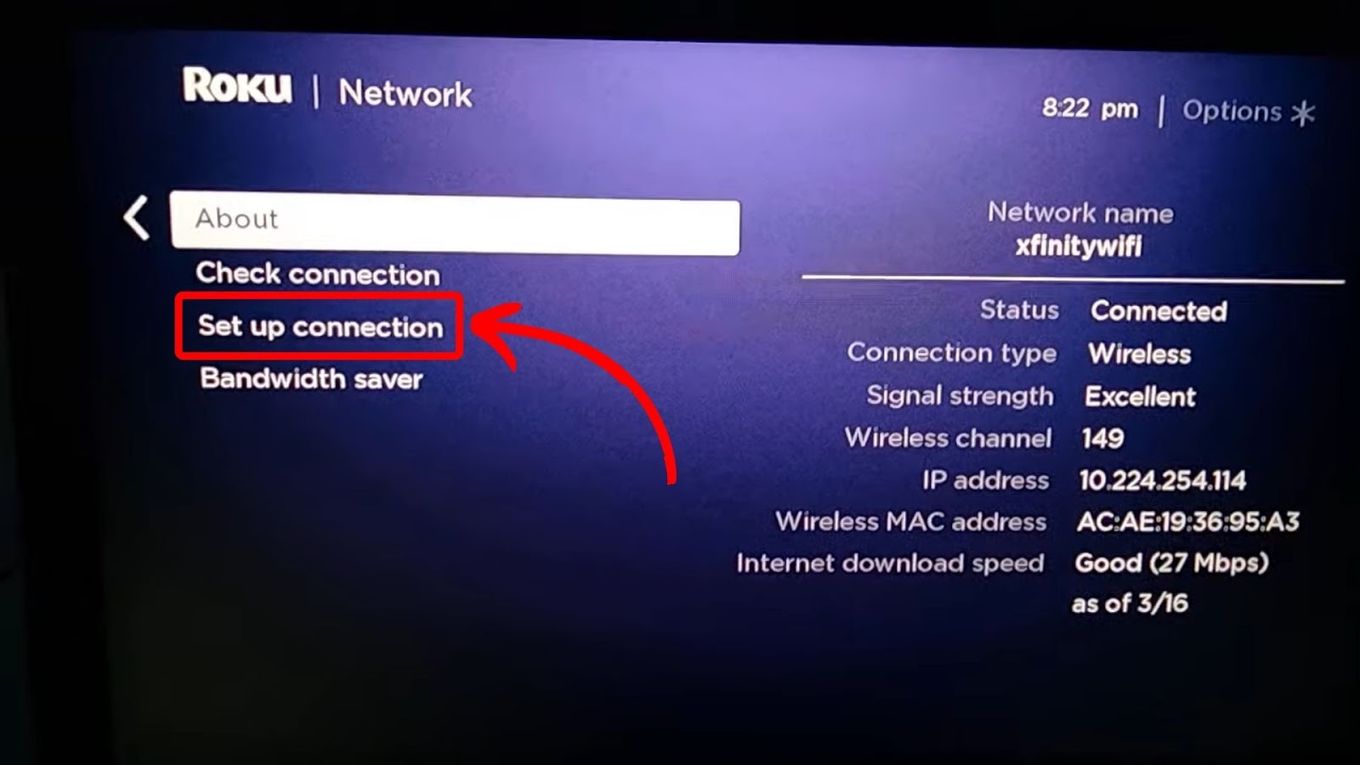
- Select Network and then About.
- Note down the IP address displayed on the screen.
- On your smartphone or computer, open a web browser.
- In the address bar, type in the IP address of your Roku device.
- Press Enter or tap Go to access the Roku web interface.
- From the web interface, you can control your Roku device using the on-screen remote.
Using the web interface, you can navigate through the Roku menu, launch channels, and control playback. It provides a user-friendly interface similar to the physical remote control.
This method is useful if you have misplaced your physical remote or your Roku device is not able to connect to Wi-Fi. By directly entering the IP address, you can regain control and enjoy your favorite content even without a functioning Wi-Fi network.
It’s important to note that the ability to directly enter the IP address may depend on the model of your Roku device. Some older models may not have this feature available. Additionally, make sure that the device you are using to access the Roku web interface is on the same network as the Roku device.
If you encounter any difficulties or need additional assistance, refer to the Roku support documentation or reach out to the Roku customer support team for further guidance.
So, if your Roku remote is unable to connect to Wi-Fi, try the method of directly entering the IP address to establish a connection and regain control of your Roku device.
Enabling Mobile Hotspot on Smartphone
If you find yourself without access to a Wi-Fi network and are unable to connect your Roku remote, you can create a mobile hotspot on your smartphone. Enabling a mobile hotspot allows you to use your smartphone’s cellular data to provide internet connectivity for your Roku device.
Here’s how you can connect your Roku remote through a mobile hotspot:
- On your smartphone, go to the settings menu.
- Look for the option that says “Hotspot” or “Tethering.”
- Select “Mobile hotspot” or a similar option.
- Follow the on-screen instructions to enable the mobile hotspot feature.
- On your Roku device, go to the settings menu.
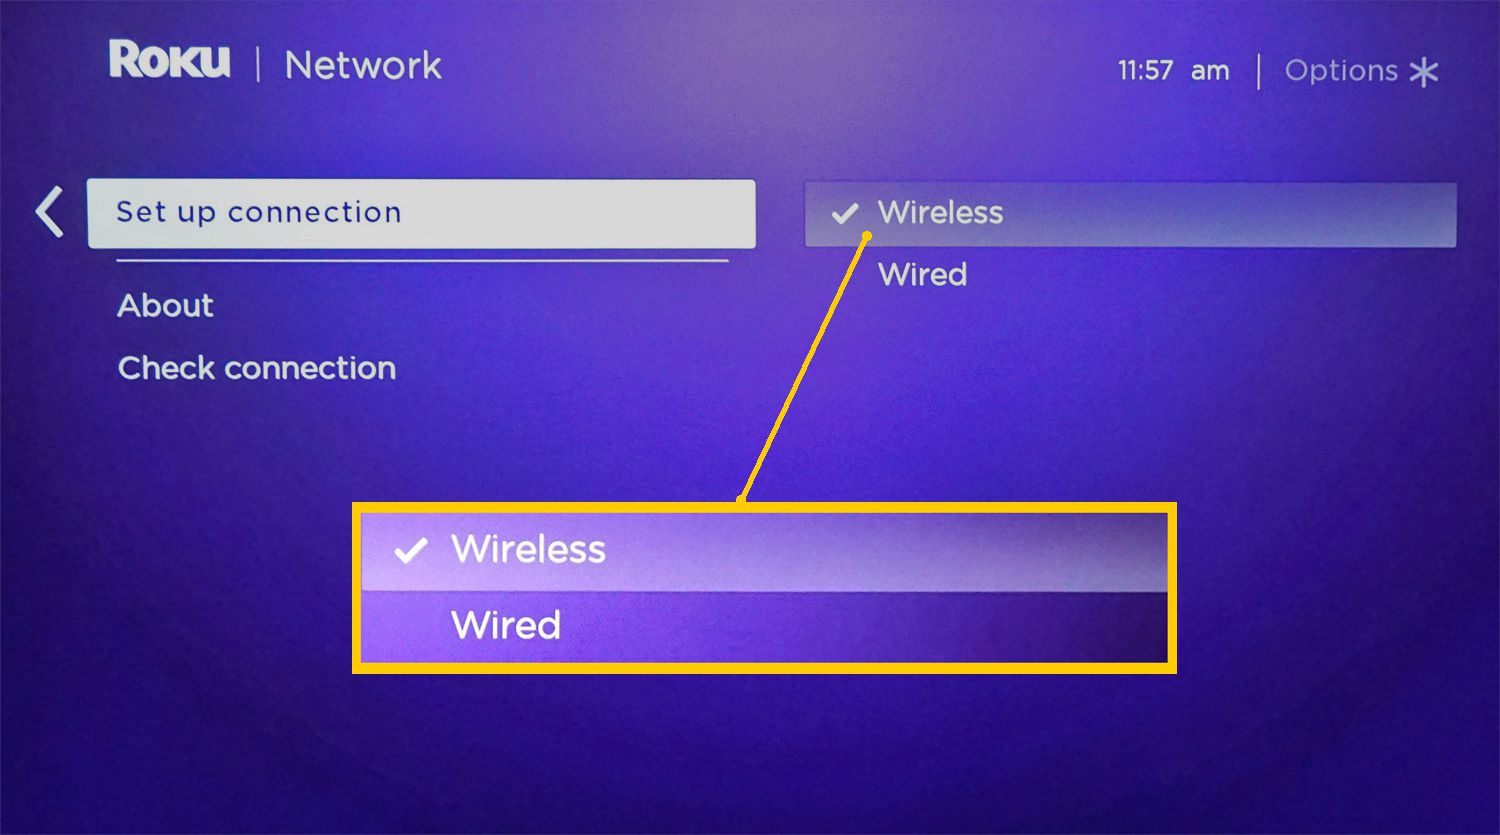
- Select “Network” and then choose “Set up connection.”
- Follow the prompts to connect your Roku device to the mobile hotspot.
Once connected, your Roku device will use the cellular data from your smartphone’s mobile hotspot to access the internet and connect to the Roku servers. This allows you to navigate through the Roku channels, stream content, and control your Roku remote.
Keep in mind that using a mobile hotspot may consume a significant amount of your cellular data, so it’s important to monitor your usage and ensure that you have an appropriate data plan. Additionally, the performance of the Roku device may vary depending on the strength of the cellular signal.
Enabling a mobile hotspot on your smartphone provides a convenient solution for connecting your Roku remote when Wi-Fi is not available. It allows you to enjoy your favorite shows and movies using your smartphone’s cellular data, giving you the flexibility to stay entertained wherever you are.
If you encounter any issues while setting up the mobile hotspot or connecting your Roku device, refer to the user manual of your smartphone or contact your mobile service provider for further assistance.
So, if you’re in a situation where Wi-Fi is not accessible, enable the mobile hotspot feature on your smartphone to establish a connection and connect your Roku remote.
Connecting Roku Remote through Ethernet
If you have an Ethernet connection available, you can connect your Roku remote using a wired connection instead of relying on Wi-Fi. This method provides a stable and reliable connection for your Roku device, ensuring uninterrupted streaming and control of your Roku remote.
Here’s how you can connect your Roku remote through Ethernet:
- Ensure that your Roku device and the router or modem are in close proximity.
- Connect one end of an Ethernet cable to the Ethernet port on your Roku device.
- Connect the other end of the Ethernet cable to an available Ethernet port on your router or modem.
- On your Roku device, navigate to the settings menu.
- Select “Network” and then choose “Set up connection.”
- Follow the prompts to set up a wired connection on your Roku device.
Once the wired connection is established, your Roku device will automatically detect the Ethernet network and configure the settings accordingly. You can now enjoy seamless connectivity and control of your Roku remote.
Connecting your Roku remote through Ethernet offers several benefits. It provides a more stable and reliable connection compared to Wi-Fi, especially in areas with a weak Wi-Fi signal or interference. It also helps to reduce latency and buffering when streaming content, ensuring a smooth and uninterrupted viewing experience.
However, it’s important to note that not all Roku models support Ethernet connections. Make sure to check the specifications of your Roku device to ensure that it has an Ethernet port. Additionally, ensure that you have an available Ethernet port on your router or modem to establish the wired connection.
If you experience any issues during the setup process or encounter connectivity problems, refer to the Roku support documentation or contact the Roku customer support team for further assistance.
So, if you prefer a wired connection or if Wi-Fi is not reliable in your location, connect your Roku remote through Ethernet for a stable and seamless streaming experience.