Introduction
Connecting your Chromebook to a Wi-Fi network is a crucial task that allows you to have access to the internet and all the online resources it offers. Whether you’re at home, work, or a coffee shop, having a stable and secure Wi-Fi connection is essential for your Chromebook to function effectively.
In this article, we will guide you through the process of connecting your Chromebook to a Wi-Fi network. We will provide step-by-step instructions to help you enable Wi-Fi, view available networks, and troubleshoot any common issues that may arise during the connection process.
With a few simple steps, you’ll be able to enjoy the benefits of browsing the web, streaming videos, accessing cloud-based applications, and much more on your Chromebook.
It’s important to note that the specific steps may vary slightly depending on the model and version of your Chromebook. However, the general process remains the same across most devices.
Now, let’s dive into the details and learn how to connect your Chromebook to a Wi-Fi network.
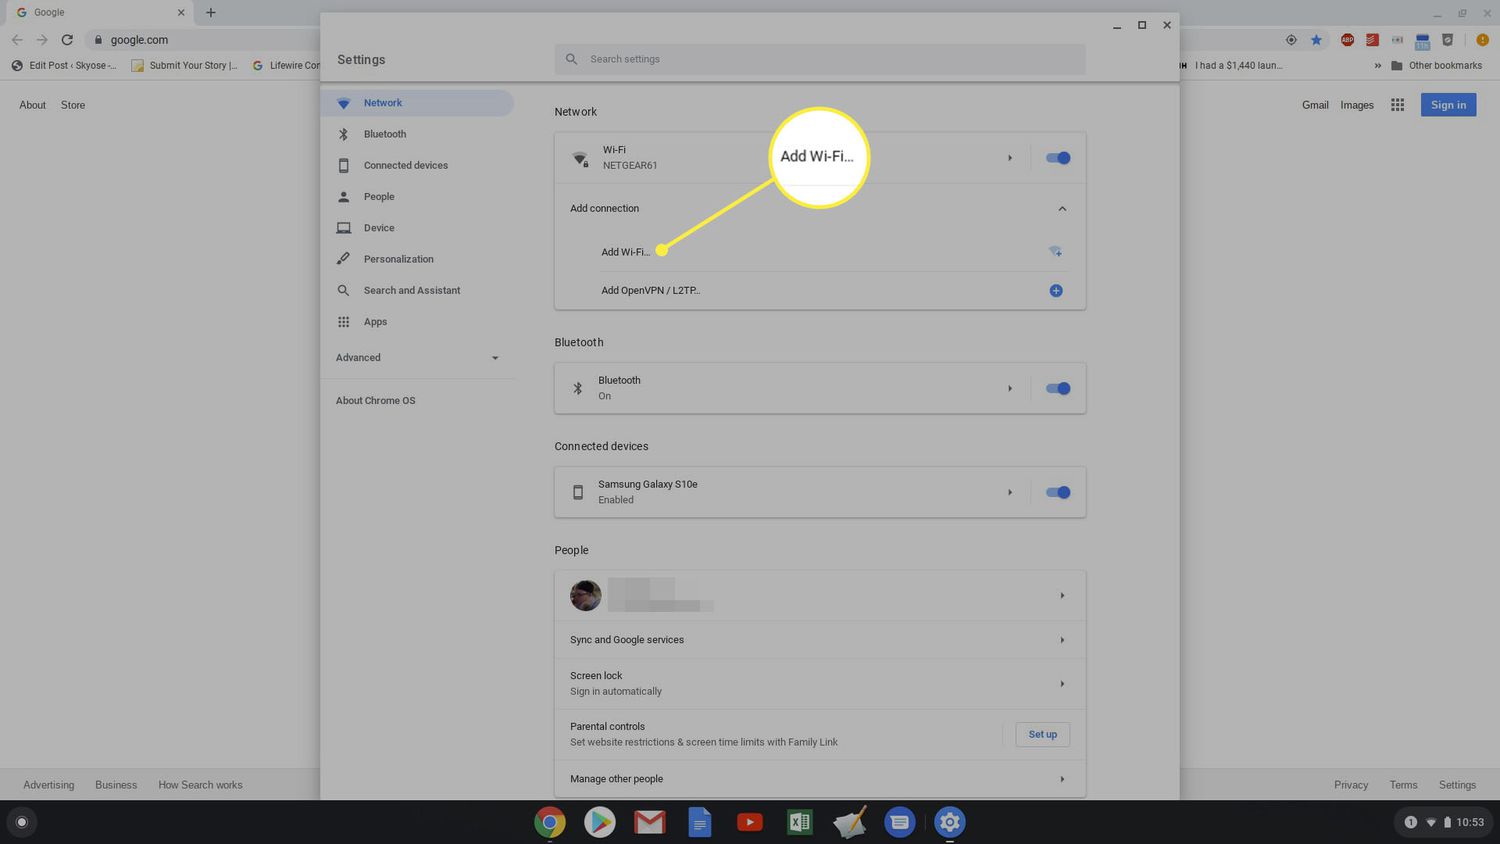
Step 1: Enable Wi-Fi on your Chromebook
The first step to connect your Chromebook to a Wi-Fi network is to ensure that the Wi-Fi feature is enabled. By default, Wi-Fi is usually turned on, but it’s always a good idea to double-check.
To enable Wi-Fi on your Chromebook, follow these simple steps:
- Click on the network icon located in the bottom-right corner of your screen. It looks like a series of curved lines.
- A menu will appear, showing you the available network options. At the top of the menu, make sure that the “Wi-Fi” toggle switch is turned on. If it’s grayed out, click on it to enable Wi-Fi.
- Once Wi-Fi is enabled, you will see a list of available networks.
Enabling Wi-Fi on your Chromebook allows it to detect and connect to available networks in your vicinity. Now that Wi-Fi is enabled, let’s move on to the next step to connect to a specific Wi-Fi network.
Step 2: View available networks
Once you have enabled the Wi-Fi feature on your Chromebook, the next step is to view the available networks in your vicinity. This will allow you to choose the Wi-Fi network you want to connect to.
Follow these steps to view the available networks:
- Click on the network icon located in the bottom-right corner of your screen. It looks like a series of curved lines.
- A menu will appear, displaying the available networks in your area. The names of the networks will be listed on the menu.
- Take a moment to look through the list of networks and identify the one you want to connect to.
The list of networks will include both secured and unsecured networks. Secured networks require a password to connect, while unsecured networks are open and can be connected to without a password. It’s recommended to connect to a secured network to ensure the privacy and security of your data.
Now that you have identified the Wi-Fi network you wish to connect to, let’s move on to the next step: establishing the connection.
Step 3: Connect to a Wi-Fi network
After identifying the Wi-Fi network you want to connect to, it’s time to establish the connection on your Chromebook. Follow these simple steps to connect to a Wi-Fi network:
- Click on the network icon in the bottom-right corner of your screen. The icon resembles a series of curved lines.
- A list of available networks will appear. Locate the Wi-Fi network you want to connect to and click on its name.
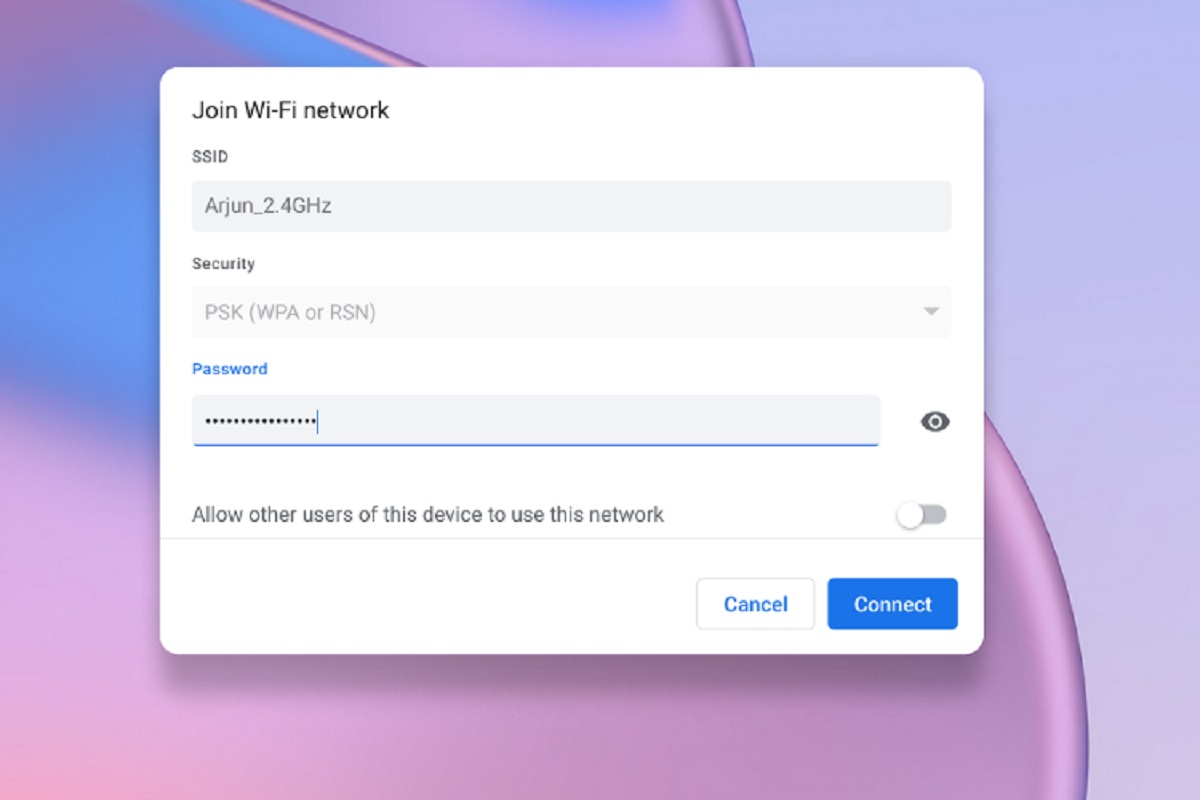
- If the network is secured, a window will pop up asking for the Wi-Fi password. Enter the correct password and click “Connect”.
- Your Chromebook will now attempt to establish a connection to the selected Wi-Fi network. Once connected, the network name will be displayed along with the Wi-Fi signal strength.
Congratulations! You have successfully connected your Chromebook to the desired Wi-Fi network. Now you can start enjoying a stable internet connection and access online content.
It’s important to note that if you want your Chromebook to automatically connect to the same Wi-Fi network in the future, make sure to check the “Remember this network” or “Connect automatically” option when entering the Wi-Fi password. This will save you the hassle of manually connecting each time.
If you are unable to connect to the Wi-Fi network or experiencing any issues, don’t worry. The next step will provide troubleshooting tips to help you resolve common Wi-Fi connection problems.
Step 4: Enter the Wi-Fi password
If you are connecting to a secured Wi-Fi network, you will need to enter the Wi-Fi password to establish the connection on your Chromebook. Follow these steps to enter the Wi-Fi password:
- After selecting the desired Wi-Fi network from the available networks list, a window will appear asking for the Wi-Fi password.
- Type in the correct password for the selected network. Be careful to enter it accurately, as passwords are case-sensitive.
- Click on the “Connect” button to proceed.
Your Chromebook will now attempt to connect to the Wi-Fi network using the provided password. If the password you entered is correct, the connection will be established, and you will be able to access the internet.
If you are unsure about the Wi-Fi password for the network you want to connect to, you can check with the network administrator or the owner of the Wi-Fi network. They should be able to provide you with the necessary password.
It’s worth noting that some Wi-Fi networks may have additional security measures in place, such as WPA2 Enterprise authentication. In such cases, you may need to contact the network administrator for further instructions on how to connect to the network.
Now that you have successfully entered the Wi-Fi password, your Chromebook is ready to browse the web and make the most of the internet connection.
Step 5: Troubleshooting common Wi-Fi connection issues
While connecting your Chromebook to a Wi-Fi network is usually a smooth process, you may encounter some common issues along the way. Here are a few troubleshooting tips to help you resolve such issues:
- Ensure that the Wi-Fi network is within range: Make sure you are in close proximity to the Wi-Fi network you’re trying to connect to. The signal strength diminishes as you move further away from the router.
- Restart your Chromebook: Sometimes, a simple restart can fix the connectivity issues. Restart your Chromebook and attempt to connect to the Wi-Fi network again.
- Check the Wi-Fi network settings: Double-check the network settings on your Chromebook to ensure they are correctly configured. Make sure the network name and password are entered correctly.
- Power cycle your Wi-Fi router: Turn off your Wi-Fi router, wait for a few seconds, and then turn it back on. This can help resolve any temporary glitches with the router.
- Update your Chromebook and router firmware: Ensure that both your Chromebook and Wi-Fi router are running the latest firmware updates. Outdated firmware can sometimes cause compatibility issues.
- Disable VPN or proxy settings: If you have any VPN or proxy settings enabled, try disabling them and then attempt to connect to the Wi-Fi network.
- Reset network settings: In some cases, resetting the network settings on your Chromebook can help resolve the connection issues. Go to “Settings”, then “Advanced”, and click on “Reset settings” under the “Network” section.
- Contact your network administrator: If you are connecting to a network at work or school, reach out to the network administrator for assistance. They can provide additional guidance and troubleshoot the network from their end.
By following these troubleshooting tips, you can often resolve common Wi-Fi connection issues on your Chromebook and enjoy a seamless internet experience.
If the problem persists or if you encounter any other connectivity problems, it’s recommended to reach out to the Chromebook support team or consult the Chromebook user manual for further assistance.
Conclusion
Connecting your Chromebook to a Wi-Fi network is a fundamental step in accessing the internet and all its resources. By following the steps outlined in this article, you can easily connect to a Wi-Fi network and enjoy browsing, streaming, and online activities on your Chromebook.
We started by enabling the Wi-Fi feature on your Chromebook and then proceeded to view the available networks. Once you identified the desired network, you learned how to connect to it by entering the Wi-Fi password. Additionally, we provided troubleshooting tips to help you overcome common Wi-Fi connection issues.
Remember, it’s important to keep your Wi-Fi network secure by connecting to secured networks and avoiding untrusted or open networks. Protecting your personal information and ensuring a safe browsing experience should always be a priority.
If you encounter any difficulties during the Wi-Fi connection process, don’t hesitate to seek support from the Chromebook customer support team or consult the user manual for further guidance.
Now that you know how to connect to a Wi-Fi network on your Chromebook, you can make the most of its capabilities and enjoy the vast opportunities that the internet has to offer.
So go ahead, connect to your favorite Wi-Fi network, and embark on your digital journey with your Chromebook!