Introduction
Welcome to our guide on how to clear the print queue in Windows 10. If you’ve ever encountered a situation where a print job gets stuck or your printer refuses to print, the most probable cause is a jammed print queue. The print queue, also known as the print spooler, is a temporary storage area on your computer that holds print jobs for your printer to process.
Having a stuck print queue can be frustrating, especially when you have important documents waiting to be printed. But fear not, as we will walk you through various methods to clear the print queue and get your printer back to its normal functioning.
Whether you prefer using the traditional Control Panel, the Command Prompt for a quick and direct approach, or specific printer properties for a more targeted solution, we’ve got you covered. By the end of this guide, you’ll have a clear understanding of how to clear the print queue in Windows 10 and regain control over your printing tasks.
Before diving into the methods, it’s worth noting that you may need administrative privileges on your Windows 10 computer to perform some of the steps. Additionally, the exact steps may vary slightly depending on your printer model.
Now that we have the basics covered, let’s explore the different methods available to clear the print queue in Windows 10. Whether you’re a beginner or a tech-savvy individual, you’ll find a method that suits your preferences and resolves your print queue issues.
Understanding the Print Queue
Before we delve into the methods of clearing the print queue in Windows 10, it’s important to have a clear understanding of what the print queue is and how it works.
The print queue, also known as the print spooler, is a software component that manages all the print jobs sent to a printer. When you send a print command from your computer, the job is temporarily stored in the print queue until the printer is ready to process it. The print queue ensures that multiple print jobs can be managed and processed in a sequential manner.
When a print job gets stuck in the queue, it means that there is an issue preventing it from being processed or completed. Common reasons for a jammed print queue include printer errors, communication problems between the computer and the printer, or incompatible print job formats.
It’s important to note that the print queue is specific to each printer connected to your computer. If you have multiple printers, each printer will have its own separate print queue. This allows you to prioritize and manage print jobs for different printers individually.
When a print job is stuck in the queue, it can prevent subsequent print jobs from being processed. This can be frustrating, especially when you have urgent documents that need to be printed. Clearing the print queue is the most effective way to resolve this issue and allow your printer to resume normal operation.
Clearing the print queue essentially removes all the pending print jobs from the queue, giving your printer a fresh start. By doing this, you can eliminate any possible errors or conflicts that may have been causing the print queue to become jammed.
In the following sections, we will explore multiple methods to clear the print queue in Windows 10. These methods range from using the Control Panel and Command Prompt to accessing printer properties and using specialized print management tools. Each method offers a different approach, allowing you to choose the one that best suits your needs and preferences.
Method 1: Clearing the Print Queue using Control Panel
If you prefer using a graphical interface to clear the print queue in Windows 10, the Control Panel offers a simple and user-friendly method. Follow the steps below to clear the print queue using the Control Panel:
- Press the Windows key + R on your keyboard to open the Run dialog box.
- Type “control” and press Enter to open the Control Panel.
- In the Control Panel window, select “Hardware and Sound.”
- Click on “Devices and Printers.”
- Locate the printer whose print queue you wish to clear. Right-click on the printer and select “See what’s printing.”
- In the print queue window, click on “Printer” in the top menu bar.
- Select “Cancel All Documents.”
This action will clear all pending print jobs in the queue for the selected printer.
After following these steps, wait for a few moments to allow the print queue to clear. You can then try sending a new print job to your printer to see if it prints correctly.
Using the Control Panel to clear the print queue is a straightforward method that can be used for most printer models. However, if you encounter any issues, such as the print queue not clearing or the printer not responding, consider trying an alternative method.
Now that you’ve learned how to clear the print queue using the Control Panel, let’s explore other methods to clear the print queue in Windows 10 for more advanced troubleshooting options.
Method 2: Clearing the Print Queue using Command Prompt
If you prefer using the command line interface and want a direct method to clear the print queue in Windows 10, you can use the Command Prompt. Here’s how:
- Press the Windows key + R on your keyboard to open the Run dialog box.
- Type “cmd” and press Enter to open the Command Prompt.
- In the Command Prompt window, type the following command and press Enter:
net stop spooler - Wait for a few moments until the print spooler service is stopped.
- Type the following command and press Enter:
del /q %systemroot%\System32\spool\printers\* - This command will delete all the files in the print spooler folder, which contains the print queue.
- After deleting the files, type the following command and press Enter:
net start spooler - This command will start the print spooler service again.
Once you have executed these commands, the print queue should be cleared.
It’s important to note that using the Command Prompt to clear the print queue requires administrative privileges. If you’re prompted to provide administrator permission, click “Yes” to proceed.
The Command Prompt method offers a direct and efficient way to clear the print queue, especially for those who are comfortable using the command line interface. If you encounter any issues or error messages during the process, it is recommended to restart your computer and try the method again.
Now that you know how to clear the print queue using the Command Prompt in Windows 10, let’s explore other methods to clear the print queue for more advanced troubleshooting options.
Method 3: Clearing the Print Queue using Services
If you’re encountering issues with the print queue in Windows 10, another effective method to clear it is by using the Services tool. Here’s how:
- Press the Windows key + R on your keyboard to open the Run dialog box.
- Type “services.msc” and press Enter to open the Services window.
- Scroll down or use the search bar to locate the “Print Spooler” service.
- Right-click on the “Print Spooler” service and select “Stop” from the context menu. This will temporarily stop the service.
- Leave the Services window open and open File Explorer by pressing the Windows key + E.
- Navigate to the following location:
C:\Windows\System32\spool\PRINTERS - Inside the “PRINTERS” folder, delete all the files. These are the print jobs stored in the print queue.
- Go back to the Services window and right-click on the “Print Spooler” service again, but this time, select “Start” from the context menu to restart the service.
By following these steps, you have successfully cleared the print queue using the Services tool in Windows 10.
Using the Services tool provides a more direct approach to managing the print queue. Stopping the Print Spooler service allows you to delete the print jobs directly from the system folder, ensuring a complete removal of any stuck or pending print jobs in the queue.
Do note that you may require administrative privileges to stop and start the Print Spooler service. In case you encounter any issues or error messages, try restarting your computer and repeating the method.
Now that you’re familiar with the process of clearing the print queue using Services in Windows 10, let’s explore other methods to clear the print queue for more advanced troubleshooting options.
Method 4: Clearing the Print Queue using Print Management
If you’re looking for a more advanced method to clear the print queue in Windows 10, using the Print Management tool can provide additional options and functionality. Follow the steps below to clear the print queue using Print Management:
- Press the Windows key + R on your keyboard to open the Run dialog box.
- Type “printmanagement.msc” and press Enter to open the Print Management window.
- In the Print Management window, select “All Printers” from the left-hand side pane.
- Expand the list of printers by clicking on the arrow icon next to it.
- Locate the printer whose print queue you want to clear.
- Right-click on the printer and select “Open Queue” from the context menu.
- In the print queue window, click on “Printer” in the top menu bar.
- Select “Cancel All Documents.”
By following these steps, you can clear the print queue for the selected printer using the Print Management tool in Windows 10.
The Print Management tool offers a comprehensive set of features for managing and troubleshooting printing tasks. It allows you to view and cancel print jobs, manage printer properties, configure printer ports, and perform various administrative tasks related to printing.
It’s worth noting that the Print Management tool may not be available in all editions of Windows 10. If you cannot access Print Management, consider trying one of the other methods mentioned previously.
Now that you know how to clear the print queue using Print Management in Windows 10, let’s explore other methods to clear the print queue for more advanced troubleshooting options.
Method 5: Clearing the Print Queue using Printer Properties
If you prefer a more targeted approach to clear the print queue in Windows 10, you can use the Printer Properties dialog for the specific printer. Here’s how:
- Open the Control Panel by pressing the Windows key + R on your keyboard, typing “control,” and pressing Enter.
- In the Control Panel window, select “Hardware and Sound.”
- Click on “Devices and Printers.”
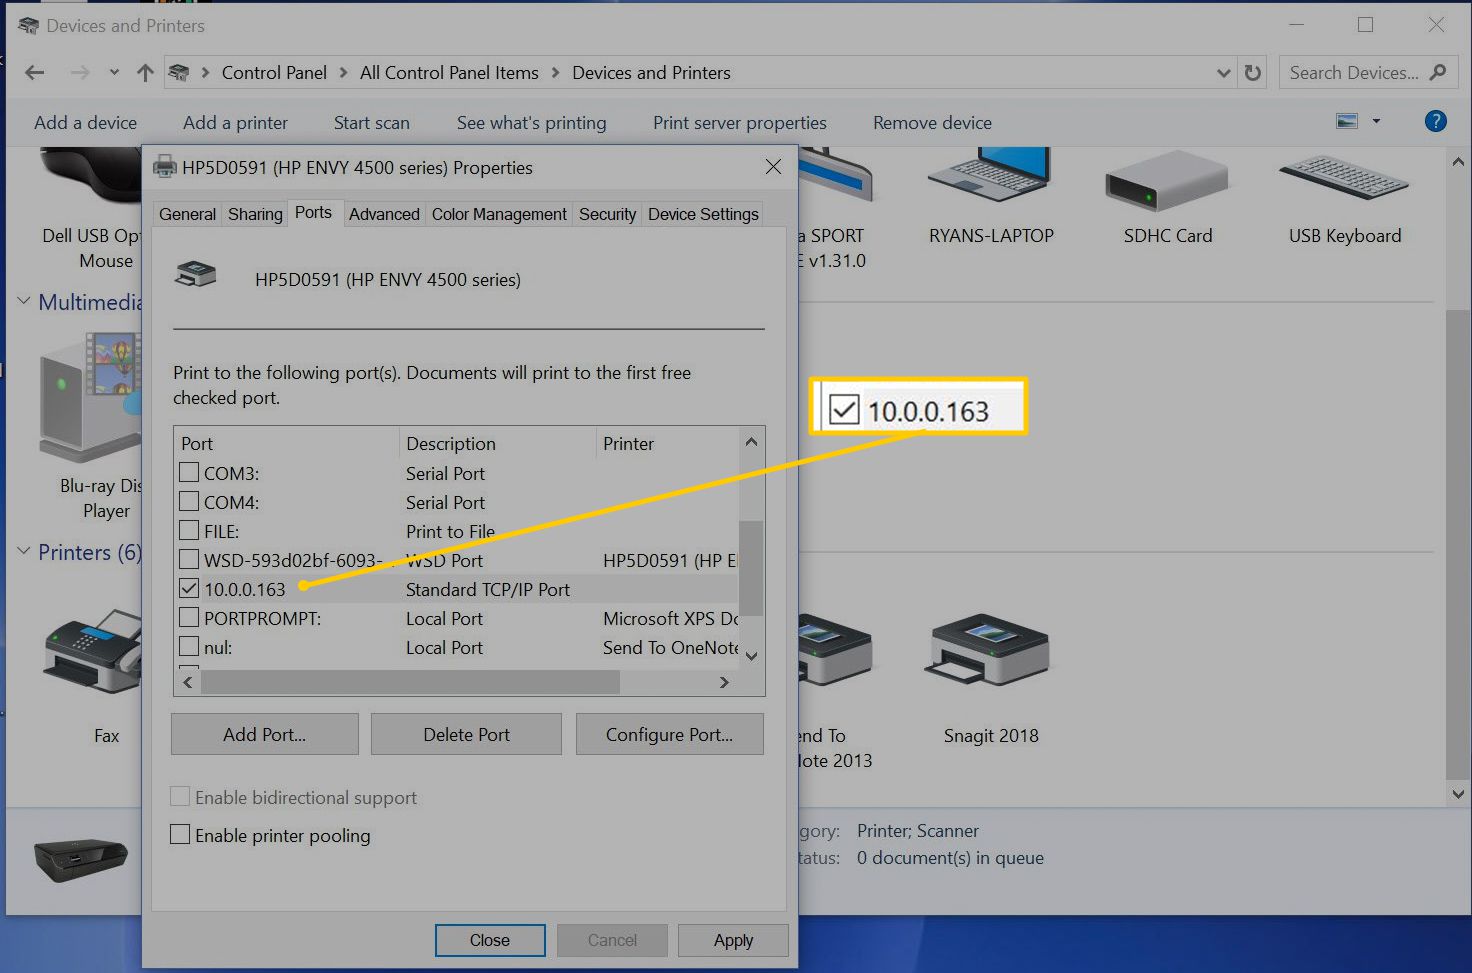
- Locate the printer whose print queue you want to clear. Right-click on the printer and select “Printer properties.”
- In the Printer Properties dialog box, navigate to the “General” or “Maintenance” tab.
- Look for an option to “Cancel All Documents” or “Purge Print Documents.”
- Click on the appropriate option to clear the print queue for the selected printer.
By following these steps, you can clear the print queue for the specific printer using the Printer Properties dialog.
This method provides a more targeted approach to clearing the print queue for a specific printer. It allows you to access printer-specific options and settings directly from the Printer Properties dialog, giving you more control over your printing tasks.
Keep in mind that the options and layout of the Printer Properties dialog may vary depending on your printer model. If you encounter any difficulties or cannot find the appropriate option, refer to the printer’s user manual or the manufacturer’s website for specific instructions.
Now that you know how to clear the print queue using Printer Properties in Windows 10, you have a variety of methods to choose from depending on your preferences and the specific printer-related issues you may be facing.
Conclusion
Clearing the print queue in Windows 10 is essential to resolve printing issues and ensure smooth operation of your printer. We have explored several methods to clear the print queue, each with its own benefits and suitability for different preferences and situations.
Using the Control Panel provides a simple and user-friendly approach, while the Command Prompt offers a direct method for those comfortable with the command line interface. The Services tool allows for more advanced troubleshooting, while Print Management provides additional options and functionality. Lastly, using the Printer Properties dialog gives a targeted approach specific to the printer in question.
It’s important to note that while these methods are effective in most cases, there may be instances where additional troubleshooting may be required. If you continue to experience issues with your print queue or printer, it may be worth seeking further assistance or contacting your printer manufacturer for support.
Remember to follow the specific steps outlined in each method and ensure that you have the necessary administrative privileges when required. Additionally, it’s always a good practice to restart your computer and printer after performing any troubleshooting steps to ensure that the changes take effect.
By following the methods outlined in this guide, you can successfully clear the print queue in Windows 10 and get your printer back to its normal functioning, enabling you to print your important documents with ease.
We hope that this guide has been helpful to you in resolving your print queue issues. As technology continues to evolve, it’s always beneficial to stay informed and updated on troubleshooting methods for different devices and operating systems.
Thank you for reading, and happy printing!