Introduction
When it comes to accessing websites on the internet, the Domain Name System (DNS) plays a crucial role. DNS is responsible for translating domain names into their respective IP addresses, allowing your computer to connect to the desired website. By default, your computer or device is configured to use the DNS server provided by your Internet Service Provider (ISP). However, there may be instances where you want to change your DNS server, whether it’s for improved speed, enhanced security, or accessing region-restricted content.
In this article, we will guide you through the process of changing the DNS server on your Windows 10 computer. By following these steps, you will be able to update the DNS server settings and customize your internet experience according to your preferences.
Before we begin, it is important to note that changing your DNS server settings requires administrative privileges on your computer. Additionally, make sure to obtain the IP addresses of the DNS servers you want to use, whether they are provided by a third-party DNS service or a public DNS resolver.
Now, without further ado, let’s dive into the step-by-step guide on how to change DNS server settings on Windows 10.
Step 1: Accessing the Network and Internet Settings
To begin changing your DNS server settings on Windows 10, you need to access the Network and Internet Settings. Follow these simple steps:
- Click on the Start button located at the bottom left corner of your desktop.
- From the Start menu, click on the Settings icon, which resembles a gear.
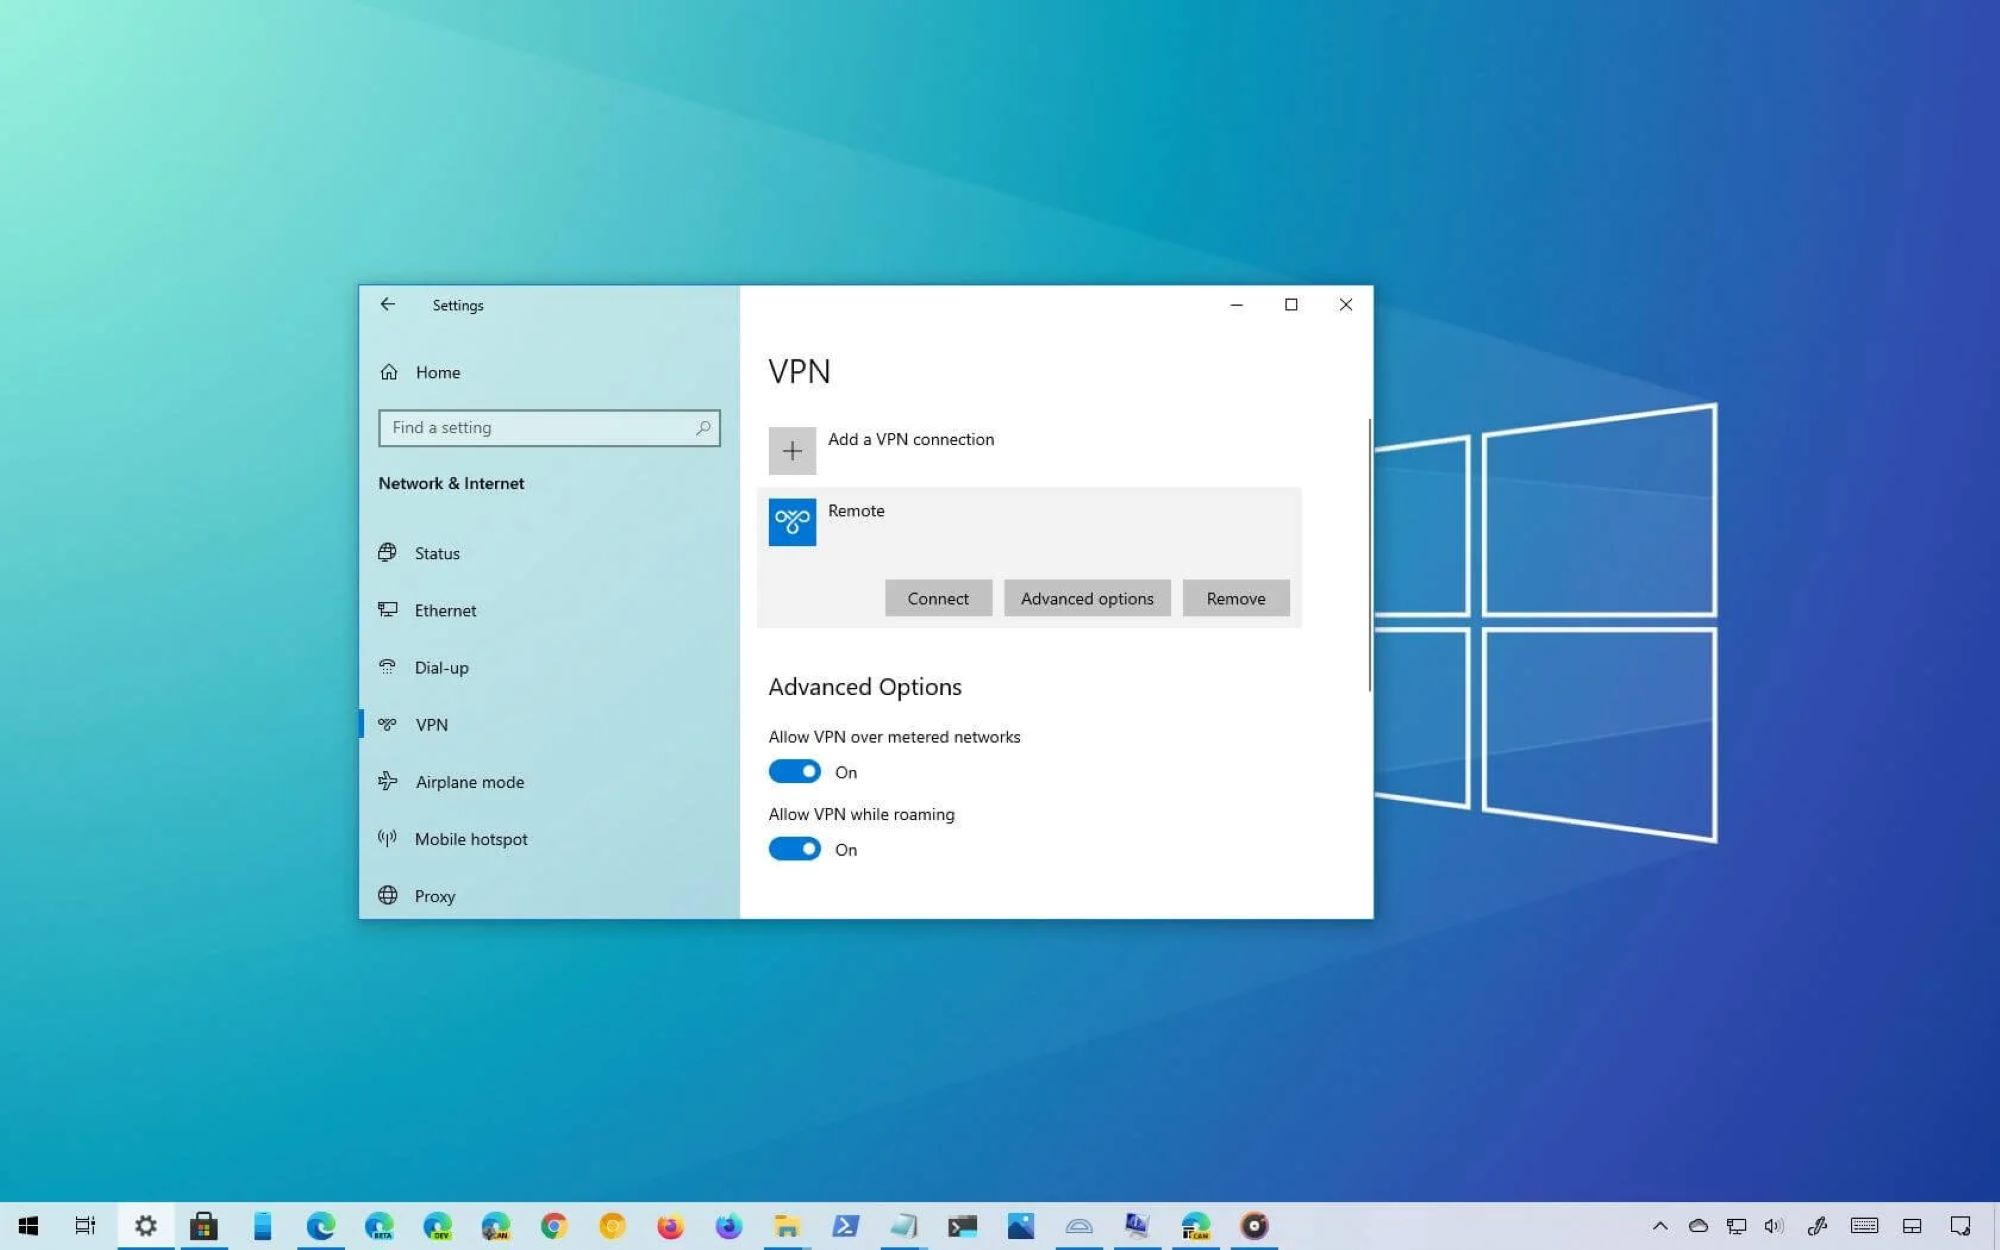
- Once the Settings window opens, click on the Network & Internet option.
Alternatively, you can access the Network and Internet Settings by right-clicking on the network icon in the system tray, usually located at the bottom right corner of the screen, and selecting Open Network & Internet settings.
By following these steps, you will successfully access the Network and Internet Settings, which will serve as the base for making further changes to your DNS server settings.
Step 2: Opening the Network and Sharing Center
After accessing the Network and Internet Settings, the next step is to open the Network and Sharing Center. This will allow you to access the network adapter settings and make changes to your DNS server. Follow these steps:
- In the Network & Internet Settings window, navigate to the Status tab in the left sidebar. It should be the second option from the top.
- Scroll down until you see the Network and Sharing Center option and click on it.
Alternatively, you can directly open the Network and Sharing Center by right-clicking on the network icon in the system tray and selecting Open Network and Sharing Center.
Once you have opened the Network and Sharing Center, you will have access to various network-related settings that will allow you to make the necessary changes to your DNS server settings.
Step 3: Changing the Adapter Settings
Now that you have opened the Network and Sharing Center, it’s time to make changes to your adapter settings. This will enable you to configure the DNS server on your Windows 10 computer. Follow these steps:
- In the Network and Sharing Center, locate the section labeled Change your network settings and click on the Change adapter settings link.
- This will open the Network Connections window, displaying all the network adapters available on your computer.
- Identify the network adapter that you are currently using to connect to the internet. It can be Ethernet, Wi-Fi, or any other type of connection.
- Right-click on the desired network adapter and select Properties from the context menu.
By following these steps, you will be able to access the properties of the network adapter that you want to configure to change the DNS server settings.
Step 4: Selecting the Network Adapter to Configure
In order to change the DNS server settings, you need to select the specific network adapter that you want to configure. This step is crucial as it ensures that the changes are applied to the correct adapter. Follow these steps to select the network adapter:
- In the Properties window of the network adapter, click on the Networking tab.
- Under the This connection uses the following items: section, you will see a list of protocols and services.
- Scroll down the list and look for the Internet Protocol Version 4 (TCP/IPv4) option.
- Click on the checkbox next to Internet Protocol Version 4 (TCP/IPv4) to select it.
- Ensure that no other protocols or services are selected in this list unless necessary.
By following these steps, you will have successfully selected the specific network adapter that you want to configure for changing the DNS server settings.
Step 5: Opening the Properties of the Network Adapter
Now that you have selected the desired network adapter, it’s time to open its properties to make changes to the DNS server settings. Opening the properties will allow you to configure the specific details of the adapter. Follow these steps:
- In the Properties window of the network adapter, click on the Properties button.
- This will open another window displaying the properties of the selected network adapter.
- Scroll down the list of properties and look for an entry labeled Internet Protocol Version 4 (TCP/IPv4).
- Highlight the Internet Protocol Version 4 (TCP/IPv4) entry by clicking on it.
By following these steps, you will successfully open the properties of the network adapter, allowing you to make changes to the DNS server settings and customize your connection according to your needs.
Step 6: Selecting Internet Protocol Version 4 (TCP/IPv4)
Now that you have opened the properties of the network adapter, the next step is to select the Internet Protocol Version 4 (TCP/IPv4) option. This will allow you to configure the DNS server settings specifically for this protocol. Follow these steps:
- In the properties window of the network adapter, make sure that the General tab is selected.
- Scroll through the list of components and locate the Internet Protocol Version 4 (TCP/IPv4) entry.
- Click on the Internet Protocol Version 4 (TCP/IPv4) entry to highlight it.
- Once selected, click on the Properties button located below the list of components.
By following these steps, you will be able to select the Internet Protocol Version 4 (TCP/IPv4) component, which is essential for configuring the DNS server settings on your Windows 10 computer.
Step 7: Entering the New DNS Server Addresses
After selecting the Internet Protocol Version 4 (TCP/IPv4) option, you can now enter the new DNS server addresses. Follow these steps to configure the DNS server settings:
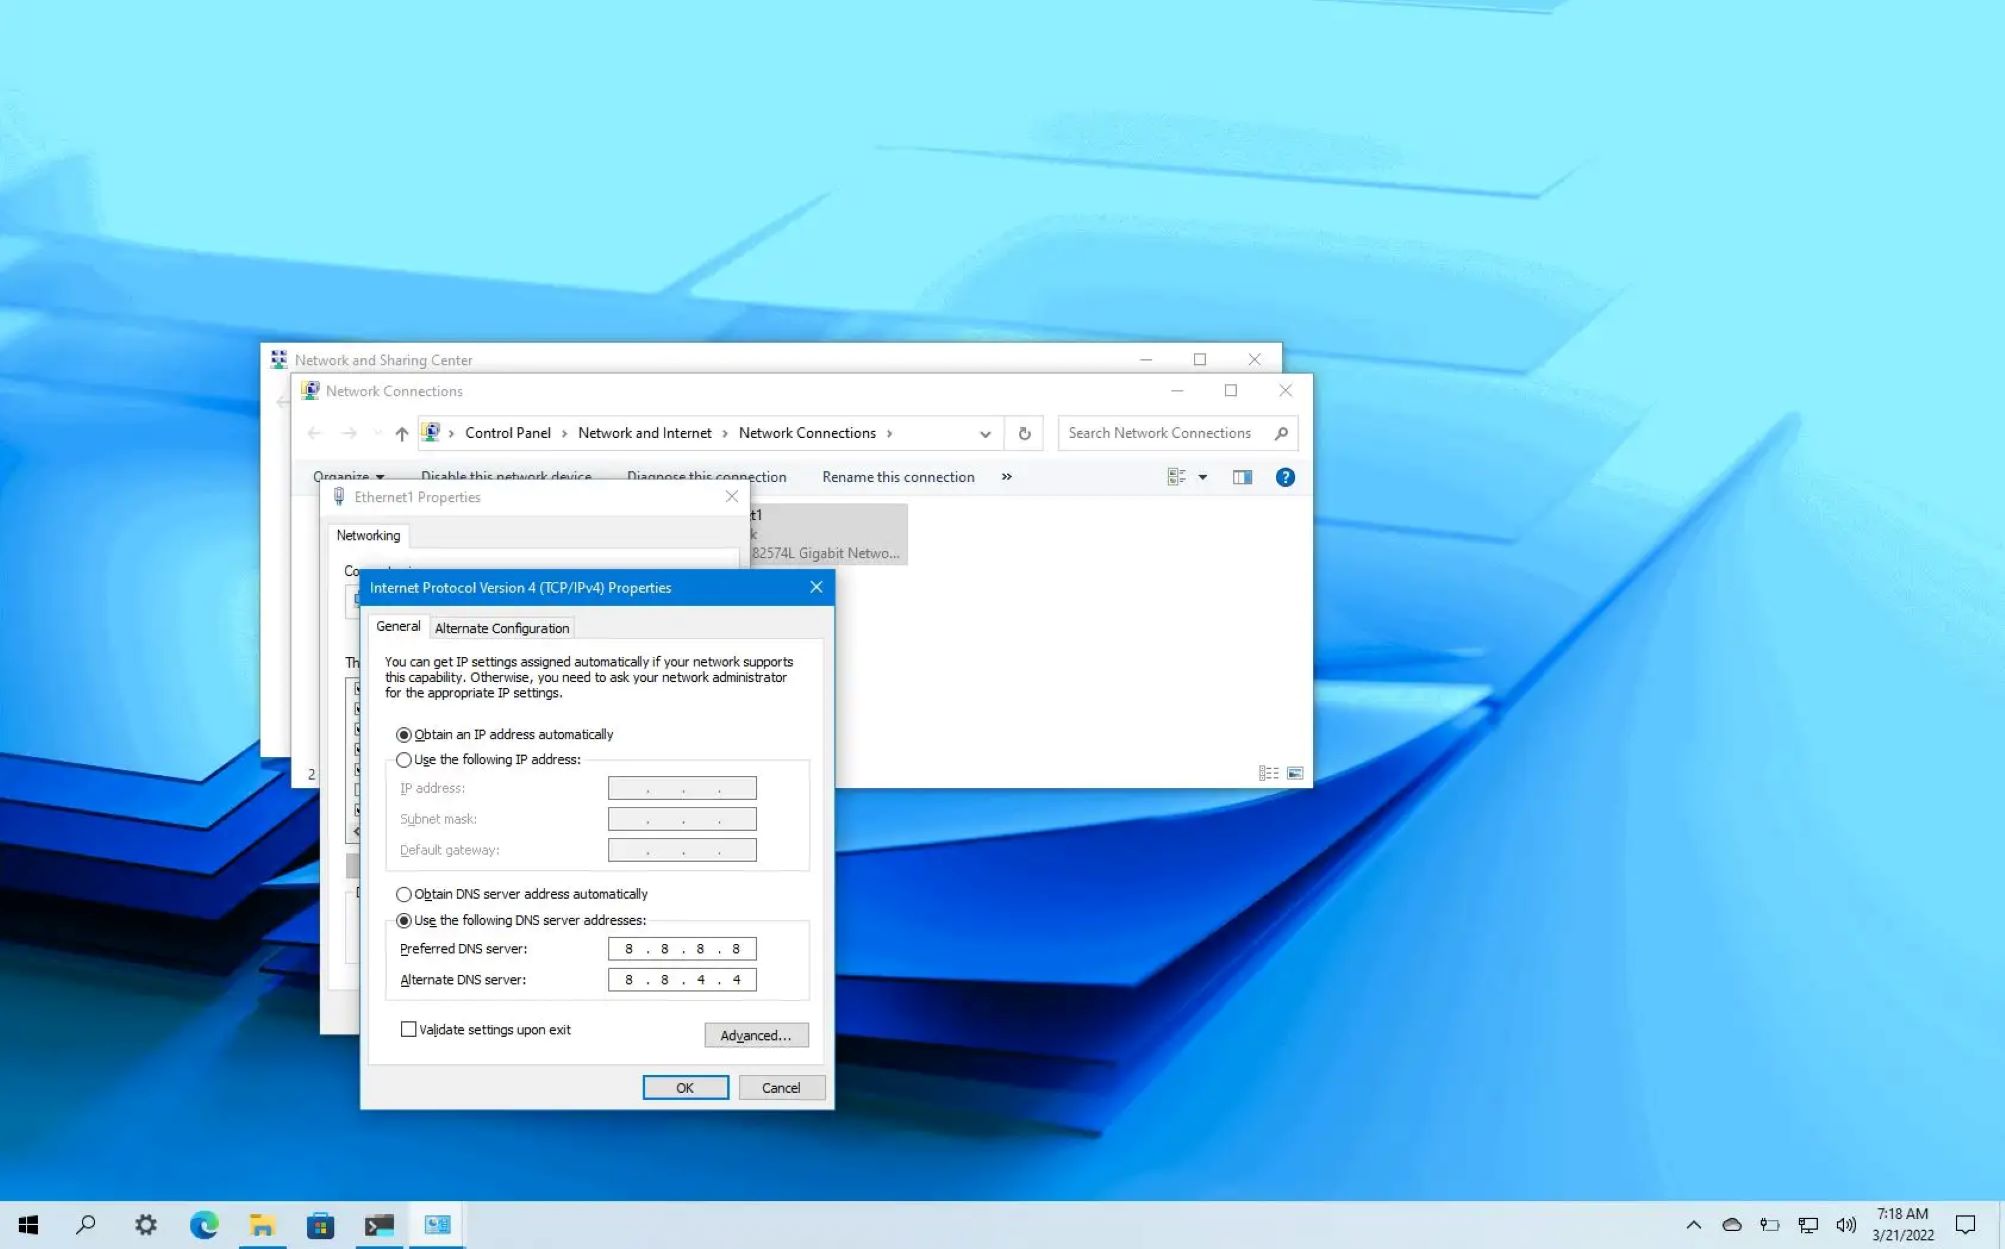
- In the properties window of the network adapter, make sure that the General tab is selected.
- Click on the Use the following DNS server addresses radio button.
- In the Preferred DNS server field, enter the IP address of the primary DNS server that you want to use.
- In the Alternate DNS server field, enter the IP address of the secondary DNS server, if applicable.
- If you have additional DNS servers that you want to use, click on the Add button and enter their respective IP addresses.
Note that you can obtain the IP addresses of the DNS servers from your DNS service provider or consult public DNS resolver providers such as Google DNS or OpenDNS.
By following these steps, you will be able to enter the new DNS server addresses, allowing your network adapter to use the specified DNS servers to resolve domain names.
Step 8: Verifying the Changes and Saving the Settings
After entering the new DNS server addresses, it’s important to verify the changes and save the settings. This ensures that the updated DNS configuration is applied to your network adapter. Follow these steps:
- Double-check the entered DNS server addresses in the properties window to ensure their accuracy.
- If needed, make any necessary modifications to the DNS server addresses before proceeding.
- Click on the OK button to save the changes and close the properties window.
- To verify the changes, you can perform a simple test by opening a web browser and navigating to any website.
- If the website loads successfully, it indicates that the new DNS server settings are working properly.
By following these steps, you will be able to verify the changes made to the DNS server addresses and ensure that they have been successfully applied to your network adapter.
Conclusion
Changing the DNS server settings on your Windows 10 computer can provide various benefits, such as improved speed, enhanced security, and access to region-restricted content. By following the step-by-step guide outlined in this article, you now have the knowledge to modify the DNS server addresses to suit your needs. Let’s recap the key points:
First, you accessed the Network and Internet Settings, which served as the base for making further changes. Then, you opened the Network and Sharing Center to access the network adapter settings. You selected the specific network adapter you wanted to configure and opened its properties. After that, you selected the Internet Protocol Version 4 (TCP/IPv4) entry to customize the DNS server settings. Following that, you entered the new DNS server addresses, ensuring accuracy and including any additional servers if necessary. Lastly, you verified the changes and saved the settings to ensure they were successfully applied to your network adapter.
Remember, changing the DNS server settings may have an impact on your internet connection, so it’s essential to choose reliable DNS servers and ensure that you have the correct IP addresses. If you experience any issues or want to revert to your previous DNS settings, you can always revisit the network adapter properties and make the necessary changes.
By being able to change the DNS server settings, you have gained more control over your internet experience and can optimize it based on your preferences. Whether it’s for improved performance, enhanced security, or accessing region-restricted content, customizing your DNS server is a valuable tool in your Windows 10 arsenal.
So go ahead and explore the various DNS server options available to you, and enjoy a faster and more personalized internet browsing experience!