Introduction
Welcome to the world of web browsing! Nowadays, we spend a significant amount of time surfing the internet, searching for information, and exploring various websites. As we navigate through different web pages, our browsers accumulate a trail of our online activities – this is known as browsing history.
Browsing history is a useful feature that allows us to revisit previously visited web pages with ease. However, there are times when we may want to clear our browsing history for various reasons. Perhaps you want to maintain your online privacy, remove clutter, or simply start with a clean slate. Whatever the reason may be, clearing your browser history can be done quickly and easily in Google Chrome.
In this article, we’ll walk you through the step-by-step process of clearing your browser history in Chrome. Whether you’re using Chrome on your computer, tablet, or smartphone, the steps remain the same. So, let’s dive in and learn how to clear your browsing history in Chrome!
Step 1: Accessing the Chrome settings
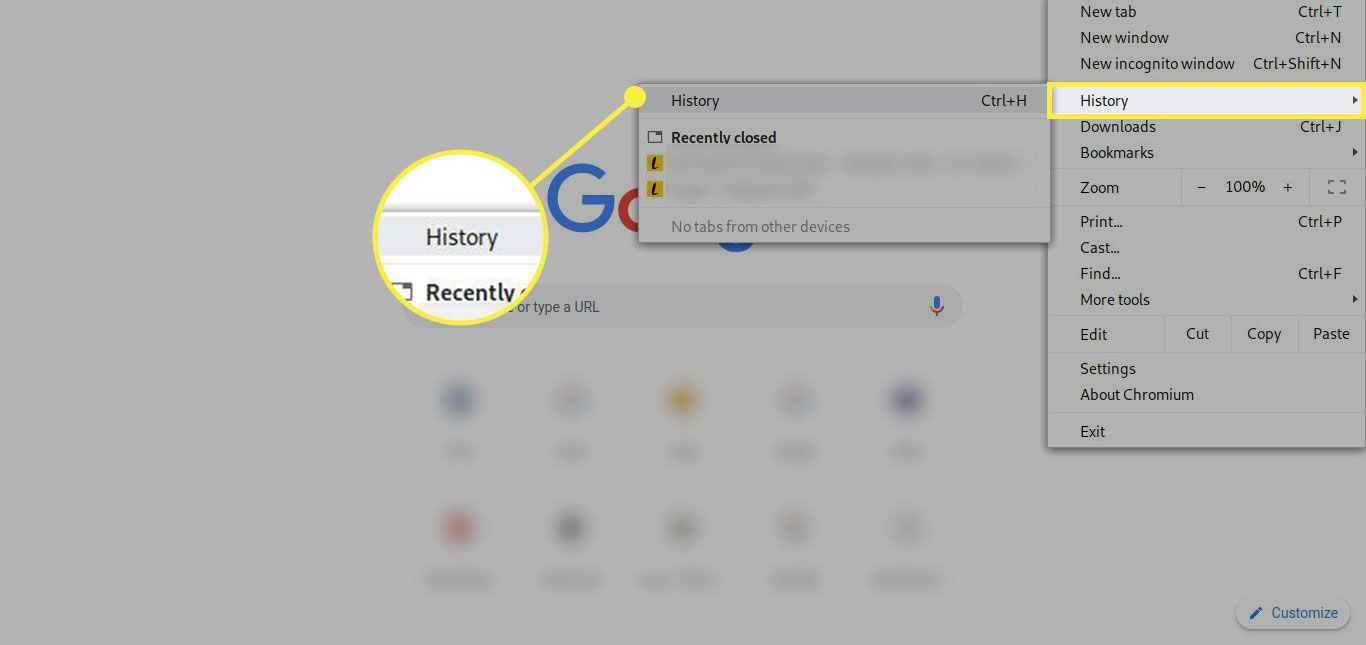
The first step in clearing your browsing history in Chrome is to access the Chrome settings. To do this, open Google Chrome on your device and click on the three vertical dots located at the top-right corner of the browser window. This will open a drop-down menu.
From the drop-down menu, scroll down and click on the “Settings” option. Alternatively, you can also access the settings by typing “chrome://settings/” in the address bar and pressing Enter.
Once you’re in the Chrome settings, you’ll see a list of different categories on the left-hand side. These categories include “Privacy and security,” “Advanced,” “Appearance,” and more.
For now, we’ll focus on the “Privacy and security” category, as this is where you’ll find all the options related to clearing your browsing history.
Click on the “Privacy and security” category to expand it. You’ll see a range of options such as “Clear browsing data,” “Cookies and other site data,” “Site settings,” and more.
Now that you’ve accessed the Chrome settings, you’re ready to move on to the next step – clearing your browsing history.
Step 2: Clearing browsing history
Now that you have accessed the Chrome settings, it’s time to clear your browsing history. To do this, locate the “Privacy and security” category on the left-hand side of the settings page and click on it to expand the options.
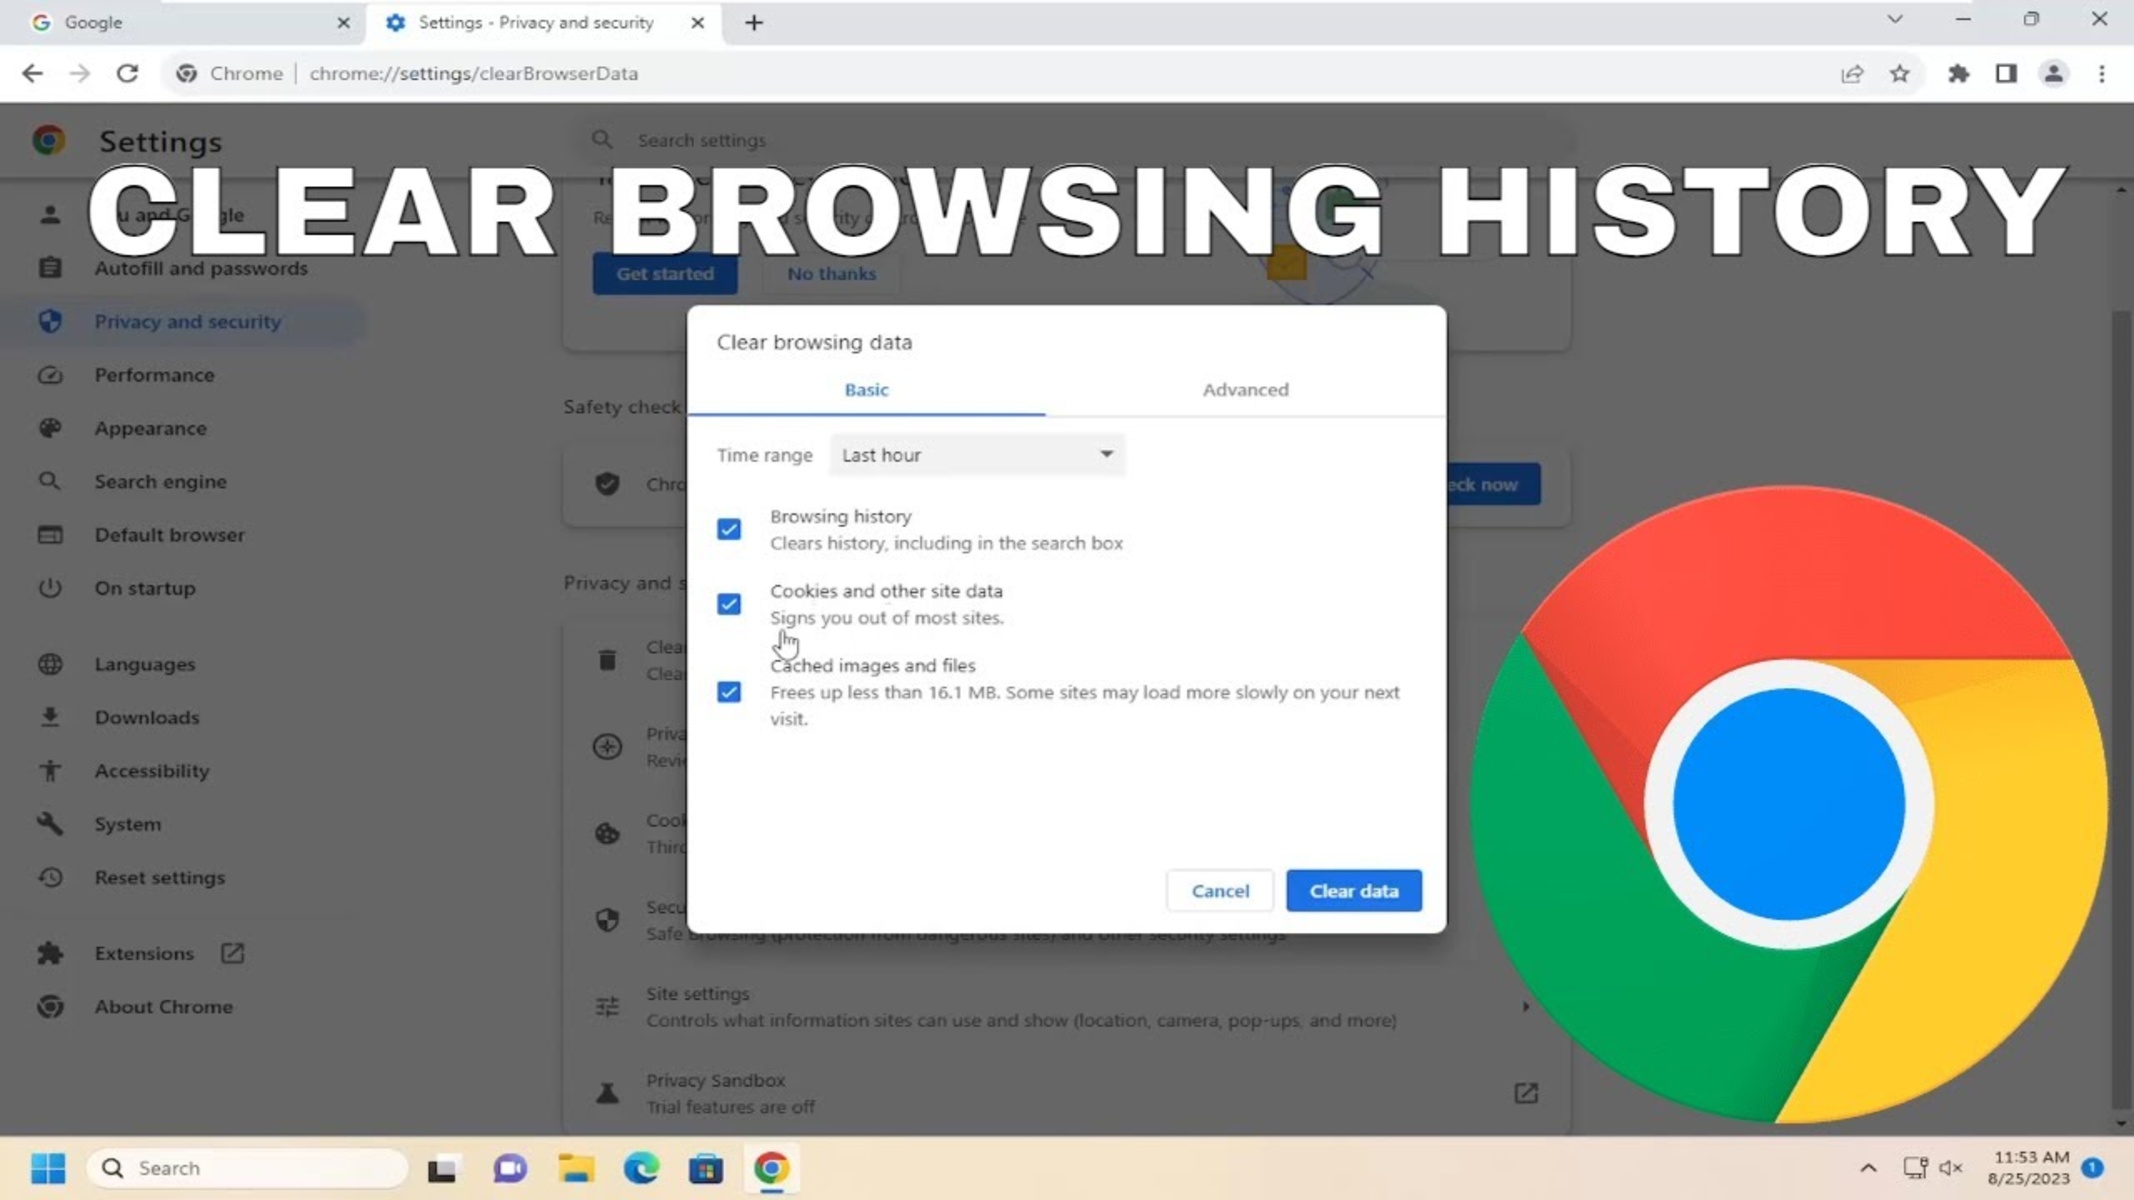
Within the “Privacy and security” category, you will find the option “Clear browsing data.” Click on it to proceed.
A new tab will open, displaying the “Clear browsing data” dialog box. This dialog box allows you to select the specific data you want to remove from your browsing history.
By default, the “Browsing history” option is selected, which means that Chrome will clear your entire browsing history. However, if you only want to remove specific items, uncheck the “Browsing history” option and proceed to the next step.
Below the “Browsing history” option, you will find additional options such as “Download history,” “Cookies and other site data,” “Cached images and files,” and more. Check the boxes next to the data you want to clear from your browsing history.
Once you have selected the desired options, click on the “Clear data” button. Chrome will then begin the process of clearing your browsing history based on the selected criteria.
Depending on the amount of data in your browsing history, this process may take a few moments to complete. Once it’s done, you will receive a confirmation message indicating that your browsing history has been cleared.
That’s it! You have successfully cleared your browsing history in Chrome. Now, let’s move on to the next step – choosing what to remove from your browsing history.
Step 3: Choosing what to remove
When clearing your browsing history in Chrome, it’s important to have control over what exactly you want to remove from your browsing data. In the “Clear browsing data” dialog box, you have the option to choose specific items to remove, rather than clearing everything.
By default, the “Browsing history” option is selected, which means that Chrome will clear your entire browsing history. However, if you only want to remove specific items, uncheck the “Browsing history” option and proceed to select the desired options.
Besides browsing history, there are other options available for you to choose from:
- Download history: This option allows you to remove the record of files you have downloaded while browsing.
- Cookies and other site data: Clearing this option will remove cookies, local storage, and other data associated with websites you have visited.
- Cached images and files: Chrome stores webpage files, such as images and scripts, to improve page loading speed. By checking this option, you can clear these cached files.
- Passwords: If you want to remove saved passwords from Chrome, you can select this option. Note that you will need to sign in again on websites that previously had your saved passwords.
- Autofill form data: This option allows you to clear saved data that fills in forms automatically, such as your name, email, and address.
Select the options that you want to remove from your browsing history by checking the respective boxes. Take a moment to consider which data you want to keep and which data you want to remove before proceeding.
Once you have chosen the desired items, click on the “Clear data” button. Chrome will then begin the process of clearing the selected data based on your preferences.
Remember, clearing your browsing history can improve your privacy and browsing experience, but it’s important to be mindful of the data you choose to remove.
Now that you have selected what to remove from your browsing history, let’s move on to the next step – clearing browsing history for specific time ranges.
Step 4: Clearing specific time ranges
In addition to choosing specific items to remove from your browsing history, you can also clear your browsing data for specific time ranges in Chrome. This feature provides even more flexibility and control over your browsing history clearing process.
When you are in the “Clear browsing data” dialog box, you will notice a drop-down menu labeled “Time range”. By default, the option “All time” is selected, which means that Chrome will clear your entire browsing history. However, you can click on the drop-down menu to select a different time range.
The available options for time ranges include:
- Last hour: This option will clear your browsing history for the past hour only.
- Last 24 hours: Choosing this option will remove your browsing history for the past 24 hours.
- Last 7 days: Selecting this option will clear your browsing history for the past week.
- Last 4 weeks: This option removes your browsing history for the past four weeks.
- All time: As mentioned earlier, this option clears your entire browsing history.
Choose the time range you prefer by clicking on the respective option in the drop-down menu.
Once you have selected the desired time range and chosen the specific items you want to remove, click on the “Clear data” button to initiate the clearing process.
Chrome will then promptly clear the selected browsing data for the specified time range. You will receive a confirmation message when the clearing process is complete.
Clearing your browsing history for specific time ranges allows you to retain recent data while removing older entries. It’s a great way to maintain your privacy and keep your browsing history organized.
Now that you understand how to clear your browsing history for specific time ranges, let’s move on to the next step – clearing cookies and other site data.
Step 5: Clearing cookies and other site data
Aside from clearing your browsing history, it’s often necessary to clear cookies and other site data as well. These are small files stored by websites on your device to remember your preferences and enhance your browsing experience. However, clearing this data can help protect your privacy and ensure a fresh start when visiting websites.
To clear cookies and other site data in Chrome, access the Chrome settings as explained in Step 1. Once you’re in the settings, scroll down to the “Privacy and security” category and click on “Cookies and other site data.”
On the “Cookies and site data” page, you’ll find the option “Clear cookies and site data.” Click on the “Clear” button next to it to proceed.
A dialog box will appear, warning you that clearing this data will sign you out of most websites and may remove personalized settings. If you’re ready to proceed, click on the “Clear” button.
Chrome will then start clearing your cookies and other site data. This process may take a few moments, depending on the amount of data to be cleared. Once complete, you will receive a confirmation message.
It’s important to note that clearing cookies and site data will sign you out of websites where you were previously logged in. You will need to sign back in on those websites and may lose any personalized settings associated with them.
By clearing cookies and other site data, you can start fresh with your browsing experience and ensure that websites don’t keep track of you or your previous preferences.
Now that you know how to clear cookies and other site data, let’s move on to the next step – clearing cached images and files.
Step 6: Clearing cached images and files
Clearing cached images and files is another important step in maintaining a clean browsing experience in Chrome. When you visit websites, your browser stores certain files, such as images and scripts, in a cache to help load web pages faster in the future. However, over time, the cache can accumulate a large amount of data, potentially slowing down your browsing speed.
To clear cached images and files in Chrome, follow these simple steps:
- Access the Chrome settings by clicking on the three vertical dots in the top-right corner of the browser window and selecting “Settings” from the drop-down menu.
- Scroll down to the “Privacy and security” category in the settings page and click on “Clear browsing data.”
- In the “Clear browsing data” dialog box, make sure the “Cached images and files” option is checked.
- Uncheck any other options that you want to keep, or leave them checked if you want to clear those as well.
- Click on the “Clear data” button to initiate the clearing process.
Chrome will then proceed to clear the cached images and files from your browser. This process shouldn’t take too long, but it may vary depending on the amount of cached data on your device.
By clearing cached images and files, you free up space and improve the loading speed of web pages. Any stored images and files that were previously cached will have to be reloaded the next time you visit a website.
It’s important to note that clearing cached images and files may temporarily slow down the loading of web pages until the cache is rebuilt. However, this is a small trade-off for the benefits of a faster, cleaner browsing experience.
Now that you know how to clear cached images and files, let’s move on to the next step – clearing saved passwords and autofill data.
Step 7: Clearing saved passwords and autofill data
Clearing saved passwords and autofill data is crucial if you want to ensure the privacy and security of your browsing experience. Chrome saves passwords and autofill data to make it convenient for you to log in to websites and fill out forms. However, there may come a time when you want to clear this data or start fresh with new login credentials.
To clear saved passwords and autofill data in Chrome, follow these steps:
- Access the Chrome settings by clicking on the three vertical dots in the top-right corner of the browser window and selecting “Settings” from the drop-down menu.
- Scroll down to the “Autofill” category in the settings page and click on “Addresses and more” or “Passwords,” depending on what you want to clear.
- If you want to clear autofill data, such as saved addresses or credit card information, click on “Addresses and more.” To clear saved passwords, click on “Passwords.”
- On the respective page, you’ll see a list of autofill data or saved passwords. You can manually delete individual entries by clicking on the three vertical dots next to each entry and selecting “Remove.”
- If you want to clear all saved passwords or autofill data, click on the “More” button (three vertical dots) at the top-right corner of the page and select “Clear all” or “Clear all passwords” from the drop-down menu.
- A confirmation dialog box will appear, asking if you’re sure you want to clear the selected data. Click “Clear” to proceed.
Chrome will then clear the selected saved passwords or autofill data, ensuring a fresh start for your future browsing and form-filling activities.
Keep in mind that clearing saved passwords will remove all stored login credentials, and you will need to log in again on websites that previously had your saved passwords.
Clearing saved passwords and autofill data is an important step in maintaining privacy and security. It allows you to have full control over the data that Chrome remembers about your browsing habits.
Now that you’ve learned how to clear saved passwords and autofill data, let’s move on to the next step – clearing browsing data on exit.
Step 8: Clearing browsing data on exit
If you want to ensure that your browsing history and data are cleared automatically every time you close Chrome, you can enable the option to clear browsing data on exit. This helps maintain your privacy and keeps your browsing sessions clean.
To enable the option to clear browsing data on exit in Chrome, follow these simple steps:
- Access the Chrome settings by clicking on the three vertical dots in the top-right corner of the browser window and selecting “Settings” from the drop-down menu.
- Scroll down to the “Privacy and security” category in the settings page and click on “Clear browsing data.”
- In the “Clear browsing data” dialog box, click on the “Advanced” tab located at the top.
- Scroll down to the “Privacy and security” section, where you’ll find the option “Exit cleaning.”
- By default, the “Keep local data until you quit your browser” option is selected. To enable the option to clear browsing data on exit, toggle the switch to the right.
- Once enabled, you can customize the data that will be cleared on exit by clicking on the “Choose what to clear every time you close the browser” link.
- Select the specific browsing data you want to clear on exit, such as browsing history, cookies and other site data, cached images and files, and more.
- Click on the “Done” button to save your settings.
From now on, whenever you close Chrome, the selected browsing data will be automatically cleared, providing you with a fresh start for your next browsing session.
Clearing browsing data on exit is a convenient way to maintain your privacy and avoid the accumulation of unnecessary data on your device. It ensures that your browsing history and personal information are not stored locally.
Now that you know how to enable the option to clear browsing data on exit, let’s move on to the last step – managing browsing history with Chrome extensions.
Step 9: Managing browsing history with Chrome extensions
In addition to the built-in features in Chrome, you can further enhance your ability to manage and control your browsing history through the use of Chrome extensions. These extensions offer additional functionalities and customization options to suit your specific needs.
To manage your browsing history with Chrome extensions, follow these steps:
- Open the Chrome Web Store by clicking on the “Apps” button in the bookmarks bar and selecting “Web Store.”
- In the search bar, type in keywords like “browsing history” or “history manager” to find relevant extensions.
- Review the available extensions and read their descriptions and user reviews to find one that suits your requirements.
- Once you’ve selected an extension, click on the “Add to Chrome” button to download and install it.
- Follow the on-screen instructions to complete the installation process.
- Access the extension by clicking on its icon in the Chrome toolbar.
- Explore the features and options provided by the extension to manage and organize your browsing history.
Chrome extensions for managing browsing history can offer various functionalities. They may allow you to selectively delete specific entries, categorize browsing history, set reminders, export or import data, and much more. Find an extension that aligns with your preferences and requirements.
Remember to read the documentation or user guides provided by the extension developers to learn about the specific features and how to utilize them effectively.
By using Chrome extensions, you can have more control and flexibility in managing your browsing history. They provide additional tools and functionalities to further streamline your browsing experience.
With these additional tips and steps, you are now equipped with the knowledge to effectively manage and clear your browsing history in Chrome. Whether you choose to utilize the built-in features or leverage extensions, you can maintain your privacy, optimize your browsing experience, and enjoy a fresh start with each new session.
Keep exploring and experimenting with different options to find what works best for you. Happy browsing!
Conclusion
Congratulations! You now have a comprehensive understanding of how to clear your browsing history in Chrome. By following these steps, you can keep your browsing experience clean, maintain your privacy, and optimize the performance of your browser.
We started by accessing the Chrome settings and then cleared the browsing history, choosing specific items to remove. We also explored the option of clearing browsing data for specific time ranges, giving you greater control over what data is removed. Additionally, we learned how to clear cookies and other site data, which helps protect your privacy and ensure a fresh start on websites.
Moreover, we discussed how to clear cached images and files to improve page loading speed and save valuable storage space. Clearing saved passwords and autofill data helps you manage your login credentials and maintain control over personal information. And if you prefer, you can enable the option to clear browsing data on exit.
Lastly, we covered how to manage your browsing history with Chrome extensions, offering you additional functionality and customization options based on your specific needs.
Now, armed with this knowledge, you can confidently manage and clear your browsing history in Chrome. Remember to periodically clear your history to maintain privacy, optimize performance, and start with a clean slate. Whether you choose to perform these actions manually or use extensions, the power is in your hands.
Happy browsing!