Introduction
Using the internet has become an integral part of our daily lives. Whether it’s for browsing websites, accessing online services, or connecting with others, our web browsers play a significant role in our digital experiences. However, as we explore the internet, our browsers accumulate a history of websites we visit, searches we perform, and cookies that track our online activities. While this history helps to enhance our browsing experience in many ways, there are times when we may need to clear it.
Clearing your browser history can provide several benefits. Firstly, it improves your online privacy by removing traces of your internet activities, ensuring that sensitive information doesn’t fall into the wrong hands. Secondly, it helps to maintain the performance and speed of your browser, as a cluttered history can slow down loading times. Lastly, it allows you to start with a clean slate, enabling a fresh and optimized browsing experience.
In this article, we will guide you through the process of clearing your browser history on various popular web browsers, as well as different devices and operating systems. Whether you’re using Google Chrome, Mozilla Firefox, Microsoft Edge, Safari, Opera, Internet Explorer, or browsing on Android or iOS devices, we’ve got you covered.
So, if you’re ready to take control of your online privacy and optimize your browsing experience, let’s dive into the step-by-step guides to clear your browser history on different platforms.
Why is it important to clear your browser history?
Clearing your browser history has several important benefits that can enhance your online privacy and browsing experience.
1. Privacy Protection: When you browse the internet, your browser keeps track of the websites you visit, the searches you perform, and other online activities. This information can be accessed by others who have access to your device, such as family members, friends, or even potential hackers. Clearing your browser history helps to safeguard your privacy by removing traces of your online activities, ensuring that your personal information remains confidential.
2. Security: Browser history can often include sensitive information, such as login credentials, credit card details, or personal data entered on forms. If someone gains access to your device or if it gets stolen, they can potentially retrieve this information from your browser history. By regularly clearing your history, you decrease the risk of such sensitive data falling into the wrong hands.
3. Optimized Performance: As you browse the internet, your browser saves files and data from visited websites to improve loading times and provide a smoother experience when revisiting those sites. However, over time, this stored data can accumulate and take up valuable space on your device. Clearing your browser history helps maintain the optimal performance and speed of your browser by freeing up storage and reducing clutter.
4. Personalization Reset: Web browsers often use your browsing history to personalize your online experience, such as displaying targeted ads or suggesting websites based on your previous searches. While this can be convenient, it can also lead to a filter bubble where you only see content that aligns with your past interests. By clearing your browser history, you can start with a clean slate and experience a broader range of online content.
5. Eliminate Tracking Cookies: Many websites use cookies to track your online behavior and activities. These cookies can store information about your preferences, login details, and other data. By clearing your browser history, you can remove these tracking cookies, reducing the amount of data that is collected about you as you browse the web.
Overall, regularly clearing your browser history is an essential step in maintaining your privacy, security, and optimizing your browsing experience. By doing so, you can enjoy a safer and more personalized online journey.
How to clear your browser history on Google Chrome
Google Chrome is one of the most popular web browsers, known for its speed, security, and user-friendly interface. If you’re a Chrome user and want to clear your browsing history, follow these simple steps:
- Open Google Chrome on your computer.
- Click on the three vertical dots in the top-right corner of the browser window to open the Chrome menu.
- From the dropdown menu, hover over “History” and then click on “History” again in the submenu that appears.
- A new tab will open, showing your browsing history. Alternatively, you can directly access this page by typing “chrome://history/” in the address bar.
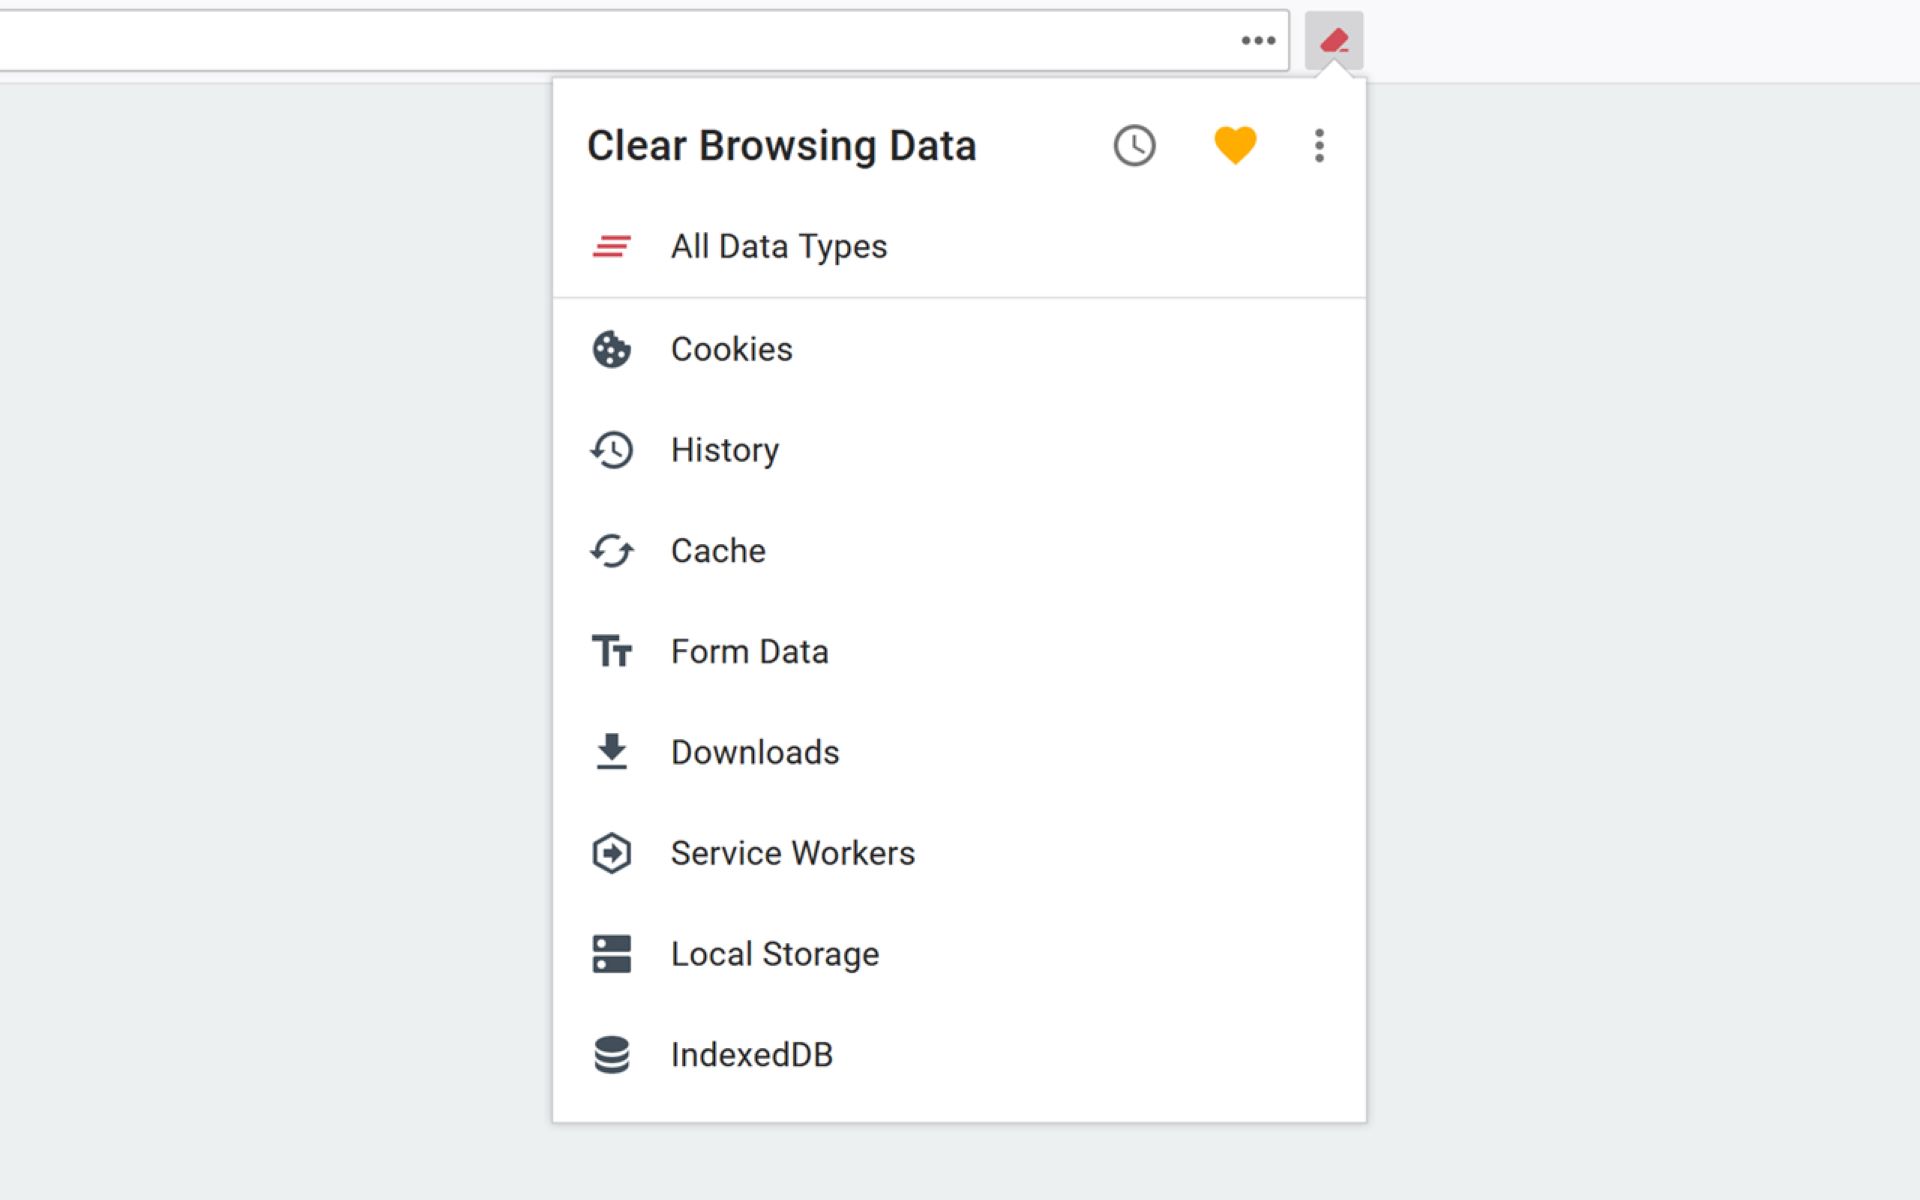
- To clear your history, click on the “Clear browsing data” option on the left-hand side of the screen.
- A popup window will appear, allowing you to customize what data you want to clear. You can choose to clear browsing history, cookies, cached images and files, and other site data.
- Select the time range for which you want to clear the data. You can choose from the past hour, day, week, month, or select “All time” to clear your entire history.
- Tick the boxes next to the types of data you want to clear.
- Click the “Clear data” button to confirm and start the clearing process.
- After the process is complete, you’ll see a confirmation message that your browsing data has been cleared.
That’s it! You have successfully cleared your browsing history on Google Chrome.
Remember that clearing your browser history will remove all the websites you have visited, cookies, and cached files. It will also sign you out of any websites you were logged into. So, if you have any important information or unsaved data, make sure to save it before clearing your history.
Regularly clearing your browsing history on Google Chrome helps maintain your privacy, improve browser performance, and provide a more optimized browsing experience.
How to clear your browser history on Mozilla Firefox
Mozilla Firefox is a popular web browser known for its speed, security, and customizable features. If you use Firefox and want to clear your browsing history, follow these steps:
- Open Mozilla Firefox on your computer.
- Click on the three horizontal lines in the top-right corner of the browser window to open the Firefox menu.
- From the dropdown menu, click on “Library”.
- In the submenu that appears, click on “History”.
- A new tab will open, showing your browsing history.
- To clear your history, click on the “Clear Recent History” option on the right-hand side of the screen.
- A popup window will appear, allowing you to customize what data you want to clear.
- Select the time range for which you want to clear the data. You can choose from the past hour, two hours, four hours, today, or select a custom range.
- Tick the boxes next to the types of data you want to clear. You can choose to clear browsing & download history, cookies, cache, active logins, and site preferences.
- Click the “Clear Now” button to confirm and start the clearing process.
- After the process is complete, you’ll see a confirmation message that your browsing data has been cleared.
That’s it! You have successfully cleared your browsing history on Mozilla Firefox.
Keep in mind that clearing your browser history will remove all the websites you have visited, cookies, and cached files. It will also sign you out of any websites you were logged into. Therefore, if you have any important information or unsaved data, make sure to save it before clearing your history.
Regularly clearing your browsing history on Mozilla Firefox helps protect your privacy, improve browser performance, and ensure a more optimized browsing experience.
How to clear your browser history on Microsoft Edge
Microsoft Edge is a modern web browser developed by Microsoft and is the default browser for Windows 10. If you’re using Edge and want to clear your browsing history, follow these simple steps:
- Open Microsoft Edge on your computer.
- Click on the three horizontal dots in the top-right corner of the browser window to open the Edge menu.
- From the dropdown menu, click on “History”.
- A side panel will appear on the right side of the browser window, showing your browsing history.
- To clear your history, click on the “Clear history” button at the top of the side panel.
- A popup window will appear, allowing you to customize what data you want to clear.
- Select the time range for which you want to clear the data. You can choose from the past hour, day, week, or select “All time” to clear your entire history.
- Tick the boxes next to the types of data you want to clear. You can choose to clear browsing history, cookies, cached data and files, download history, form data, and passwords.
- Click the “Clear” button to confirm and start the clearing process.
- After the process is complete, you’ll see a confirmation message that your browsing data has been cleared.
That’s it! You have successfully cleared your browsing history on Microsoft Edge.
Remember that clearing your browser history will remove all the websites you have visited, cookies, and cached files. It will also sign you out of any websites you were logged into. So, if you have any important information or unsaved data, make sure to save it before clearing your history.
Regularly clearing your browsing history on Microsoft Edge helps protect your privacy, improve browser performance, and provide a more optimized browsing experience.
How to clear your browser history on Safari
Safari is the default web browser for Apple devices, providing a fast and user-friendly browsing experience. If you’re using Safari and want to clear your browsing history, follow these steps:
- Open Safari on your device.
- In the top menu, click on “History”.
- In the dropdown menu, click on “Clear History”.
- A popup window will appear, allowing you to customize what data you want to clear.
- Select the time range for which you want to clear the data. You can choose from the past hour, today, today and yesterday, or select “all history” to clear your entire history.
- Click on the “Clear History” button to confirm and start the clearing process.
- After the process is complete, your browsing history will be cleared.
That’s it! You have successfully cleared your browsing history on Safari.
Please note that clearing your browser history in Safari will remove all the websites you have visited, cookies, and cached files. Additionally, clearing your history will sign you out of any websites you were previously logged into. If you have any important information or unsaved data, make sure to save it before clearing your history.
Regularly clearing your browsing history on Safari helps protect your privacy, improve browser performance, and ensure a more optimized browsing experience.
How to clear your browser history on Opera
Opera is a feature-rich web browser known for its speed, security, and built-in tools. If you’re using Opera and want to clear your browsing history, follow these simple steps:
- Open Opera on your computer.
- Click on the Opera logo in the top-left corner of the browser window to open the main menu.
- From the dropdown menu, hover over “History” to expand the submenu.
- Click on “Clear browsing data…” in the submenu.
- A popup window will appear, allowing you to customize what data you want to clear.
- Select the time range for which you want to clear the data. You can choose from the past hour, day, week, month, or select “All time” to clear your entire history.
- Tick the boxes next to the types of data you want to clear. You can choose to clear browsing history, cookies, cached images and files, download history, and more.
- Click the “Clear data” button to confirm and start the clearing process.
- After the process is complete, you’ll see a confirmation message that your browsing data has been cleared.
That’s it! You have successfully cleared your browsing history on Opera.
Keep in mind that clearing your browser history will remove all the websites you have visited, cookies, and cached files. It will also sign you out of any websites you were logged into. Therefore, if you have any important information or unsaved data, make sure to save it before clearing your history.
Regularly clearing your browsing history on Opera helps maintain your privacy, improve browser performance, and ensure a more optimized browsing experience.
How to clear your browser history on Internet Explorer
Internet Explorer, also known as IE, has been the default web browser for Windows operating systems for many years. If you’re using Internet Explorer and want to clear your browsing history, follow these steps:
- Open Internet Explorer on your computer.
- Click on the gear icon in the top-right corner of the browser window to open the Tools menu.
- From the dropdown menu, hover over “Safety” to open the submenu.
- Click on “Delete browsing history” in the submenu.
- A popup window will appear, allowing you to choose what data you want to delete.
- Tick the boxes next to the types of data you want to delete. You can choose to delete browsing history, cookies, temporary Internet files, form data, and passwords.
- Click the “Delete” button to confirm and start the clearing process.
- After the process is complete, your browsing history will be deleted.
That’s it! You have successfully cleared your browsing history on Internet Explorer.
Please note that clearing your browser history in Internet Explorer will remove all the websites you have visited, cookies, and cached files. It will also sign you out of any websites you were logged into. If you have any important information or unsaved data, make sure to save it before clearing your history.
Regularly clearing your browsing history on Internet Explorer helps protect your privacy, improve browser performance, and ensure a more optimized browsing experience.
How to clear your browser history on Android devices
If you use an Android device and want to clear your browser history, follow these steps:
- Open the Chrome browser app on your Android device.
- Tap on the three vertical dots in the top-right corner of the browser window to open the Chrome menu.
- From the dropdown menu, tap on “History”.
- A list of your browsing history will appear.
- To clear your history, tap on the “Clear browsing data” button at the bottom of the screen.
- Select the time range for which you want to clear the data. You can choose from the past hour, day, week, month, or select “All time” to clear your entire history.
- Tick the boxes next to the types of data you want to clear. You can choose to clear browsing history, cookies, cached images and files, and more.
- Tap the “Clear data” button to confirm and start the clearing process.
- After the process is complete, you’ll see a confirmation message that your browsing data has been cleared.
Note that the steps provided are specifically for the Chrome browser on Android devices. The process may vary slightly for other browsers or versions of Chrome, but the general concept remains the same.
Regularly clearing your browser history on Android devices helps protect your privacy, free up storage space, and ensure a more optimized browsing experience.
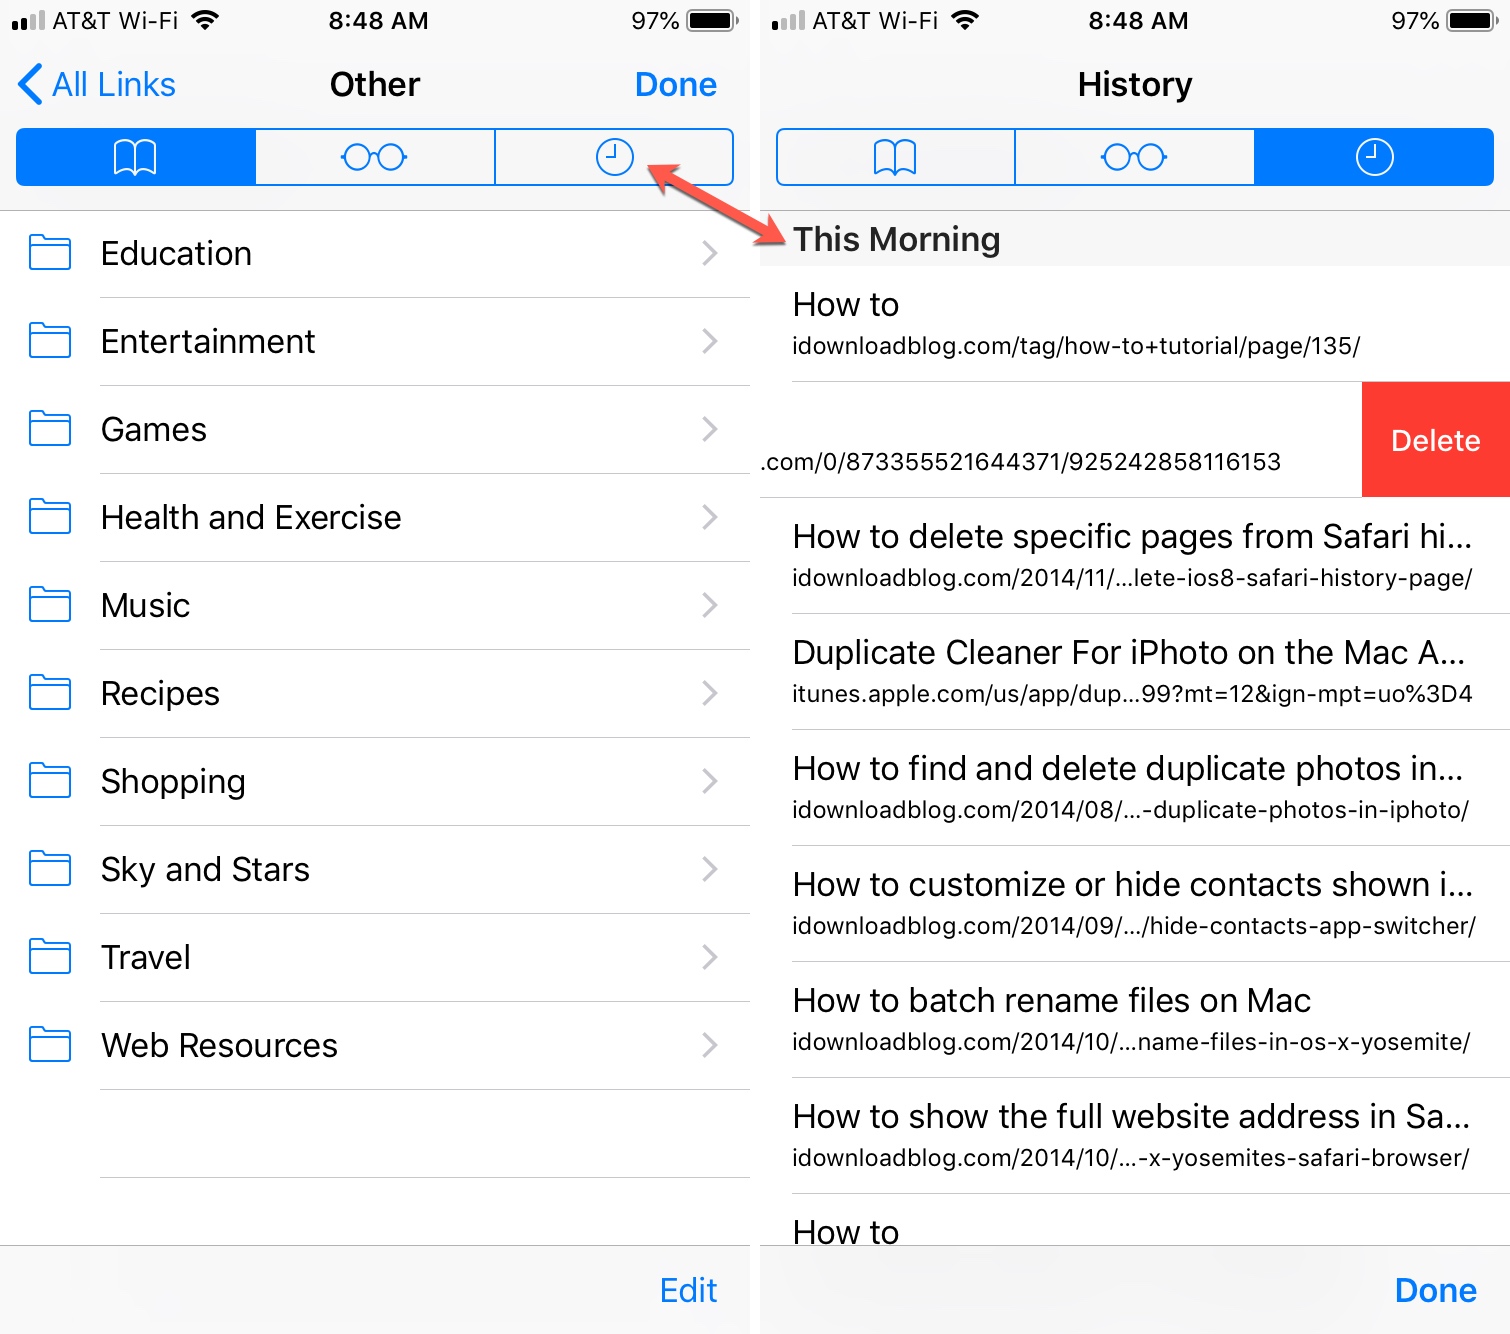
How to clear your browser history on iOS devices
If you use iOS devices such as an iPhone or iPad and want to clear your browser history, follow these steps:
- Open the Safari browser app on your iOS device.
- Tap on the book icon located at the bottom of the screen to open the bookmarks menu.
- Swipe left on the top row to reveal additional options, and tap on the “History” button.
- A list of your browsing history will appear.
- To clear your history, tap on the “Clear” button at the bottom of the screen.
- A popup window will appear, giving you options to clear the last hour, today, or today and yesterday.
- Tap on the desired time range, or choose “All time” to clear your entire history.
- Tap the “Clear” button to confirm and start the clearing process.
- After the process is complete, your browsing history will be cleared.
Please note that the steps provided are specifically for the Safari browser on iOS devices. The process may vary slightly for other browsers, but the general concept remains the same.
Regularly clearing your browser history on iOS devices helps maintain your privacy, free up storage space, and ensure a more optimized browsing experience.
How often should you clear your browser history?
The frequency at which you should clear your browser history depends on your personal preferences and needs. However, there are a few factors to consider when deciding how often to clear your browsing history:
1. Privacy: If maintaining your online privacy is a top priority, you might want to clear your browser history more frequently. By clearing your history, you minimize the chances of sensitive information falling into the wrong hands and reduce the risk of being tracked online.
2. Device Security: If you share your device with others or are concerned about your device being lost or stolen, clearing your browsing history regularly is advisable. This helps ensure that your personal information, such as saved passwords or logged-in accounts, is not accessible to unauthorized users.
3. Storage Optimization: Over time, your browser history, cookies, and cached files can take up a significant amount of storage space on your device. Clearing your history can help free up space and improve the performance of your browser and device.
4. Personalization and Convenience: Browsers often use your browsing history to personalize your online experience, such as suggesting relevant websites or displaying targeted ads. If you prefer a fresh and diverse browsing experience, clearing your history more frequently can help break out of the filter bubble and discover new content.
As a general guideline, clearing your browser history once a month or every few months can strike a balance between maintaining privacy, optimizing device performance, and personalizing your browsing experience. However, you may choose to adjust this frequency based on your individual needs and preferences.
It’s worth noting that clearing your history does not erase all traces of your online activities. Internet service providers, websites you visit, and other entities may still retain some information about your internet usage. If you require a higher level of privacy, consider using a virtual private network (VPN) or utilizing private browsing modes provided by browsers.
In the end, the decision of how often to clear your browser history is up to you. Regularly assessing your privacy needs and taking action accordingly can help ensure a safe and enhanced browsing experience.
Conclusion
Clearing your browser history is an essential practice for maintaining privacy, optimizing browser performance, and enhancing your overall browsing experience. By removing traces of your online activities, you can protect sensitive information, prevent unauthorized access to your data, and minimize tracking by third-party entities.
In this article, we have provided step-by-step guides on how to clear browser history on popular web browsers such as Google Chrome, Mozilla Firefox, Microsoft Edge, Safari, Opera, and Internet Explorer. We have also covered the process for clearing browser history on both Android and iOS devices.
When determining the frequency at which to clear your browser history, consider factors such as privacy concerns, device security, storage optimization, and personalization preferences. While clearing your history once a month or every few months is a general guideline, adjusting this frequency based on your individual needs is recommended.
Remember to be mindful of any important information or unsaved data before clearing your history, as the process will remove browsing history, cookies, and cached files. It is advisable to save any important data before proceeding.
Regularly clearing your browser history allows you to enjoy a fresh and optimized browsing experience, free from unnecessary clutter, while safeguarding your privacy. Incorporating this practice into your digital routine will help ensure a safer and more enjoyable online journey.