Introduction
Keeping your PC clean is essential for optimal performance and longevity. Over time, dust, dirt, and debris can accumulate both on the exterior and interior of your computer, hindering its functionality and potentially causing hardware issues. Regularly cleaning your PC not only helps to improve its performance but also prevents overheating and extends its lifespan.
In this guide, we will walk you through the step-by-step process of cleaning your PC. We will cover everything from cleaning the exterior to cleaning the internal components and running antivirus software. By following these simple steps, you can ensure that your PC remains in top-notch condition.
Before we dive into the cleaning process, it’s important to note that proper precautions should be taken before cleaning your PC. Make sure to shut down your computer and unplug it from any power source before beginning. Additionally, remember to handle your computer with care and avoid using excessive force while cleaning to prevent damaging any delicate components.
Now that we have covered the necessary precautions, let’s get started with the cleaning process!
Essential Tools for Cleaning Your PC
Before you begin cleaning your PC, it’s important to gather the necessary tools to ensure a thorough and efficient cleaning process. Here are the essential tools you’ll need:
- Compressed Air Canister: This is a must-have tool for removing dust from hard-to-reach areas of your PC. The compressed air canister blasts away dust without the risk of damaging sensitive components.
- Microfiber Cloth: A soft, lint-free microfiber cloth is perfect for wiping down the exterior of your PC and removing smudges and fingerprints from the surface.
- Cotton Swabs: Use cotton swabs to clean around the keys of your keyboard and other tight areas where dust and dirt tend to accumulate.
- Isopropyl Alcohol: Isopropyl alcohol is an effective solvent for removing stubborn stains and grime from surfaces. Use it with a cloth or cotton swab for thorough cleaning.
- Screwdriver Set: Depending on your PC model, you may need a screwdriver to open the case and access the internal components. Make sure to have a Phillips or flathead screwdriver on hand.
These tools will help ensure that you can clean both the exterior and interior of your PC effectively. Having them readily available will save you time and make the cleaning process much easier.
Now that you have all the necessary tools, let’s move on to the step-by-step process of cleaning your PC.
Step 1: Shutting Down and Disconnecting
Before you start cleaning your PC, it’s crucial to shut it down properly and disconnect it from any power sources. This will ensure your safety and prevent any damage to the computer components. Here’s how to do it:
- Save your work and close all applications: Make sure to save any ongoing work and close all open applications. This will prevent any data loss or corruption during the shutdown process.
- Shut down your PC: Click on the “Start” button on the Taskbar, then select the “Shut down” option from the menu. Wait for the PC to completely shut down before proceeding to the next step.
- Disconnect the power cord: Unplug the power cord from the back of your computer or the power outlet. This will ensure that there is no electrical current flowing through your PC.
- Disconnect any peripherals: If you have any external devices connected to your PC like printers, scanners, or speakers, unplug them as well. This will make it easier to access and clean the different components of your computer.
By following these steps, you minimize the risk of electrical shock and allow for a safe cleaning process. Now that your PC is shut down and disconnected, you can move on to the next step of cleaning the exterior.
Step 2: Cleaning the Exterior
Now that your PC is shut down and disconnected, it’s time to clean the exterior. The exterior of your computer can collect dust, fingerprints, and other smudges, which can affect its overall appearance. Here’s how to clean the exterior of your PC:
- Use a microfiber cloth: Start by gently wiping down the surface of your PC with a soft microfiber cloth. This will help remove any dust and loose debris without scratching the surface.
- Focus on the monitor and keyboard: Pay extra attention to the monitor and keyboard, as these areas are more prone to smudges and fingerprints. Use gentle, circular motions to remove any marks.
- Don’t forget the ports: Use a cotton swab slightly dampened with isopropyl alcohol to clean the ports and connectors on the back of your PC. Be careful not to get any liquid inside the ports or damage the pins.
- Clean the mouse: If you’re using a wired mouse, wipe it with a microfiber cloth to remove any dust and dirt. For a wireless mouse, remove the batteries and clean the battery compartment as well.
- Let it air dry: After cleaning, allow the exterior of your PC to air dry completely before plugging it back in and powering it on.
Regularly cleaning the exterior of your PC not only keeps it looking good but also prevents dust and grime from entering the internal components. It also helps maintain proper airflow, reducing the risk of overheating. With the exterior of your PC clean, it’s time to move on to cleaning the keyboard and mouse in the next step.
Step 3: Cleaning the Keyboard and Mouse
Your keyboard and mouse are two of the most frequently used components of your PC, meaning they can accumulate a lot of dirt, crumbs, and debris over time. Cleaning them regularly is essential for keeping them in good working condition. Here’s how to clean your keyboard and mouse:
- Turn the keyboard upside down: Gently turn your keyboard upside down and give it a few gentle taps to dislodge any loose debris or crumbs. Shake it lightly to remove any remaining particles.
- Use compressed air: Use a can of compressed air to blow away any dust and debris from between the keys. Pay extra attention to the spaces between the keys as they tend to collect the most dirt.
- Wipe down the keys: Dampen a cloth or cotton swab with isopropyl alcohol and gently wipe down the keys, removing any stickiness or grime. You can also use a small brush to clean hard-to-reach areas.
- Clean the mouse: If you’re using a wired mouse, detach it from your PC. Use a microfiber cloth or a cotton swab dampened with isopropyl alcohol to clean the surfaces and buttons of the mouse. For a wireless mouse, remove the batteries before cleaning and ensure the battery compartment is free from any debris.
- Let it dry: Allow the keyboard and mouse to air dry completely before reconnecting them to your PC.
By regularly cleaning your keyboard and mouse, you can maintain their functionality and ensure a smooth typing and navigating experience. With your keyboard and mouse now clean, it’s time to move on to cleaning the monitor in the next step.
Step 4: Cleaning the Monitor
A clean and clear monitor is essential for optimal viewing experience while using your PC. Dust, fingerprints, and smudges can affect the clarity and visibility of the screen. Here’s how to clean your monitor properly:
- Turn off the monitor: Before cleaning, turn off your monitor and allow it to cool down to avoid any potential damage.
- Use a microfiber cloth: Start by gently wiping the screen with a soft, lint-free microfiber cloth. Avoid using paper towels or rough materials as they can scratch the screen.
- Dampen the cloth: If there are stubborn marks or fingerprints on the screen, lightly dampen the microfiber cloth with distilled water. Make sure not to apply water directly to the screen.
- Wipe gently: Use gentle, circular motions to clean the screen, applying minimal pressure. Avoid pressing too hard or scrubbing vigorously as this can damage the display.
- Dry thoroughly: After cleaning, ensure that the screen is completely dry before turning it back on. Any moisture left on the screen can cause damage.
It’s important to note that different types of monitors may require specific cleaning methods. If your monitor has a glossy or anti-glare coating, refer to the manufacturer’s guidelines to ensure you’re using the appropriate cleaning techniques.
By regularly cleaning your monitor, you can enjoy a crisp and clear display, enhancing your overall computing experience. With your monitor now clean, let’s move on to cleaning the CPU in the next step.
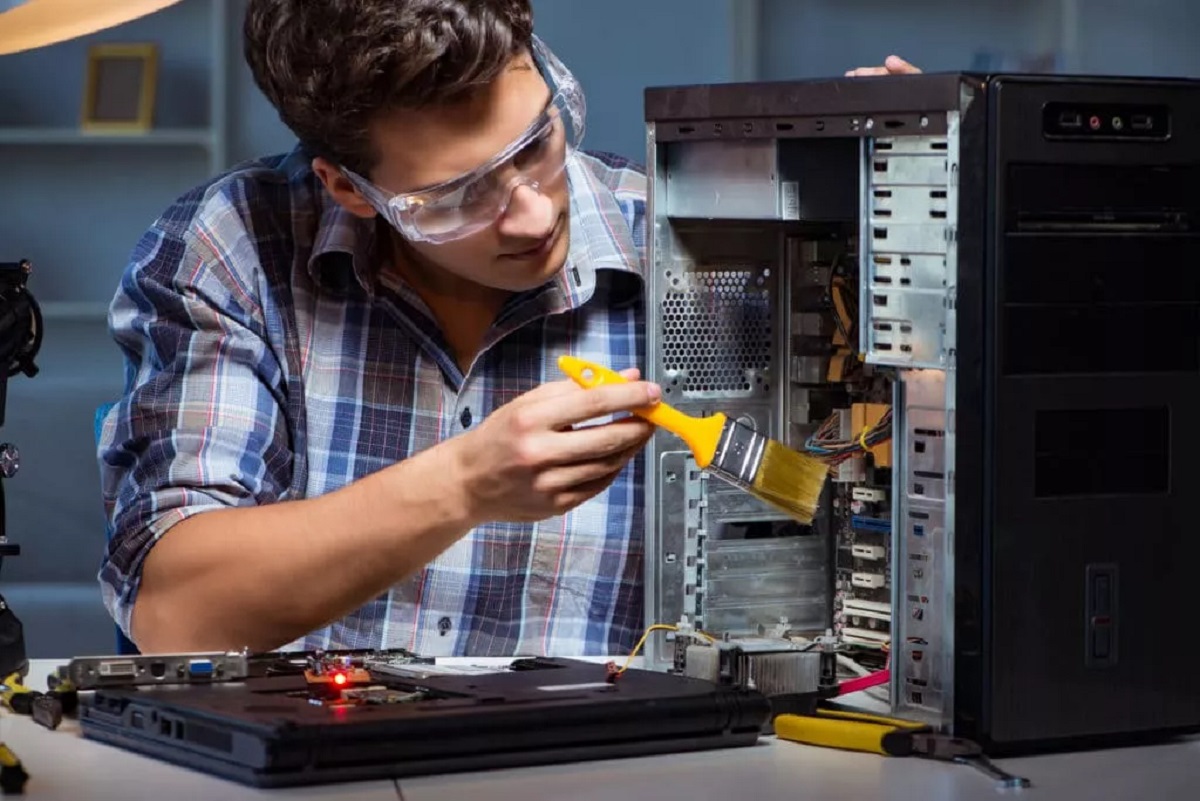
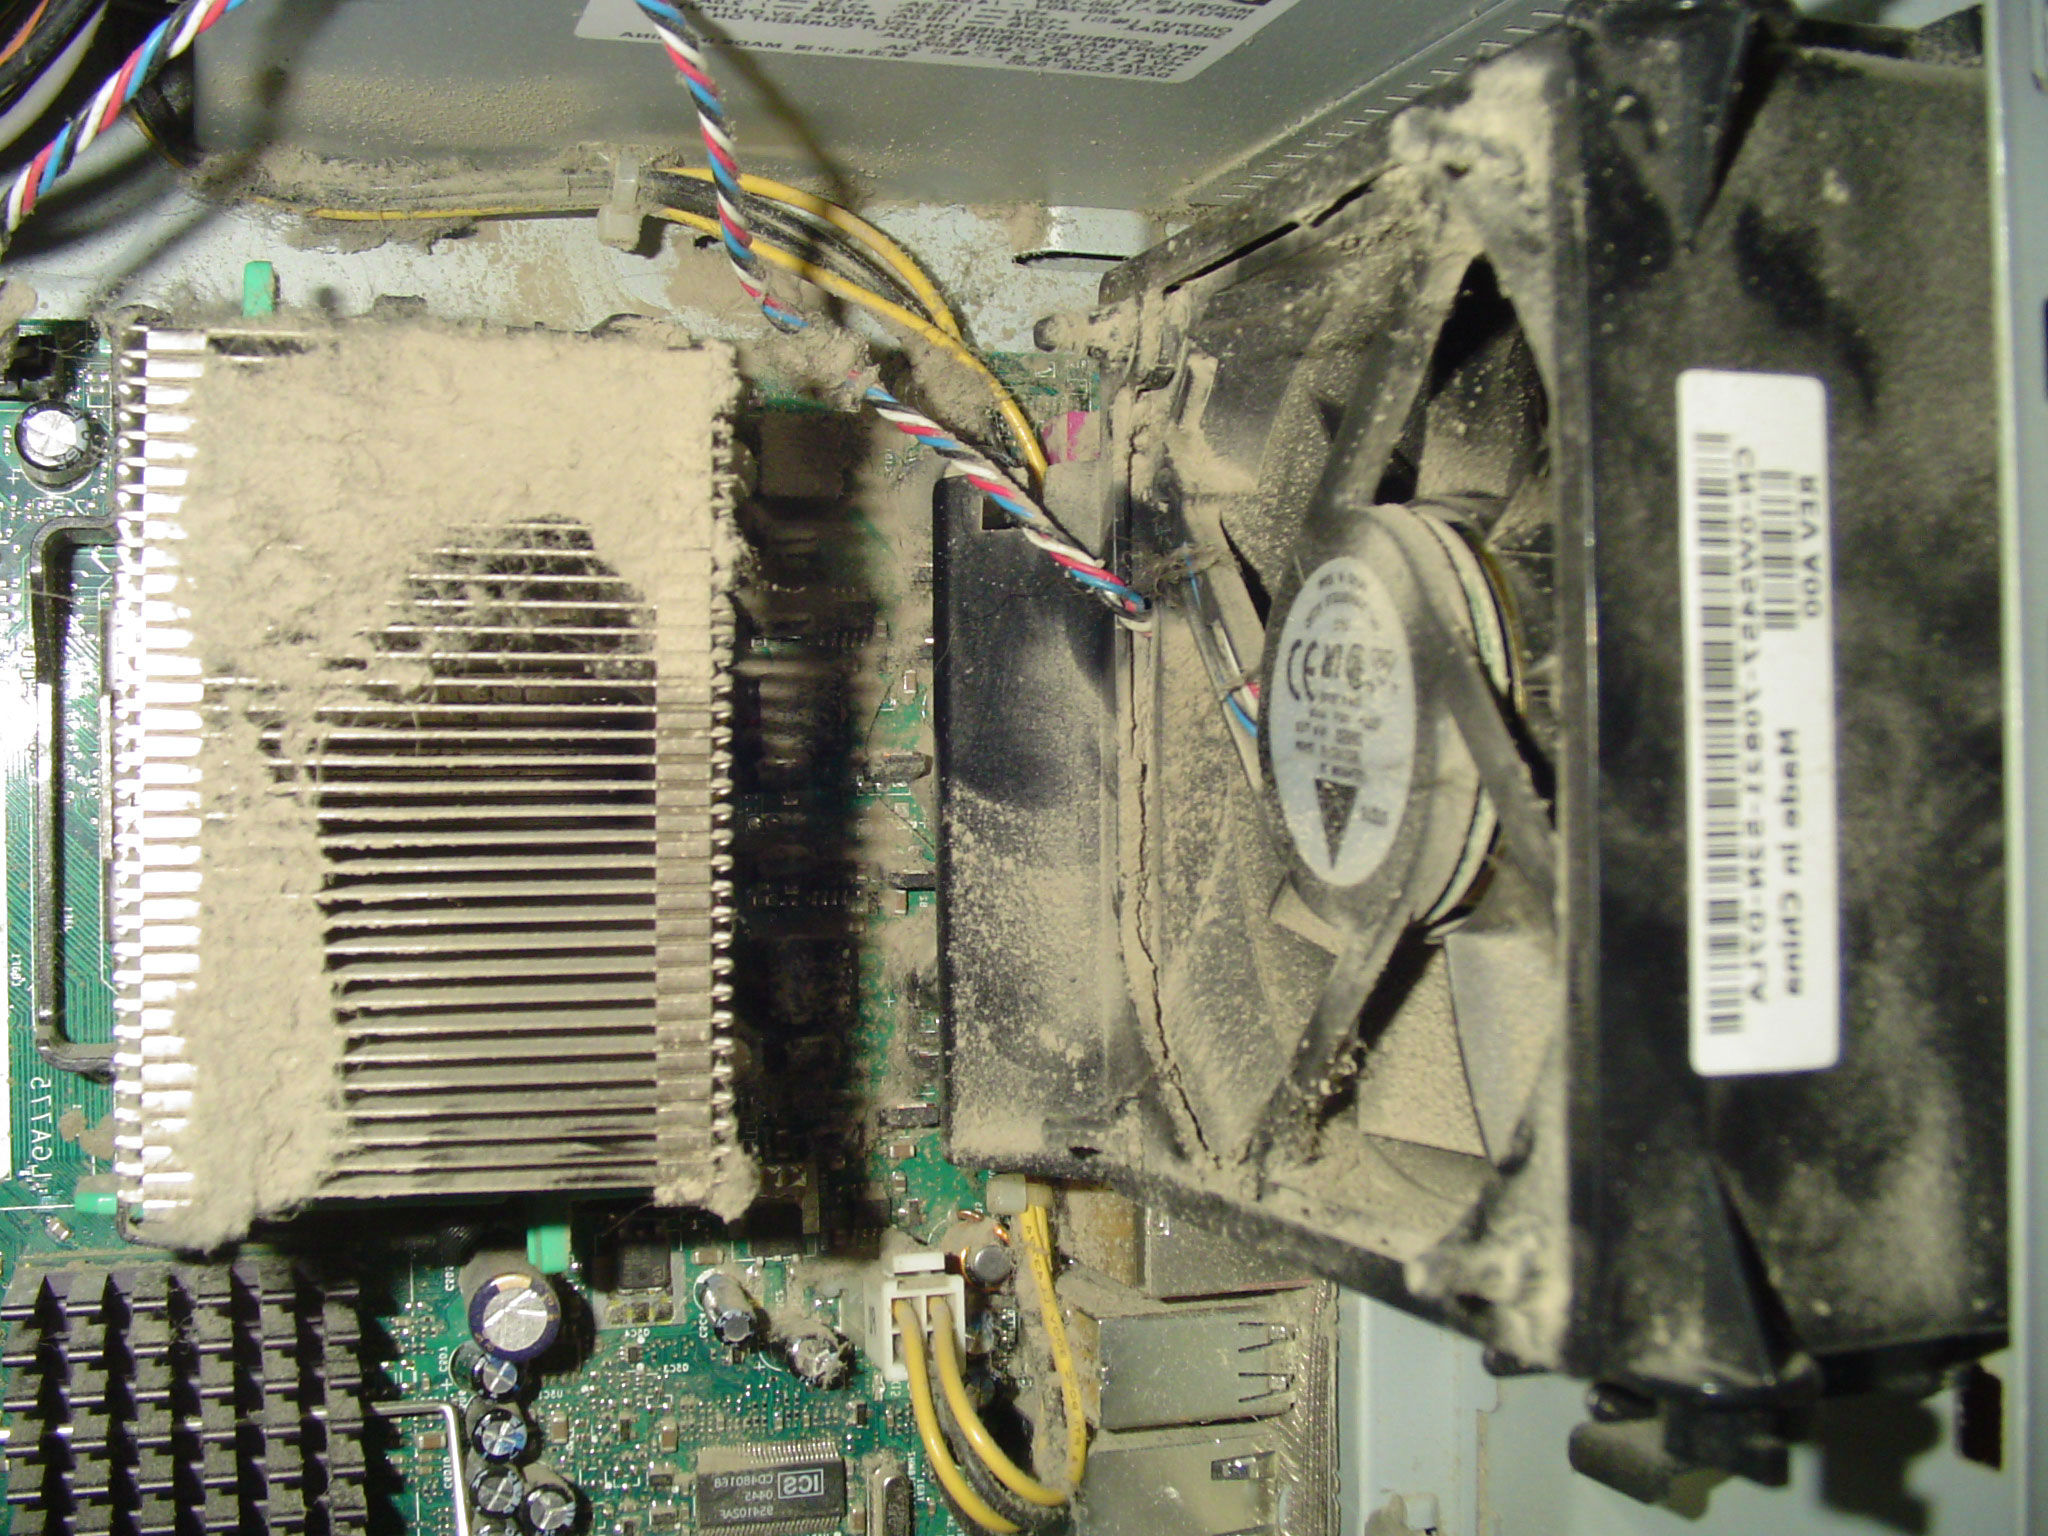
Step 5: Cleaning the CPU
The CPU (Central Processing Unit) is the brain of your computer and can accumulate dust and debris over time, potentially leading to overheating and performance issues. Cleaning the CPU is crucial for maintaining its functionality. Here’s how to clean your CPU:
- Open the CPU case: Before cleaning the CPU, ensure that your computer is shut down and unplugged from any power source. Use a screwdriver to open the CPU case, exposing the internal components.
- Use compressed air: With the CPU case open, use a can of compressed air to blow away any dust particles from the CPU and its surroundings. Avoid using a vacuum cleaner as it can generate static electricity and damage the delicate components.
- Remove dust with a soft brush: For stubborn dust that can’t be removed with compressed air, use a soft brush to gently sweep away any remaining particles. Make sure to be careful and avoid touching any sensitive components.
- Check the CPU fan: Take a closer look at the CPU fan to see if there’s any excessive buildup of dust. If needed, use compressed air to blow away the dust from the fan blades and its surrounding area.
- Reassemble the CPU case: After cleaning the CPU and its components, close the CPU case and ensure that all screws are securely tightened.
Regularly cleaning the CPU helps to maintain proper airflow and keeps the components running efficiently. Keep in mind that if you’re not comfortable opening the CPU case or handling the internal components, it’s best to seek professional assistance.
With the CPU cleaned, we can now move on to cleaning the internal components in the next step.
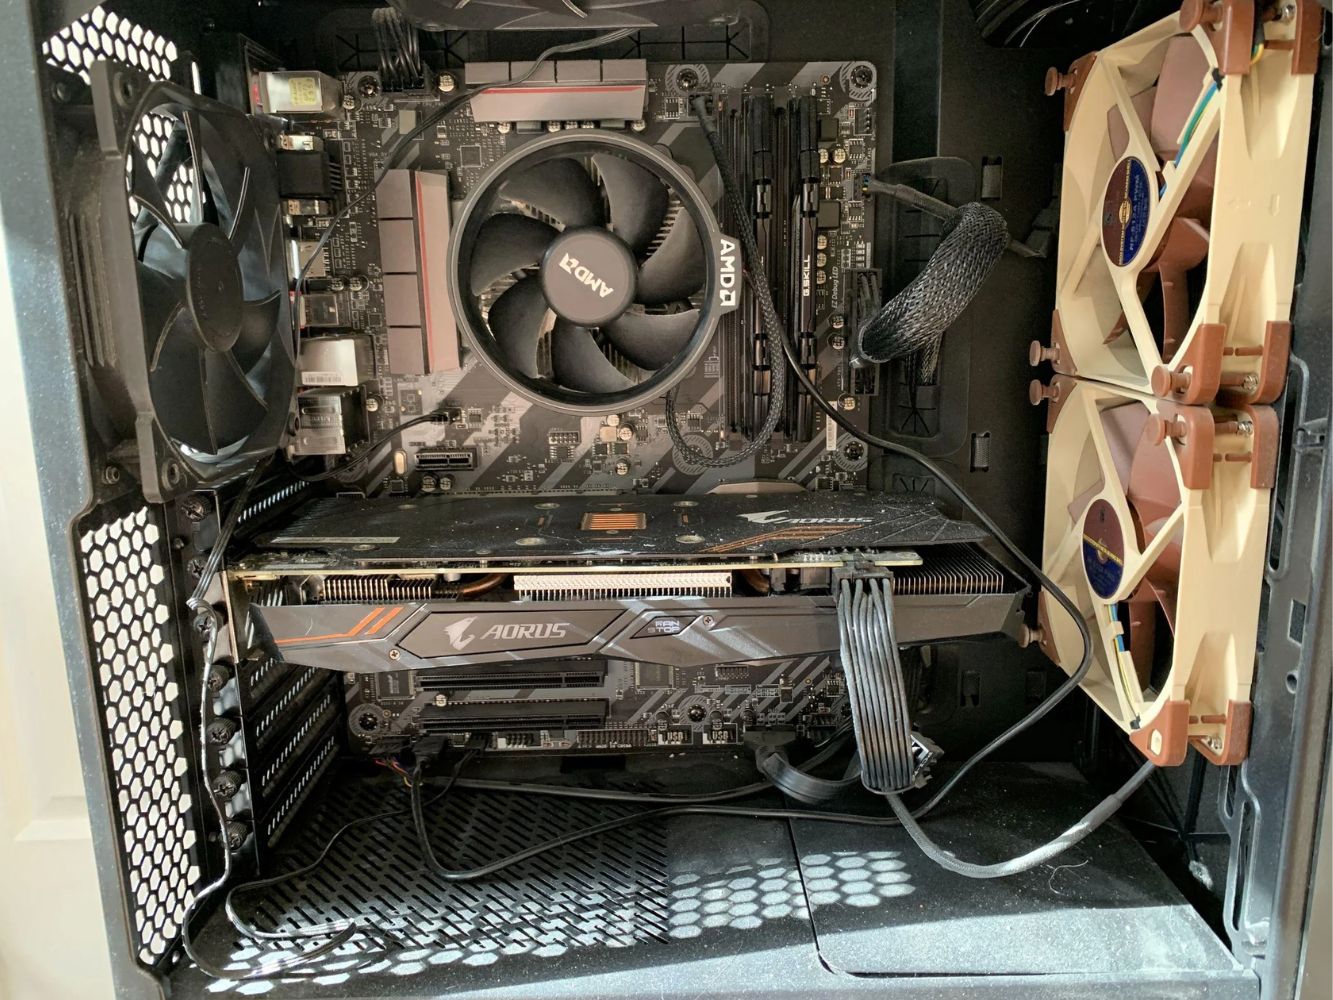
Step 6: Cleaning the Internal Components
Ensuring the internal components of your PC are clean is essential for its optimal performance and longevity. Over time, dust and debris can accumulate on various components such as the motherboard, RAM, and graphics card, impacting their efficiency. Here’s how to clean the internal components:
- Ground yourself: Before touching any internal components, it’s important to ground yourself to prevent any static electricity discharge. You can do this by touching a metal object or using an anti-static wristband.
- Use compressed air: With the CPU case open, use a can of compressed air to blow away any dust from the internal components. Be sure to target the nooks and crannies where dust tends to accumulate.
- Clean the motherboard: Use a soft brush or a cotton swab lightly dampened with isopropyl alcohol to gently clean the motherboard, paying attention to remove any noticeable dust or grime. Take care not to apply too much pressure or wet the motherboard excessively.
- Remove and clean RAM modules: If necessary, remove the RAM modules from their slots and clean them using a soft, lint-free cloth. Gently wipe the contact pins to remove any dirt or oxidation. Ensure that the modules are completely dry before reinserting them.
- Clean the graphics card: If you have a separate graphics card, use compressed air to blow away any dust from the card and its fans. Ensure that the fans are free from obstruction to promote proper cooling.
Cleaning the internal components of your PC promotes better airflow and reduces the risk of overheating. Take your time to ensure thorough cleaning and be mindful of delicate components while handling them. With the internal components clean, let’s proceed to the next step of cleaning the fans and vents.
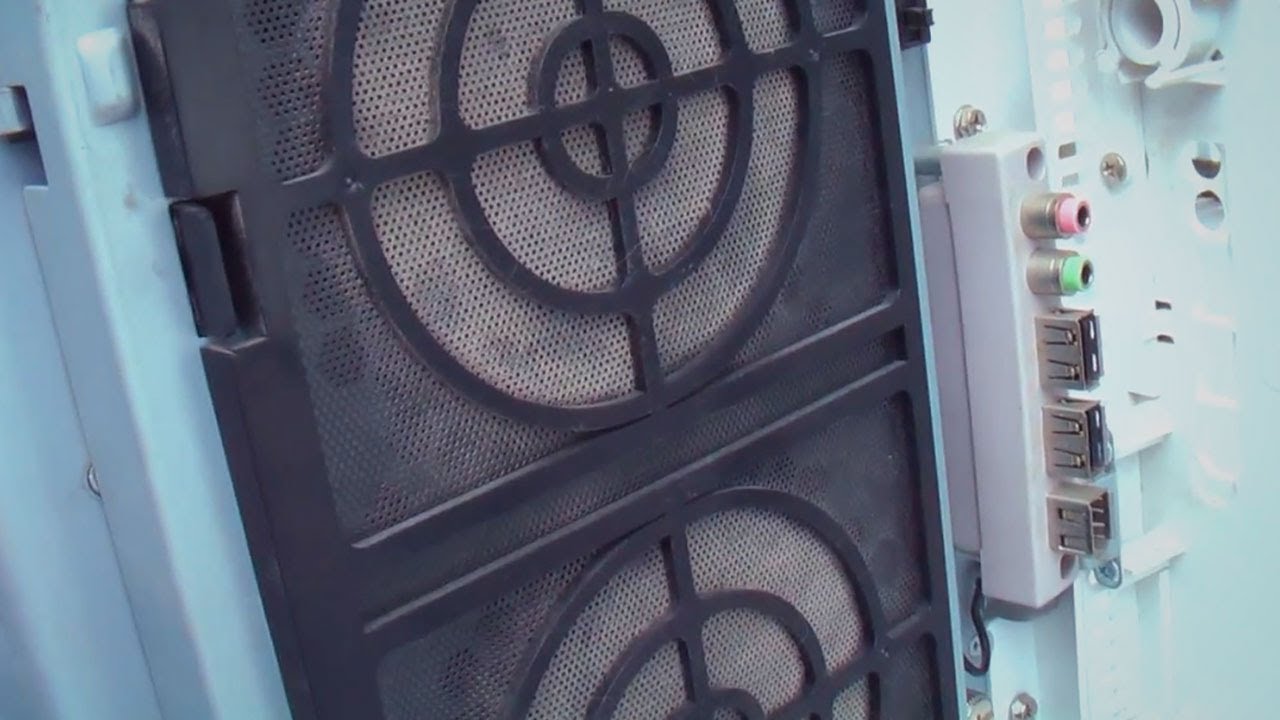
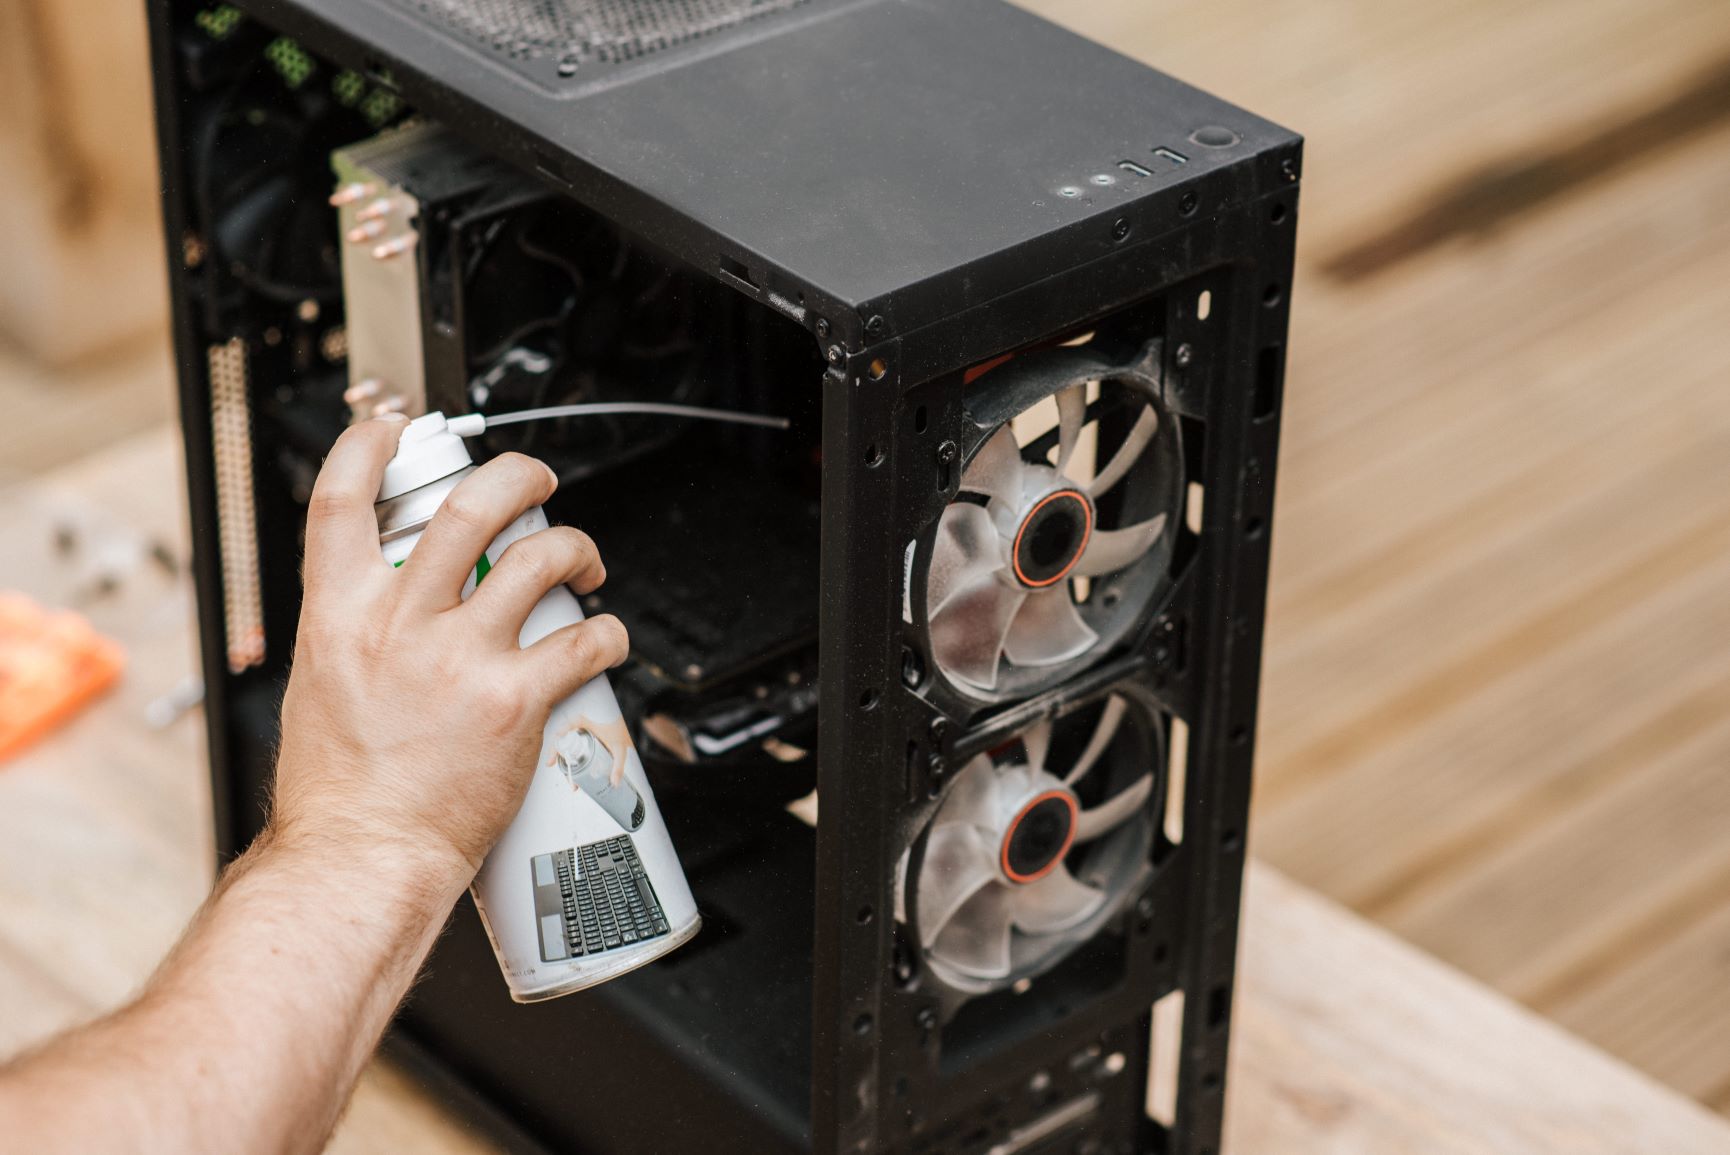
Step 7: Cleaning the Fans and Vents
The fans and vents in your PC play a crucial role in maintaining proper airflow and keeping the internal components cool. However, they can easily accumulate dust and debris over time, obstructing airflow and causing overheating issues. Cleaning the fans and vents is essential for optimal performance. Here’s how to clean them:
- Shut down your PC: Ensure your computer is shut down and unplugged from any power source before cleaning the fans and vents.
- Locate the fans and vents: Identify the fans and vents in your PC case. Typically, you’ll find fans on the front, back, and sometimes on the side of the case. Vents are usually located on the sides, top, or bottom.
- Use compressed air: Hold the can of compressed air upright and carefully blow air into the fans and vents. Make sure to keep the can upright to avoid any liquid from spraying out. The compressed air will dislodge the dust and debris from the fans and vents.
- Hold the fans in place: While blowing air into the fans, it’s essential to hold them in place to prevent any damage caused by the force of the air. You can use your fingers or a small object to keep the fans from spinning.
- Wipe away loose debris: After using compressed air, use a soft brush or cloth to gently wipe away any remaining loose debris from the fans and vents.
Regularly cleaning the fans and vents allows for better airflow and prevents overheating. A clean and well-ventilated system ensures the longevity of your PC’s components. With the fans and vents clean, let’s move on to cleaning the hard drive in the next step.
Step 8: Cleaning the Hard Drive
Cleaning your hard drive not only frees up valuable storage space but also helps improve the overall performance of your computer. Over time, temporary files, unnecessary programs, and other clutter can accumulate on your hard drive, affecting its efficiency. Here’s how to clean your hard drive:
- Remove unnecessary files: Start by deleting any files and folders that you no longer need. This includes temporary files, downloaded files, and old documents.
- Uninstall unused programs: Go through your list of installed programs and uninstall any applications that you no longer use. This helps to free up space and declutter your hard drive.
- Use disk cleanup utility: Windows users can utilize the built-in Disk Cleanup utility. Simply search for “Disk Cleanup” in the Start Menu, select your hard drive, and let the utility scan for unnecessary files that can be safely removed.
- Remove browser cache and cookies: Clearing your browser’s cache and cookies can also help free up space on your hard drive. Each browser has its own settings for clearing cache and cookies.
- Consider using a disk cleaning software: If you want a more thorough and automated cleaning process, there are various third-party disk cleaning software available that can safely scan and remove unnecessary files from your hard drive.
Cleaning your hard drive regularly not only helps in organizing your files but also enhances the speed and performance of your PC. Remember to exercise caution when deleting files or uninstalling programs to avoid deleting any important data. With your hard drive clean, we can proceed to the next step of updating and running antivirus software.
Step 9: Updating and Running Antivirus Software
Maintaining a clean and secure PC involves not only physical cleaning but also ensuring that your system is protected against malware and viruses. Updating and running antivirus software regularly is vital for safeguarding your computer and data. Here’s how to update and run antivirus software:
- Check for updates: Open your antivirus software and check for updates. Most antivirus programs have an option to update the virus definitions and software to ensure that you have the latest protection against emerging threats.
- Perform a full system scan: Once you’ve updated your antivirus software, initiate a full system scan. This comprehensive scan will search for any malicious files or software on your computer.
- Quarantine or remove threats: If the antivirus software detects any threats, follow the recommended actions. Depending on the severity, you may have the option to quarantine the file or remove it completely.
- Schedule regular scans: To keep your PC protected, schedule regular scans with your antivirus software. Automatic scans can run in the background, ensuring that your system is continuously monitored and protected.
- Enable real-time protection: Make sure to enable real-time protection in your antivirus software settings. This feature actively monitors your system for any suspicious activities or threats, providing immediate protection.
Updating and running antivirus software is essential in preventing malware infections and protecting your personal information. Regular scans and real-time protection provide peace of mind and ensure a secure computing experience.
With the completion of this step, you’ve now thoroughly cleaned and protected your PC. Your computer is now ready to deliver optimal performance and reliability.
Conclusion
Cleaning your PC is an essential maintenance task that helps ensure its optimal performance, longevity, and overall usability. By following the step-by-step process outlined in this guide, you can thoroughly clean every aspect of your computer, from the exterior to the internal components.
Throughout the cleaning process, we covered important steps such as shutting down and disconnecting your PC, cleaning the exterior, keyboard, mouse, monitor, CPU, internal components, fans, and vents. We also discussed cleaning the hard drive and the importance of updating and running antivirus software to keep your PC secure.
Regularly cleaning your PC not only improves its performance but also prevents dust and debris buildup, reduces the risk of overheating, and extends the lifespan of your computer. It’s important to remember to gather the necessary tools, such as compressed air, microfiber cloths, cotton swabs, and isopropyl alcohol, to ensure an effective cleaning process.
Additionally, taking proper precautions, including shutting down and disconnecting your PC before cleaning, grounding yourself to avoid static electricity discharge, and handling delicate components with care, is crucial to prevent any damage to your computer.
By incorporating these cleaning practices into your routine maintenance, you can enjoy a cleaner, more efficient, and reliable PC. Regularly cleaning your PC not only enhances its performance but also provides a more enjoyable user experience.
So don’t wait – start cleaning your PC today and reap the benefits of a well-maintained and properly functioning computer!