Introduction
Welcome to our guide on how to clean the glass on your PC case! If you’re a computer enthusiast or gamer, you know that having a sleek and stylish PC case is not only important for aesthetics but also for showcasing your high-performance components. One key feature of modern PC cases is the glass panel, which provides a clear view of the internal components and RGB lighting. However, over time, these glass panels can accumulate dust, fingerprints, and smudges, compromising the overall appearance of your setup.
Regularly cleaning the glass on your PC case is essential to maintain its pristine look and ensure optimal visibility. Not only does it enhance the overall aesthetics of your PC, but it also allows you to better showcase your hardware and RGB lighting effects.
In this guide, we will walk you through the step-by-step process of cleaning the glass on your PC case. We will cover the tools you’ll need, as well as the proper techniques to effectively remove dust, grime, and fingerprints without damaging the glass. Whether you have a tempered glass or acrylic panel, these cleaning methods will help you achieve a crystal-clear and smudge-free view of your PC’s internals.
By following the steps outlined in this guide, you can safely and efficiently clean the glass on your PC case, maintaining its visual appeal and ensuring optimal transparency. So, let’s get started and learn how to restore the clarity and shine to your PC case’s glass panel!
Why is it important to clean the glass on your PC case?
Keeping the glass on your PC case clean goes beyond just maintaining a visually appealing setup. Here are several reasons why regular cleaning of the glass panel is essential:
1. Aesthetics: The glass panel on your PC case serves as a showcase for your carefully curated components and RGB lighting. Over time, dust, fingerprints, and grime can accumulate on the glass, diminishing the overall aesthetics of your setup. By keeping it clean, you can ensure that your PC case always looks sleek and professional.
2. Component Visibility: One of the main reasons for having a glass panel on your PC case is to provide a clear view of the internal components. When the glass becomes dirty, it can obstruct your view and make it difficult to appreciate the hardware inside. By cleaning the glass, you can enjoy uninterrupted visibility and showcase your high-performance components.
3. Cooling Efficiency: Dirty glass panels can impede airflow within the PC case, affecting the cooling efficiency. Dust buildup may block air intake or prevent hot air from escaping, leading to higher temperatures and potential performance issues. Regular cleaning ensures that airflow remains unrestricted, preventing overheating and maximizing the lifespan of your components.
4. Longevity: A clean glass panel not only enhances the aesthetics but also contributes to the longevity of your PC case. Dust and other particles on the glass can scratch or damage its surface, impacting its transparency and overall durability. By regularly cleaning the glass, you can prevent scratches and maintain its pristine condition for years to come.
5. Better Gaming and Streaming Experience: If you enjoy gaming or live streaming, having a clean and clear glass panel can significantly enhance your experience. It allows you and your audience to see the action happening inside your PC, showcasing the high-performance hardware and unique lighting effects. A clean glass panel ensures that nothing distracts from the immersive gaming or streaming experience.
6. Personal Satisfaction: As a PC enthusiast, taking pride in your setup is vital. Keeping the glass panel clean provides a sense of accomplishment and satisfaction, knowing that you have maintained your PC case to the best of your ability. It can boost your morale and motivate you to continue maintaining the overall cleanliness of your setup.
Now that we understand the importance of keeping the glass on your PC case clean, let’s explore the tools you’ll need to accomplish this task effectively.
What tools do you need for cleaning?
Before you begin cleaning the glass on your PC case, it’s essential to gather the right tools to ensure a thorough and safe cleaning process. Here are the essential tools you’ll need:
1. Microfiber cloth: A microfiber cloth is a must-have tool for cleaning the glass panel on your PC case. It is a soft and non-abrasive cloth that helps remove dust, fingerprints, and smudges without leaving any streaks or scratches behind. Ensure that the cloth is clean and free from any debris before using it on the glass.
2. Isopropyl alcohol: Isopropyl alcohol, also known as rubbing alcohol, is an effective solution for cleaning the glass panel. It helps dissolve grease, grime, and stubborn fingerprints. Make sure to use a high-quality isopropyl alcohol with at least 70% concentration for optimal cleaning performance.
3. Distilled water: Distilled water is a gentle and safe alternative to tap water that can be used in conjunction with isopropyl alcohol for a streak-free and residue-free cleaning. It helps to dilute the alcohol and ensures that no mineral deposits remain on the glass surface.
4. Compressed air or soft brush: Before applying any cleaning solution, it’s important to remove loose dust and debris from the glass panel. You can use compressed air to blow away the dust or a soft brush with bristles specifically designed for electronic cleaning to gently remove the particles.
5. Cotton swabs: Cotton swabs, commonly known as Q-tips, are useful for reaching tight corners and edges of the glass panel. They allow for precise application of the cleaning solution and help remove any stubborn dirt or grime that may be difficult to reach with a cloth.
6. Gloves: Wearing gloves, preferably lint-free gloves, is recommended to avoid leaving fingerprints, oils, or smudges on the glass during the cleaning process. They also protect your hands from any chemicals present in the cleaning solution.
7. Cleaning solution bottle: If you prefer to make your own cleaning solution, having a small spray bottle is useful for mixing and dispensing the solution onto the glass surface. It allows for more controlled application and prevents wastage of the cleaning solution.
Gathering these tools before starting the cleaning process will ensure that you have everything needed to achieve a thorough and effective cleaning of the glass panel on your PC case. Now that we have the necessary tools, let’s dive into the step-by-step process of cleaning the glass on your PC case.
Step 1: Turn off and unplug your PC
Before you begin cleaning the glass on your PC case, it’s crucial to ensure the safety of your hardware by turning off and unplugging your PC. This step will prevent any accidental damage to your components and reduces the risk of electrical shock. Follow these steps to properly shut down and disconnect your PC:
1. Save your work and close all applications: Before shutting down your PC, save any ongoing work and close all applications to prevent data loss or corruption.
2. Shut down the PC: Click on the Start menu in the lower-left corner of the screen, then select the “Shut down” option. Allow your operating system to fully shut down, ensuring that all processes are terminated.
3. Unplug the power cord: Once your PC is completely turned off, unplug the power cord from the wall outlet. This step will not only protect your hardware but also provide you with a clear workspace to clean the glass panel.
4. Ground yourself: To prevent any static electricity discharge that could potentially damage your PC’s components, it’s advisable to ground yourself. Touch a metal surface like the PC case or a grounded object, or wear an anti-static wrist strap if available.
5. Locate and remove any external power sources: If your PC case has any additional power sources, such as external RGB lighting or fan controllers, make sure to unplug them from the power source as well. This step ensures that no electrical current is running through the case during the cleaning process.
By following these steps to turn off and unplug your PC properly, you will minimize the risk of damage to your hardware and ensure a safe cleaning process. With your PC powered down and disconnected from the power source, you’re now ready to move on to the next step: removing the glass panel.
Step 2: Remove the glass panel
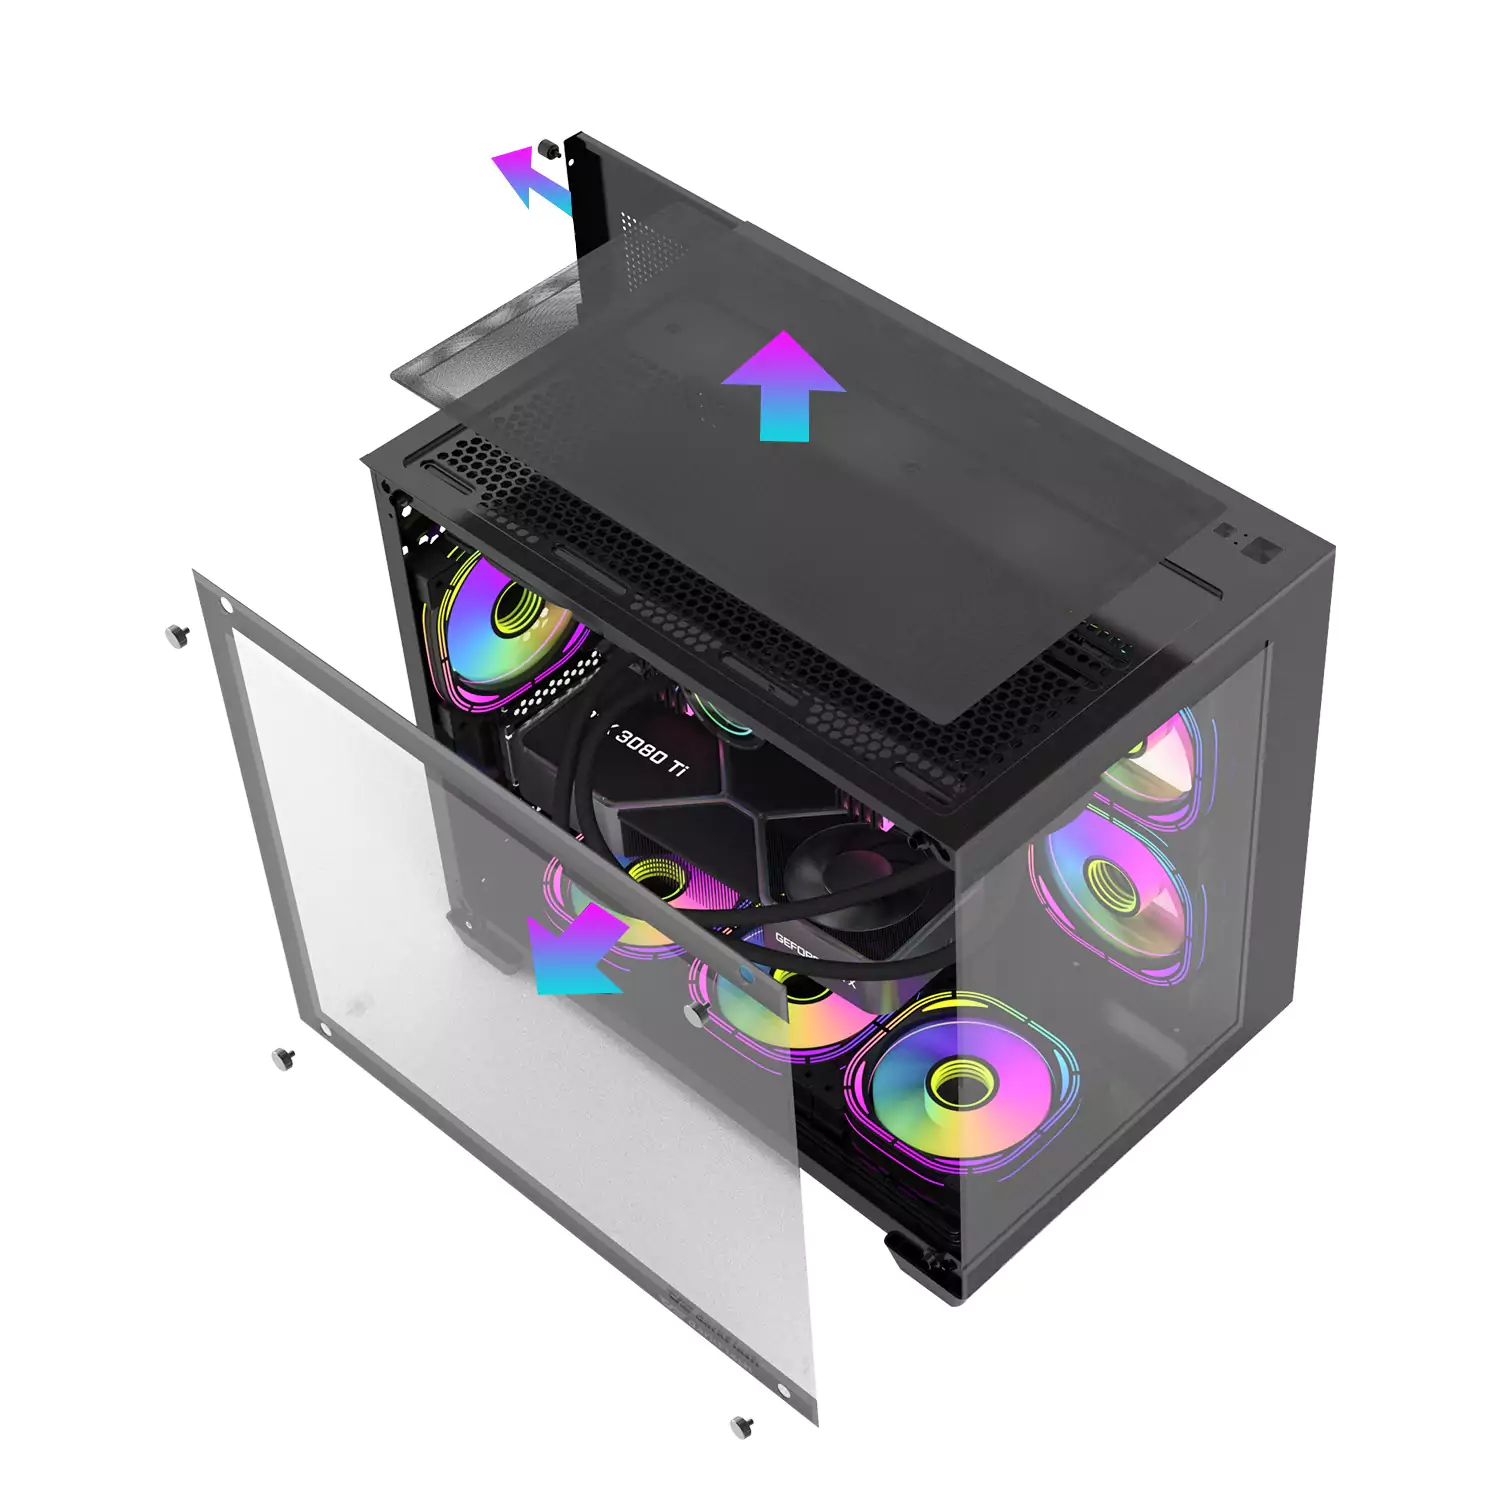
With your PC turned off and unplugged, it’s time to remove the glass panel for cleaning. Follow these steps to safely remove the glass panel from your PC case:
- Locate the screws or latches: Examine your PC case to find the screws or latches that secure the glass panel in place. These can typically be found along the edges of the panel or in the corners. Consult your PC case manual if you’re unsure of the exact location.
- Use the appropriate tools: Depending on your PC case design, you may need a screwdriver or simply your hands to remove the screws or unlatch the panel. Make sure to choose the correct tool for your specific case.
- Loosen and remove the screws: If your PC case uses screws to secure the glass panel, use a screwdriver to loosen and remove them. Be careful not to apply too much force or overtighten the screws, as this can damage the case or the glass panel.
- Unlatch or slide the panel: If your PC case features latches or a sliding mechanism, follow the instructions in your case manual to safely remove the glass panel. Gently lift or slide the panel in the designated direction until it is completely detached from the case.
- Set the glass panel aside: Once the glass panel is removed, place it on a clean, soft surface such as a microfiber cloth or a towel. This will prevent any scratches or damage to the glass while you clean it.
It’s worth noting that not all PC cases have removable glass panels. Some cases may feature hinged panels that can be opened without completely removing them. In such cases, follow the instructions in your case manual to access and clean the glass effectively.
By following these steps, you can safely detach the glass panel from your PC case without causing any damage. With the glass panel set aside, you’re ready to move on to the next step: removing dust and grime from the glass surface.
Step 3: Remove dust and grime
Now that you have removed the glass panel from your PC case, it’s time to get rid of the accumulated dust and grime. Follow these steps to effectively remove any debris from the glass surface:
- Inspect the glass: Take a close look at the glass panel to identify any visible dust or grime. Pay attention to the corners and edges where dirt tends to accumulate.
- Blow away loose particles: Use a can of compressed air or a soft brush to gently blow away any loose dust or debris from the surface of the glass. Start from the top and work your way down, ensuring that you cover the entire glass area.
- Focus on stubborn dirt: For any stubborn dirt or grime that remains on the glass, you can use a soft brush or a clean, dry microfiber cloth to gently scrub the affected areas. Be careful not to apply excessive pressure, as this can scratch the glass. Instead, use gentle circular motions to lift the dirt.
- Pay attention to edges and corners: Dust and grime tend to accumulate in the edges and corners of the glass panel. Use a cotton swab lightly dampened with a small amount of isopropyl alcohol or distilled water to clean these hard-to-reach areas. Gently swipe along the corners and edges to remove any stubborn dirt.
- Check for smudges and fingerprints: Smudges and fingerprints can make the glass appear dirty, even after removing dust and grime. Inspect the glass panel for any visible smudges, and if needed, lightly dampen a clean microfiber cloth with a mixture of isopropyl alcohol and distilled water. Gently wipe the affected areas in a circular motion until the smudges or fingerprints are removed.
Remember to avoid using harsh chemicals or abrasive materials when cleaning the glass panel, as they can damage the surface. Stick to gentle cleaning methods and choose the least invasive approach to preserve the integrity of the glass.
Once you have successfully removed the dust and grime from the glass panel, you’re ready to proceed to the next step: using a cleaning solution to ensure a thorough clean.
Step 4: Use a cleaning solution
After removing dust and grime from the glass panel, it’s time to clean it more thoroughly using a cleaning solution. Here’s how you can use a cleaning solution to ensure a spotless and smudge-free glass surface:
- Prepare the cleaning solution: In a small spray bottle, mix equal parts of isopropyl alcohol and distilled water. This solution effectively cuts through grease, removes fingerprints, and leaves the glass streak-free. Avoid using vinegar or ammonia-based cleaners as they can damage the glass or leave behind residue.
- Lightly spray the cleaning solution: Spray a few mists of the cleaning solution onto a clean microfiber cloth. It should be damp, but not soaking wet. Avoid spraying the solution directly onto the glass panel to prevent any liquid from seeping into the electronics of your PC case.
- Gently wipe the glass surface: Starting from the top, gently wipe the glass surface in a horizontal or vertical motion, using light pressure. Ensure that you cover the entire glass area, paying particular attention to any stubborn smudges or fingerprints.
- Focus on corners and edges: Use a cotton swab lightly dampened with the cleaning solution to clean the corners and edges of the glass panel. This will help remove any dirt build-up that may be harder to reach with a cloth.
- Dry the glass panel: After wiping the glass panel with the cleaning solution, use a dry microfiber cloth to buff the surface and remove any remaining moisture. This step ensures that the glass is left streak-free and sparkling.
It’s important to note that using excessive amounts of the cleaning solution can lead to streaks or leave behind residue. Therefore, it’s best to start with a small amount and add more if needed. Additionally, be gentle when wiping the glass to avoid scratching or damaging the surface.
By using a suitable cleaning solution and following these steps, you can effectively remove stubborn smudges, fingerprints, and other residues, leaving your glass panel clean and transparent.
Now that your glass panel is clean, it’s time to move on to the next step: drying the glass to ensure a crystal-clear finish.
Step 5: Dry the glass
After cleaning the glass panel with a cleaning solution, it’s important to properly dry it to ensure a crystal-clear finish. Follow these steps to effectively dry the glass and prevent any streaks or water spots:
- Inspect for excess moisture: Before drying, inspect the glass panel to ensure that there are no excessive moisture or visible streaks. If you notice any, use a clean microfiber cloth to gently blot them dry.
- Use a dry microfiber cloth: Grab a clean and dry microfiber cloth that hasn’t been used for cleaning, as lint or debris on the cloth can leave behind streaks. Ensure that the cloth is soft and absorbent.
- Start from the top: Begin drying the glass panel from the top and work your way down. Use gentle, circular motions to remove any remaining moisture from the surface. Make sure to cover the entire glass area.
- Pay attention to edges and corners: Focus on drying the edges and corners of the glass panel, as these areas tend to retain more moisture. Use a cotton swab or a corner of the microfiber cloth to gently dry these hard-to-reach spots.
- Buff for a streak-free finish: Once the glass panel is mostly dry, gently buff the surface with the microfiber cloth to ensure a streak-free finish. This step helps remove any lingering moisture and leaves the glass looking clear and glossy.
It’s important to note that using a dry microfiber cloth is essential for achieving a streak-free finish. Avoid using paper towels or regular towels, as they can leave lint or fibers behind, resulting in an unsightly appearance.
By effectively drying the glass panel, you can ensure that it is free from streaks and water spots, and ready to be reinstalled back onto your PC case.
Now that the glass panel is dry, it’s time to move on to the final step: reinstalling the glass panel onto your PC case.
Step 6: Reinstall the glass panel
With the glass panel cleaned and dried, it’s time to reinstall it back onto your PC case. Follow these steps to ensure a secure and proper reinstallation:
- Align the panel: Carefully align the glass panel with the designated slots or hinges on your PC case. Take your time to ensure that it is properly positioned.
- Insert the panel: Once aligned, gently insert the glass panel into the slots or attach it to the hinges. Be cautious not to force it or apply excessive pressure to avoid damaging the glass or the case.
- Secure with screws or latches: If your PC case uses screws, use a screwdriver to secure the glass panel in place. Tighten the screws just enough to keep the panel securely attached but avoid overtightening. For cases with latches, follow the instructions provided with your PC case to properly secure the panel.
- Test fit: After securing the glass panel, give it a gentle wiggle or shake to ensure that it is stable and properly locked in place. Check for any gaps or unevenness between the panel and the case to ensure a snug fit.
- Connect any additional power sources: If your PC case has any external power sources, such as RGB lighting or fan controllers, reconnect them to the power source. Refer to your PC case manual for specific instructions on reconnecting these devices.
By following these steps, you can safely and securely reinstall the glass panel onto your PC case, completing the cleaning process successfully.
Once the glass panel is securely reattached, you can now admire your clean and transparent PC case, allowing you to showcase your high-performance components in all their glory. Regularly cleaning the glass panel will help maintain its pristine appearance and allow you to fully enjoy the aesthetics of your setup.
Congratulations! You have successfully cleaned and reinstalled the glass panel on your PC case. By following these steps and periodically repeating the process, you can keep your PC case looking sleek and professional for years to come.
Conclusion
Cleaning the glass panel on your PC case is a crucial step in maintaining its aesthetics and maximizing the visibility of your high-performance components. By following the step-by-step guide outlined in this article, you can effectively remove dust, grime, fingerprints, and smudges from the glass surface, restoring its clarity and shine.
We started by highlighting the importance of cleaning the glass on your PC case, emphasizing how it enhances the overall look, promotes better component visibility, improves cooling efficiency, and contributes to the longevity of your setup. We then discussed the essential tools needed for the cleaning process, including a microfiber cloth, isopropyl alcohol, distilled water, compressed air or a brush, cotton swabs, gloves, and a cleaning solution bottle.
Following that, we outlined each step of the cleaning process, from turning off and unplugging your PC to removing the glass panel, removing dust and grime, using a cleaning solution, drying the glass, and finally, reinstalling the glass panel securely onto your PC case.
By diligently following these steps, you can maintain a clean, clear, and smudge-free glass panel, allowing you to showcase your PC’s internals with pride. Regularly cleaning the glass panel will not only enhance the appearance of your setup but also contribute to better cooling and a more enjoyable gaming or streaming experience.
Remember to exercise caution and avoid using harsh chemicals or abrasive materials that could damage the glass or your PC components. Additionally, always refer to your PC case manual for specific instructions on removing and reattaching the glass panel, as different cases may have varying mechanisms.
Now that you have the knowledge and guidance, it’s time to roll up your sleeves, grab your cleaning supplies, and give your PC case’s glass panel the TLC it deserves. Enjoy a clear view of your components and make your setup shine!