Introduction
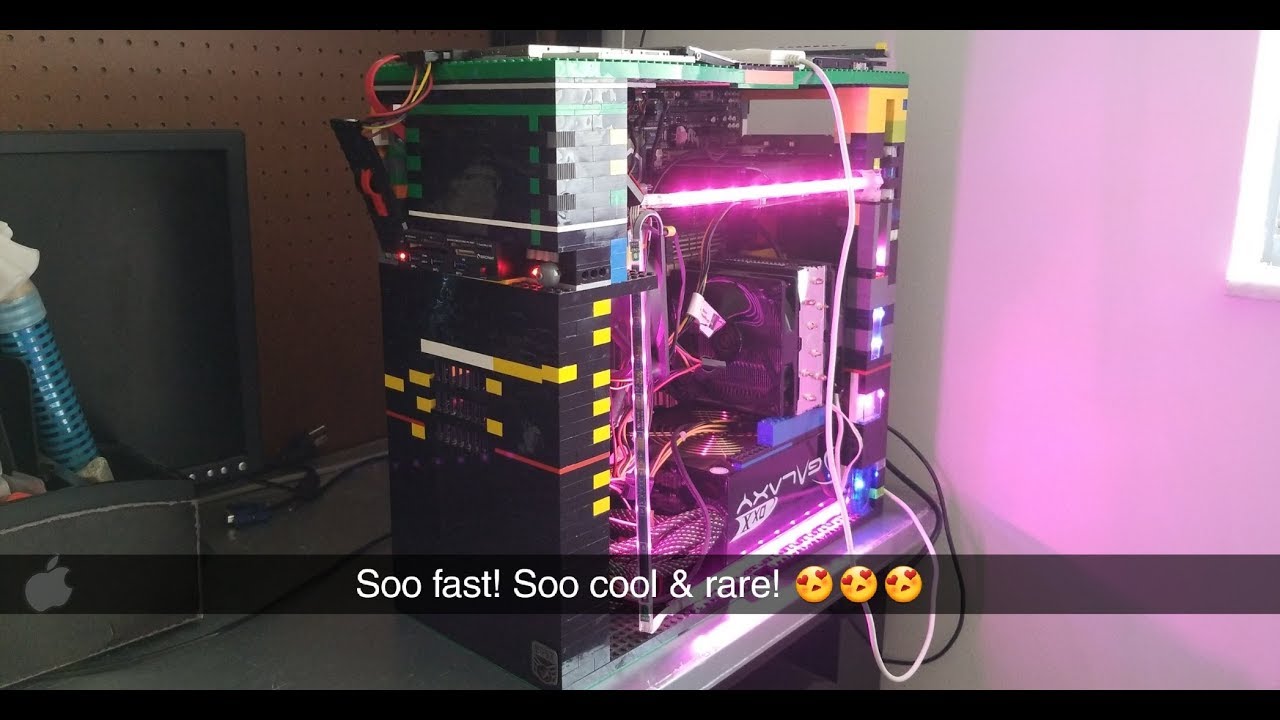
Have you ever wondered how you can combine your love for building with LEGO bricks and your passion for computers? Look no further – in this article, we will guide you through the exciting process of transforming LEGO pieces into a unique and functional PC case.
Building your own PC case using LEGOs not only allows you to showcase your creativity but also provides a cost-effective alternative to traditional computer cases. Not to mention, it’s a fun project that can be enjoyed by individuals of all ages.
While it may sound like a challenging endeavor, with the right tools, materials, and a little bit of patience, you’ll be able to construct a one-of-a-kind PC case that is both visually appealing and functional.
Throughout this guide, we will break down the process step-by-step, from selecting the LEGO pieces to assembling the components. Whether you’re a seasoned LEGO enthusiast or a beginner, follow along and let’s bring your LEGO PC case to life.
Before we dive into the details, here’s a quick overview of the materials you’ll need to get started:
Materials Needed
Before you begin constructing your LEGO PC case, make sure you have the following materials ready:
- LEGO Bricks: Collect a sufficient amount and variety of LEGO bricks, plates, and tiles to create the desired shape and size for your PC case. Choose colors that complement your aesthetic preferences.
- Motherboard Tray: You’ll need a suitable motherboard tray to securely hold and mount your motherboard. It should be compatible with the form factor of your motherboard and provide enough space for other components.
- Side Panels: To enclose your PC case, you’ll need LEGO bricks to create two side panels. These panels should have enough structural integrity to support the weight of the components.
- Front and Back Panels: Design and build front and back panels to cover the openings of your PC case. These panels will provide access to USB ports, audio jacks, and other front-facing features.
- Top and Bottom Panels: Construct sturdy top and bottom panels for your LEGO PC case. These panels should provide ample space for ventilation and cable management.
- Power Supply: Ensure you have a compatible and reliable power supply unit (PSU) for your PC case. Consider the power requirements of your components to choose an appropriate PSU.
- CPU Cooler: Select a CPU cooler that fits within the dimensions of your LEGO PC case. It should provide sufficient cooling capabilities for your processor.
- Hard Drive/SSD: Determine the storage capacity you require and choose a suitable hard drive or solid-state drive to install in your PC case. Ensure it is compatible with your motherboard.
- Graphics Card: If you plan to include a dedicated graphics card in your build, choose one that fits within the dimensions of your LEGO PC case and is compatible with your motherboard.
- Cables and Connectors: Gather all the necessary cables, including SATA cables, fan cables, and power cables, to connect your components. Ensure they are the correct length for your PC case design.
- Tools: Have a set of basic tools readily available, including a screwdriver, wire cutters, and pliers, for assembling the components and securing them in place.
Remember, the specific materials you’ll need may vary depending on your PC components and the design of your LEGO PC case. Take your time to gather all the necessary materials before you begin the construction process.
Step 1: Choosing the LEGO pieces
When building a LEGO PC case, selecting the right LEGO pieces is crucial to ensure a sturdy and visually appealing final product. Here are some tips to help you choose the perfect LEGO pieces:
1. Size and shape: Consider the dimensions and shape of your PC case design. Different LEGO pieces come in varying sizes, such as bricks, plates, tiles, slopes, and connectors. Choose pieces that fit together securely and create a solid structure.
2. Structural integrity: Since your LEGO PC case will house valuable computer components, it’s important to choose pieces that provide adequate strength and stability. Look for pieces with interlocking capabilities and avoid using loose or worn-out LEGO pieces.
3. Aesthetics: Decide on the color scheme and style you want for your LEGO PC case. Depending on your collection, you may have a wide range of colors to choose from. Consider whether you want a uniform color scheme or prefer a more colorful and eclectic design.
4. Customization options: LEGO pieces offer incredible versatility, allowing you to customize your PC case to reflect your personal style. Look for pieces with unique patterns, textures, and details that can enhance the overall look of your LEGO PC case.
5. Accessibility: While certain LEGO pieces may be visually appealing, ensure that they do not obstruct access to important components such as the motherboard, graphics card slots, or drive bays. Consider the placement of ports, connectors, and ventilation areas when selecting LEGO pieces for the front, back, and sides of your PC case.
6. Functional considerations: While aesthetics are important, do not compromise on the functionality of your LEGO PC case. Ensure that the LEGO pieces you choose allow proper airflow for cooling, have enough space to accommodate all your components, and provide easy access for maintenance and upgrades.
Take your time to sort through your LEGO collection and experiment with different combinations. Don’t be afraid to mix and match pieces to create the perfect design. Remember, the choice of LEGO pieces will significantly impact the final appearance and functionality of your LEGO PC case, so choose wisely.
Step 2: Preparing the motherboard tray
The motherboard tray is a crucial component of your LEGO PC case as it provides the foundation for mounting your motherboard and other essential components. Here’s how you can prepare the motherboard tray:
1. Select a suitable LEGO baseplate: Choose a LEGO baseplate that fits the dimensions of your motherboard and provides enough space for mounting screws. Ensure that the baseplate is sturdy enough to support the weight of the motherboard.
2. Mark the mounting holes: Place your motherboard on the baseplate and align it to determine the locations of the mounting holes. Use a marker or pencil to mark the spots where the screws will go. Double-check the alignment to ensure accurate hole placement.
3. Drill or pierce holes: Using a small hand drill or piercing tool, carefully create holes at the marked spots on the baseplate. Ensure that the holes are slightly larger than the screws you will be using to allow for adjustments during installation.
4. Secure the motherboard standoffs: Attach the appropriate motherboard standoffs to the baseplate. These standoffs provide elevation and support for your motherboard, ensuring it does not come in direct contact with the LEGO tray. Align the standoffs with the drilled holes and secure them tightly.
5. Test the motherboard fit: Place your motherboard on the tray and check if it aligns correctly with the drilled holes and standoffs. Make any necessary adjustments to ensure a proper fit. Ensure that there is enough clearance for connectors, ports, and components on the motherboard.
6. Reinforce the tray: To add extra stability and support, consider reinforcing the underside of the tray with additional LEGO pieces. This will help distribute the weight of the components evenly and prevent any flexing or bending of the tray.
Once you have prepared the motherboard tray, you can move on to the next steps of assembling your LEGO PC case. It is important to have a secure and stable foundation to ensure the proper functioning of your motherboard and other components.
Step 3: Crafting the side panels
The side panels of your LEGO PC case provide structural support and help enclose the interior components. Here’s how you can craft the side panels:
1. Determine the desired height and width: Decide on the dimensions for the side panels based on your overall PC case design. Consider the size of your motherboard, the space needed for expansion slots, and clearance for cables and connectors.
2. Choose the LEGO pieces: Select LEGO bricks, plates, or panels that will form the main structure of the side panels. Opt for pieces that are sturdy, secure, and provide enough strength to support the weight of the components within the case.
3. Build the framework: Start by creating a frame using the chosen LEGO pieces. Connect them vertically and horizontally to form a rectangular or square shape, depending on your design. Ensure the corners are reinforced for added stability.
4. Add aesthetic elements: Once the frame is created, you can enhance the appearance of the side panels by adding decorative elements. Consider using different colors, patterns, or unique LEGO pieces to create a visually appealing design.
5. Create ventilation openings: To ensure proper airflow and cooling, incorporate ventilation openings into the side panels. Use small LEGO bricks or tiles to create evenly spaced holes or patterns. Ensure the ventilation openings do not compromise the structural integrity of the side panels.
6. Test the fit: Place the side panels against the motherboard tray and other components to check for proper alignment and clearance. Adjust the size or shape of the side panels if necessary to ensure a snug fit.
7. Secure the side panels: Once you are satisfied with the fit, secure the side panels to the motherboard tray and any additional support structures using LEGO connection points. Ensure that the side panels are firmly attached and provide adequate support to the interior components.
By crafting the side panels with care and attention to detail, you can create a visually appealing and functional enclosure for your LEGO PC case. Remember to maintain sufficient space for ventilation and easy access to the components for future upgrades or maintenance.
Step 4: Building the front and back panels
The front and back panels of your LEGO PC case not only provide a finished look but also serve as access points for ports, buttons, and other front-facing features. Here’s how you can build the front and back panels:
1. Determine the dimensions: Measure the height and width needed for the front and back panels based on your overall PC case design. Take into account the size and placement of external connectors, such as USB ports, audio jacks, and power buttons.
2. Choose the LEGO pieces: Select LEGO bricks, plates, or tiles that will form the main structure of the front and back panels. Consider pieces that offer enough space for connectors and buttons, while maintaining the desired aesthetic appearance.
3. Create openings and slots: Using appropriate LEGO pieces, create openings or slots for connectors and buttons on the front panel. Consider the positioning and size of each connector and carefully measure and mark the locations for precise placement.
4. Design the front panel layout: Arrange the connectors, buttons, and other front-facing features on the front panel to ensure they fit comfortably within the designated openings or slots. Ensure the alignment is correct and double-check the placement before securing them in place.
5. Build the structure: Assemble the LEGO pieces to construct the main structure of the front and back panels. Reinforce the corners and edges for added strength and stability. Consider incorporating additional LEGO elements, such as slopes or tiles, to enhance the appearance and add texture.
6. Test the fit: Place the front and back panels against the already assembled components of your LEGO PC case to check for proper alignment and clearance. Make any necessary adjustments to ensure a precise fit without interfering with other components.
7. Secure the panels: Once you are satisfied with the fit and alignment, securely attach the front and back panels to the corresponding sections of your PC case using LEGO connection points. Ensure that the panels are firmly attached and provide accessibility to the necessary front-facing features.
By carefully constructing the front and back panels, you can achieve a polished and functional appearance for your LEGO PC case. Take your time to ensure the correct placement of connectors and buttons, as well as a solid structure that complements the overall design.
Step 5: Creating the top and bottom panels
The top and bottom panels of your LEGO PC case serve as the final pieces that enclose the internal components and provide additional stability. Here’s how you can create the top and bottom panels:
1. Determine the dimensions: Measure the length and width needed for the top and bottom panels based on your overall PC case design. Consider leaving ample space for proper ventilation and cable management.
2. Choose the LEGO pieces: Select sturdy LEGO bricks, plates, or tiles to form the main structure of the top and bottom panels. Opt for pieces that can support the weight of the components while providing the desired aesthetics.
3. Build the main structure: Assemble the LEGO pieces to create the main structure for the top and bottom panels. Ensure that the panels are solid and have enough rigidity to support the weight of the components inside the case.
4. Create ventilation openings: To promote airflow and prevent overheating, incorporate ventilation openings into the top and/or bottom panels. Design patterns using small LEGO bricks or tiles, allowing for efficient airflow while keeping the structure robust.
5. Design cable management features: Consider adding cable management features to the top and/or bottom panels. Incorporate slots or channels using LEGO pieces, allowing you to route and organize cables neatly, preventing tangling and maximizing airflow.
6. Test the fit: Place the top and bottom panels onto the already assembled components of your LEGO PC case. Ensure that they align properly and provide sufficient clearance for the internal components and connectors. Make any necessary adjustments to achieve a precise fit.
7. Secure the panels: Once you are satisfied with the alignment and fit, securely attach the top and bottom panels to the corresponding sections of your PC case. Use LEGO connection points to firmly secure the panels and ensure that they do not shift or detach during use.
By creating well-designed and structurally sound top and bottom panels, you can complete the enclosure of your LEGO PC case. The incorporation of ventilation openings and cable management features will contribute to optimal airflow and organization, ensuring the longevity and efficiency of your PC components.
Step 6: Assembling all the components together
In this step, it’s time to bring all the pieces together and assemble your LEGO PC case. Here’s how you can do it:
1. Prepare the components: Ensure that all the necessary components for your PC build are ready. This includes the motherboard, CPU, graphics card, memory modules, storage devices, PSU, and any other peripherals you plan to include.
2. Install the motherboard: Carefully place the motherboard onto the prepared motherboard tray, aligning the mounting holes with the standoffs. Secure it in place using the appropriate screws, ensuring a snug fit.
3. Install the CPU and memory: Install the CPU onto the motherboard’s socket according to the manufacturer’s instructions. Attach the CPU cooler firmly to ensure proper cooling. Insert the memory modules into the corresponding slots, applying even pressure until they click into place.
4. Install the graphics card: If you have a dedicated graphics card, insert it into the appropriate expansion slot on the motherboard. Ensure it is securely seated and fasten it to the case if needed, depending on the weight and size of the card.
5. Install storage devices: Connect your hard drive or solid-state drive to the appropriate SATA ports on the motherboard. Securely mount the storage device in the designated area of your LEGO PC case, ensuring it is fastened securely.
6. Connect cables and peripherals: Connect the necessary cables, such as SATA cables for the storage devices, power cables for the motherboard and graphics card, and any other cables required by your components. Don’t forget to connect peripherals such as the keyboard, mouse, and monitor.
7. Organize and manage cables: Take the time to carefully route and manage the cables within your LEGO PC case. Utilize cable management features such as slots, channels, or tie-down points on the case to keep the cables organized and improve airflow.
8. Double-check all connections: Once everything is connected, double-check all the connections to ensure they are secure and in the correct positions. Verify that all cables are properly seated and that there are no loose connections that could cause issues during operation.
9. Close the case: Finally, carefully position the top panel of your LEGO PC case and secure it to the corresponding sections using LEGO connection points. Ensure that the case is fully closed and that all panels are aligned properly.
By following these steps and taking your time to assemble the components correctly, you’ll have a fully functional LEGO PC case ready for use.
Step 7: Securing the components in place
Once you have assembled all the components in your LEGO PC case, it’s important to ensure that they are securely fastened in place. Here’s how you can secure the components:
1. Check for loose connections: Before proceeding, carefully inspect all connections, including screws, cables, and connectors. Ensure that everything is tightly secured and that there are no loose or wobbly components.
2. Secure the motherboard: Double-check that the motherboard is securely mounted on the motherboard tray using the appropriate screws or standoffs. Confirm that it is stable and free from any movement that could cause damage or interruptions.
3. Fasten the CPU cooler: Ensure that the CPU cooler is tightly fastened to the CPU socket. Double-check that the fans are properly aligned and securely mounted. This will prevent any potential overheating issues and ensure efficient cooling.
4. Mount the graphics card: If you have a dedicated graphics card, ensure that it is securely attached to the motherboard and that it is properly seated in the expansion slot. Fasten any necessary screws or brackets to provide additional support.
5. Secure storage devices: Confirm that the hard drive or solid-state drive is firmly mounted in its designated area within the LEGO PC case. Ensure that all cables are properly connected to the storage device and the motherboard.
6. Organize cables: Take the time to organize and manage all cables within the PC case. Avoid any tangled or twisted cables that could obstruct airflow or cause connection issues. Utilize cable tie-downs or routing channels within your LEGO PC case to keep cables neat and organized.
7. Secure other peripherals: If you have any additional peripherals such as optical drives or expansion cards, make sure they are securely mounted and connected to the appropriate ports on the motherboard.
8. Test for stability: Gently shake the LEGO PC case to ensure that all components are securely held in place. If there is any movement or instability, recheck the fasteners and connections to rectify the issue.
By securing all the components in your LEGO PC case, you can ensure that they stay in place during transportation and usage. This not only prevents damage but also promotes optimal performance and reliability.
Step 8: Installing the power supply
The power supply (PSU) is a critical component of your LEGO PC case, as it provides the necessary electrical power for your computer to function. Here’s how you can install the power supply:
1. Determine the PSU placement: Decide on the placement of the power supply within your LEGO PC case. Consider factors such as ventilation, cable management, and the proximity to other components.
2. Prepare the PSU mounting area: Ensure that the mounting area for the power supply is clear of any obstruction or debris. Clean the area if necessary to avoid any potential issues with proper installation.
3. Mount the power supply: Align the power supply in the designated area of the LEGO PC case and secure it in place using the appropriate screws or mounting brackets. Ensure that it is firmly and evenly attached.
4. Connect power cables: Connect the necessary power cables from the power supply to the motherboard, CPU, graphics card, storage devices, and any other components requiring power. Ensure that the correct cables and connectors are used and that they are firmly connected.
5. Route and manage cables: Take the time to organize and route the power supply cables neatly within the LEGO PC case. Utilize cable tie-downs or routing channels to keep the cables organized, prevent clutter, and optimize airflow.
6. Double-check connections: Once all the power cables are connected, double-check each connection to ensure they are secure and properly seated. Loose connections can lead to power disruptions and malfunctioning components.
7. Test the power supply: Use a reliable power source to test the power supply and make sure it is functioning correctly. Check that all components receive the necessary power and that there are no issues with startup or performance.
Installing the power supply properly is crucial to ensure reliable power delivery to your LEGO PC case. By following these steps and double-checking all connections, you can ensure that your computer receives the necessary power to operate efficiently and without interruptions.
Step 9: Connecting all the cables
Now that the components are securely in place and the power supply is installed, it’s time to connect all the necessary cables within your LEGO PC case. Follow these steps to ensure proper cable connections:
1. Refer to the motherboard manual: Consult the documentation that came with your motherboard to identify the specific ports and connectors for each cable. Different motherboards may have varying layouts and connector types.
2. Connect the main power cable: Locate the main power cable from the power supply, typically a 24-pin ATX connector. Align the connector with the corresponding port on the motherboard and firmly push it in until it clicks into place.
3. Attach the CPU power connector: Locate the CPU power connector, usually a 4-pin or 8-pin connector, depending on your motherboard. Align the connector with the port on the motherboard near the CPU socket and firmly insert it.
4. Connect SATA cables: Connect the SATA cables from your storage devices, such as hard drives or SSDs, to the corresponding SATA ports on the motherboard. Ensure a secure connection for reliable data transfer.
5. Plug in the front panel connectors: Connect the front panel connectors from your case to the designated pins on the motherboard. These connectors include power switch, reset switch, power LED, and HDD LED, among others. Refer to the motherboard manual for the exact pin layout.
6. Connect USB, audio, and other peripheral cables: Attach the USB, audio, and any other peripheral cables to the appropriate ports on the motherboard. Take note of the specific connectors and their corresponding ports on the motherboard.
7. Double-check all connections: Once all the cables are connected, double-check each connection to ensure they are secure and properly seated. Ensure that there are no loose cables that could get in the way of cooling fans or obstruct other components.
8. Organize and manage cables: Take the time to organize and manage the cables within your LEGO PC case. Utilize cable tie-downs, routing channels, and any built-in cable management features to keep the cables organized, optimize airflow, and maintain a neat appearance.
By carefully connecting all the necessary cables, you ensure that your LEGO PC case operates properly and all components can communicate effectively. Take your time to align and secure each connection, and verify that everything is in the correct port according to the motherboard manual.
Step 10: Testing and troubleshooting
After completing the assembly of your LEGO PC case and connecting all the cables, it’s crucial to test the system and troubleshoot any potential issues that may arise. Follow these steps to ensure everything is functioning as intended:
1. Power on the PC: Connect the power cable to your LEGO PC case and turn on the power supply. Press the power button on the case to start the system. Verify if all the fans start spinning and lights on the components illuminate.
2. Monitor display: Check if the monitor receives a signal from the graphics card. Ensure that the display cable is securely connected to both the monitor and the graphics card. If there is no display, double-check connections and try reseating the graphics card.
3. BIOS/UEFI setup: Access the BIOS/UEFI settings by pressing the appropriate key or combination of keys during the boot process (usually F2, Delete, or F10). Verify that the system recognizes all components, such as the CPU, memory, and storage devices. Make any necessary adjustments, such as enabling XMP for memory overclocking.
4. Test component functionality: Run diagnostic software, such as CPU stress tests or memory tests, to ensure that each component is functioning correctly. Monitor temperatures and performance to ensure stable operation. If any issues arise, double-check connections and reseat components if necessary.
5. Check for software updates: Ensure that you have the latest drivers and firmware updates for your components. Visit the manufacturers’ websites and download and install any available updates to optimize performance and compatibility.
6. Troubleshooting: If you encounter any issues during the testing process, refer to the troubleshooting section in the user manuals of your components. Troubleshoot specific issues, such as hardware conflicts, driver errors, or system stability problems, using the appropriate resources and support channels.
7. Testing for stability: Run a stress test on your LEGO PC case to ensure that it can handle intensive workloads and gaming sessions without crashing or overheating. Monitor temperatures, fan speeds, and system stability during the stress test to identify any potential problems.
By thoroughly testing your LEGO PC case and troubleshooting any issues, you can ensure optimal performance and stability. Take the time to address any problems that arise, seeking help from manufacturer support if needed, to create a reliable and efficient system.
Conclusion
Congratulations! You have successfully transformed LEGO pieces into a unique and functional PC case. Building a LEGO PC case not only allows you to showcase your creativity but also provides a cost-effective and personalized alternative to traditional computer cases.
Throughout this guide, we have covered each step, from choosing the LEGO pieces to troubleshooting any issues that may arise during the assembly process. By carefully selecting and combining the LEGO bricks, plates, and tiles, you were able to create a visually appealing and structurally sound PC case.
Remember, when choosing the LEGO pieces, consider the size, shape, structural integrity, aesthetics, and functionality to ensure a sturdy and visually appealing final product. Preparing the motherboard tray, crafting the side panels, building the front and back panels, creating the top and bottom panels, and securing all the components in place were crucial steps in the process.
After assembling the components and connecting all the cables, don’t forget to test your LEGO PC case and troubleshoot any potential issues. This ensures that your creation performs optimally and reliably, providing a seamless computing experience.
Now that your LEGO PC case is complete, continue to monitor its performance, conduct routine maintenance, and keep an eye out for any necessary upgrades or improvements. Enjoy the pride of owning a unique PC case that reflects your creativity and technical prowess.
Thank you for following this guide on how to turn LEGOs into a remarkable PC case. We hope you had a satisfying and rewarding experience. Happy computing!