Introduction
Welcome to this handy guide on how to check the RAM on your PC. RAM, or Random Access Memory, is an essential component of your computer that affects its performance and multitasking capabilities. It is important to monitor and understand your RAM usage to ensure optimal system performance and identify any potential issues.
There are various methods you can use to check the amount of RAM installed on your PC. In this article, we will explore five different methods that you can easily follow, ranging from using built-in tools like Task Manager and System Information to using command prompt, PowerShell, and third-party software.
Knowing how much RAM your PC has can help you determine if you have enough memory to run resource-intensive applications or if you need to upgrade your RAM for better performance. Additionally, checking your RAM usage can also help you identify if any background processes or applications are consuming excessive memory, which may be slowing down your system.
Before we dive into the methods, it’s essential to note that the steps provided in this guide are applicable to Windows operating systems. The specific steps may vary slightly depending on the version of Windows you are using, but the overall process remains the same.
Now, let’s explore the different methods you can use to check the RAM on your PC and gain valuable insights into your system’s memory usage.
Method 1: Using Task Manager
One of the fastest and easiest ways to check your RAM usage is by using the built-in Task Manager tool on your Windows PC. Task Manager provides real-time information about the processes and performance of your computer, including memory usage.
To open Task Manager, you can right-click on the taskbar and select “Task Manager” from the context menu, or you can press Ctrl + Shift + Escape on your keyboard. Once Task Manager is launched, follow these steps:
- Click on the “Performance” tab at the top of the Task Manager window.
- In the left sidebar, select “Memory”. This will display detailed information about your RAM usage, including the total amount of memory installed and the amount currently in use.
- Under the “Memory” section, you can view metrics such as “In Use”, “Standby”, “Modified”, and “Free”. These numbers represent the different types of memory usage on your PC.
- If you want more details, click on “Open Resource Monitor” at the bottom of the Task Manager window. Resource Monitor provides a more in-depth view of your system’s resource utilization, including memory, CPU, disk, and network.
- Once you have checked your RAM usage, you can close Task Manager by clicking on the “X” button in the top-right corner of the window.
Using Task Manager is a quick and convenient way to check your RAM usage on the go. It allows you to monitor memory usage in real-time and identify any applications or processes that might be consuming excessive memory.
Now that we have covered the first method, let’s move on to the next one, which involves using the System Information tool to check your RAM on a Windows PC.
Method 2: Using System Information
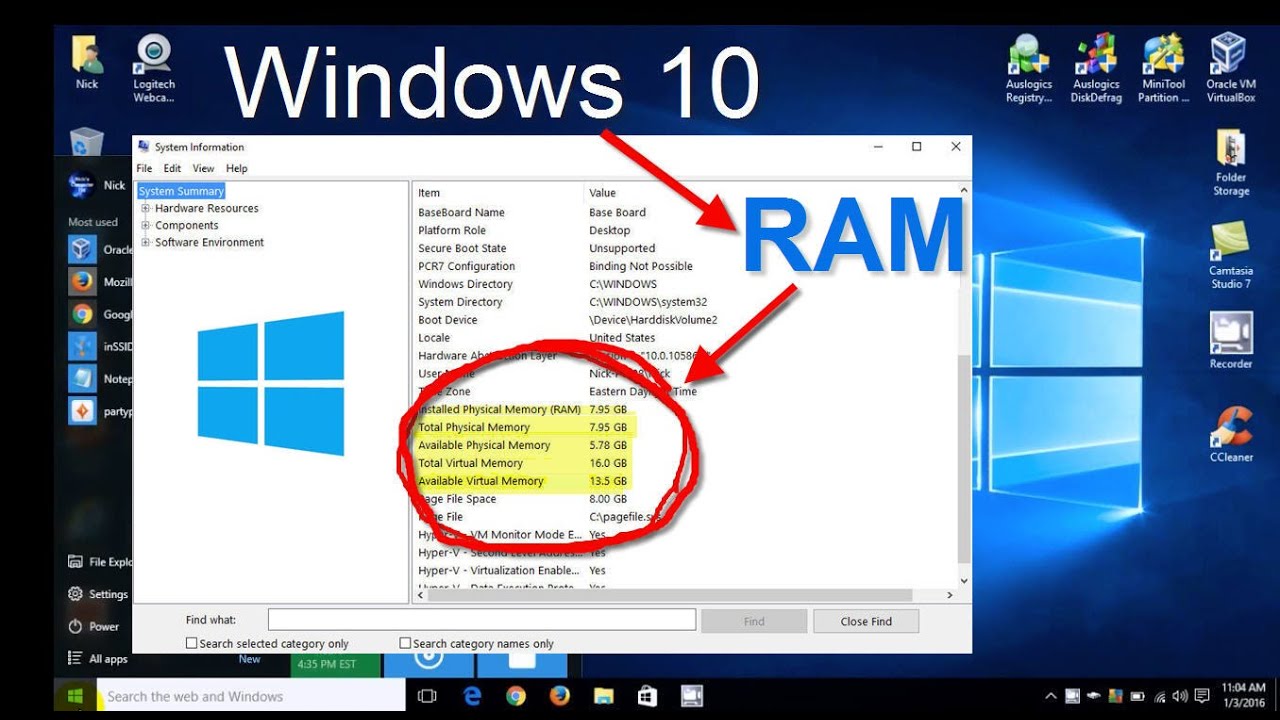
The System Information tool is another built-in feature in Windows that provides detailed information about your computer’s hardware and software configurations. It can also be used to check the amount of RAM installed on your PC.
To access System Information, you can follow these steps:
- Press the Windows key + R to open the Run dialog box.
- Type “msinfo32” (without quotes) and press Enter.
- The System Information window will open, displaying various details about your computer.
- In the left sidebar, expand the “Components” section and select “Memory”.
- In the right pane, you will see detailed information about your RAM, including the total physical memory, available memory, and the device name.
- You can also find additional information about your memory modules, such as their manufacturer, part number, and speed.
- After reviewing the RAM details, you can close the System Information window.
Using System Information is a reliable way to check your RAM as it provides comprehensive details about your memory configuration. This method can be helpful if you need to know specific information about your RAM modules, such as the manufacturer or speed.
Now that we have explored the second method, let’s move on to the next one, which involves using the command prompt to check your RAM on a Windows PC.
Method 3: Using Command Prompt
If you prefer using the command line interface, you can check your RAM usage on a Windows PC using the Command Prompt. The Command Prompt provides a powerful way to access various system information, including memory details.
To use the Command Prompt to check your RAM, follow these steps:
- Open the Command Prompt by pressing the Windows key + R to open the Run dialog box, type “cmd” (without quotes), and press Enter.
- In the Command Prompt window, type the following command and press Enter:
wmic memorychip get capacity - The output will display the capacity of each RAM module installed on your PC, measured in bytes. You can calculate the total RAM capacity by summing up the values displayed.
- If you want more detailed information about your RAM modules, you can type the following command and press Enter:
wmic memorychip list full - This command will provide comprehensive information about your RAM modules, including the manufacturer, product name, serial number, speed, and more.
- Once you have checked the necessary details, you can close the Command Prompt window.
The Command Prompt offers a straightforward and efficient method for checking your RAM using simple commands. It provides detailed information about your RAM modules, allowing you to see the exact specifications of each installed module.
Now that we have covered the third method, let’s move on to the next one, which involves using PowerShell to check your RAM on a Windows PC.
Method 4: Using PowerShell
In addition to the Command Prompt, Windows also offers PowerShell, a more advanced and versatile command-line interface. PowerShell provides even more flexibility and control over system administration tasks, including checking your RAM usage.
To check your RAM using PowerShell, follow these steps:
- Open PowerShell by pressing the Windows key, typing “PowerShell” (without quotes), and selecting the “Windows PowerShell” app.
- In the PowerShell window, type the following command and press Enter:
Get-WmiObject -Class Win32_PhysicalMemory | Measure-Object -Property Capacity -Sum - The output will display the total RAM capacity in bytes. You can convert the value to a more readable format, such as gigabytes (GB), by dividing the result by 1 gigabyte (1 GB = 1024 * 1024 * 1024 bytes).
- For a more detailed view of your RAM modules, you can use the following command and press Enter:
Get-WmiObject -Class Win32_PhysicalMemory | Format-Table Manufacturer, PartNumber, Speed, Capacity -AutoSize - This command will provide detailed information about each RAM module, including the manufacturer, part number, speed, and capacity.
- Once you have obtained the necessary details, you can close the PowerShell window.
PowerShell offers a powerful and flexible method for checking your RAM, enabling you to obtain detailed information about your RAM modules in a convenient and customizable manner.
Now that we have explored the fourth method, let’s move on to the final one, which involves using third-party software to check your RAM on a Windows PC.
Method 5: Using Third-Party Software
If you prefer a more user-friendly and comprehensive approach to checking your RAM, you can utilize third-party software specifically designed for system monitoring and diagnostics. These software tools provide detailed insights into your computer’s performance, including RAM usage.
There are various reliable and popular third-party software options available that can help you check your RAM. Some examples include:
- HWiNFO: HWiNFO is a powerful hardware information and monitoring tool that provides detailed reports on your system’s hardware components, including RAM. It offers real-time monitoring of memory usage and provides information about each RAM module, such as manufacturer, speed, capacity, and more.
- Speccy: Speccy is a lightweight and user-friendly system information tool that provides detailed reports on your computer’s hardware specifications. It offers a clear overview of your RAM details, including the total installed memory, memory type, speed, and more.
- CPU-Z: CPU-Z is a popular utility that focuses on providing detailed information about your computer’s processor, motherboard, and RAM. It displays comprehensive details about your RAM modules, including manufacturer, part number, frequency, and timings.
To use third-party software to check your RAM, follow these general steps:
- Download and install the preferred third-party software onto your Windows PC.
- Launch the software and navigate to the memory or RAM section.
- Review the information provided, such as total memory capacity, module details, and memory usage.
- Depending on the software, you may also have additional options for real-time monitoring, performance optimization, and troubleshooting.
- Once you have gathered the necessary information, you can close the third-party software.
Using third-party software provides a comprehensive and user-friendly approach to checking your RAM. These tools offer in-depth insights into your system’s memory usage and provide additional features for monitoring and optimizing performance.
Now that we have covered all the methods, you have a variety of options to choose from when it comes to checking the RAM on your PC. Whether you prefer using built-in tools like Task Manager and System Information or utilizing third-party software for a more comprehensive analysis, the choice is yours. Regularly monitoring your RAM usage can help you ensure optimal system performance and identify any potential issues that may need attention.
Conclusion
Checking the RAM on your PC is crucial for understanding your system’s performance and ensuring optimal functionality. Throughout this guide, we explored five different methods to help you easily check your RAM usage on a Windows PC.
We started by using the built-in Task Manager, which provides real-time information about your system’s memory usage. Task Manager is quick and convenient, allowing you to monitor your RAM on-the-go.
We then moved on to the System Information tool, which offers comprehensive details about your computer’s hardware and software configurations. Using System Information, you can obtain detailed information about your RAM modules, helping you understand their specifications.
The Command Prompt and PowerShell methods provided command-line approaches for checking your RAM. These methods are ideal for users who prefer a more advanced and customizable way of retrieving RAM information.
Lastly, we discussed the use of third-party software. Third-party tools like HWiNFO, Speccy, and CPU-Z offer user-friendly interfaces and comprehensive reports on your system’s hardware components, including RAM details.
By utilizing these methods, you can gain valuable insights into your RAM usage, identify any performance issues, and make informed decisions about system upgrades or optimizations.
Remember, monitoring your RAM is essential for maintaining optimal performance and ensuring your computer runs smoothly. Regularly checking your RAM usage can help you identify any resource-hungry applications or processes that may be causing performance bottlenecks.
Whether you prefer using built-in tools or third-party software, the choice ultimately depends on your personal preference and requirements. So go ahead and choose the method that suits your needs best, and start exploring the world of your PC’s RAM!