Introduction
PlayStation is a popular gaming platform that offers a wide range of digital content for gamers to enjoy. Whether you’ve recently made a purchase or simply want to review your past transactions, it’s important to know how to check your PlayStation purchases. By doing so, you can keep track of your spending, ensure that your account is secure, and easily access your downloaded games, add-ons, and other content whenever you want.
In this guide, we’ll walk you through the steps to check your PlayStation purchases and view your transaction history. You’ll also learn how to access your download list and find email receipts for your purchases. So, whether you’re a seasoned PlayStation gamer or new to the platform, this article will provide you with the necessary information to stay in control of your purchases.
Before we dive into the step-by-step process, it’s important to note that you’ll need an active PlayStation account and internet access to follow the instructions outlined in this guide. Once you have these prerequisites in place, you’ll be ready to uncover the details of your PlayStation purchases and ensure a smooth gaming experience.
Step 1: Sign in to your PlayStation account
The first step to checking your PlayStation purchases is to sign in to your PlayStation account. This will grant you access to your personal profile and all the features associated with it. Follow the steps below to sign in:
- Open the PlayStation app on your console or visit the PlayStation website on your computer.
- Click on the “Sign In” button located at the top right corner of the screen.
- Enter your PlayStation Network (PSN) ID and password in the designated fields.
- Click on the “Sign In” button to continue.
If you have enabled two-factor authentication for your account, you may be prompted to enter a verification code that will be sent to your registered email or mobile device. Enter the code to proceed with the sign-in process.
Once you have successfully signed in, you will have full access to your PlayStation account and its associated features. Now that you’re logged in, we can move on to the next step in checking your PlayStation purchases.
Step 2: Go to the PlayStation Store
After signing in to your PlayStation account, the next step is to navigate to the PlayStation Store. This is where you can find and access all the digital content available for purchase. To go to the PlayStation Store, follow the instructions below:
- From your console’s home screen, select the PlayStation Store icon located in the main menu.
- If you’re accessing the PlayStation Store from a web browser, visit the PlayStation website and click on the “Store” tab.
Once you have clicked on the PlayStation Store icon or accessed the Store tab on the website, you will be taken to the main page of the PlayStation Store.
On the PlayStation Store, you can explore various categories, including games, add-ons, demos, themes, and more. To proceed with checking your PlayStation purchases, we will move on to the next step: accessing your download list.
Step 3: Access your Download List
Once you’re on the main page of the PlayStation Store, you need to access your download list to view your purchased content. The download list contains a record of all the items you have downloaded or purchased on your PlayStation account. Follow the steps below to access your download list:
- From the main page of the PlayStation Store, navigate to the menu located at the top of the screen.
- Scroll right until you find the “Library” option and select it.
- In the Library, you will find a list of options. Choose “Purchased” or “Download List” to proceed.
By selecting the “Purchased” or “Download List” option, you will be able to view all the games, add-ons, and other content that you have purchased on your PlayStation account.
Once you’re in the download list, you can scroll through the items and select the particular content you want to check. This will allow you to see details such as the title, release date, and any available updates for that specific item.
Accessing the download list is a crucial step in checking your PlayStation purchases as it provides an organized record of all the content you have acquired. Now that you know how to access your download list, we can proceed to the next step: filtering your purchases.
Step 4: Filter your purchases
Filtering your purchases allows you to sort and organize your PlayStation purchases based on various criteria. By filtering your purchases, you can easily find specific items or narrow down your search to a particular category. Here’s how you can filter your purchases:
- In your download list, locate the filtering options or filter icon. This may be represented by a funnel or filter symbol.
- Click on the filtering options or filter icon to open the filter menu.
- Choose your desired filtering criteria, such as sorting by date, price, or platform.
- Apply the filters to display the results according to your chosen criteria.
Once you have applied the filters, you will see a refined list of your PlayStation purchases that fulfill the selected criteria. This makes it easier to navigate through your purchases and locate specific items or browse through specific categories.
Filtering your purchases provides a more tailored and efficient way to review and manage your PlayStation content. Now, with your purchases filtered, let’s move on to the next step: viewing your transaction history.
Step 5: View your transaction history
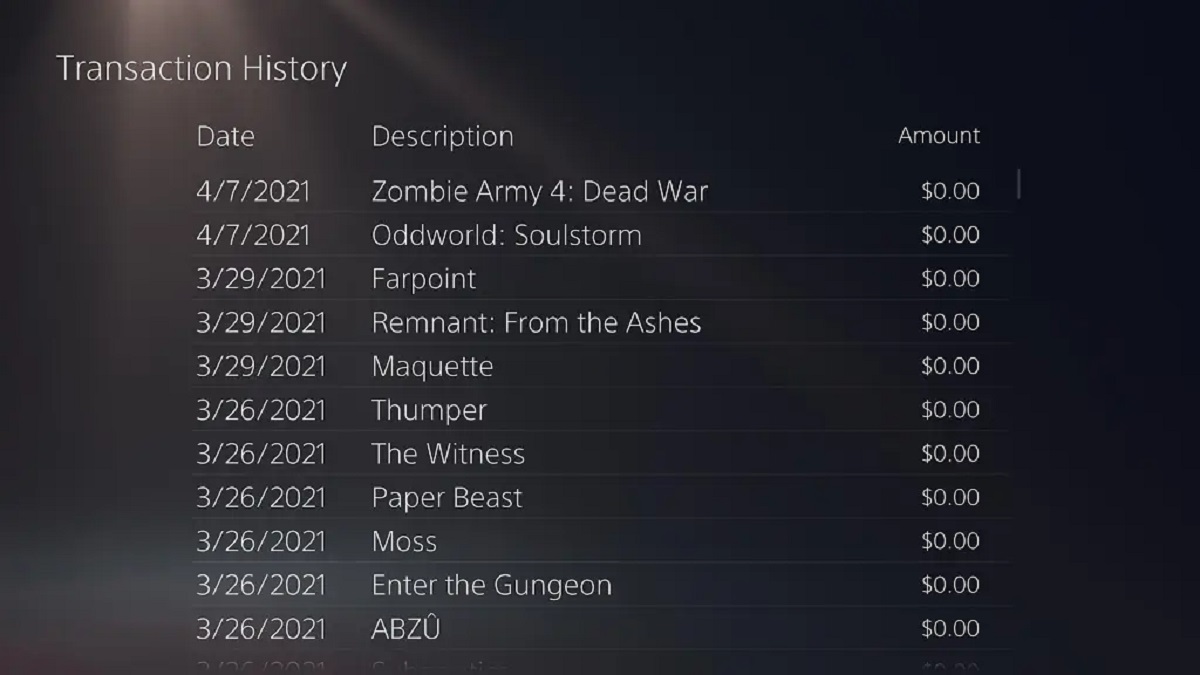
Viewing your transaction history allows you to see a detailed record of all the purchases you have made on your PlayStation account. The transaction history provides information such as the date and time of purchase, the item purchased, and the amount spent. To view your transaction history, follow these steps:
- Return to the main menu of your PlayStation account.
- Navigate to the “Settings” or “Account Management” section.
- Look for an option related to “Transaction History” or “Purchase History” and select it.
- You will be presented with a list of your recent transactions, sorted by date or another preferred criteria.
- Scroll through the list to find the specific transaction you want to review or click on a transaction to see more details.
The transaction history provides valuable information about your PlayStation purchases, giving you an overview of your spending habits and helping you keep track of your digital content library.
In addition to viewing your transaction history directly on your PlayStation console, you can also access it through the PlayStation website. Simply log in to your account, navigate to the Account or Settings section, and locate the Transaction History option.
Now that you know how to view your transaction history, you can easily keep track of your PlayStation purchases, ensuring transparency and better financial management.
Step 6: Check your email receipts
Checking your email receipts is another method to keep track of your PlayStation purchases. Whenever you make a purchase on your PlayStation account, Sony sends a receipt to the email address associated with your account. This receipt provides detailed information about the transaction, including the items purchased, the date and time of purchase, and the amount paid. Follow these steps to check your email receipts:
- Open your email account and locate the inbox associated with the email address linked to your PlayStation account.
- Look for an email from PlayStation or Sony related to your recent purchase.
- Click on the email to open it and review the details of your transaction.
By checking your email receipts, you can ensure that all your purchases are accounted for and easily refer back to them when needed. This is particularly useful if you want to provide proof of purchase or if you need to seek assistance from PlayStation customer support regarding a specific transaction.
If you can’t find the email receipt in your inbox, make sure to check your spam or junk folder, as it may have been filtered there by mistake. If you still can’t locate the email, ensure that the email address associated with your PlayStation account is correct and up to date.
By regularly checking your email receipts, you can maintain an accurate record of your PlayStation purchases and quickly access the information you need. Now that you’ve learned how to check your email receipts, you have another method to keep track of your transactions.
Conclusion
Checking your PlayStation purchases is an essential part of managing your gaming experience. By following the steps outlined in this guide, you can easily access your PlayStation account, navigate to the PlayStation Store, access your download list, filter your purchases, view your transaction history, and check your email receipts.
By regularly reviewing your purchases, you can keep track of your spending, ensure the security of your account, and easily access your downloaded games, add-ons, and other content. Whether you’re a casual gamer or an avid PlayStation enthusiast, this knowledge empowers you to stay in control of your digital content library.
Remember to sign in to your PlayStation account to access all the features and navigate to the PlayStation Store to find and purchase the desired digital content. Utilize the download list and apply filters to organize and optimize your PlayStation purchases. Take advantage of the transaction history to review and track your spending habits, and regularly check your email receipts for a comprehensive record of your transactions.
With these steps and tips in mind, you can confidently manage your PlayStation purchases, ensuring a seamless and enjoyable gaming experience. Whether you’re hunting for your next gaming adventure or looking to reminisce about past favorites, this guide has equipped you with the necessary knowledge to navigate your PlayStation purchases with ease. Happy gaming!