You can check the number of cores in a virtual machine from inside the guest operating system using built-in tools like Task Manager, PowerShell, or Command Prompt on Windows, or the `sysctl hw.ncpu` command on Linux. Alternatively, you can check the allocated CPU cores from the hypervisor's management interface, such as VMware vSphere, Oracle VirtualBox, or Hyper-V Manager, which is useful when you need to verify the exact configuration assigned to the VM. Knowing this number matters because it directly affects the VM's processing power, its ability to handle resource-intensive workloads, and whether you need to adjust allocations to fix performance bottlenecks.
Understanding vCPUs, cores, and logical processors
Before checking the numbers, it is critical to understand the difference between virtual CPUs (vCPUs), physical cores, and logical processors. A vCPU is a virtual processor presented to the guest OS by the hypervisor; it is not a physical core. In most hypervisors, the total number of vCPUs equals the product of virtual sockets and cores per socket. For example, in VMware vSphere, the "Number of CPUs" (virtual sockets) multiplied by "Cores per Socket" gives the total vCPUs. A logical processor is what the operating system sees as a processing unit; on a machine with hyperthreading enabled, one physical core can appear as two logical processors. Therefore, when you check the number of cores from inside the guest OS, you may see logical processors, which can be double the number of physical cores. This distinction matters because allocating too many vCPUs relative to the host's physical cores can degrade performance, especially if you exceed the recommended ratios like KVM's limit of 10 vCPUs per physical core.
Check cores from inside the Windows guest OS
Method 1: Using Task Manager
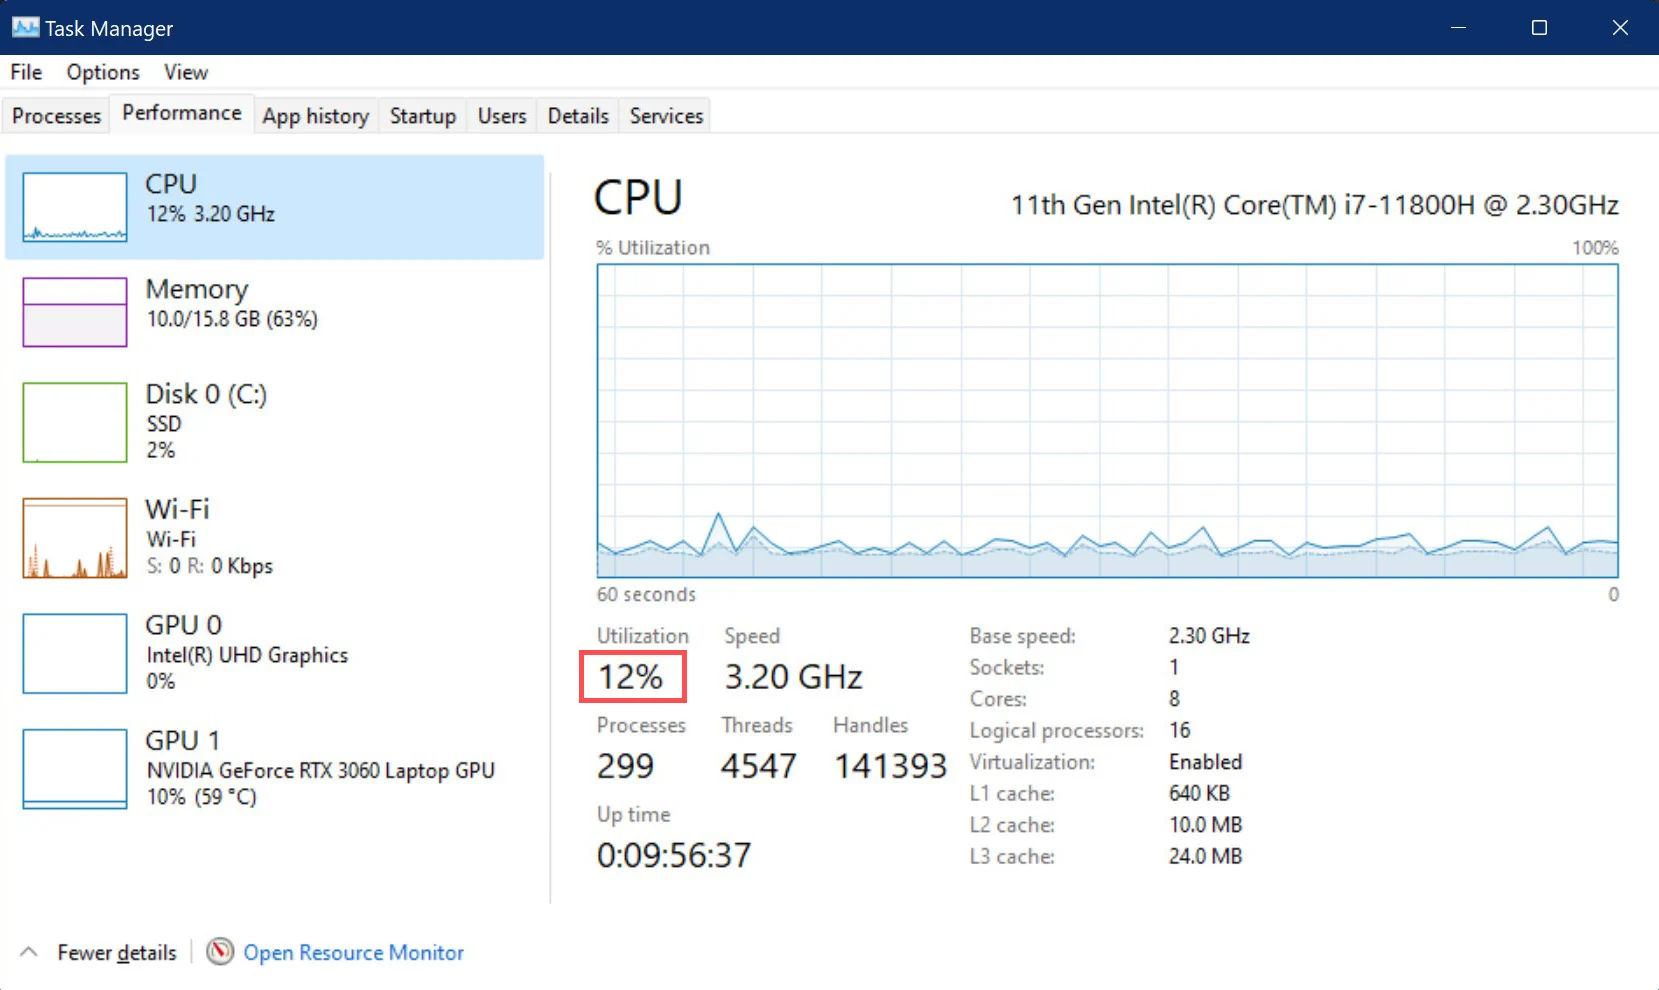
Task Manager provides the quickest visual way to see the number of logical processors available to the Windows guest. It is ideal for a fast overview without any command-line interaction.
- Press Ctrl + Shift + Esc to open Task Manager.
- Click the Performance tab.
- Select CPU in the left pane.
- Look at the bottom-right corner of the CPU graph; the "Logical processors" value shows the total number of logical processors available to the VM.
- If you need more detail, right-click the graph and select "Change graph to" then "Logical processors" to see each logical processor individually.
Task Manager only shows the total logical processors, not the distinction between cores and threads. For a more granular breakdown, use PowerShell or Command Prompt.
Method 2: Using PowerShell
PowerShell offers a scriptable way to retrieve core information, which is useful for automation or when you need detailed processor data beyond a simple count.
- Open PowerShell by searching for "PowerShell" in the Start Menu.
- Type the following command and press Enter:
Get-WmiObject Win32_ComputerSystem | Select-Object -ExpandProperty NumberOfLogicalProcessors - The output shows the total number of logical processors, which corresponds to the cores available to the VM.
- For detailed per-core information, run:
Get-WmiObject Win32_Processor
This command returns properties like NumberOfCores and NumberOfLogicalProcessors for each physical processor socket presented to the guest. It is particularly useful when you need to verify the socket and core configuration separately.
Method 3: Using Command Prompt
Command Prompt provides a lightweight, text-based alternative that is easy to integrate into scripts or batch files.
- Open Command Prompt by searching for "Command Prompt" in the Start Menu.
- Type the following command and press Enter:
wmic cpu get NumberOfCores - The output displays the total number of physical cores configured in the VM.
- Alternatively, run
wmic cpu get NumberOfLogicalProcessorsto see the logical processor count.
The Command Prompt method is faster for quick checks and works well when you prefer a command-line interface or need to embed the query into an existing script.
Check cores from inside a Linux guest OS
For Linux guests, the terminal provides a direct and reliable way to check the allocated CPU cores. The `sysctl hw.ncpu` command is a standard method that works across most Linux distributions.
- Open a terminal window.
- Type the following command and press Enter:
sysctl hw.ncpu - The output displays a number like "hw.ncpu: 4", which indicates the number of CPU cores allocated to the VM.
This command reads the kernel's hardware configuration and returns the exact count of cores the guest OS sees. It is especially useful in headless Linux servers where a graphical interface is not available.
Check cores from the hypervisor settings
Checking from the hypervisor side shows the actual configured allocation, which may differ from what the guest OS reports due to oversubscription or hyperthreading. This is the authoritative source for the VM's CPU configuration.
VMware vSphere
- Right-click the virtual machine in the vSphere Client and select "Edit Settings."
- Under the "Virtual Hardware" tab, expand the "CPU" section.
- The "Number of CPUs" field shows the virtual sockets, and "Cores per Socket" shows the cores per socket.
- Multiply these two values to get the total vCPUs allocated to the VM.
This view is essential when you need to verify the socket/core ratio, which affects how the guest OS licenses and schedules processors. VMware's CPU Hot-Add feature allows adding multicore CPUs to a running VM, provided the VM compatibility is ESXi 5.0 or later and the feature is enabled.
Oracle VirtualBox
- Select the VM in VirtualBox Manager and click "Settings."
- Go to the "System" tab, then the "Processor" tab.
- The "Processor(s)" slider shows the number of virtual CPU cores allocated to the VM.
VirtualBox supports presenting up to 32 virtual CPU cores to each VM. However, it is recommended not to configure VirtualBox VMs to use more CPU cores than are physically available on the host, excluding hyperthreads. Overallocating cores can lead to severe performance degradation because the hypervisor has to schedule more virtual cores than physical ones exist.
Hyper-V Manager
In Hyper-V Manager, select the VM and open its Settings. Note that Hyper-V hosts running Windows Server 2012 support up to 320 logical processors, but the Windows OS in the management partition (host) will only utilize a maximum of 64 root Virtual Processors. This limit affects the host's ability to manage many VMs simultaneously, so plan your core allocations accordingly.
Next steps for optimal VM performance
Once you know the number of cores, you can decide whether the allocation matches the workload. If a VM feels underpowered, you may need to increase its vCPUs, but always stay within the hypervisor's recommended limits. For example, if you want to improve gaming performance inside a VM, you might need to allocate more CPU to a game by adjusting the VM's processor settings. Similarly, if you are running a VMware VM and need to use hardware-assisted virtualization, you should enable virtualization in vmware virtual machine to unlock full CPU features. For memory-related performance issues, you can check RAM in command prompt to verify whether the VM has enough memory alongside its cores. Balancing cores, RAM, and hypervisor limits is the key to getting the best performance from your virtual machines without overloading the host.