Introduction
Welcome to the world of virtualization! Creating a Mac OS virtual machine allows you to experience the power and elegance of macOS right on your existing Windows or Linux machine. Whether you’re a developer, designer, or simply an Apple enthusiast, having a virtual machine is a great way to explore different macOS versions, test software compatibility, or even run iOS apps.
In this step-by-step guide, we will walk you through the process of creating a Mac OS virtual machine. We will cover everything from downloading the necessary files to configuring the virtual machine and installing additional software. So buckle up and get ready to bring the best of both Windows and macOS worlds together!
Before we dive into the details, it’s important to note that creating a Mac OS virtual machine requires a few prerequisites. First and foremost, you’ll need a powerful computer with plenty of memory and storage. Virtual machines typically require a significant amount of resources to run smoothly, so make sure you meet the minimum system requirements.
Secondly, you’ll need a copy of the Mac OS installation media or disk image file (.iso). This can be obtained legally through the Apple Store or you can find third-party sources that provide macOS downloads. However, please ensure you have the appropriate licensing and permissions before proceeding.
Additionally, you’ll need a virtualization software such as VMware Workstation Pro, VirtualBox, or Parallels Desktop. These tools allow you to create and run virtual machines on your computer. Some of them offer free versions, while others require a paid license. Choose the one that best suits your needs and budget.
Now that we have the basics covered, let’s move on to the first step: downloading the necessary files for our Mac OS virtual machine.
Prerequisites
Before diving into the exciting world of creating a Mac OS virtual machine, there are a few prerequisites that you need to have in place. These are essential to ensure a smooth and successful setup process. Let’s take a look at what you’ll need:
1. A Powerful Computer: Creating and running a virtual machine requires a computer with sufficient resources. Make sure your machine meets the minimum system requirements for virtualization. This includes having a fast processor, ample RAM (at least 8GB, ideally more), and enough storage space to accommodate the virtual machine and Mac OS installation files.
2. Mac OS Installation Media: You’ll need a copy of the Mac OS installation media or disk image file (.iso) to install on your virtual machine. This can be obtained legally through the Apple Store if you have a Mac, or you can find third-party sources that provide macOS downloads. Ensure you have the appropriate licensing and permissions to use the software.
3. Virtualization Software: To create and run the Mac OS virtual machine, you’ll require virtualization software like VMware Workstation Pro, VirtualBox, or Parallels Desktop. These tools allow you to create and manage virtual machines on your computer. Some software options may require a paid license, while others offer free versions with limited features. Choose the one that suits your needs and budget.
4. Sufficient Disk Space: Virtual machines and operating systems require a significant amount of disk space. Ensure that you have enough free disk space available to accommodate the virtual machine and the Mac OS installation files. It’s best to allocate a separate partition or drive for the virtual machine to avoid any storage constraints.
5. Basic Technical Knowledge: While this guide will provide step-by-step instructions, having a basic understanding of computer systems, virtualization concepts, and operating systems will be beneficial. Familiarize yourself with the virtualization software you choose and be comfortable navigating through the settings and options.
With these prerequisites in place, you’re well-equipped to embark on the journey of creating your very own Mac OS virtual machine. Let’s move on to the exciting next step: downloading the necessary files for our virtual machine setup.
Step 1: Downloading the necessary files
The first step in creating your Mac OS virtual machine is to gather all the necessary files. This includes obtaining the macOS installation media or disk image file (.iso) and the virtualization software. Let’s get started:
1. Obtain the Mac OS installation media: If you have a Mac, you can download the macOS installation files from the Apple Store. Simply go to the App Store and search for the version of macOS you want to install. Once downloaded, the installation files will be located in the Applications folder. If you don’t have a Mac, you can find third-party sources that provide macOS downloads. Ensure that you obtain the installation files legally and have the appropriate licensing and permissions to use them.
2. Choose a virtualization software: There are several options available for virtualization software, so choose one that suits your needs. Some popular choices include VMware Workstation Pro, VirtualBox, and Parallels Desktop. VMware Workstation Pro is a powerful and feature-rich option, VirtualBox is free and open-source, while Parallels Desktop offers a seamless integration between Mac and Windows. Depending on your preference and budget, select the virtualization software that best suits you.
3. Download the virtualization software: Once you’ve chosen the virtualization software, visit the official website and download the appropriate version for your operating system. Ensure you choose the version that is compatible with your machine’s architecture (32-bit or 64-bit). Follow the installation instructions provided by the software vendor to install it on your computer. Make sure to keep track of the installation location, as we will need it in the subsequent steps.
4. Create a folder for the virtual machine: Before proceeding, create a dedicated folder on your computer to store the files related to your virtual machine. This folder will house the virtual hard drive, configuration files, and other resources associated with the virtual machine. Organizing the files in a separate folder will make it easier to manage and locate them during the setup process.
With the necessary files downloaded and organized, you are now ready to move on to the next step: setting up the virtualization software for your Mac OS virtual machine.
Step 2: Setting up the virtualization software
Now that you have obtained the necessary files, it’s time to set up the virtualization software on your computer. This step involves installing and configuring the virtualization software to prepare it for creating your Mac OS virtual machine. Let’s get started:
1. Install the virtualization software: Locate the installation file you downloaded in the previous step and run it. Follow the on-screen instructions provided by the software vendor to install the virtualization software on your computer. Make sure to choose the appropriate options and settings during the installation process.
2. Launch the virtualization software: Once the installation is complete, launch the virtualization software. You will be greeted with a welcome screen or a dashboard, depending on the software you chose. Take a few moments to familiarize yourself with the interface and options available.
3. Configure virtual machine settings: Before creating a new virtual machine, it’s important to configure some settings that will optimize its performance. These settings include allocating system resources such as CPU cores, RAM, and storage to the virtual machine. It’s recommended to assign at least 2 cores and 4 GB of RAM to the virtual machine for optimal performance.
4. Enable virtualization support: To ensure a smooth virtual machine setup, make sure that virtualization support is enabled in your computer’s BIOS settings. The method to access the BIOS may vary depending on your computer manufacturer and model. Consult your computer’s documentation or search online for instructions on enabling virtualization support.
5. Save the virtual machine configuration: Once you have made all the necessary configuration changes, it’s a good practice to save the virtual machine configuration. This will allow you to easily recreate the virtual machine or transfer it to another computer in the future. Specify a location within your dedicated folder to save the configuration files.
With the virtualization software set up and configured, you are now ready for the exciting part: creating a new virtual machine and installing Mac OS on it. This will be covered in the next step of our guide.
Step 3: Creating a new virtual machine
With the virtualization software set up, it’s time to create a new virtual machine to run Mac OS. This involves specifying the machine settings, such as the amount of RAM, CPU cores, and disk space allocated to the virtual machine. Let’s dive into the process of creating a new virtual machine:
1. Open the virtualization software: Launch the virtualization software that you installed in the previous step. The software’s interface will provide options to create a new virtual machine or open an existing one. Choose the option to create a new virtual machine.
2. Select the operating system: When prompted, choose the option to install operating system later or manually select the operating system. This will enable you to specify the version of Mac OS you are going to install.
3. Specify the virtual machine name and location: Give the virtual machine a descriptive name that will help you identify it later. Choose a location within your dedicated folder to store the virtual machine files. This will ensure easy access and organization of the files in the future.
4. Set the virtual machine hardware settings: Specify the amount of RAM to allocate to the virtual machine. It is recommended to assign at least 4GB of RAM for a smooth Mac OS experience. Configure the virtual machine with a sufficient number of CPU cores, usually 2 or more, depending on the capabilities of your physical machine.
5. Create a virtual hard drive: Select the option to create a new virtual hard drive for the virtual machine. Choose the appropriate storage capacity for the virtual hard drive; 50GB or more is recommended to accommodate the Mac OS installation and future updates.
6. Choose the installation media: Select the option to install the operating system from a disk image file (.iso) or installation media. Locate and select the Mac OS installation media or disk image file you obtained earlier.
7. Review and confirm the virtual machine settings: Take a moment to review the virtual machine settings before proceeding. Double-check the allocated resources, the location of the virtual machine files, and the installation media. Once you are satisfied with the settings, confirm and create the virtual machine.
Congratulations! You have successfully created a new virtual machine for your Mac OS. The next step will guide you through the process of installing Mac OS on the virtual machine. It’s time to bring macOS to life in the virtual environment!
Step 4: Installing Mac OS on the virtual machine
Now that you have created a new virtual machine, it’s time to install Mac OS on it. In this step, we will guide you through the installation process, which involves booting the virtual machine from the Mac OS installation media and completing the setup. Let’s get started:
1. Start the virtual machine: Open the virtualization software and select the newly created virtual machine. Click on the option to start or power on the virtual machine. This will initiate the boot process.
2. Boot from the Mac OS installation media: As the virtual machine starts, it will prompt you to choose the installation media. Select the option to boot from the Mac OS installation media, which can be either a disk image file (.iso) or physical media if you’re installing from a physical disk.
3. Follow the on-screen instructions: The Mac OS installation process will begin. Follow the on-screen instructions provided by the installer to proceed with the installation. This includes selecting the language, agreeing to the license agreements, and choosing the disk on which to install Mac OS.
4. Customize the installation (optional): During the installation process, you may have the option to customize certain settings. This might include selecting specific applications, additional drivers, or customizing the installation location. Customize these settings according to your preferences or proceed with the default options.
5. Wait for the installation to complete: Once you have confirmed the settings, sit back and relax as the installation proceeds. The time taken for the installation will depend on your system’s performance and the version of Mac OS being installed.
6. Set up your Mac OS: After the installation is complete, the virtual machine will restart. Follow the initialization steps and set up your Mac OS just like you would on a physical Mac computer. This includes selecting your region, creating a user account, and personalizing the settings.
7. Install updates (optional): After the initial setup, it is recommended to check for and install any available updates for your Mac OS. This will ensure that your virtual machine is up to date with the latest security patches, bug fixes, and performance improvements.
Congratulations! You have successfully installed Mac OS on your virtual machine. You now have a fully functional virtual Mac environment, ready to explore and experience the features of macOS. In the next step, we will guide you through the process of configuring the virtual machine to optimize its performance. Stay tuned!
Step 5: Configuring the virtual machine
After installing Mac OS on your virtual machine, it is important to configure the virtual machine settings to optimize its performance and enhance your overall virtual Mac experience. In this step, we will guide you through the process of configuring the virtual machine. Let’s get started:
1. Adjust the virtual machine display: Start by adjusting the display settings of the virtual machine to match your preferences. You can change the screen resolution, color depth, and even enable full-screen mode. Having the right display settings will ensure a seamless and visually pleasing user interface.
2. Configure the network settings: Next, configure the network settings of the virtual machine to enable internet connectivity. Depending on the virtualization software you are using, you can choose from different network connection options such as bridged, NAT, or host-only. Select the appropriate option and make sure the virtual machine has access to the internet.
3. Enable shared folders (optional): If you want to share files between your host machine and the virtual machine, enable shared folders. This feature allows you to easily transfer files back and forth without the need for external storage devices. Specify the folders you want to share and set the access permissions accordingly.
4. Configure the virtual machine resources: Adjust the resource allocation for your virtual machine to ensure optimal performance. Allocate enough RAM, CPU cores, and disk space based on your requirements and the system’s capabilities. You can modify these settings in the virtualization software’s configuration options for the virtual machine.
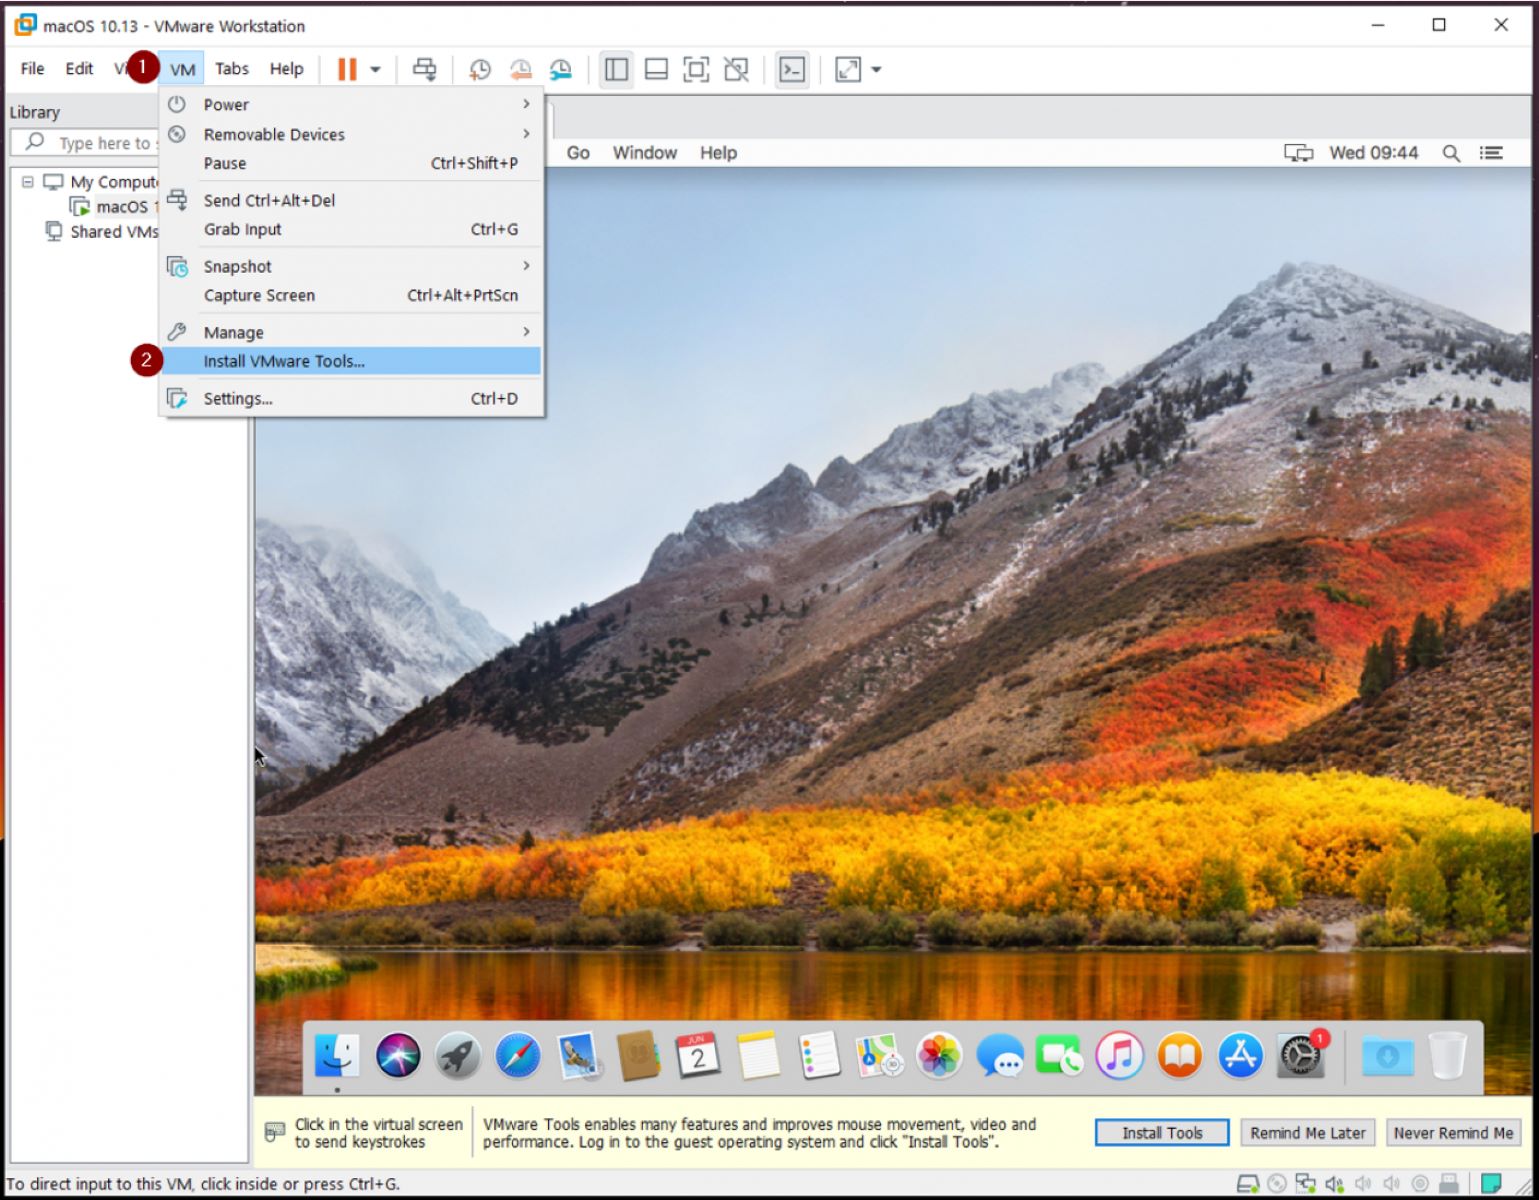
5. Install VMware Tools (if using VMware Workstation): If you are using VMware Workstation as your virtualization software, it is recommended to install VMware Tools. This set of drivers and utilities enhances the performance and functionality of the virtual machine. Follow the instructions provided by VMware to install these tools.
6. Backup your virtual machine: It’s always a good practice to create regular backups of your virtual machine. This ensures that if any issues or unforeseen circumstances occur, you can restore your virtual machine to a previous working state. Use the backup features provided by your virtualization software or create a manual backup of the virtual machine files.
7. Test the virtual machine: Once you have configured the virtual machine, take some time to test its functionality. Open various applications, access the internet, and perform common tasks to ensure everything is running smoothly. Address any issues you encounter to ensure a seamless Mac experience.
With the virtual machine properly configured, you are ready to make the most of your virtual Mac environment. In the next step, we will explore the installation of additional software and drivers to enhance the functionality of your virtual machine. Stay tuned!
Step 6: Installing additional software and drivers
In this step, we will look at installing additional software and drivers on your virtual machine to enhance its functionality and compatibility. Installing these software and drivers will enable you to take full advantage of the features offered by your virtual Mac environment. Let’s dive in:
1. Install essential software: Begin by installing essential software that you need for your work or personal use. This may include productivity tools, web browsers, media players, or any other software that you regularly use. Download the software from trusted sources and follow the installation instructions provided by the software vendor.
2. Install macOS updates: Check for any available updates for your Mac OS version. Keeping your virtual machine up-to-date with the latest patches and security updates is crucial to ensure smooth and secure operation. Go to the System Preferences and select “Software Update” to check for available updates. Follow the instructions to install any available updates.
3. Install device drivers: If you are using specialized devices such as printers, scanners, or graphics tablets, install the necessary device drivers on your virtual machine. Visit the manufacturer’s website and download the compatible drivers for your devices. Follow the driver installation instructions provided by the manufacturer to configure and set up your devices.
4. Install virtualization software tools: Some virtualization software, such as VMware Workstation, provides additional tools that can enhance the performance of the virtual machine. For example, VMware Tools for VMware Workstation improves graphics performance, allows seamless mouse integration, and enables file sharing between the host and virtual machine. Follow the instructions provided by your virtualization software’s documentation to install these tools.
5. Install security software: Just like with any computer, it is important to install security software to protect your virtual Mac environment from malware and other threats. Install a trusted antivirus program and configure it to perform regular scans and updates. Additionally, consider using a virtual private network (VPN) for enhanced security and privacy when using your virtual machine online.
6. Install productivity and development tools: Depending on your needs, install productivity and development tools that will help you work efficiently in your virtual machine. This may include text editors, coding environments, design software, or project management tools. Install these tools from trusted sources, following the respective installation instructions.
7. Test the installed software and drivers: Once you have installed all the necessary software and drivers, take some time to test their functionality. Ensure that the applications are running smoothly, the devices are properly recognized, and the performance of the virtual machine is not affected. Address any issues or conflicts that arise to ensure a seamless user experience.
By installing additional software and drivers, you can customize your virtual Mac environment to suit your specific needs and maximize your productivity. In the final step of our guide, we will explore some essential optimizations and settings to further enhance the performance of your virtual machine. Stay tuned!
Step 7: Optimizing the virtual machine settings
In this final step, we will explore various optimizations and settings that can further enhance the performance and usability of your virtual machine. By fine-tuning these settings, you can ensure a smoother and more efficient virtual Mac experience. Let’s dive in:
1. Adjust virtual machine resources: Assess the resource allocation of your virtual machine and make any necessary adjustments. Consider increasing the amount of RAM and CPU cores allocated to your virtual machine if you frequently run resource-intensive applications. This will help improve performance and responsiveness.
2. Enable hardware acceleration: If your host computer supports hardware acceleration features like Intel VT-x or AMD-V, enable these options in the virtualization software settings. Hardware acceleration can significantly improve the overall performance of your virtual machine, especially when running graphic-intensive applications or performing complex tasks.
3. Adjust display settings: Fine-tune the display settings of your virtual machine to ensure a crisp and clear visual experience. Adjust the screen resolution and color depth to match your preferences and the capabilities of your host computer. Additionally, enable options like accelerated 3D graphics if available to enhance graphics performance.
4. Optimize storage: Regularly optimize the storage of your virtual machine to maintain efficient disk usage. Remove unnecessary files and applications, and periodically defragment or compress the virtual hard disk. This will help improve performance and maximize available disk space.
5. Backup and snapshot: Create regular backups and snapshots of your virtual machine to protect against data loss and provide easy recovery options. Backing up your virtual machine helps safeguard your data and settings, while snapshots allow you to revert to a previous state quickly if needed.
6. Configure power settings: Adjust the power settings of your virtual machine to optimize energy usage and extend battery life if applicable. Consider enabling power-saving features, such as enabling sleep mode or adjusting the power profile, for better resource management and efficiency.
7. Fine-tune networking: If network performance is important to your virtual machine usage, configure the networking settings accordingly. Optimize the network adapter type, bandwidth allocation, and network connection type to prioritize performance or stability based on your needs.
8. Disable unnecessary services and startup programs: Review the list of services and startup programs running in your virtual machine and disable any unnecessary ones. Removing unnecessary services and programs will help free up system resources and improve overall performance.
9. Stay updated: Regularly update your virtual machine’s software, including the operating system, virtualization software, and installed applications. Keeping your virtual machine up to date ensures the latest security patches, bug fixes, and performance enhancements are applied.
By optimizing the virtual machine settings, you can customize and fine-tune your virtual Mac environment to suit your specific needs and achieve optimal performance. With all the steps completed, you are now equipped with a fully functional and optimized Mac OS virtual machine. Enjoy exploring macOS and all its features!
Conclusion
Congratulations on successfully creating your Mac OS virtual machine! By following the steps outlined in this guide, you have brought the power and elegance of macOS to your existing Windows or Linux machine. This virtual environment allows you to explore different macOS versions, test software compatibility, and run iOS apps, opening up endless possibilities for developers, designers, and Apple enthusiasts.
In the introductory section, we discussed the prerequisites, emphasizing the need for a powerful computer, obtaining the Mac OS installation media, and choosing the right virtualization software. Next, we walked through the step-by-step process of downloading the necessary files, setting up the virtualization software, creating a new virtual machine, installing Mac OS, and configuring the virtual machine settings.
We also highlighted the importance of installing additional software and drivers to enhance functionality, security, and productivity. By carefully selecting and installing essential software, keeping your Mac OS version up to date, and configuring device drivers, you can ensure a seamless and optimized virtual Mac experience.
To further maximize the performance of your virtual machine, we explored optimization techniques. Adjusting resource allocation, enabling hardware acceleration, optimizing storage, and fine-tuning various settings can enhance the overall performance and usability of your virtual machine.
Creating a Mac OS virtual machine opens up a world of possibilities, allowing you to harness the power and versatility of macOS within your existing environment. Whether you’re a developer testing software compatibility, a designer exploring new creative tools, or simply an Apple enthusiast wanting to experience the Mac ecosystem, a virtual machine provides the perfect solution.
Remember to regularly update your virtual machine’s software, create backups and snapshots, and stay vigilant with security measures. By staying proactive, you can ensure that your virtual Mac environment remains secure, efficient, and up to date.
We hope this guide has provided you with the knowledge and confidence to create and optimize your Mac OS virtual machine. Enjoy the seamless integration of Windows or Linux and macOS, and explore the best of both worlds. Have a great time exploring macOS and maximizing your productivity!