Introduction
Welcome to the digital age where email has become an essential means of communication. Whether you’re a student, professional, or simply an individual looking to stay connected, having an email account is a necessity. In this article, we’ll guide you on how to check your email effectively and efficiently.
Setting up an email account is the first step towards accessing and managing your emails. From personal accounts like Gmail and Yahoo Mail to professional accounts provided by your employer, the process is typically straightforward. You’ll need to provide some basic information such as your name, desired email address, and a secure password. Once your account is set up, you’re ready to start using it.
Logging in to your email account requires visiting the email provider’s website or using an email client software. Most email providers have user-friendly interfaces that make accessing your account effortless. Simply enter your email address and password, and you’ll be granted access to your inbox.
Once you’re logged in, you’ll be greeted with the email interface. This is where you’ll spend most of your time managing your email. Familiarizing yourself with the layout and navigation options will help you navigate through your emails with ease.
Checking your inbox is as simple as clicking on the inbox folder or tab. This is where all your incoming emails land. Your inbox will display a list of emails, usually sorted by date and time. It’s important to regularly check your inbox to ensure you don’t miss any important messages.
Reading and replying to emails is a fundamental part of email communication. When you receive a new email, simply click on it to open and read its contents. If you need to respond, you can compose a reply directly within the email interface. Some email providers also offer options like forwarding or marking emails as important.
To keep your inbox organized, you can delete or archive emails that you no longer need. Deleting removes the email permanently, while archiving allows you to store it in a separate folder for future reference. Managing your emails effectively will prevent your inbox from becoming cluttered and make it easier to find what you need.
In addition to sorting and searching through emails, it’s important to manage your email contacts. Most email providers allow you to create and edit a list of contacts. This makes it convenient to address your emails without the hassle of manually typing in email addresses each time.
To stay up-to-date with incoming emails, setting up email notifications is crucial. Depending on your preferences, you can choose to receive notifications via email, desktop notifications, or even mobile push notifications. This ensures that you’re alerted instantly when you receive new emails.
Lastly, troubleshooting email issues is an inevitable part of the email experience. Whether it’s a forgotten password, email not sending, or difficulty accessing your account, knowing how to troubleshoot common email problems will save you valuable time and frustration.
Now that you have a general idea of what to expect, let’s dive deeper into each of these topics to become a proficient email checker. By the end of this article, you’ll be equipped with the knowledge and skills to seamlessly manage your emails and stay connected with the digital world.
Setting Up Email Account
Before you can start checking your email, you need to set up an email account. The process may vary depending on the email provider you choose, but the general steps remain the same. Here’s a guide to help you set up your email account:
1. Choose an Email Provider: There are numerous email providers to choose from, such as Gmail, Yahoo Mail, Outlook, and many more. Consider factors like storage capacity, user-friendly interface, and security features when selecting a provider.
2. Access the Provider’s Website: Once you have chosen an email provider, access their official website through your web browser.
3. Click on the Sign-Up or Create an Account Button: Look for a button or link that allows you to create a new account. It may be labeled as “Sign Up,” “Create Account,” or something similar.
4. Fill Out the Registration Form: You’ll be prompted to fill out a registration form with your personal information. This will typically include your name, desired email address, and a secure password. Make sure to choose a strong password to protect your account.
5. Verify Your Email Address: After filling out the registration form, you may need to verify your email address. This can be done by clicking on a verification link sent to the email address you provided during registration.
6. Customize Your Account Settings (Optional): Some email providers allow you to customize your account settings. You can personalize your email signature, set up filters and folders, and configure other preferences to suit your needs.
7. Familiarize Yourself with the Interface: Once your account is set up, take some time to explore the email provider’s interface. Navigate through the different tabs, menus, and options to get acquainted with the layout and features.
8. Set Up Two-Factor Authentication (Optional): For enhanced security, consider enabling two-factor authentication. This adds an extra layer of protection by requiring a verification code in addition to your password when logging in.
Now that your email account is set up, you can proceed to the next step: logging in to your account and accessing your emails. Remember to keep your login credentials secure and update your password periodically to protect your email account from unauthorized access.
Logging in to Email Account
Once you have set up your email account, the next step is to log in and access your email. Logging in may vary depending on the email provider, but generally follows a similar process. Here’s how you can log in to your email account:
1. Open a Web Browser: Launch your preferred web browser, such as Google Chrome, Mozilla Firefox, or Microsoft Edge.
2. Visit the Email Provider’s Website: Type in the URL of the email provider’s website in the address bar. For example, if you are using Gmail, enter “www.gmail.com” or if you are using Yahoo Mail, enter “www.mail.yahoo.com”.
3. Locate the Sign-In or Login Option: On the email provider’s website, look for the sign-in or login option. It’s usually located at the top right corner of the page. Click on it to proceed.
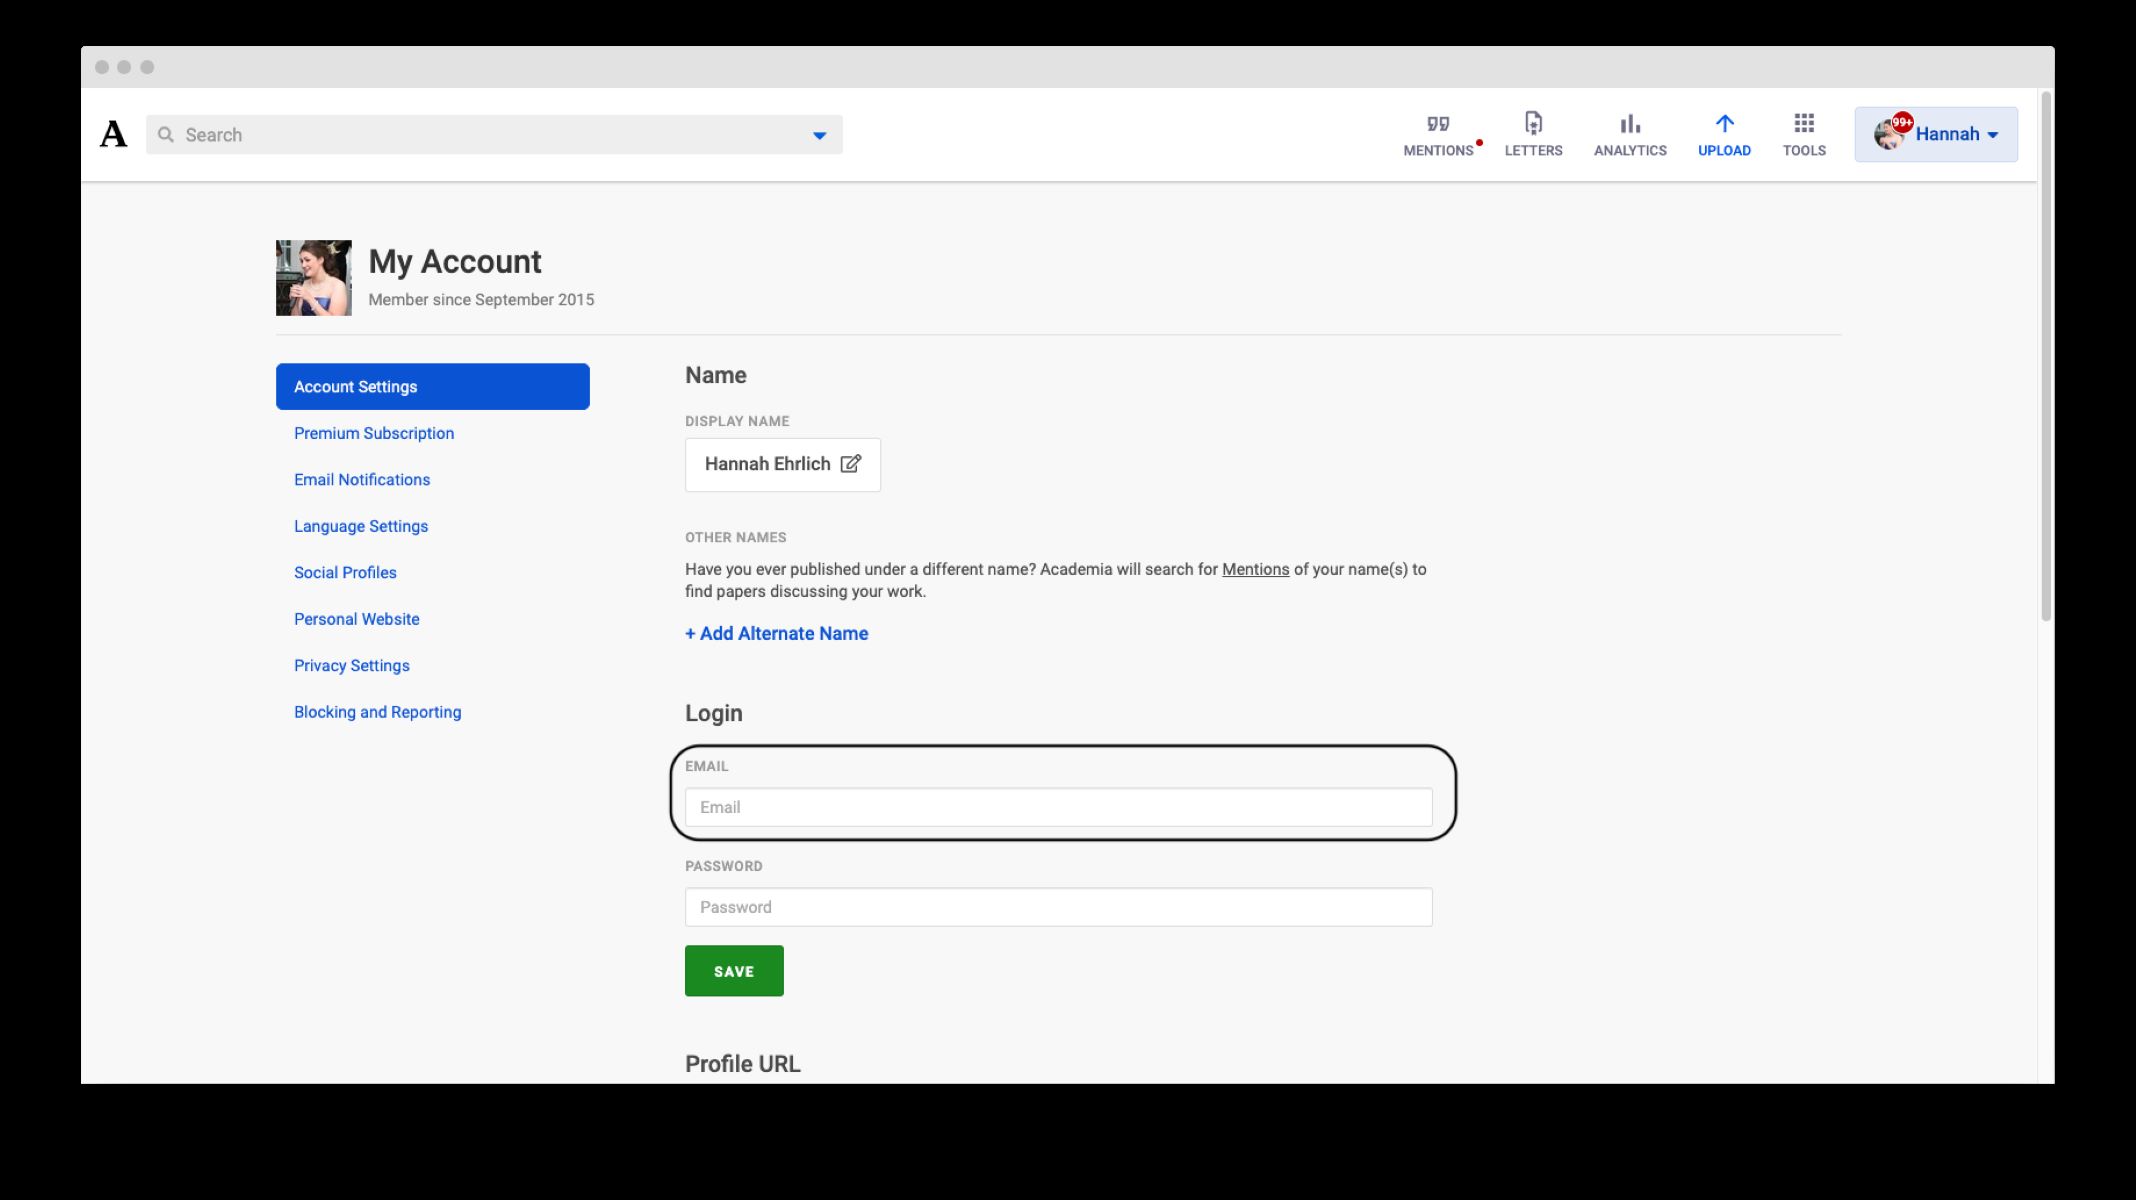
4. Enter Your Email Address: In the login form, enter your complete email address. For example, if your email address is “example@gmail.com”, enter “example@gmail.com”.
5. Provide your Password: Next, enter the password associated with your email account. Make sure to type it accurately and ensure that the “Caps Lock” key is not accidentally activated.
6. Enable or Disable ‘Stay Signed In’ or ‘Remember Me’ Option: Some email providers offer the option to stay signed in or remember your login details for convenience. Choose this option if you’re using a secure personal device or private computer. If you’re using a shared device or public computer, it’s recommended to leave this option disabled.
7. Click on the Sign-In or Login Button: Once you have entered your email address and password, click on the sign-in or login button to access your email account.
8. Complete any Additional Security Steps (if applicable): Depending on your email provider and account settings, you may be prompted to complete additional security steps, such as providing a verification code sent to your registered phone number or email address.
9. Navigate Through Your Email Interface: Upon successful login, you will be directed to your email interface. Take a moment to familiarize yourself with the different folders, menus, and options available to you.
Logging in to your email account is a crucial step that allows you to access and manage your emails. Remember to keep your login credentials secure and log out of your account when using a public or shared device.
Navigating the Email Interface
Once you have logged in to your email account, you will be greeted with the email interface. Navigating through the interface efficiently will help you manage your emails with ease. Here’s a guide to help you navigate the email interface:
1. Inbox Folder: The inbox folder is where all your incoming emails land. It’s the primary folder you will interact with on a regular basis. Click on the inbox folder to view a list of your received emails.
2. Navigation Bar: Most email interfaces include a navigation bar or menu that allows you to access different features and folders within your email account. Common options include Inbox, Sent, Drafts, Spam, Trash, and more. Click on these options to navigate to the respective folders.
3. Compose Button: Look for a “Compose” or “New Email” button to start composing a new email. This button is typically located prominently on the email interface and allows you to create and send emails to recipients.
4. Email Preview Pane: In some email interfaces, you can enable a preview pane that displays a preview of the selected email without having to open it fully. This can be a time-saving option when quickly scanning through your emails.
5. Email Sorting Options: Most email interfaces offer various sorting options to help you organize your emails. You can sort your emails by date, sender, subject, or other criteria. Explore the sorting options to find the best way to manage your emails effectively.
6. Folder Management: Some email interfaces allow you to create custom folders or labels to organize your emails. This can be useful for categorizing emails based on specific criteria, such as work-related, personal, or projects. Create folders and move emails into them for better organization.
7. Email Filters: Email filters allow you to automatically sort incoming emails into specific folders based on pre-defined criteria. This feature can be helpful for managing emails from specific senders, applying labels, or marking them as important. Set up filters to streamline your email organization process.
8. Settings and Preferences: Explore the settings and preferences section of your email account to customize your email interface according to your preferences. You can adjust notification settings, email signature, display options, and more to tailor the email interface to your needs.
9. Help and Support: If you encounter any difficulties or have questions about the email interface, look for a help or support section provided by the email provider. They often offer resources such as FAQ pages, tutorials, or customer support channels to assist you.
By familiarizing yourself with the different elements of the email interface, you can navigate through your emails efficiently and make the most out of your email management experience.
Checking Inbox
One of the primary tasks when managing your email is checking your inbox. Your inbox is the central hub where all your incoming emails are stored. Here’s how you can effectively check your inbox:
1. Access Your Email Account: Start by logging in to your email account using your email address and password. Once logged in, you will be directed to the email interface.
2. Locate the Inbox Folder: Look for the inbox folder in the navigation menu or sidebar. It is usually labeled as “Inbox” and is prominently displayed.
3. Click on the Inbox Folder: Click on the inbox folder to enter and view the contents of your inbox. The inbox will display a list of your received emails, typically arranged in chronological order, with the most recent email at the top.
4. Scan Through the Emails: Take a moment to scan through the emails in your inbox. Pay attention to the sender’s name, subject line, and any preview text provided. This will give you a general idea of what the email is about.
5. Mark Unread Emails: If you come across emails that you haven’t read yet, consider marking them as unread. Most email interfaces provide an option to mark emails as unread, allowing you to easily identify them later.
6. Check for Important Emails: Look for any emails that may be of high importance or require immediate attention. These could include emails from your boss, clients, or urgent requests. Prioritize these emails and address them first.
7. Take Note of Attachments: Keep an eye out for any emails with attachments. These could be documents, images, or other files. Attachments are usually indicated by an icon next to the email or mentioned within the email’s subject line or body.
8. Use Email Preview Pane (if available): Some email interfaces offer a preview pane that allows you to read a preview of the selected email without opening it fully. This can be helpful in quickly scanning through your emails without having to open each one individually.
9. Keep Your Inbox Organized: As you check your inbox, make sure to manage your emails effectively. Delete any irrelevant or unnecessary emails, archive important emails for future reference, and mark emails that require follow-up or further action.
10. Reply or Forward Emails: If you come across emails that require a response, take the time to compose a reply or forward the email to the appropriate recipients. This will help you stay on top of your email communication and maintain efficient correspondence.
Regularly checking your inbox is essential to stay updated with your incoming emails. By following these steps, you can effectively manage your inbox and ensure that you don’t miss any important messages.
Reading and Reply to Emails
Reading and replying to emails is a crucial part of managing your email communication effectively. Here’s a step-by-step guide on how to read and reply to your emails:
1. Open Your Inbox: Start by logging into your email account and accessing your inbox. This is where all your incoming emails are stored.
2. Select an Email: Scan through your inbox and click on the email you want to read. The selected email will open in a new window or pane, displaying the sender’s name, subject line, and the body of the email.
3. Read the Email: Take the time to read the email carefully. Understand the sender’s message, any instructions provided, and the context of the email. Pay attention to any attachments or links mentioned within the email.
4. Compose a Reply: Once you have read the email, you may need to compose a reply. Look for a “Reply” or “Reply All” button, typically located at the top or bottom of the email. Clicking on this button will open a new email composition window.
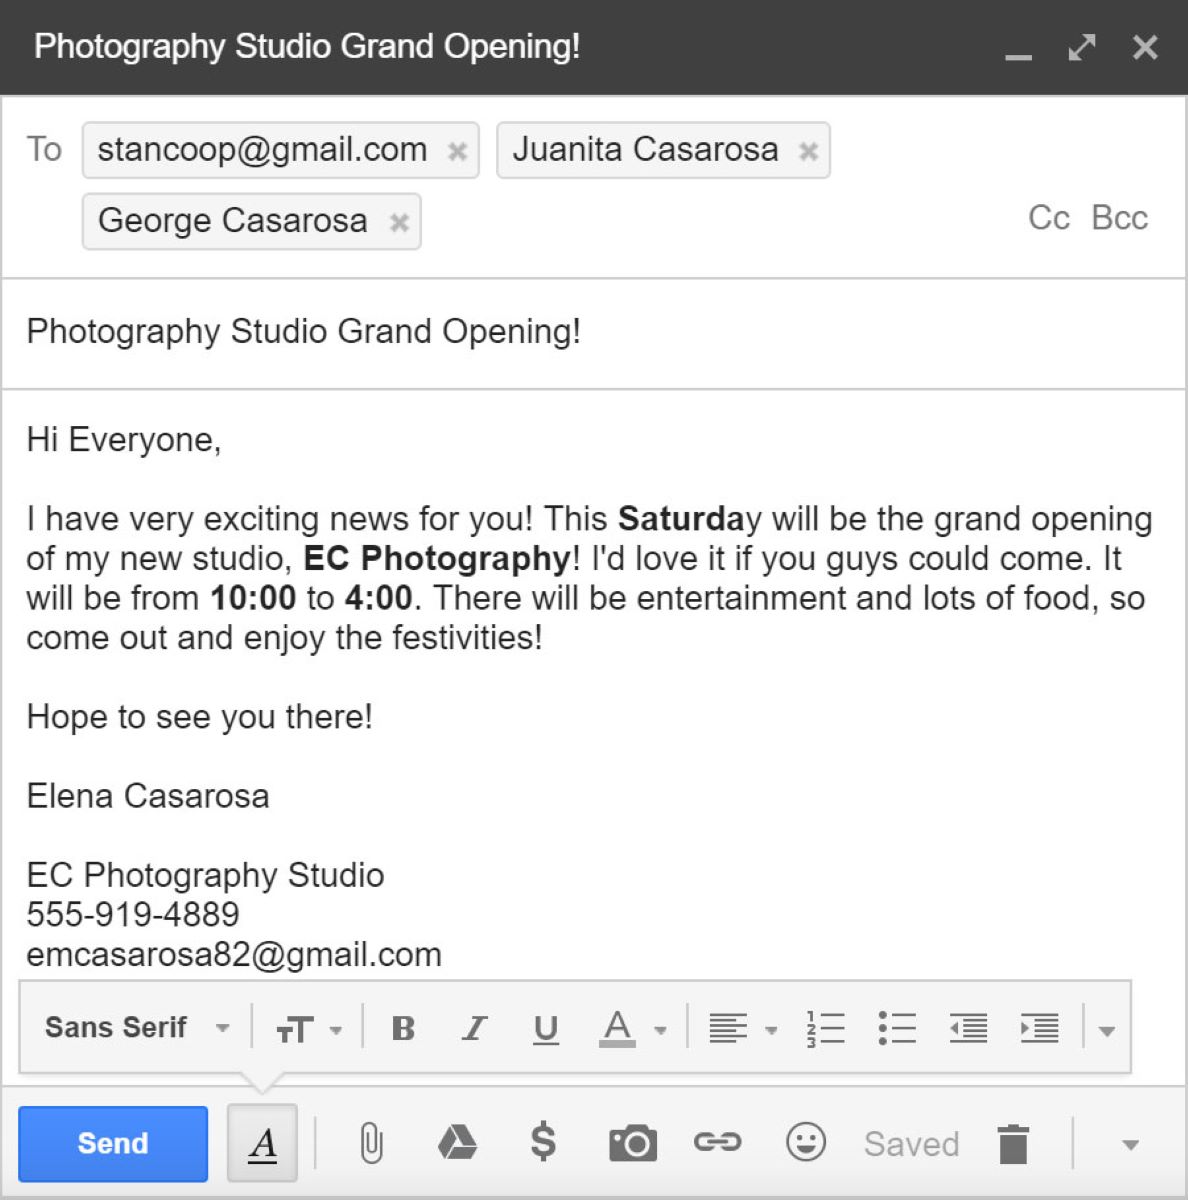
5. Craft Your Reply: In the new email composition window, type your response to the sender. Be clear, concise, and courteous in your message. Address any points or questions raised by the sender and provide any necessary updates or information.
6. Format Your Reply (Optional): Depending on your email service, you may have access to formatting options. You can format your reply by adding bullet points, bold or italicized text, or even attaching files if needed.
7. Include Attachments (if necessary): If you need to send any files or documents as part of your reply, use the attachment feature. Most email interfaces have an attachment button that allows you to browse and attach files from your computer or cloud storage.
8. Review and Edit Your Reply: Before sending your reply, take a moment to review and edit it for clarity, grammar, and spelling errors. Make sure your message conveys the intended meaning and is free from any typos.
9. Send Your Reply: Once you are satisfied with your reply, click on the send or submit button to send your response to the email sender. Your reply will be delivered to their email address.
10. Forward or Compose New Email (if applicable): In some cases, you may need to forward the email to someone else or compose a new email as a follow-up to the received email. Use the “Forward” or “Compose” button to perform these actions.
Remember to respond to emails promptly and professionally. By following these steps, you can effectively read and reply to your emails, ensuring efficient communication and keeping your inbox organized.
Deleting and Archiving Emails
Deleting and archiving emails are essential steps to effectively manage your inbox and ensure that it remains organized. Here’s a guide on how to delete and archive emails:
1. Select the Email(s): Start by navigating to your inbox or the folder that contains the emails you want to delete or archive. Look for the checkbox or selection option next to each email.
2. Delete Emails: If you want to permanently remove emails from your inbox, select the checkbox next to the emails you wish to delete. Look for a “Delete” or “Trash” button, usually located at the top or bottom of the email interface. Click on it to delete the selected emails.
3. Confirm Deletion: Depending on your email provider, you may be prompted to confirm the deletion before permanently removing the emails. Confirm the deletion if prompted.
4. Archive Emails: If you want to store emails for future reference without cluttering your inbox, select the checkbox next to the emails you wish to archive. Look for an “Archive” or “Move” button, usually located at the top or bottom of the email interface. Click on it to archive the selected emails.
5. Choose Archive Folder: Some email interfaces allow you to choose a specific folder or label to archive your emails. Select the desired folder or label from the options provided, or create a new folder if necessary.
6. Retrieve Archived Emails: To access archived emails, navigate to the designated archive folder or label. The archived emails will be stored there, allowing you to retrieve them when needed without cluttering your inbox.
7. Delete Unnecessary Emails Regularly: To prevent your inbox from becoming cluttered, make it a habit to regularly delete unnecessary emails. Remove spam, promotional emails, and other irrelevant messages to keep your inbox clean.
8. Be Cautious with Permanently Deleting Emails: When deleting emails, be cautious as this action will permanently remove them from your account. Double-check the emails before confirming the deletion to avoid accidentally deleting important messages.
9. Consider Storage Limits: Keep in mind that email accounts often have storage limits. If you are nearing your storage capacity, deleting or archiving emails can help free up space for new incoming messages.
By regularly deleting unnecessary emails and archiving those of importance, you can maintain an organized inbox and easily locate important messages when needed.
Sorting and Searching Emails
Sorting and searching emails are valuable features that help you efficiently manage and find specific emails in your inbox. Here’s how you can effectively sort and search for emails:
1. Sorting Emails:
– By Date: Sorting emails by date allows you to view your emails in chronological order, with the latest emails appearing at the top of the list. This is particularly useful when you want to focus on recent correspondence or track the timeline of a conversation.
– By Sender: Sorting emails by sender organizes your inbox based on the email addresses of the senders. This allows you to quickly locate emails from specific individuals or organizations.
– By Subject: Sorting emails by subject arranges your inbox alphabetically based on the subject lines of the emails. This can be helpful when searching for emails related to a specific topic or project.
– By Importance: Some email interfaces provide the option to sort emails by importance. This feature prioritizes important emails, placing them at the top of your inbox for quick access.
2. Searching Emails:
– Use the Search Bar: Look for the search bar within your email interface. Enter keywords, names, or subject lines related to the email you are looking for. The search function will scan your inbox or selected folders to display relevant results.
– Advanced Search Options: Explore advanced search options offered by your email provider. These options allow you to refine your search by specifying criteria such as date range, sender, recipient, attachments, and more. Utilizing these advanced options can help you narrow down search results.
– Search Filters and Labels: Some email interfaces enable you to create filters or labels to categorize and organize your emails. Assign labels or filters to emails based on specific criteria, making it easier to locate them when searching.
– Saved Searches or Folders: Consider creating saved searches or folders for specific categories of emails. For example, you can create a folder for emails related to a particular project or a saved search for unread or flagged emails. These saved searches or folders allow you to quickly access relevant emails without repeatedly running the same search.
– Use Boolean Operators: If your email provider supports it, you can use Boolean operators such as AND, OR, and NOT to refine your search. This enables you to search for emails that meet specific criteria or combine multiple search terms to narrow down results.
– Search History: Some email interfaces keep a history of your recent searches. This allows you to easily repeat previous searches without having to re-enter all the search criteria.
By utilizing sorting and searching features effectively, you can quickly find specific emails, stay organized, and efficiently manage your inbox.
Managing Email Contacts
Managing your email contacts is essential for efficient communication and easy access to important email addresses. Here are some tips on how to effectively manage your email contacts:
1. Create Contacts List or Address Book: Most email interfaces allow you to create a contacts list or address book. Take advantage of this feature by adding contacts and organizing them into categories or groups. This makes it easier to find and address emails to specific individuals or groups.
2. Add New Contacts: Whenever you receive an email from a new contact, add their email address to your contacts list. Look for an “Add Contact” or “Save Contact” option within your email interface. Enter the person’s name, email address, and any additional information you find relevant.
3. Edit and Update Contact Information: Regularly review and update contact information to ensure accuracy. Update email addresses, phone numbers, job titles, or any other relevant details for each contact. Keeping contact information up to date allows for seamless communication.
4. Import and Sync Contacts: If you have contacts stored in other applications or devices, such as your phone or another email account, consider importing or syncing those contacts with your email account. This saves time and effort by consolidating all your contacts in one place.
5. Use Contact Groups: Organize your contacts into groups based on common attributes, such as work colleagues, personal friends, or project teams. This allows you to address emails to entire groups at once, saving time when sending mass emails.
6. Search Contacts: Look for a search function within your contacts list to quickly find specific contacts. Enter the person’s name or email address to narrow down the search results and locate the desired contact.
7. Delete Unnecessary Contacts: Regularly review your contacts list and remove any outdated or irrelevant contacts. Deleting unnecessary contacts keeps your list streamlined and makes it easier to find the contacts you need.
8. Backup Your Contacts: Consider backing up your contacts to prevent any loss in case of data or system failure. Some email platforms provide options to export or backup your contacts as a file, which can be stored securely.
9. Utilize Autocomplete Feature: As you compose emails, take advantage of the autocomplete feature that suggests email addresses based on your contacts list. This saves time by automatically populating the recipient’s email address as you type their name.
10. Sync Contacts Across Devices: If you access your email account on multiple devices, such as your computer, phone, or tablet, enable contact syncing to ensure that your contacts are available and up to date across all devices.
By effectively managing your email contacts, you can streamline communication, save time in addressing emails, and maintain an organized list of contacts for future reference.
Setting Up Email Notifications
Email notifications are a convenient way to stay updated and promptly respond to incoming emails. Setting up email notifications ensures that you don’t miss important messages even when you’re not actively checking your email. Here’s how to set up email notifications:
1. Access Email Settings: Navigate to the settings section of your email account. Look for options related to notifications or alerts. The specific location and terminology may vary depending on your email provider.
2. Choose Notification Type: Decide which type of notifications you prefer to receive. Common options include email notifications, desktop notifications, or push notifications on your mobile device. Select the option that suits your needs and preferences.
3. Configure Email Notifications: If you choose to receive email notifications, you can specify the conditions under which you want to be notified. Options may include receiving notifications for all incoming emails, only important emails, or emails from specific contacts or folders.
4. Customize Notification Preferences: Some email providers allow you to customize the appearance and sound of the notification. Personalize the notification settings to make them more noticeable or distinguishable from other notifications you receive on your device.
5. Set Quiet Hours (Optional): If you don’t want to be disturbed during specific hours, consider setting up quiet hours for your email notifications. This prevents notifications from alerting you during designated times, such as overnight or during important meetings.
6. Test Notifications: Once you have configured your email notification settings, send a test email to ensure that you receive the notification as desired. This allows you to confirm that the notifications are set up correctly and functioning properly.
7. Adjust Notification Frequency (Optional): Some email providers offer options to adjust the frequency of email notifications. You can choose to receive notifications immediately, at set intervals, or in batches. Experiment with different notification frequency settings to find what works best for you.
8. Disable or Enable Notifications: If you no longer wish to receive email notifications, access your email settings and disable the notification feature. Likewise, if you disabled notifications previously and want to re-enable them, revisit the settings and turn them back on.
9. Review Battery and Data Usage (Mobile Devices): Keep in mind that email notifications, especially push notifications, can consume battery life and data on mobile devices. If you’re experiencing issues, consider adjusting your notification settings to minimize the impact on battery usage and data consumption.
By setting up email notifications, you can stay informed and promptly respond to important emails, ensuring effective communication and timely actions. Adjust the notification settings as needed to strike a balance between staying updated and minimizing interruptions.
Troubleshooting Email Issues
While email is a reliable communication tool, occasionally you may encounter issues that disrupt your email experience. It’s important to know how to troubleshoot common email problems to ensure a seamless and uninterrupted flow of communication. Here are some troubleshooting tips for common email issues:
1. Check Internet Connection: Start by confirming that you have a stable internet connection. Ensure that you’re connected to a reliable network, and if necessary, restart your router or modem to troubleshoot any connectivity issues.
2. Verify Email Server Status: Sometimes, email service providers experience temporary outages or maintenance periods that may affect email access. Check the status page or official social media accounts of your email provider to see if there are any reported server issues.
3. Check Email Settings: Review your email account settings to ensure that they are correctly configured. Verify the incoming and outgoing server settings, email address, and password. Make any necessary corrections if there are errors or discrepancies.
4. Clear Browser Cache and Cookies: If you access your email through a web browser, clearing your browser’s cache and cookies can resolve issues related to loading or accessing emails. Clearing these temporary files helps ensure a fresh start for your browser.
5. Disable Browser Extensions and Add-ons: Certain browser extensions or add-ons may interfere with the functionality of your email account. Temporarily disable any extensions or add-ons that may be causing conflicts, and check if the issue persists.
6. Update Email Client Software: If you use an email client software like Outlook or Thunderbird, ensure that you have the latest version installed. Updating the software can address bugs or compatibility issues that may be affecting your email experience.
7. Monitor Spam and Junk Folders: If you’re not receiving expected email messages, check your spam or junk folder. Sometimes, legitimate emails get misidentified as spam. Mark any valid emails as “not spam” to ensure they are delivered to your inbox in the future.
8. Scan for Malware or Viruses: Malware or viruses on your computer or device can disrupt email functionality. Run a full system scan using a reputable antivirus software to detect and remove any potential threats that may be affecting your email experience.
9. Contact Email Service Provider Support: If you have tried the above troubleshooting steps and the issue persists, reach out to the customer support of your email service provider. They can provide more specific assistance tailored to your email service.
10. Consider Alternative Email Clients: If all else fails, you may want to consider switching to an alternative email client or using webmail provided by a different email service provider. This can provide a fresh start and resolve persistent issues.
Remember to document any error messages or steps you have taken for troubleshooting purposes, as this information can be helpful when seeking further assistance.
By following these troubleshooting tips, you can overcome common email issues and ensure a smooth and uninterrupted email experience.
Conclusion
Congratulations! You’ve reached the end of this guide on how to effectively check and manage your email. By following the steps outlined in this article, you now have the knowledge and skills to navigate through your email account with confidence, stay organized, and communicate efficiently.
From setting up your email account and logging in to navigating the email interface, checking your inbox, and reading and replying to emails, each step plays a crucial role in ensuring a smooth and productive email experience. Additionally, you’ve learned how to delete and archive emails to keep your inbox clutter-free, as well as how to sort and search your emails for easy retrieval.
Managing your email contacts allows you to stay connected with the important people in your network, and by setting up email notifications, you can stay informed and respond promptly to incoming emails. Finally, troubleshooting common email issues ensures that you can overcome any challenges that may arise and maintain a seamless flow of communication.
Remember, effective email management is not only about staying organized but also about maintaining professionalism and responsiveness. By applying the techniques and strategies covered in this guide, you can enhance your email communication skills, save time, and avoid missing important messages.
Now that you have the tools and knowledge to manage your email effectively, it’s time to put them into practice. Take control of your inbox, stay on top of your emails, and make the most of this essential communication tool.
Happy email managing!