Introduction
Welcome to our guide on how to check the battery level of your Logitech keyboard. Logitech keyboards are known for their reliability and longevity, but it’s always a good idea to keep an eye on the battery level to ensure uninterrupted usage. Whether you use a wireless or a Bluetooth keyboard, monitoring the battery level will help you avoid any unexpected disruptions during your work or gaming sessions.
Knowing how to check the battery level of your Logitech keyboard is important, as it allows you to plan ahead and be prepared with fresh batteries when needed. In this guide, we will take you through the step-by-step process of checking the battery level on your Logitech keyboard.
We will cover basic steps that apply to most Logitech keyboard models, but it’s important to note that there might be slight variations depending on the specific model you own. It’s always a good idea to refer to the user manual provided with your keyboard for more precise instructions.
So, without further ado, let’s dive into the process of checking the battery level on your Logitech keyboard and ensure that you always have the power you need for seamless typing and maximum productivity!
Step 1: Turn on the keyboard
The first step in checking the battery level of your Logitech keyboard is to ensure that it is turned on. If you are using a wireless keyboard, locate the power switch on the keyboard and turn it on. Many Logitech keyboards have an indicator light that will turn on when the keyboard is powered on.
If you are using a Bluetooth keyboard, make sure that Bluetooth is enabled on your computer or device. Often, Bluetooth keyboards have a dedicated button or switch that you need to press to enter pairing mode. Once you have turned on the keyboard and established the Bluetooth connection, you are ready to proceed to the next step.
It’s worth noting that some Logitech keyboards have automatic power-saving features that will turn off the keyboard after a period of inactivity. If you notice that your keyboard is not responding, it may have entered power-saving mode. Simply press any key on the keyboard to wake it up and proceed with the battery check.
By ensuring that your Logitech keyboard is turned on, you can accurately assess the battery level and take appropriate action, whether it’s replacing the batteries or charging the keyboard, if applicable. Let’s move on to the next step to continue the battery check process.
Step 2: Locate the battery compartment
Once your Logitech keyboard is turned on, the next step is to locate the battery compartment. The battery compartment is where you will find the batteries that power your keyboard. The location of the battery compartment may vary depending on the model of your Logitech keyboard.
Start by flipping your keyboard over so that the backside is facing up. Look for a small latch or release button near the top or bottom edge of the keyboard. This latch or button is typically used to open the battery compartment and access the batteries.
If you are having trouble finding the latch or release button, refer to the user manual or look for any markings or icons on the bottom of the keyboard that indicate the location of the battery compartment.
Once you have located the latch or release button, press it or slide it in the indicated direction to unlock the battery compartment. Some Logitech keyboards may have a simple battery cover that can be easily lifted off, while others may have a more complex mechanism. Follow the instructions provided with your keyboard to open the compartment successfully.
With the battery compartment open, you are now ready to proceed to the next step and check the battery level indicator on your Logitech keyboard. Continue reading to find out how to do this.
Step 3: Remove the battery cover
With the battery compartment of your Logitech keyboard open, the next step is to remove the battery cover. The battery cover protects the batteries and keeps them securely in place within the keyboard.
Depending on the model of your Logitech keyboard, the battery cover may be a separate piece that needs to be lifted off or a part of the keyboard that can be opened using a latch or sliding mechanism.
If the battery cover is a separate piece, simply lift it off gently using your fingertips. Be careful not to apply too much force or use sharp objects that may damage the cover or the keyboard.
If your keyboard has a latch or sliding mechanism, follow the instructions provided with your model to unlock and open the battery cover. This may involve sliding a switch or pressing a release button to detach the cover from the keyboard.
Once the battery cover is removed, you will have direct access to the batteries. Take a moment to familiarize yourself with the battery layout and the battery terminals. This will help you in identifying the battery level indicator on your Logitech keyboard, which we’ll cover in the next step.
Remember to handle the battery cover and batteries with care. If you need to replace the batteries, ensure that you use the correct type and follow proper disposal guidelines for old or depleted batteries.
Now that the battery cover is removed, let’s move on to the next step and check the battery level indicator on your Logitech keyboard.
Step 4: Check the battery level indicator
With the battery cover removed, you can now check the battery level indicator on your Logitech keyboard. The battery level indicator is a feature that allows you to determine how much power is left in your keyboard’s batteries.
Look for a small LED light or a series of LED lights near the battery compartment or on the top surface of your Logitech keyboard. These lights are designed to indicate the battery level and provide you with a quick visual reference.
The number and color of the LED lights may vary depending on the model of your Logitech keyboard. In most cases, a single LED light or a row of lights will be present, with each light representing a specific battery level.
For example, a green LED light may indicate a high or full battery level, an orange light may indicate a medium or halfway charged battery, and a red light may indicate a low or nearly depleted battery.
Consult the user manual or the Logitech website for your specific keyboard model to understand the exact meaning of the LED light colors and their corresponding battery levels.
Take a moment to observe the battery level indicator and identify the current battery level of your Logitech keyboard. This will give you an idea of whether the batteries are still in good condition or if they need to be replaced.
If your keyboard does not have a battery level indicator, it is a good idea to replace the batteries periodically or keep spare batteries on hand to avoid unexpected interruptions in usage.
Now that you have checked the battery level indicator, it’s time to move on to the next step, which involves replacing the batteries if necessary. Continue reading to learn more.
Step 5: Replace the batteries if necessary
After checking the battery level indicator on your Logitech keyboard, you may find that the batteries need to be replaced. When the battery level is low or depleted, it’s important to replace the batteries to ensure optimal performance of your keyboard.
If you determine that replacing the batteries is necessary, follow these steps:
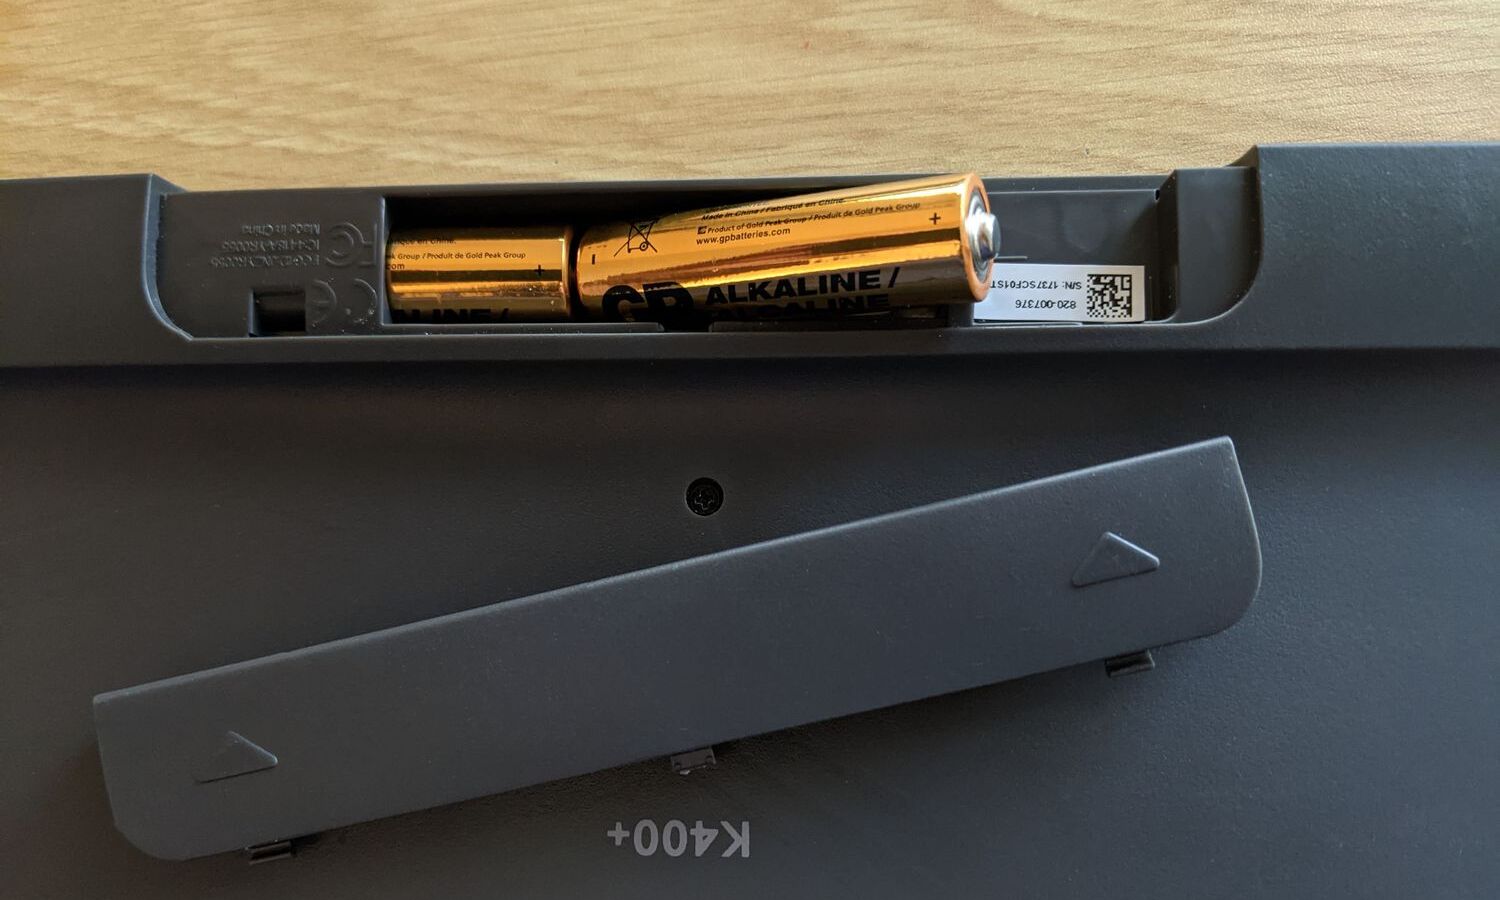
- First, make note of the battery type required for your Logitech keyboard. Common battery types for Logitech keyboards include AA or AAA batteries.
- Refer to the user manual or the markings inside the battery compartment to find the correct orientation for inserting the batteries.
- Take out the old batteries from the compartment, ensuring that you dispose of them properly according to the guidelines in your area for battery recycling.
- Insert the new batteries into the compartment, following the correct orientation as indicated.
- Close the battery compartment by reattaching the battery cover or securing it with the latch or sliding mechanism.
It’s essential to ensure that the batteries are properly inserted and secured in the compartment. Loose batteries or incorrect positioning may cause connectivity issues or disrupt the keyboard’s functionality.
Once the new batteries are in place and the battery compartment is closed, give your Logitech keyboard a moment to establish a connection and power up. The LED lights should indicate the new battery level, confirming that the replacement has been successful.
If you continue to experience battery-related issues despite replacing the batteries, consult the Logitech customer support or refer to the troubleshooting section in the user manual for further guidance.
Now that you have successfully replaced the batteries, it’s time to move on to the next step and test your Logitech keyboard to ensure it’s functioning properly. Continue reading to learn more.
Step 6: Test the keyboard
After replacing the batteries in your Logitech keyboard, it’s important to test its functionality to ensure that everything is working as expected. Testing the keyboard will allow you to verify if the battery replacement resolved any issues and that the keyboard is responsive and functioning properly.
To test your Logitech keyboard, follow these steps:
- Make sure your keyboard is properly connected to your computer or device. For wireless keyboards, ensure that the USB receiver or Bluetooth connection is securely plugged in or enabled.
- Place your hands on the keyboard and type a message or any combination of keys to see if they register accurately. Pay attention to any lag, unresponsiveness, or missing keystrokes.
- Test out various keys, including special function keys and multimedia keys, to ensure that all features are working correctly.
- If applicable, test the keyboard’s adjustable features such as backlighting, volume control, or programmable keys to ensure they are functioning as intended.
- Check if any additional features or functionalities specific to your Logitech keyboard are working properly.
If you encounter any issues during the testing phase, such as unresponsive keys or erratic behavior, double-check that the batteries are inserted correctly and securely. If the problem persists, refer to the troubleshooting section of the user manual or contact Logitech customer support for further assistance.
Once you have confirmed that your Logitech keyboard is functioning correctly, you can enjoy uninterrupted typing or gaming sessions with confidence that the battery replacement has resolved any power-related issues.
Congratulations! You have successfully completed the process of testing your Logitech keyboard. Now you can proceed to use your keyboard for all your typing needs.
Conclusion
Checking the battery level of your Logitech keyboard is a crucial step in ensuring uninterrupted usage and optimal performance. By following the steps outlined in this guide, you can easily monitor the battery level and take appropriate action, such as replacing the batteries if necessary.
Remember to always turn on your keyboard before proceeding with the battery check. Locate the battery compartment, remove the battery cover, and inspect the battery level indicator. If the battery level is low or depleted, replace the batteries following the correct orientation. Finally, test the keyboard to ensure it’s functioning properly.
While these steps should apply to most Logitech keyboard models, it’s important to consult the user manual or Logitech’s official website for specific instructions and any model-specific variations.
Regularly checking the battery level and taking timely action will help you avoid unexpected interruptions and maintain a smooth typing experience. It’s also a good idea to keep spare batteries on hand or consider using rechargeable batteries to minimize waste and save costs in the long run.
We hope this guide has been helpful in guiding you through the process of checking the battery level on your Logitech keyboard. Enjoy continued reliability and optimal performance from your Logitech keyboard!