Introduction
Welcome to this step-by-step guide on how to change your email signature in Gmail. Your email signature is a crucial element of your professional communication as it provides essential contact information and adds a personal touch to your emails. Whether you want to update your existing signature or create a brand new one, Gmail makes it easy to customize this important feature.
Having a well-designed email signature can help you leave a lasting impression on your recipients, communicate vital details about yourself or your business, and add a touch of professionalism to every email you send. With Gmail’s user-friendly interface, you can easily customize your signature to reflect your personal style and include the information that is most relevant to your recipients.
In this guide, we’ll walk you through the process of changing your email signature in Gmail. We’ll cover everything from accessing the settings menu to editing or creating a new signature. So, whether you’re a Gmail beginner or a seasoned user looking to update your signature, this article has got you covered.
Before we dive into the steps, make sure you have your desired signature content prepared. This may include your name, job title, contact information, company website, and even a carefully crafted tagline or a link to your social media profiles. With all of this information at hand, you’ll be ready to create or modify your email signature in no time.
Step 1: Open Gmail Settings
The first step in changing your email signature in Gmail is to access the settings menu. Here’s how you can do it:
- Open your Gmail account by visiting mail.google.com and entering your login credentials.
- Once you’re logged in, locate the gear icon in the top right corner of the Gmail window. This icon represents the settings menu.
- Click on the gear icon to open a dropdown menu. From the menu, select “Settings”.
By clicking on “Settings”, you will be redirected to the Gmail settings page, where you can customize various aspects of your Gmail account.
Alternatively, you can also access the settings page by clicking on the “Settings” option in the top right corner of the Gmail window and selecting “See all settings”.
It’s worth noting that the location of the gear icon and the settings option may vary slightly based on the version of Gmail you’re using. However, regardless of the version, you should be able to find the settings menu by looking for the gear icon.
Now that you have successfully opened the Gmail settings page, you’re one step closer to changing your email signature. In the next step, we’ll explore the general tab within the settings page, where the signature settings are located.
Step 2: Go to the General Tab
Once you’ve accessed the Gmail settings page, the next step is to navigate to the General tab. This is where you can find the signature settings. Here’s how:
- On the Gmail settings page, you will notice several tabs at the top. Click on the “General” tab to proceed.
The General tab contains various options to customize your Gmail account, including settings related to your signature.
Depending on the version of Gmail you’re using, you may find the signature settings directly within the General tab, or you may need to scroll down to locate them. The specific section you’re looking for will be labeled as “Signature”.
If you’re using the newer version of Gmail, you may see an option to toggle the signature on or off, along with the option to edit it. If you’re using the classic version of Gmail, you will find a text box where you can enter and format your signature.
In the signature settings, you’ll have the option to choose whether to include your signature on new emails, replies, or both. You can also enable an option to insert your signature before quoted text in a reply. These settings allow you to control where and when your signature appears in your emails.
By navigating to the General tab and locating the signature settings, you’re now ready to edit or create a new signature. In the next step, we’ll dive into the details of how to modify or create your desired signature.
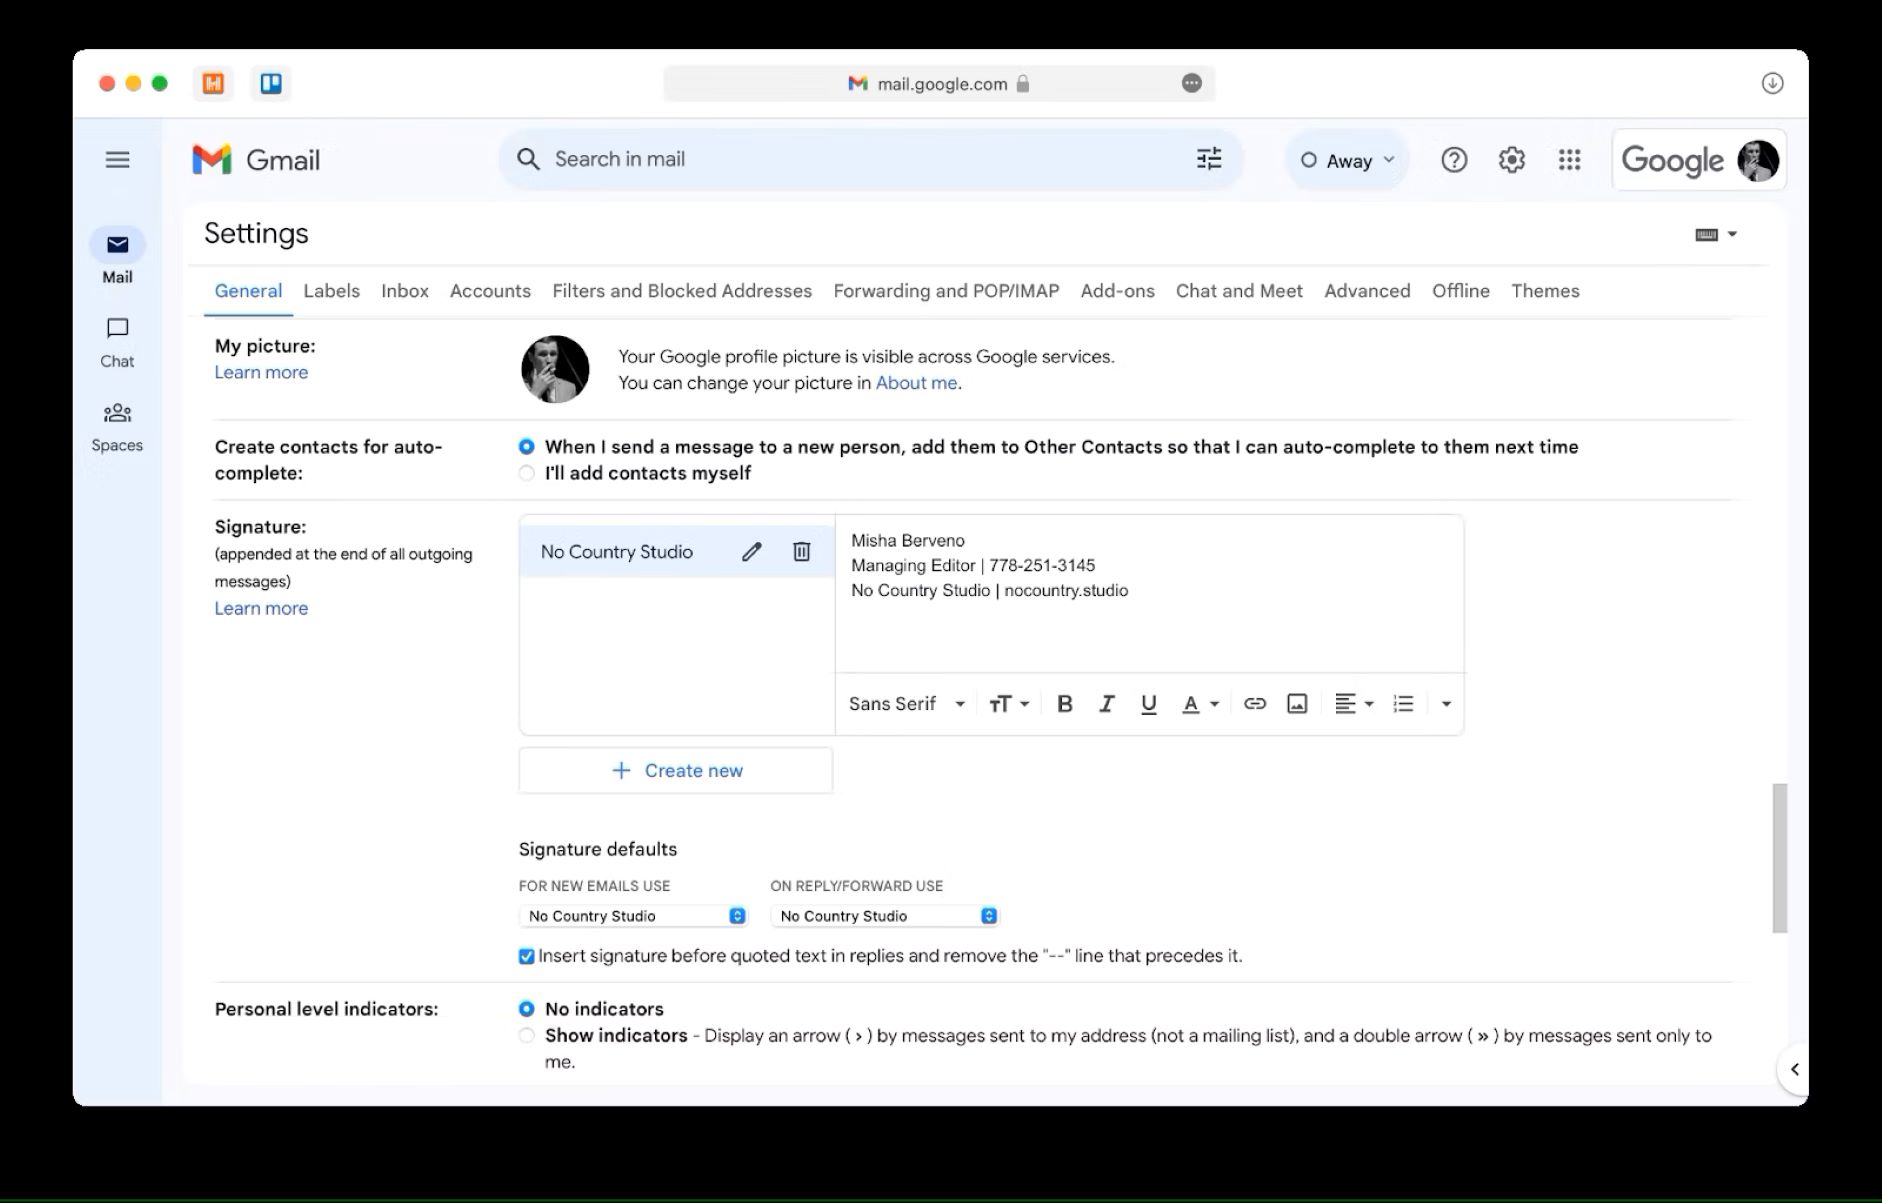
Step 3: Locate the Signature Section
After accessing the General tab in the Gmail settings page, the next step is to locate the signature section. Here’s how you can find it:
- Scroll down the General tab until you come across a section labeled “Signature”.
Within the signature section, you will find options to edit or create your email signature. The appearance of this section may vary depending on the version of Gmail you are using.
In the newer version of Gmail, you will see toggles to enable or disable the signature for new emails and replies. There will also be an option to edit the actual content of the signature.
In the classic version of Gmail, there will be a text box where you can enter and customize your signature. You can use formatting options to change the font, size, color, and style of your signature text.
Some users may also have the option to use Rich Text Formatting, which allows for more advanced customization options such as adding images and hyperlinks to your signature. This feature can help you create a visually appealing and informative email signature.
It’s important to keep in mind that Gmail imposes certain limitations on the size and complexity of the signature. For example, there may be a character limit or restrictions on the number of lines allowed. Make sure to review these limitations and adjust your signature accordingly to ensure it appears correctly in your emails.
By locating the signature section within the General tab, you’re now ready to edit your existing signature or create a new one. Let’s move on to the next step to explore the process of modifying or creating a signature that truly reflects your personal or professional brand.
Step 4: Edit or Create a New Signature
Once you have located the signature section within the Gmail settings, you can now proceed to edit your existing signature or create a new one from scratch. Here’s how:
- If you already have a signature set up, you can simply edit the existing text to make the desired changes. Use the text box provided to modify the content.
- If you want to create a new signature, clear the existing text and start typing your desired signature from scratch.
- You can add and format text as needed, using options like bold, italics, underline, and more. You can also change the font, size, color, and alignment of your signature text.
- If you want to include additional elements in your signature, such as your company logo or a hyperlink to your website, you may need to use HTML coding or the Rich Text Formatting feature, if available.
- Make sure to include all the necessary information you want in your signature, such as your name, job title, contact details, and any other relevant information.
- As you make changes or create a new signature, you can preview how it will appear in the “Preview” section provided.
Take your time to customize your signature to make it visually appealing and informative. Experiment with different fonts, styles, and formatting options to create a signature that aligns with your personal or professional brand.
Remember to keep your signature concise and avoid cluttering it with excessive information. A well-designed and professional-looking signature will leave a positive impression on your recipients.
Once you are satisfied with your changes or the new signature you have created, you’re ready to save the changes and start using your updated signature for your Gmail emails.
Let’s move on to the final step to learn how to save your changes and ensure your updated signature is applied to your outgoing emails.
Step 5: Save Changes
After editing or creating your email signature in Gmail, the final step is to save your changes to ensure your updated signature is applied to your outgoing emails. Here”s how to save your changes:
- Scroll down to the bottom of the settings page until you reach the end.
- Look for the “Save Changes” or “Save” button.
- Click on the button to save your changes.
Once you have saved your changes, Gmail will automatically apply your updated or newly created signature to all new emails you compose.
If you had an email draft open while modifying your signature, you may need to refresh the page or reopen the draft to see the changes applied to that specific email.
It’s important to note that the changes you make to your signature will only be reflected in newly composed emails, not in your previously sent or received emails.
If you have multiple email accounts connected to your Gmail, make sure to repeat the steps for each account to update the signature individually.
Now that you have successfully saved your changes, you can start enjoying the benefits of your updated email signature in Gmail. Your professional and personalized signature will leave a lasting impression on your recipients and enhance your overall email communication.
Remember, you can always return to the Gmail settings page to further customize or update your signature as your needs or preferences change over time.
Congratulations, you have now successfully changed your email signature in Gmail. Happy emailing!