Introduction
When it comes to gaming, having a high-quality monitor can greatly enhance your gaming experience. However, sometimes games may launch on the wrong monitor, causing frustration and inconvenience. Fortunately, there are several methods to change which monitor a game is displayed on, allowing you to ensure that your gaming setup is optimized.
In this article, we will explore three different methods to change the monitor on which a game is displayed. Each method offers a viable solution, so you can choose the one that suits your needs and preferences.
Whether you prefer a straightforward approach, using the built-in display settings of your operating system, or you want to fully customize your gaming experience with graphics control panel options, or even explore dedicated third-party software, we’ve got you covered.
So, if you’re ready to regain control over which monitor your games appear on, let’s dive into the methods and get your gaming setup exactly how you want it.
Method 1: Using Display Settings
One of the simplest and most accessible ways to change the monitor on which a game is displayed is through the display settings of your operating system. Whether you’re using Windows, macOS, or Linux, this method offers a native solution that doesn’t require any additional software.
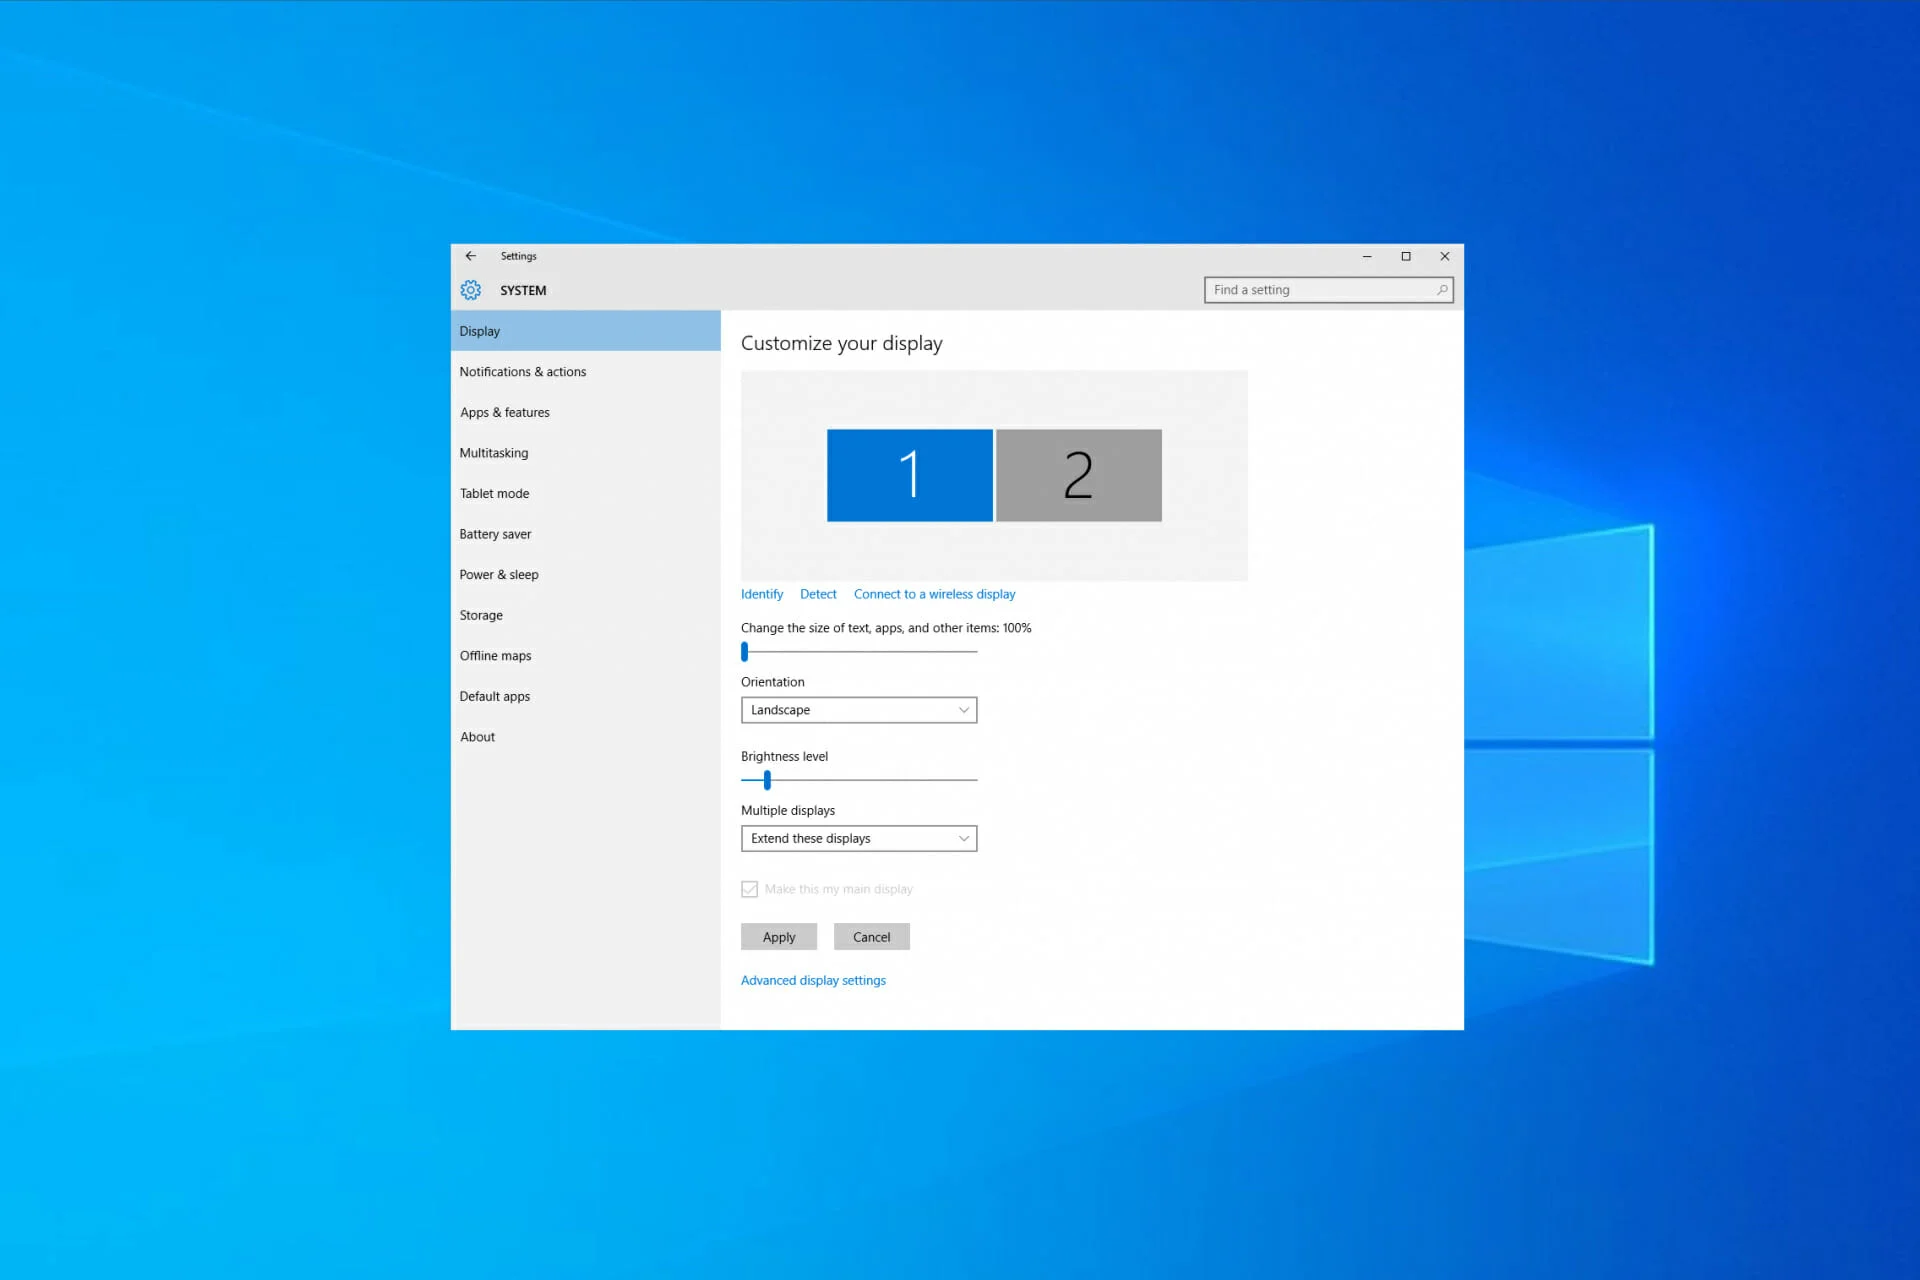
To get started, right-click on your desktop and select “Display Settings” or a similar option from the context menu. This will open a window or settings panel where you can configure your display settings.
Within the display settings, you should see a diagram or representation of your monitors. Identify the monitor on which the game is currently launching and drag and drop it to the desired position or number on the diagram. This will set the selected monitor as the primary display.
Next, look for an option to choose the primary display or select the display order. This can be labeled as “Multiple displays,” “Display arrangement,” or something similar. Click on this option and ensure that the desired monitor is set as the primary or main display.
Once you have made these changes, click “Apply” or “OK” to save the settings. Now, when you launch a game, it should appear on the designated monitor.
If the game is still launching on the wrong monitor, you may need to adjust the settings within the game itself. Many games offer options to select the display or monitor on startup or within the game settings. Explore the game’s options or settings menu to locate this feature and choose the desired monitor.
Using the display settings of your operating system is often the easiest and most straightforward method to change the monitor on which a game is displayed. However, if this method doesn’t work for you or you prefer more advanced customization options, there are alternative methods to explore.
Method 2: Using Graphics Control Panel
If you have a dedicated graphics card from AMD or NVIDIA, you can utilize the graphics control panel to change the monitor on which a game is displayed. Both companies provide software that allows you to customize various graphics settings, including display configurations.
To access the graphics control panel, right-click on your desktop and look for options such as “AMD Radeon Settings” or “NVIDIA Control Panel.” Click on the appropriate option to open the control panel.
Once you’re in the control panel, navigate to the display or monitor settings. Here, you’ll find options to arrange and configure your displays. Depending on the software, you can usually drag and drop monitors to rearrange their positions or select the primary display.
Find the monitor on which the game is currently launching and make sure it is set as the primary display or designated as the display you want to use for gaming.
After adjusting the display settings, save the changes and exit the control panel. Now, when you launch a game, it should appear on the desired monitor.
Keep in mind that the steps and options within the graphics control panel may vary depending on your graphics card and the version of the software. It’s recommended to refer to the documentation or support resources provided by the manufacturer for detailed instructions.
Using the graphics control panel offers more advanced customization options compared to the display settings of your operating system. This method is particularly beneficial if you want to fine-tune specific settings for gaming, such as adjusting the refresh rate or enabling features like FreeSync or G-Sync.
If the game is still launching on the wrong monitor, be sure to also check the in-game display settings and adjust them accordingly. Many games have options to select the display or monitor to use, allowing you to override any default settings.
Now that we’ve covered using the graphics control panel to change the monitor for games, let’s explore another method using third-party software for even more flexibility and functionality.
Method 3: Using Third-Party Software
If the previous methods don’t meet your requirements or you’re looking for additional features and flexibility, using dedicated third-party software can provide a comprehensive solution to change the monitor on which a game is displayed.
There are several popular software options available that specialize in managing display configurations and optimizing gaming experiences.
One such software is DisplayFusion, which offers extensive customization options for multi-monitor setups. With DisplayFusion, you can create profiles for different games and specify which monitor they should launch on. Additionally, it provides features like hotkeys and taskbar management, further enhancing your gaming experience.
Another powerful tool is Actual Multiple Monitors. This software allows you to define specific rules for each game, determining the monitor, window position, and other display-related settings. It also offers handy features like extended taskbars and wallpaper management.
Before using third-party software, ensure that you download it from a reputable source and follow the installation instructions. Once installed, familiarize yourself with the software’s interface and settings to configure your desired display arrangement for games.
Each software has its own set of features and options, so explore and experiment to find the best fit for your needs. Some third-party programs come with a free version, while others require a purchase for full functionality.
To prevent any conflicts between third-party software and your operating system or existing graphics control panel, consider closing unnecessary applications and disabling conflicting settings while using the third-party software.
By using third-party software, you can gain greater control over your gaming setup, allowing you to fine-tune display configurations and enjoy a seamless gaming experience across multiple monitors.
Remember, if you are still experiencing issues where games continue to launch on the wrong monitor, double-check the in-game display settings. Often, games have their own settings that override system or third-party configurations.
Now that we’ve explored the use of third-party software, let’s summarize the methods and conclude how you can change the monitor on which games are displayed.
Conclusion
Changing the monitor on which a game is displayed can greatly improve your gaming experience, allowing you to fully utilize your hardware and optimize your setup. In this article, we discussed three methods to achieve this goal.
In Method 1, we explored using the display settings of your operating system. This method provides a simple and straightforward way to rearrange your displays and designate the primary monitor for gaming.
Method 2 involved utilizing the graphics control panel provided by your graphics card manufacturer. This option offers more advanced customization options, allowing you to fine-tune various display settings specifically for gaming.
For those seeking additional functionality and flexibility, Method 3 involved the use of third-party software such as DisplayFusion or Actual Multiple Monitors. These programs provide extensive features, including the ability to create profiles for different games and define specific display configurations.
It’s important to note that different solutions may work best for different individuals depending on their specific setup, preferences, and requirements. It may require some experimentation and trial-and-error to find the method that suits you best.
Before implementing any changes, be sure to check the in-game settings as well, as many games have their own display options that can override system or third-party configurations.
By following these methods, you can regain control over which monitor your games appear on, ensuring an immersive and optimal gaming experience.
So, whether you choose to utilize the display settings, the graphics control panel, or third-party software, you can rest assured knowing that you have the ability to customize your gaming setup according to your preferences.
Now take what you’ve learned and get ready to enjoy your games on the perfect monitor of your choice!