Introduction
Welcome to this comprehensive guide on how to change the battery on an Ultrabook Yoga2. Over time, the performance and lifespan of laptop batteries can diminish, and replacing them is a necessary task to ensure optimal functionality. By following the step-by-step instructions provided in this article, you’ll be able to successfully replace the battery in your Ultrabook Yoga2 and continue enjoying its portability and convenience.
Before we dive into the process, it’s important to note that working with electrical components requires caution and precision. Make sure to read the entire guide before attempting to replace the battery, and if you feel unsure at any point, it’s always a good idea to consult a professional or refer to the manufacturer’s guidelines.
In the following steps, we will walk you through the entire battery replacement process, from gathering the necessary tools to testing the Ultrabook after the procedure. By carefully following these instructions, you’ll be able to swap out the old battery for a new one and have your Ultrabook running smoothly again.
Keep in mind that the specific steps may vary slightly depending on the exact model of your Ultrabook Yoga2. It’s always recommended to refer to the user manual or manufacturer’s website for any specific instructions or warnings related to your device.
Now, without further ado, let’s get started with gathering the tools you’ll need for this battery replacement journey.
Step 1: Gathering the necessary tools
Before diving into the battery replacement process, it’s essential to gather all the necessary tools to ensure a smooth and efficient procedure. Here is a list of tools you will need:
- Small Phillips-head screwdriver: This will be used to remove the screws securing the back cover of your Ultrabook.
- Anti-static wrist strap: This strap will prevent any static electricity from damaging sensitive components during the battery replacement process.
- Plastic prying tools or spudger: These tools will assist in safely detaching the back cover without causing any damage or scratches.
- Clean cloth or electrostatic discharge (ESD) mat: Having a clean and static-free workspace is crucial to protect the internal components of your Ultrabook.
- New battery: Make sure to obtain a compatible and high-quality replacement battery for your specific Ultrabook model.
Before you start, it’s a good idea to organize these tools in a clean and well-lit workspace. This will make the battery replacement process more efficient and minimize the risk of misplacing any components.
Once you have gathered all the necessary tools, you are ready to proceed to the next step: shutting down your Ultrabook.
Step 2: Shut down the Ultrabook
Before starting any maintenance or repair procedure, it’s essential to properly shut down your Ultrabook to avoid potential damage to the internal components.
To shut down your Ultrabook Yoga2, follow these simple steps:
- Save your work: Make sure to save any open documents or files to prevent data loss.
- Close all applications: Take a few moments to close all running applications on your Ultrabook.
- Click on the Start Menu: Locate the Start Menu button on the taskbar, usually located in the bottom left corner of the screen.
- Select “Power”: A dropdown menu will appear when you click on the Start Menu. Choose the “Power” option.
- Select “Shut down”: Another menu will open with different power options. Click on the “Shut down” option to initiate the shutdown process.
- Wait for the Ultrabook to power off: Allow a few moments for the Ultrabook to completely shut down before proceeding to the next step.
It’s important to ensure the Ultrabook is fully powered off before attempting any maintenance tasks, such as replacing the battery. This prevents the risk of electric shock or damage to the internal components.
Now that your Ultrabook Yoga2 is safely shut down, you’re ready to move on to the next step: locating the battery compartment.
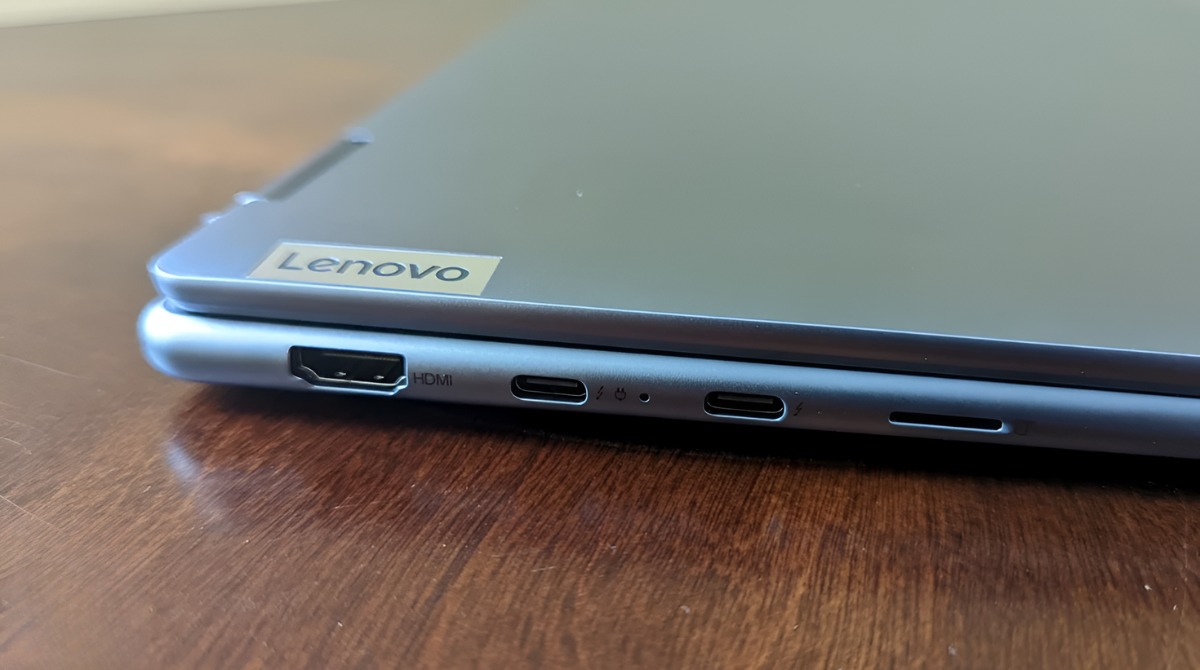
Step 3: Locate the battery compartment
Now that your Ultrabook Yoga2 is safely shut down, the next step is to locate the battery compartment. The battery compartment is where the old battery resides and where the new one will be installed.
To locate the battery compartment, follow these steps:
- Flip the Ultrabook over: Carefully flip your Ultrabook Yoga2 over so you have access to the bottom side.
- Examine the bottom panel: Take a look at the bottom panel of your Ultrabook. Look for any screws, latches, or indications of the battery compartment.
- Refer to the user manual or manufacturer’s guidelines: If you’re having trouble locating the battery compartment, consult the user manual or visit the manufacturer’s website for specific instructions related to your Ultrabook model.
It’s worth noting that the exact location and design of the battery compartment may vary depending on the Ultrabook model. Some models may have a easily removable panel, while others may require the removal of the entire back cover. Taking the time to familiarize yourself with the specific layout of your Ultrabook will help perform the replacement with ease.
Once you have located the battery compartment, you’re ready to move on to the next step: removing the screws that secure the back cover.
Step 4: Remove the screws
With the battery compartment located, it’s time to remove the screws that secure the back cover of your Ultrabook Yoga2. Removing these screws will grant you access to the internal components, including the old battery.
Follow these steps to remove the screws:
- Retrieve your small Phillips-head screwdriver: Ensure you have the correct tool for removing the screws on your Ultrabook.
- Identify the screws securing the back cover: Examine the bottom panel of your Ultrabook and identify the screws that hold the back cover in place. They are typically small and may be marked with symbols or arrows.
- Position the screwdriver correctly: Insert the screwdriver into the head of the first screw, ensuring it is securely positioned within the screw head.
- Turn the screwdriver counterclockwise: Gently rotate the screwdriver counterclockwise to loosen and remove the screw. Be careful not to apply excessive force or strip the screw head.
- Repeat for remaining screws: Once the first screw is removed, proceed to remove all the remaining screws holding the back cover in place. Take note of their position or keep them in a safe place to ensure you can reassemble the Ultrabook correctly.
It’s crucial to handle the screws with care and avoid misplacing them. Consider using a small container or a magnetic mat to keep them organized during the process.
With the screws removed, you are now ready to move on to the next step: carefully detaching the back cover without causing any damage.
Step 5: Carefully detach the back cover
Now that the screws securing the back cover of your Ultrabook Yoga2 have been removed, it’s time to carefully detach the cover. This step requires caution to avoid damaging any components or the cover itself.
Follow these steps to detach the back cover:
- Locate the notches or tabs: Examine the edges of the back cover for any notches or tabs that hold it in place. These are usually found along the perimeter and may vary in design depending on your Ultrabook model.
- Use a plastic prying tool or spudger: Insert the plastic prying tool or spudger into the notch or space between the back cover and the Ultrabook’s body. Gently apply pressure to start loosening the cover.
- Work your way around the edges: Gradually move along the edges, applying gentle and even pressure with the prying tool to separate the back cover from the Ultrabook’s body. Be careful not to force or bend the cover.
- Be mindful of any cables: As you detach the back cover, be aware of any cables that may be connected to it. Take note of their positions and ensure they don’t get caught or damaged in the process.
- Continue until the cover is fully detached: Carefully continue prying and separating the back cover until it is completely detached from the Ultrabook’s body. Set the cover aside in a safe place.
Take your time during this step and ensure that the back cover is fully detached before proceeding. Rushing or applying excessive force can lead to damage or breakage.
With the back cover successfully detached, you’re now ready to move on to the next step: locating the battery within your Ultrabook.
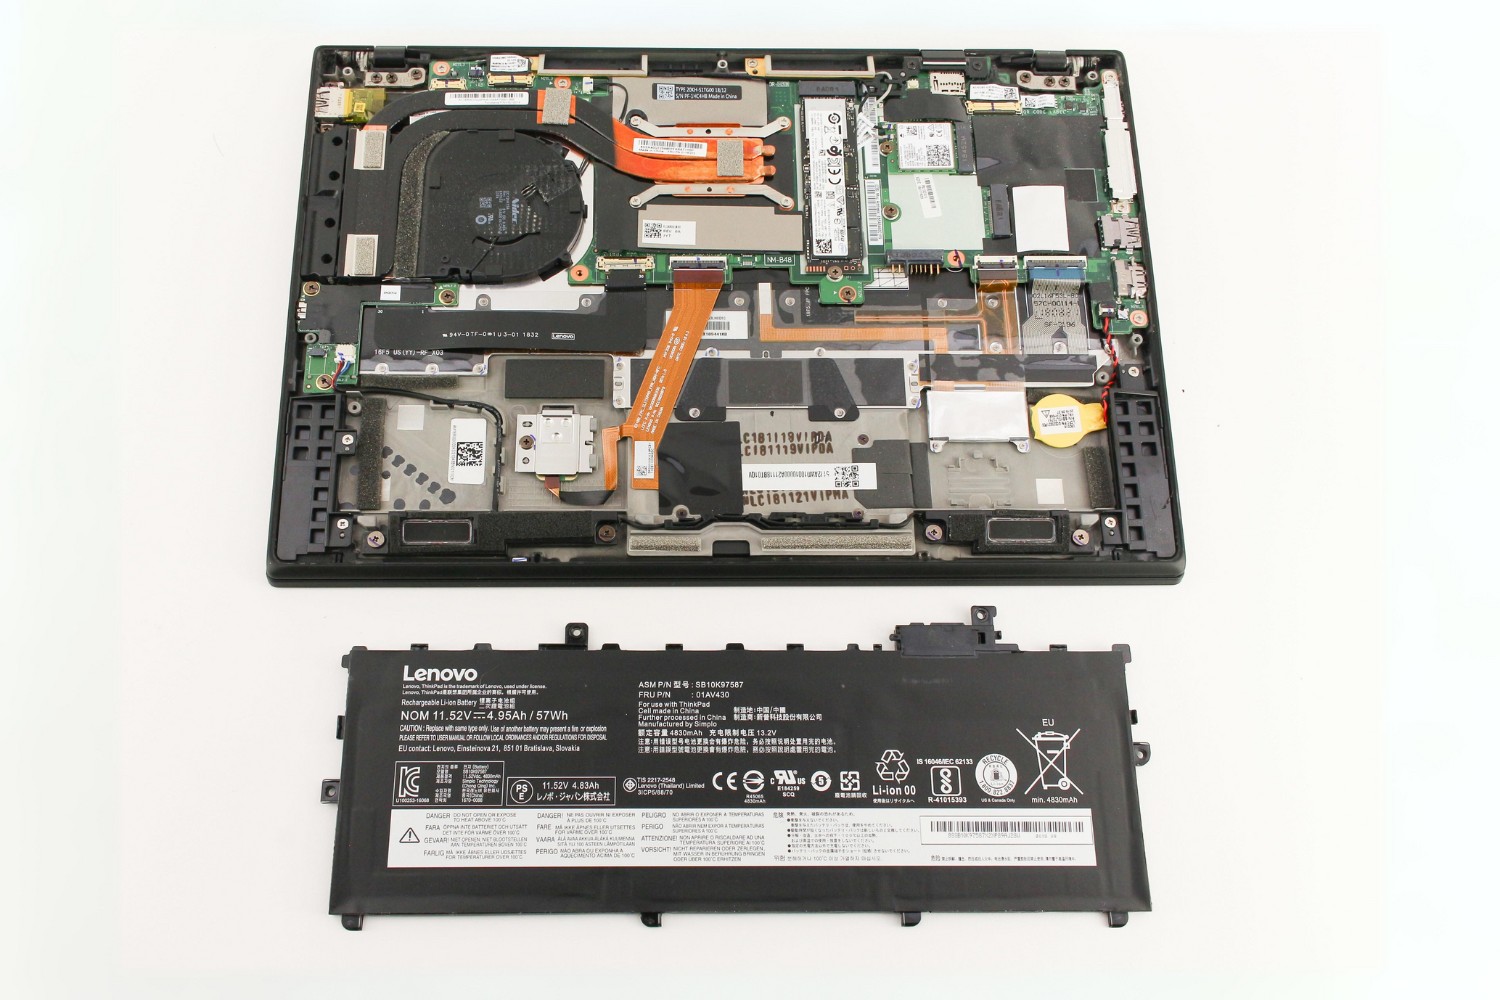
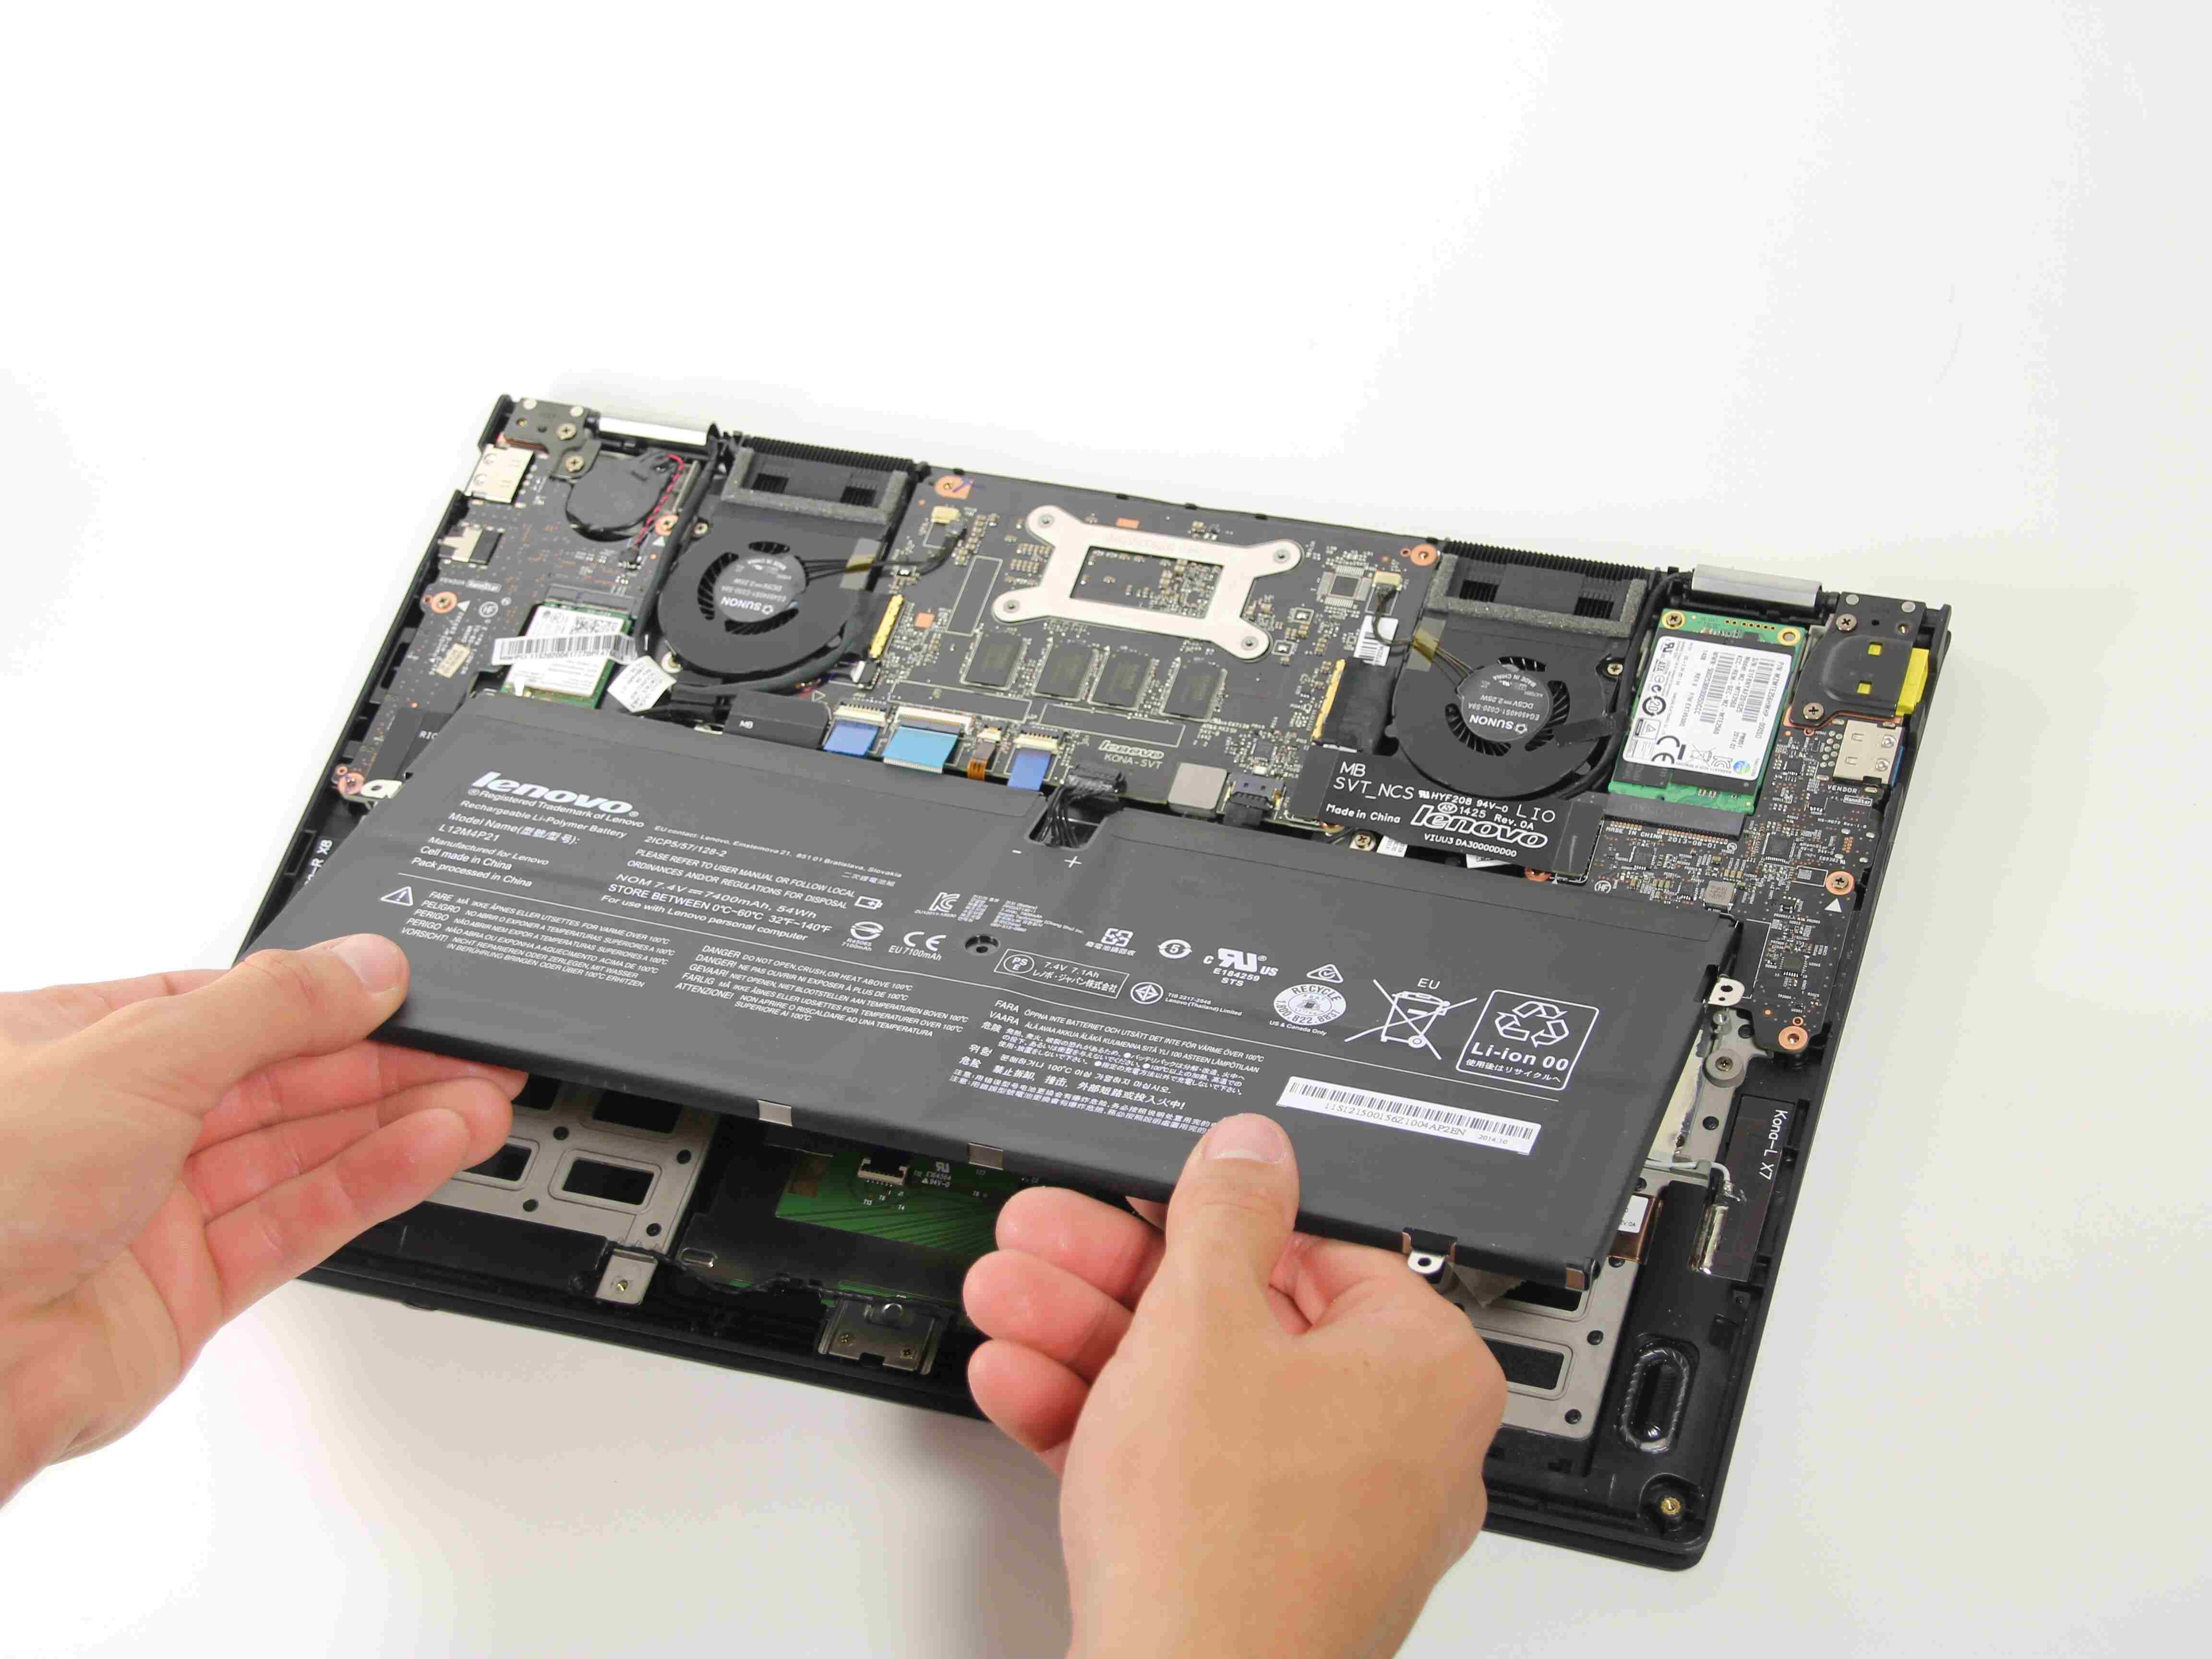
Step 6: Locate the battery
With the back cover removed, it’s time to locate the battery within your Ultrabook Yoga2. The battery is a vital component of your device and is responsible for powering it when disconnected from an external power source.
Follow these steps to locate the battery:
- Inspect the internal components: Take a look at the internal area of your Ultrabook where the back cover was previously attached. Look for a rectangular or square-shaped component that resembles a battery.
- Identify the battery label: The battery is typically labeled with information such as its model number, capacity, and voltage. This label can help you confirm that you have located the correct component.
- Note the battery’s position: Take note of how the battery is positioned within your Ultrabook. This will be helpful when it comes time to remove and replace it.
- Observe any other components or cables nearby: While locating the battery, be mindful of any other components or cables that may be connected or in close proximity. This will help you navigate around them during the replacement process.
It’s essential to exercise caution and avoid touching or tampering with any other internal components unless necessary. Mishandling can lead to damage or malfunction of your Ultrabook.
Once you have successfully located the battery, you’re ready to move on to the next step: disconnecting the battery cable.
Step 7: Disconnect the battery cable
Now that you have located the battery within your Ultrabook Yoga2, it’s time to disconnect the battery cable. This step ensures that the battery is safely disconnected from the power source and prevents any electrical issues during the replacement process.
Follow these steps to disconnect the battery cable:
- Identify the battery cable: Locate the cable that connects the battery to the Ultrabook’s motherboard. It is usually a thin, ribbon-like cable with a connector at the end.
- Gently grasp the battery connector: Carefully hold the battery connector, ensuring you have a firm grip without applying excessive force.
- Disconnect the battery cable: In one smooth motion, pull the battery connector away from the motherboard socket. Be cautious not to pull or twist the cable excessively, as this could damage the connector or cable.
- Verify disconnection: Once the battery cable is disconnected, visually inspect both ends to ensure that they are fully separated.
It’s crucial to handle the battery cable with care, as mishandling it can damage the connectors or cause other electrical issues. Take your time to ensure a clean and successful disconnection.
With the battery cable safely disconnected, you’re now ready to move on to the next step: removing the old battery from your Ultrabook.
Step 8: Remove the old battery
With the battery cable disconnected, it’s time to remove the old battery from your Ultrabook Yoga2. Removing the old battery is an essential step in the replacement process to make way for the new battery.
Follow these steps to remove the old battery:
- Take note of the battery’s position: Before removing the old battery, take a moment to observe how it is positioned within your Ultrabook. Make a mental note of its orientation and placement.
- Locate any additional fasteners or clips: Depending on your Ultrabook model, there may be additional fasteners or clips that secure the battery in place. Look for any screws, tabs, or other mechanisms that need to be addressed before removing the battery.
- Release or remove any fasteners: If there are any screws or clips holding the battery in place, use the appropriate tool to release them. Take care not to lose any screws or damage any components.
- Gently lift the old battery: With the fasteners released, carefully lift the old battery out of its compartment. Use a gentle and steady motion to avoid any unnecessary strain or damage to the battery or surrounding components.
- Set aside the old battery: Once the old battery is removed, place it in a safe and secure location. It’s a good idea to handle it with care, as batteries contain sensitive and potentially hazardous materials.
Take your time during this step and ensure that the battery is fully removed before proceeding. It’s important not to rush or force the removal, as this could cause damage to the battery or other internal components.
With the old battery safely removed, you’re now ready to move on to the next step: inserting the new battery into your Ultrabook.
Step 9: Insert the new battery
Now that the old battery has been safely removed, it’s time to insert the new battery into your Ultrabook Yoga2. Caution and precision are key during this step to ensure proper installation and functionality of the new battery.
Follow these steps to insert the new battery:
- Prepare the new battery: Take a moment to inspect the new battery, making sure it matches the specifications of your Ultrabook Yoga2. Remove any protective covers or packaging that may be on the new battery.
- Orient the battery correctly: Align the new battery in the same position as the old one, matching its orientation. Be mindful of any connectors or corresponding slots on the battery and ensure they are properly aligned.
- Gently lower the new battery: Carefully lower the new battery into the battery compartment, ensuring that it is seated and fits snugly. Take care not to force it or apply excessive pressure.
- Secure the battery: If there were any additional fasteners or clips that held the old battery in place, use them to secure the new battery. If there were no fasteners, ensure that the battery is secure and doesn’t move around freely within the compartment.
It’s essential to handle the new battery with care and avoid touching any exposed contacts or components. Follow any instructions or guidelines provided by the manufacturer for proper battery installation.
With the new battery securely inserted in your Ultrabook, you’re now ready to move on to the next step: connecting the battery cable.
Step 10: Connect the battery cable
With the new battery in place, it’s time to reconnect the battery cable to ensure proper functionality and power supply for your Ultrabook Yoga2. Connecting the battery cable is a crucial step in the battery replacement process.
Follow these steps to connect the battery cable:
- Locate the battery cable connector: Find the battery cable connector that fits into the socket on the Ultrabook’s motherboard. It should be the same connector that you disconnected in Step 7.
- Gently align the battery connector: Take the battery cable connector and align it with the corresponding socket on the Ultrabook’s motherboard. Ensure the connector is properly positioned.
- Push the battery connector into the socket: Apply gentle pressure to the battery connector, pushing it into the socket until it is fully inserted. Make sure the connection is secure and the connector is properly seated.
- Verify the connection: Once the battery cable is connected, visually inspect the connection to ensure that it is secure and properly aligned. Check that the cable is not loose and that there are no visible gaps or misalignments.
It’s crucial to handle the battery cable and connector with care to avoid bending or damaging them. Take your time to ensure a clean and successful connection.
With the battery cable successfully connected, you’re now ready to move on to the next step: replacing the back cover of your Ultrabook.
Step 11: Replace the back cover
Now that the new battery is securely installed and the battery cable is connected, it’s time to replace the back cover of your Ultrabook Yoga2. Reattaching the back cover will protect the internal components and restore the aesthetic appearance of your device.
Follow these steps to replace the back cover:
- Inspect the back cover: Before reattaching the back cover, ensure that it is clean and free from any dust or debris. Wipe it gently with a clean cloth if necessary.
- Align the back cover: Position the back cover over the Ultrabook’s body, aligning it with the tabs, slots, or notches that secure it in place. Make sure the cover is evenly and snugly positioned.
- Press down on the back cover: Apply gentle pressure to the back cover, starting from one side and moving to the other, to secure it in place. Use your fingers or a plastic prying tool to press down firmly until you hear or feel a click.
- Ensure a flush fit: Check that the back cover is flush with the Ultrabook’s body and that there are no gaps or uneven edges. This will ensure proper alignment and a seamless appearance.
Take care not to exert excessive force when pressing down on the back cover, as this could damage the cover or its alignment. Firm and even pressure is sufficient to secure it in place.
With the back cover successfully replaced, you’re almost done! It’s time to move on to the final step: fastening the screws to secure the back cover.
Step 12: Fasten the screws
With the back cover replaced and properly aligned, it’s time to fasten the screws to secure it in place on your Ultrabook Yoga2. This step ensures that the back cover remains securely attached and provides a neat and tidy appearance.
Follow these steps to fasten the screws:
- Retrieve the small Phillips-head screwdriver: Ensure you have the correct tool for fastening the screws on your Ultrabook.
- Locate the screw holes: Examine the bottom panel of your Ultrabook and identify the screw holes for the back cover. They are typically marked with symbols, arrows, or small indentations.
- Position the screwdriver correctly: Insert the screwdriver into the head of the first screw, ensuring it is securely positioned within the screw head.
- Turn the screwdriver clockwise: Gently rotate the screwdriver clockwise to tighten the screw. Be careful not to overtighten, as this could strip the screw or damage the back cover.
- Repeat for all remaining screws: Once the first screw is tightened, proceed to fasten the rest of the screws in a clockwise direction. Ensure they are snug but not overly tight.
It’s important to use the correct amount of torque when tightening the screws. Applying too much force can cause damage, while insufficient tightening may result in a loose or unstable back cover.
With all the screws securely fastened, you have successfully completed the battery replacement process for your Ultrabook Yoga2. You’re now ready for the final step: powering on and testing your Ultrabook.
Step 13: Power on and test the Ultrabook
Now that you have completed the battery replacement process for your Ultrabook Yoga2, it’s time to power it on and perform a quick test to ensure everything is functioning correctly. This step will confirm that the new battery is working as intended and that your Ultrabook is ready for use.
Follow these steps to power on and test your Ultrabook:
- Double-check all connections: Before powering on, take a moment to ensure that the battery cable is securely connected, and the back cover is properly fastened. Check for any loose connections or visible irregularities.
- Connect the power adapter: Plug in the power adapter to your Ultrabook and connect it to a power source. This will ensure that your Ultrabook has sufficient power to turn on.
- Press the power button: Locate the power button on your Ultrabook. Press and hold it for a few seconds until you see signs of the Ultrabook booting up, such as LED indicators or the display coming to life.
- Observe the startup process: Watch as your Ultrabook completes its startup sequence. Look for any error messages, abnormal behavior, or unexpected shutdowns. If everything appears to be normal, proceed to the next step.
- Perform a quick system check: Once your Ultrabook has started up, check its functionalities. Test the keyboard, trackpad, screen, and other features to ensure they are working properly. You can also check the battery indicator to confirm that the new battery is recognized.
- Run a battery test (optional): If you want to perform a more thorough test of the new battery, you can run a battery diagnostic tool or consult the manufacturer’s guidelines for battery testing. This step is optional but can provide additional assurance of the battery’s performance.
If at any point during the test you encounter any issues or abnormalities, it’s recommended to consult the manufacturer’s support or seek professional assistance to resolve the problem.
With your Ultrabook successfully powered on and tested, you have completed the battery replacement process. Enjoy your refreshed Ultrabook Yoga2 with its new battery and enhanced performance!
Conclusion
Congratulations! You’ve successfully completed the battery replacement process for your Ultrabook Yoga2. By following the step-by-step instructions outlined in this guide, you have ensured the continued functionality and longevity of your device. Replacing the battery is a necessary maintenance task that can greatly improve the portability and performance of your Ultrabook.
Throughout the process, we covered essential steps, including gathering the necessary tools, shutting down the Ultrabook, locating the battery compartment, removing and replacing the battery, and reattaching the back cover. We emphasized the importance of handling the components with care and following any specific instructions or guidelines provided by the manufacturer.
Once the battery replacement was complete, we walked you through the process of powering on and testing your Ultrabook to ensure everything is in proper working order. This final step is crucial to verify that the new battery is recognized and functioning as intended.
Remember, working with electrical components requires caution and precision. If you ever feel unsure or uncomfortable performing any of these tasks, it’s recommended to seek guidance from a professional technician or consult the manufacturer’s support.
By properly maintaining and replacing the battery as needed, you can continue to enjoy the convenience and mobility that your Ultrabook Yoga2 offers. Maintaining a healthy battery will ensure reliable performance and uninterrupted productivity for years to come.
We hope this guide has been helpful in guiding you through the battery replacement process. Thank you for choosing our step-by-step instructions, and we wish you many more amazing experiences with your Ultrabook Yoga2!