Introduction
Welcome to our guide on locating the battery on the Lenovo Ultrabook Yoga 260. If you’re facing battery issues or simply need to replace the battery, understanding its location is crucial. The Lenovo Ultrabook Yoga 260 is a sleek and versatile device, known for its portability and long-lasting battery life. However, like any electronic device, the battery will eventually require replacement.
In this guide, we will walk you through the process of finding the battery on the Lenovo Ultrabook Yoga 260 and provide step-by-step instructions on how to replace it. Whether you’re a tech-savvy individual or a beginner, don’t worry – we’ve got you covered. With our detailed instructions and illustrations, you’ll be able to successfully locate and replace the battery in no time.
Before we get started, it’s essential to note that performing any hardware modifications can void your warranty. If your device is still under warranty or if you’re unsure about your technical abilities, we recommend contacting Lenovo support or a certified technician to assist you. However, if you’re confident in your skills and ready to take on the challenge, let’s dive into the process of finding the battery on your Lenovo Ultrabook Yoga 260!
Location of the Battery on Lenovo Ultrabook Yoga 260
The battery on the Lenovo Ultrabook Yoga 260 is not easily accessible from the outside. It is located inside the device, beneath the back cover. To access the battery, you’ll need to remove the back cover of the laptop.
The back cover of the Lenovo Ultrabook Yoga 260 is secured by several screws and clips. Before proceeding, make sure you have the necessary tools, such as a small Phillips screwdriver, and a clean and static-free working surface.
Once you have the tools ready, position the laptop upside down and locate the screws on the bottom cover. Remove the screws using the Phillips screwdriver, ensuring you keep them in a safe place to avoid misplacing them. After removing all the screws, gently pry open the back cover using a plastic opening tool or your fingers.
As you remove the back cover, be mindful of any cables or connectors that may be attached to it. It’s important to handle these components with care to avoid damage. Take note of their positions and carefully disconnect any cables or connectors if necessary.
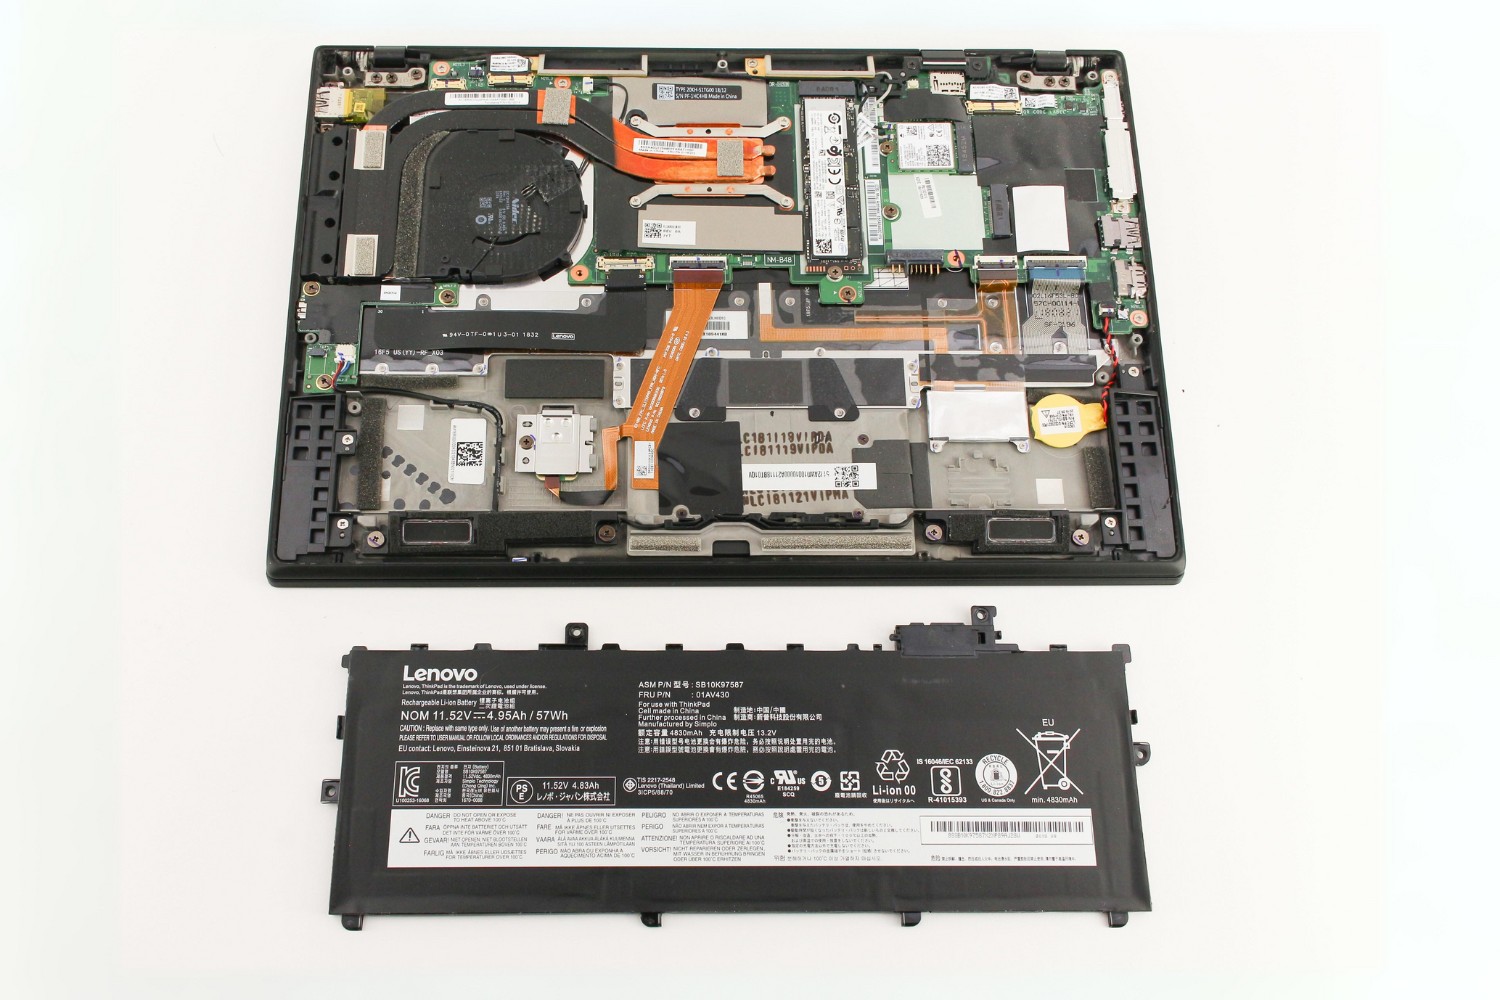
With the back cover removed, you will now have access to the internal components of the device, including the battery. The battery on the Lenovo Ultrabook Yoga 260 is usually situated near the center or bottom of the laptop, but its precise location may vary depending on the model.
Next, we will guide you on how to locate and disconnect the battery from the device, ensuring a safe and successful battery replacement process. Read on to discover how to proceed with the next steps on your Lenovo Ultrabook Yoga 260.
Removing the Back Cover
To access the battery on the Lenovo Ultrabook Yoga 260, you will first need to remove the back cover of the laptop. Follow these step-by-step instructions to safely remove the back cover:
- Make sure the laptop is powered off and disconnected from any power source.
- Position the laptop upside down on a clean and static-free working surface.
- Locate the screws on the bottom cover of the laptop.
- Using a small Phillips screwdriver, carefully remove all the screws from the bottom cover. Keep the screws in a safe place to avoid losing them.
- After removing all the screws, gently pry open the back cover using a plastic opening tool or your fingers. Start from one corner and gradually work your way around the edges.
- As you remove the back cover, be cautious of any cables or connectors that may be attached to it.
Some models of the Lenovo Ultrabook Yoga 260 may have additional screws or clips securing the back cover. If you encounter any resistance while trying to remove the cover, double-check for any hidden screws or clips that may still be in place and remove them accordingly.
Once the back cover is completely removed, place it aside in a safe location. Take note of the positions of any cables or connectors that may be attached to the cover to ensure that you can reattach them correctly later on.
Now that you have successfully removed the back cover, you can proceed to locate the battery within the Lenovo Ultrabook Yoga 260. Continue reading to learn more about finding the battery and safely replacing it.
Locating the Battery
Once you have removed the back cover of your Lenovo Ultrabook Yoga 260, you can now proceed to locate the battery. Follow these steps to find the battery within the device:
- With the back cover removed, take a moment to familiarize yourself with the internal components of the laptop.
- Look for a rectangular-shaped component located near the center or bottom of the device. This is typically where the battery is located in the Lenovo Ultrabook Yoga 260.
- The battery is usually secured in place with screws or connectors. Take note of any screws or cables attached to the battery, as you will need to disconnect them before removing the battery.
- If necessary, gently remove any screws or connectors that are securing the battery in place. Set them aside in a safe location.
- Once any screws or connectors are removed, carefully lift the battery from its housing. Use caution to avoid any unnecessary force or damage to the battery or surrounding components.
Note that the battery in the Lenovo Ultrabook Yoga 260 may vary slightly in design or location depending on the specific model you have. If you are having difficulty locating the battery, consult the user manual or reach out to Lenovo support for further assistance.
By following these steps, you should now have successfully located the battery in your Lenovo Ultrabook Yoga 260. Next, we will guide you through the process of disconnecting the battery to ensure a safe and seamless battery replacement. Read on to learn more!
Disconnecting the Battery
Before replacing the battery on your Lenovo Ultrabook Yoga 260, it is important to disconnect it from the device to avoid any potential electrical issues. Follow these steps to safely disconnect the battery:
- Ensure that the laptop is powered off and disconnected from any power sources.
- Locate the cables or connectors that are attached to the battery.
- Using a small tool or your fingers, carefully disconnect the cables or connectors. Pull them gently but firmly, ensuring that you do not apply excessive force or damage the connections.
- If the battery is secured with screws, remove them using a suitable screwdriver.
- Once all cables and connectors are detached and any securing screws are removed, the battery should be free to be lifted from its housing.
Remember to handle the battery with care as it is a delicate component. Avoid touching any exposed circuitry or sensitive parts of the battery. When handling the battery, hold it by the edges and ensure that it does not come into contact with any liquids or conductive materials.
Upon successful disconnection of the battery, you are now ready to proceed with replacing it. In the next section, we will provide you with step-by-step instructions on how to safely install the new battery into your Lenovo Ultrabook Yoga 260.
Replacing the Battery
Now that you have disconnected the old battery from your Lenovo Ultrabook Yoga 260, it’s time to replace it with a new one. Follow these steps to safely install the new battery:
- Take the new battery and carefully align it with the empty battery compartment in your laptop.
- Ensure that the connectors on the battery match the corresponding ports in the device.
- Gently lower the battery into the compartment, making sure it sits flush and securely.
- If the battery came with screws, use a suitable screwdriver to reattach them and secure the battery in place.
- Next, reconnect any cables or connectors that were previously detached from the old battery. Ensure they are firmly inserted and make a secure connection.
- Double-check that all connections, screws, and cables are properly aligned and secure.
Once you have completed these steps, you can proceed to replace the back cover of your Lenovo Ultrabook Yoga 260. Follow the reverse instructions of removing the back cover to reattach it securely. Ensure that all screws are tightened properly, but do not overtighten as this may damage the cover or the laptop’s internal components.
With the new battery installed and the back cover reattached, you can now power on your Lenovo Ultrabook Yoga 260 and test the functionality of the new battery. It is recommended to fully charge the battery before extended use.
Congratulations! You have successfully replaced the battery in your Lenovo Ultrabook Yoga 260. Enjoy extended battery life and continue to make the most of your versatile and portable device.
Conclusion
Replacing the battery on your Lenovo Ultrabook Yoga 260 may seem like a daunting task, but with the right tools and instructions, it can be easily accomplished. By following the steps outlined in this guide, you now have the knowledge and confidence to locate, disconnect, and replace the battery in your device.
Remember, if you are uncertain about your technical abilities or if your laptop is still under warranty, it is advisable to seek assistance from Lenovo support or a certified technician. Performing any hardware modifications on your own may void your warranty or cause damage to your device.
We hope this guide has been helpful in guiding you through the process of locating and replacing the battery on your Lenovo Ultrabook Yoga 260. By replacing the old battery with a new one, you can enjoy extended battery life and enhanced performance on your device.
If you have any further questions or need additional assistance, feel free to reach out to the Lenovo support team or refer to the user manual for more detailed instructions.
Thank you for choosing Lenovo, and we wish you the best in your battery replacement journey!