Introduction
Welcome to our guide on how to change your router’s channel. Your Wi-Fi channel plays a crucial role in the performance and reliability of your wireless network. By understanding and optimizing your channel selection, you can ensure a smoother and faster internet experience.
Wireless routers operate on specific frequency bands, and these bands are divided into various channels. The Wi-Fi channel determines the specific frequency range that your router uses to transmit and receive wireless signals. In simple terms, think of channels as different lanes on a highway, and your router’s signals as the vehicles trying to navigate through those lanes.
But why should you bother changing your Wi-Fi channel? Well, there are several reasons. First, if you live in a densely populated area such as an apartment complex, there may be numerous Wi-Fi networks operating on the same channel within close proximity. This can lead to interference and a drop in your network’s performance.
Second, certain devices and appliances like cordless phones, baby monitors, and microwaves can also emit signals that interfere with Wi-Fi networks. By changing your Wi-Fi channel, you can avoid conflicts and maintain a stable connection.
Third, different channels have different levels of congestion. By switching to a less congested channel, you can potentially improve the range and speed of your Wi-Fi network.
Before we dive into the process of changing your router’s channel, let’s first determine which channel your Wi-Fi network is currently using. This will help us identify any potential issues and select the most suitable channel for your needs.
Understand Your Wi-Fi Channels
Before you can effectively change your router’s channel, it’s important to have a basic understanding of Wi-Fi channels and how they work.
Wi-Fi operates on the 2.4GHz and 5GHz frequency bands, both of which are divided into multiple channels. In the 2.4GHz band, there are typically 11 channels available, while the 5GHz band offers a larger range of channels, usually between 24 and 27.
It’s important to note that in the 2.4GHz band, the channels overlap with each other. This means that even if you set your router to a specific channel, there may still be some interference from neighboring channels. On the other hand, the 5GHz band has non-overlapping channels, which can provide a more stable and interference-free connection.
When it comes to Wi-Fi channel selection, there are three main factors to consider:
- Interference: As mentioned earlier, Wi-Fi networks can be affected by interference from other wireless networks, as well as other devices that operate on the same frequency range. By choosing a less crowded channel, you can minimize interference and improve signal strength.
- Range: Different channels may have varying signal ranges. In general, lower frequency channels (e.g., channel 1) tend to have a longer range, while higher frequency channels (e.g., channel 11) have a shorter range. Consider the size of your space and the distance between your devices to determine the optimal channel for maximum coverage.
- Speed: Channels can also affect the speed and performance of your Wi-Fi network. Some channels may be more congested or prone to interference, resulting in slower speeds. Experimenting with different channels can help you find the one that provides the best balance between speed, stability, and range.
Now that you have a better understanding of Wi-Fi channels and their significance, let’s move on to the next step: checking your Wi-Fi network’s current channel.
Why Should You Change Your Wi-Fi Channel?
Changing your Wi-Fi channel can have a significant impact on the performance and reliability of your wireless network. Here are a few reasons why you might consider making this adjustment:
Reduced Interference: If you live in a densely populated area or an apartment complex, chances are there are several Wi-Fi networks operating on the same channel. This can lead to interference, causing your network speed and reliability to suffer. By switching to a less congested channel, you can minimize interference and improve your Wi-Fi performance.
Eliminating Signal Conflict: Certain devices and appliances, such as cordless phones, baby monitors, and even microwave ovens, can emit signals that interfere with Wi-Fi networks. These signals can disrupt the wireless connection, leading to slower speeds and dropped connections. By changing your Wi-Fi channel, you can avoid conflicts and maintain a stable connection.
Improving Range and Coverage: Some Wi-Fi channels have a longer range than others. If you’re experiencing weak signals or dead zones in certain parts of your home or office, changing your channel might help improve the range and coverage of your Wi-Fi network. By selecting a channel with a wider coverage area, you can ensure a more consistent and reliable connection throughout your space.
Optimizing Speed: Different Wi-Fi channels can offer varying speeds depending on congestion and interference. By experimenting with different channels, you may find one that provides faster speeds and better overall performance for your specific network setup. This can be especially beneficial if you rely on your Wi-Fi for bandwidth-intensive tasks such as streaming, online gaming, or large file downloads.
Staying Up-to-Date: Technology is constantly evolving, and newer router models may offer additional and improved channels that weren’t available on older devices. Changing your Wi-Fi channel allows you to take advantage of these advancements and ensure that your network is utilizing the latest technology for optimal performance.
Now that you understand the benefits of changing your Wi-Fi channel, let’s proceed to the next step: checking your Wi-Fi network’s current channel.
Check Your Wi-Fi Network’s Current Channel
Before you can change your Wi-Fi channel, it’s important to determine which channel your network is currently using. This information will help you assess the potential issues and make an informed decision when selecting a new channel.
To check your Wi-Fi network’s current channel, you’ll need to access your router’s settings. Here’s how:
- Connect your computer or mobile device to your Wi-Fi network.
- Open a web browser and type in the IP address of your router. This IP address is typically printed on the back or bottom of your router, or you can find it in the documentation provided by your internet service provider.
- Enter your router’s login credentials. If you haven’t changed them before, the default username and password can usually be found on the router itself or in the documentation.
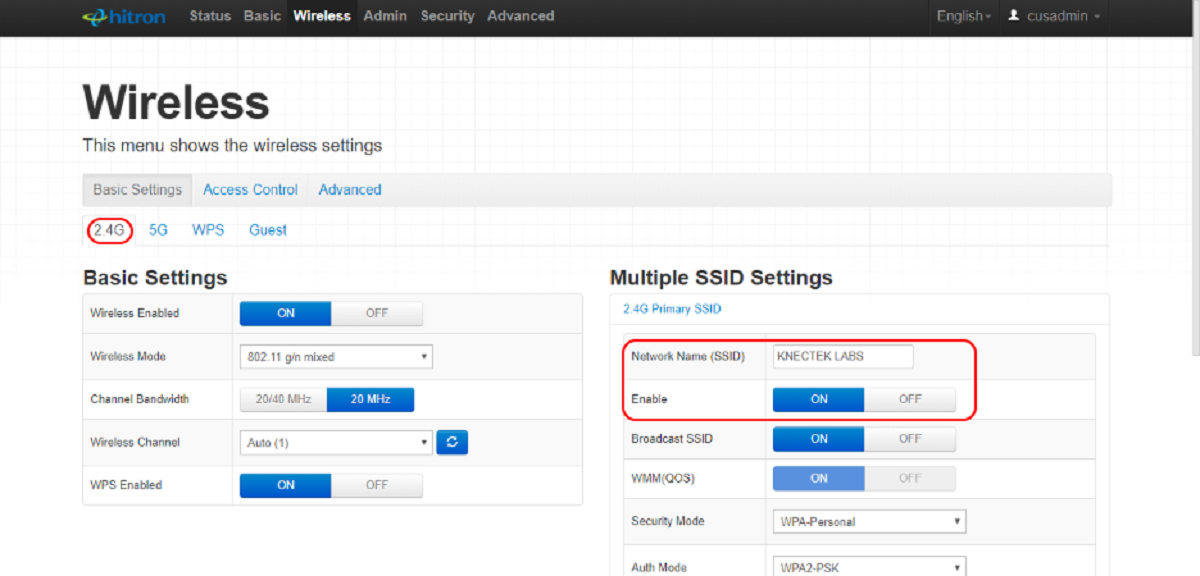
- Navigate to the wireless settings or Wi-Fi settings section of your router’s configuration interface.
- Look for the channel settings or channel selection option.
- You should now see the current channel that your Wi-Fi network is using. Take note of this channel for reference.
Once you’ve identified your network’s current channel, you can proceed to the next section, where we’ll discuss the factors to consider when choosing the right channel for your Wi-Fi network.
Factors to Consider When Choosing the Right Channel
When it comes to selecting the right Wi-Fi channel for your network, there are several factors that you should take into consideration. These factors will help you optimize your Wi-Fi performance and minimize interference. Let’s explore them:
Signal Interference: One of the most important factors to consider is the level of signal interference in your area. Wi-Fi operates on the 2.4GHz band, which is also used by other devices like cordless phones, microwaves, and baby monitors. These devices can cause interference with your Wi-Fi signal. It’s essential to choose a channel that has minimal interference from other devices and neighboring Wi-Fi networks.
Overlapping Channels: In the 2.4GHz band, Wi-Fi channels overlap with each other. This means that even if you select a specific channel, there may still be some interference from nearby channels. It’s advisable to choose a channel that has the least amount of overlap with neighboring channels to minimize interference and ensure a stable connection.
Channel Congestion: Another consideration is channel congestion. Some Wi-Fi channels tend to be more crowded than others, especially in densely populated areas. By analyzing the Wi-Fi networks in your vicinity, you can identify the channels that are heavily used by other networks. Opting for a less congested channel can help improve your network’s performance and reduce interference.
Range and Coverage: Different Wi-Fi channels have varying signal ranges. If you have a large space or multiple floors, you’ll want to choose a channel that provides sufficient coverage and minimizes dead zones. Lower frequency channels, such as channel 1, typically offer better range but might be more prone to interference. Higher frequency channels, such as channel 11, have shorter range but can be less congested.
Wi-Fi Band Support: Ensure that your devices support the channel you plan to select. For instance, older devices or those limited to 2.4GHz Wi-Fi might not be compatible with higher frequency channels in the 5GHz band. It’s important to choose a channel that is supported by all the devices you intend to connect to your network.
By considering these factors and analyzing your Wi-Fi environment, you can make a more informed decision when selecting the right channel for your router. In the next section, we will guide you through the step-by-step process of changing your router’s channel.
Step-by-Step Guide to Change Your Router’s Channel
Now that you understand the importance of choosing the right Wi-Fi channel and have considered the various factors, let’s walk through the process of changing your router’s channel. Follow these step-by-step instructions:
- Connect your computer or mobile device to your Wi-Fi network.
- Open a web browser and enter the IP address of your router in the address bar. If you’re unsure of the IP address, refer to the documentation provided by your internet service provider or check the router itself for a label.
- Enter your router’s login credentials to access the router’s configuration interface. If you haven’t changed them before, the default username and password can usually be found on the router or in the documentation.
- Navigate to the wireless settings or Wi-Fi settings section of the configuration interface.
- Look for the channel settings or channel selection option. The location and naming of this option may vary depending on your router’s model and firmware.
- Select the desired channel from the available options. Refer to your previous analysis of Wi-Fi channels, considering factors such as interference, congestion, range, and device compatibility.
- Save the changes and wait for your router to apply them. This process may take a few moments.
- Once the changes are saved, your router will start using the new channel. You may experience a temporary disconnection as the router restarts and adjusts to the new channel.
Congratulations! You have successfully changed your router’s Wi-Fi channel. Now it’s time to test your new Wi-Fi channel for performance and stability.
Note: Some routers may provide an option to automatically select the best channel based on their analysis of the Wi-Fi environment. If available, you can enable this feature to let the router choose the optimal channel for you.
Testing Your New Wi-Fi Channel
After changing your router’s Wi-Fi channel, it’s important to test the performance and stability of your new channel. This will allow you to ensure that the change has resulted in improved Wi-Fi connectivity and minimized interference. Follow these steps to test your new Wi-Fi channel:
- Connect your devices to the Wi-Fi network that is broadcasting on the new channel.
- Perform a speed test to measure your internet connection’s speed. There are numerous online speed testing tools available that can provide accurate results. Note down the upload and download speeds.
- Move around your space with your connected devices and observe the strength and stability of the Wi-Fi signal. Pay attention to any areas where the signal weakens or drops entirely. These areas may indicate that further adjustments are necessary, such as changing the router’s location or using Wi-Fi signal boosters.
- Test the Wi-Fi connectivity and performance on multiple devices, such as smartphones, tablets, laptops, and streaming devices. This will help you gauge the overall network performance and identify any potential device-specific issues.
- Check if there is any noticeable improvement in terms of reduced interference or better range and coverage. If you previously experienced issues like slow speeds, frequent disconnections, or signal drops, see if these problems have been resolved.
- Compare the results of the speed tests conducted before and after changing the Wi-Fi channel. If you notice a significant improvement in speed and stability, it indicates that the new channel selection has had a positive impact on your network.
If you are still experiencing issues or are not satisfied with the performance of your new Wi-Fi channel, you may want to consider adjusting other router settings, such as the transmit power or wireless mode. Additionally, you may want to consult with your internet service provider or a professional technician for further assistance.
By thoroughly testing your new Wi-Fi channel, you can ensure optimal performance and reliability for your wireless network. If you are satisfied with the results of your tests, you can now enjoy a more stable and efficient Wi-Fi experience.
Conclusion
Changing your router’s Wi-Fi channel can significantly improve the performance, stability, and overall experience of your wireless network. By understanding the importance of Wi-Fi channels and considering factors such as interference, congestion, range, and device compatibility, you can make an informed decision when selecting the right channel for your router.
In this guide, we covered the steps to check your Wi-Fi network’s current channel and provided a step-by-step guide to changing your router’s channel. We also emphasized the significance of testing your new Wi-Fi channel to ensure improved performance and minimized interference.
Remember to periodically review and reassess your Wi-Fi channel selection, especially if you experience any issues with your network’s speed, stability, or range. As technology and surrounding Wi-Fi environments evolve, adjusting your channel may be necessary to maintain optimal performance.
We hope this guide has been helpful in understanding how to change your router’s Wi-Fi channel. By following these steps and considering the factors discussed, you can optimize your Wi-Fi network for a seamless and reliable connection.
Happy channel-switching, and enjoy your improved Wi-Fi experience!