Introduction
When it comes to customizing your computer setup, one of the most popular and visually impactful modifications you can make is changing the color of your Corsair RAM modules. Corsair RAM modules, known for their high-performance capabilities, also offer the flexibility to modify the RGB lighting to match your personal style or create a dynamic lighting show.
By changing the color of your Corsair RAM, you can add a unique touch to your gaming or workstation setup, creating a visually stunning environment that reflects your personality and enhances the overall aesthetic appeal.
However, if you’re new to the world of computer customization, you might be wondering how to go about changing the color of your Corsair RAM. Fear not! In this guide, we will walk you through the step-by-step process of changing the color of your Corsair RAM modules, allowing you to unleash your creativity and make your system truly stand out.
Before we dive into the process, it’s worth noting that the method we’ll be discussing here primarily applies to Corsair RAM modules that are compatible with the Corsair iCue software. Corsair iCue is a powerful software suite specifically designed to control and customize Corsair RGB products, including RAM modules.
So, if you’re ready to add a touch of personalization and vibrancy to your Corsair RAM, let’s get started!
Preparing the Required Tools and Software
Before we begin the process of changing the color of your Corsair RAM, there are a few tools and software you’ll need to have on hand. Make sure you have the following items ready:
- A computer with a USB port
- Corsair RGB-compatible RAM modules
- Corsair iCue software
The first item on the list is a computer with a USB port. This is necessary because we’ll be connecting and configuring the Corsair RAM using the Corsair iCue software, which requires a USB connection between your computer and the RAM modules.
The next item you’ll need is Corsair RGB-compatible RAM modules. Not all Corsair RAM modules have RGB lighting capabilities, so it’s important to ensure that your RAM modules are compatible with the Corsair iCue software and feature RGB lighting. This will allow you to change the color and customize the lighting effects.
Lastly, you’ll need to install the Corsair iCue software. This powerful software is essential for controlling and customizing the RGB lighting of your Corsair RAM modules. You can download the latest version of Corsair iCue from the official Corsair website. Once downloaded, follow the on-screen instructions to install it on your computer.
With these tools and software at your disposal, you’re all set to embark on the journey of changing the color of your Corsair RAM. In the next section, we’ll walk you through the step-by-step process of installing Corsair iCue software and connecting your Corsair RAM modules.
Step 1: Checking Compatibility
Before delving into the process of changing the color of your Corsair RAM, it’s crucial to ensure that your RAM modules are compatible with the Corsair iCue software. This step is essential as it determines whether you’ll be able to customize the RGB lighting and modify the color profiles.
To check compatibility, start by visiting the official Corsair website and navigating to the product page of your specific RAM modules. Look for the product specifications section, which should indicate whether the modules are Corsair iCue compatible and support RGB lighting.
If your RAM modules are listed as compatible, you’re good to go! Proceed to the next step. However, if your modules aren’t listed as compatible or don’t support RGB lighting, unfortunately, you won’t be able to change the color using the Corsair iCue software. In such cases, you may need to consider upgrading to compatible modules.
Additionally, it’s worth mentioning that Corsair iCue software is compatible with a wide range of Corsair RGB products, including fans, keyboards, and mice. If you have other Corsair RGB components installed in your system, you’ll be able to synchronize and customize the lighting effects across all compatible devices.
Checking compatibility before proceeding further ensures that you won’t encounter any issues or limitations when attempting to change the color of your Corsair RAM. It ensures a smooth and hassle-free customization experience.
Now that you’ve confirmed the compatibility of your RAM modules, let’s move on to the next step, where we’ll guide you through the installation of the Corsair iCue software.
Step 2: Installing Corsair iCue Software
Now that you’ve ensured the compatibility of your Corsair RAM modules, it’s time to install the Corsair iCue software. This powerful software will serve as your control center for customizing the RGB lighting and changing the color of your RAM modules.
To install the Corsair iCue software, follow these steps:
- Visit the official Corsair website and navigate to the Downloads page.
- Locate the Corsair iCue software and click on the download link.
- Save the installation file to your computer.
- Once the download is complete, double-click on the file to initiate the installation process.
- Follow the on-screen instructions to install the Corsair iCue software.
- Once the installation is complete, launch the Corsair iCue software.
Upon launching the software, you may be prompted to update the software to the latest version. It’s advisable to proceed with the update to ensure you have the latest features and bug fixes available.
Once the software is installed and up to date, you’re ready to connect your Corsair RAM modules and begin the customization process. In the next step, we’ll guide you through the process of connecting the RAM modules to your computer.
Step 3: Connecting Corsair RAM Modules
With the Corsair iCue software installed on your computer, it’s time to connect your Corsair RAM modules. This is a crucial step as it establishes the communication between the software and your RAM modules, allowing you to control and customize their RGB lighting.
To connect your Corsair RAM modules, follow these steps:
- Ensure that your computer is turned off and unplugged from the power source.
- Open your computer case by removing the side panel. Refer to your computer’s user manual for specific instructions on how to access the RAM slots.
- Locate the RAM slots on your motherboard.
- Carefully insert your Corsair RAM modules into the available slots. Make sure they are aligned properly and firmly seated.
- Once the RAM modules are securely inserted, locate the USB cable that came with your Corsair RAM kit.
- Connect one end of the USB cable to the USB header on your motherboard.
- Connect the other end of the USB cable to the USB port on your Corsair RAM modules.
Once the RAM modules are connected via the USB cable, you’re ready to power on your computer and proceed to the next step.
It’s worth noting that the specific USB header location on your motherboard may vary depending on the model. Refer to your motherboard’s manual for the exact location of the USB header where you should connect the cable.
Now that your Corsair RAM modules are connected to your computer, we can move on to the next step, where we’ll launch the Corsair iCue software and begin customizing the color profiles.
Step 4: Launching Corsair iCue Software
Now that your Corsair RAM modules are connected to your computer, it’s time to launch the Corsair iCue software. This powerful software will allow you to control and customize the RGB lighting of your RAM modules, including changing the color profiles.
To launch the Corsair iCue software and start customizing your RAM’s color, follow these steps:
- Power on your computer and wait for it to fully boot up.
- Locate the Corsair iCue software on your desktop or in your system tray and double-click to open it. If you haven’t already installed the software, refer to Step 2 for instructions on how to download and install it from the official Corsair website.
- Once the software is launched, it may take a few seconds to detect and initialize your Corsair RAM modules.
- You’ll be presented with the main dashboard of the Corsair iCue software, which displays all the connected Corsair RGB devices, including your RAM modules.
With the Corsair iCue software successfully launched and your RAM modules detected, you’re now ready to dive into the exciting world of RGB customization. In the next step, we’ll guide you through the process of customizing the color profiles of your Corsair RAM.
Keep in mind that the layout and options within the Corsair iCue software may vary slightly depending on the version you have installed. However, the general steps and features described in this guide should be applicable to most versions of the software.
Now that you’re in the Corsair iCue software, let’s move on to the next step and start customizing the color profiles of your Corsair RAM modules.
Step 5: Customizing Color Profiles
With the Corsair iCue software launched and your Corsair RAM modules detected, it’s time to unleash your creativity and customize the color profiles of your RAM modules. The Corsair iCue software provides a wide range of options and controls to create stunning lighting effects and change the color of your RAM modules.
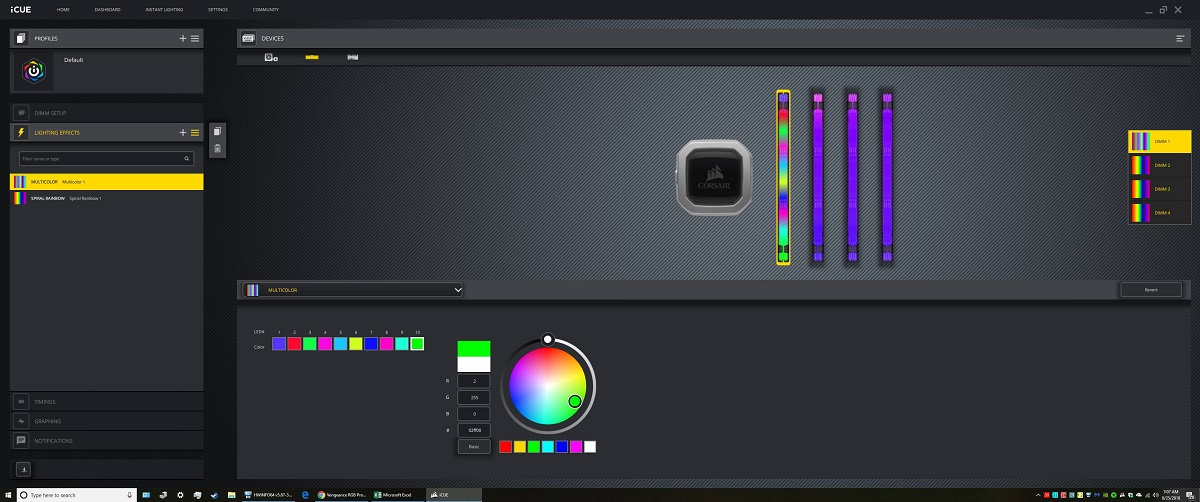
To customize the color profiles of your Corsair RAM, follow these steps:
- In the Corsair iCue software, locate the RAM module you want to customize in the device list.
- Click on the RAM module to select it and access the customization options.
- You’ll find various tabs and settings specific to your RAM module, including lighting effects, color options, and advanced controls.
- To change the color of your RAM modules, navigate to the color settings.
- Choose the color palette or color wheel to select your desired color. You can also enter specific RGB values for precise customization.
- Experiment with different colors and combinations to achieve the desired effect.
- Additionally, you can explore other customization options, such as lighting effects, patterns, and synchronization with other Corsair RGB devices.
With the Corsair iCue software, you have the freedom to create dynamic lighting effects, including gradients, pulsing, and even synchronized lighting across multiple devices.
Take your time to experiment with different color profiles and lighting effects to find the perfect combination that matches your personal style and complements your overall setup.
Once you’re satisfied with the color profile customization, you’re ready to apply the changes to your Corsair RAM modules. In the next step, we’ll guide you through the process of applying the color changes to your RAM modules.
Now that you’ve customized the color profiles of your Corsair RAM using the Corsair iCue software, let’s move on to the next step and apply these changes to your RAM modules.
Step 6: Applying Color Changes to Corsair RAM
Now that you’ve customized the color profiles of your Corsair RAM modules using the Corsair iCue software, it’s time to apply these changes and see the new colors come to life. Applying the color changes is a simple process that ensures your customizations are reflected on your RAM modules.
To apply the color changes to your Corsair RAM, follow these steps:
- Ensure that the Corsair iCue software is still running on your computer.
- In the Corsair iCue software, locate the RAM module with the customized color profiles.
- Click on the RAM module to select it and access the customization options.
- Within the customization options, look for an “Apply” or “Save” button.
- Click on the “Apply” or “Save” button to apply the color changes to your Corsair RAM modules.
- Wait for a few moments as the changes take effect. You should see the new colors and lighting effects on your RAM modules.
Once the changes have been successfully applied, your Corsair RAM modules will showcase the customized color profiles you have created. Take a moment to admire the vibrant colors and the personalized touch they bring to your computer setup.
If you feel the need to make further adjustments or explore different color profiles, you can always return to the Corsair iCue software and make the necessary changes.
Now that the color changes have been successfully applied to your Corsair RAM modules, let’s move on to the final step, where we’ll discuss the importance of saving and syncing profiles.
Step 7: Saving and Syncing Profiles
After customizing the color profiles of your Corsair RAM modules and applying the changes, it’s important to save your configurations and consider syncing them across multiple devices. This ensures that your customized color profiles are retained even after rebooting your system or disconnecting the RAM modules.
To save and sync your profiles in the Corsair iCue software, follow these steps:
- In the Corsair iCue software, locate the RAM module for which you want to save the customized color profile.
- Click on the RAM module to select it and access the customization options.
- Navigate to the profile settings or saved profiles section within the RAM module settings.
- Click on the “Save” or “Export” button to save the current color profile.
- Choose a name for your profile and select the desired location to save it.
- Once saved, your customized color profile will be available for future use or to share with others.
- If you have other Corsair RGB devices, such as fans, keyboards, or mice, you can consider syncing the color profiles across them.
- Refer to the documentation or settings of your Corsair RGB devices to enable synchronization and ensure consistent lighting effects across your entire setup.
By saving and syncing your color profiles, you can easily restore your customizations and have a uniform lighting experience across all compatible Corsair devices.
Remember to periodically back up your profiles to prevent any loss of settings and ensure that you can easily restore your preferred color profiles in the future.
With the profiles saved and optionally synced, you have successfully completed the process of changing the color of your Corsair RAM modules. Congratulations on adding a personal touch to your computer setup!
Keep in mind that you can always revisit the Corsair iCue software to modify, create new profiles, or explore different lighting effects to keep your setup fresh and visually appealing.
Now that you’re familiar with the process, you can enjoy the flexibility to change the color of your Corsair RAM according to your mood, style, or preference.
Conclusion
Changing the color of your Corsair RAM can breathe new life into your computer setup, providing a visually stunning and personalized touch. With the help of the Corsair iCue software, you can easily customize the RGB lighting and create vibrant color profiles that match your style and aesthetic preferences.
In this guide, we’ve walked you through the step-by-step process of changing the color of your Corsair RAM modules. We started by checking compatibility to ensure your RAM modules are compatible with Corsair iCue software. Then, we covered the installation of the Corsair iCue software and the connection of your RAM modules to your computer.
We then delved into launching the Corsair iCue software and customizing the color profiles of your RAM modules. Exploring various color options, effects, and synchronization possibilities allows you to create a unique lighting experience that enhances the overall look of your computer setup.
Additionally, we discussed the importance of saving and syncing profiles to ensure your customized color configurations are retained and easily accessible in the future. By saving your profiles, you can easily restore or share your preferred color settings whenever needed.
Changing the color of your Corsair RAM is a rewarding endeavor that lets you express your creativity and add a personal touch to your computer setup. Whether you’re a gamer, a creative professional, or simply looking to spruce up your workspace, customizing the color of your RAM modules can make your system truly stand out.
Remember to regularly explore new color combinations, effects, and updates from Corsair to keep your setup fresh and visually appealing. The possibilities for customization are endless with the Corsair iCue software.
Now that you have the knowledge and the tools to change the color of your Corsair RAM, it’s time to unleash your creativity and transform your computer setup into a vibrant and eye-catching display of your personal style.