Introduction
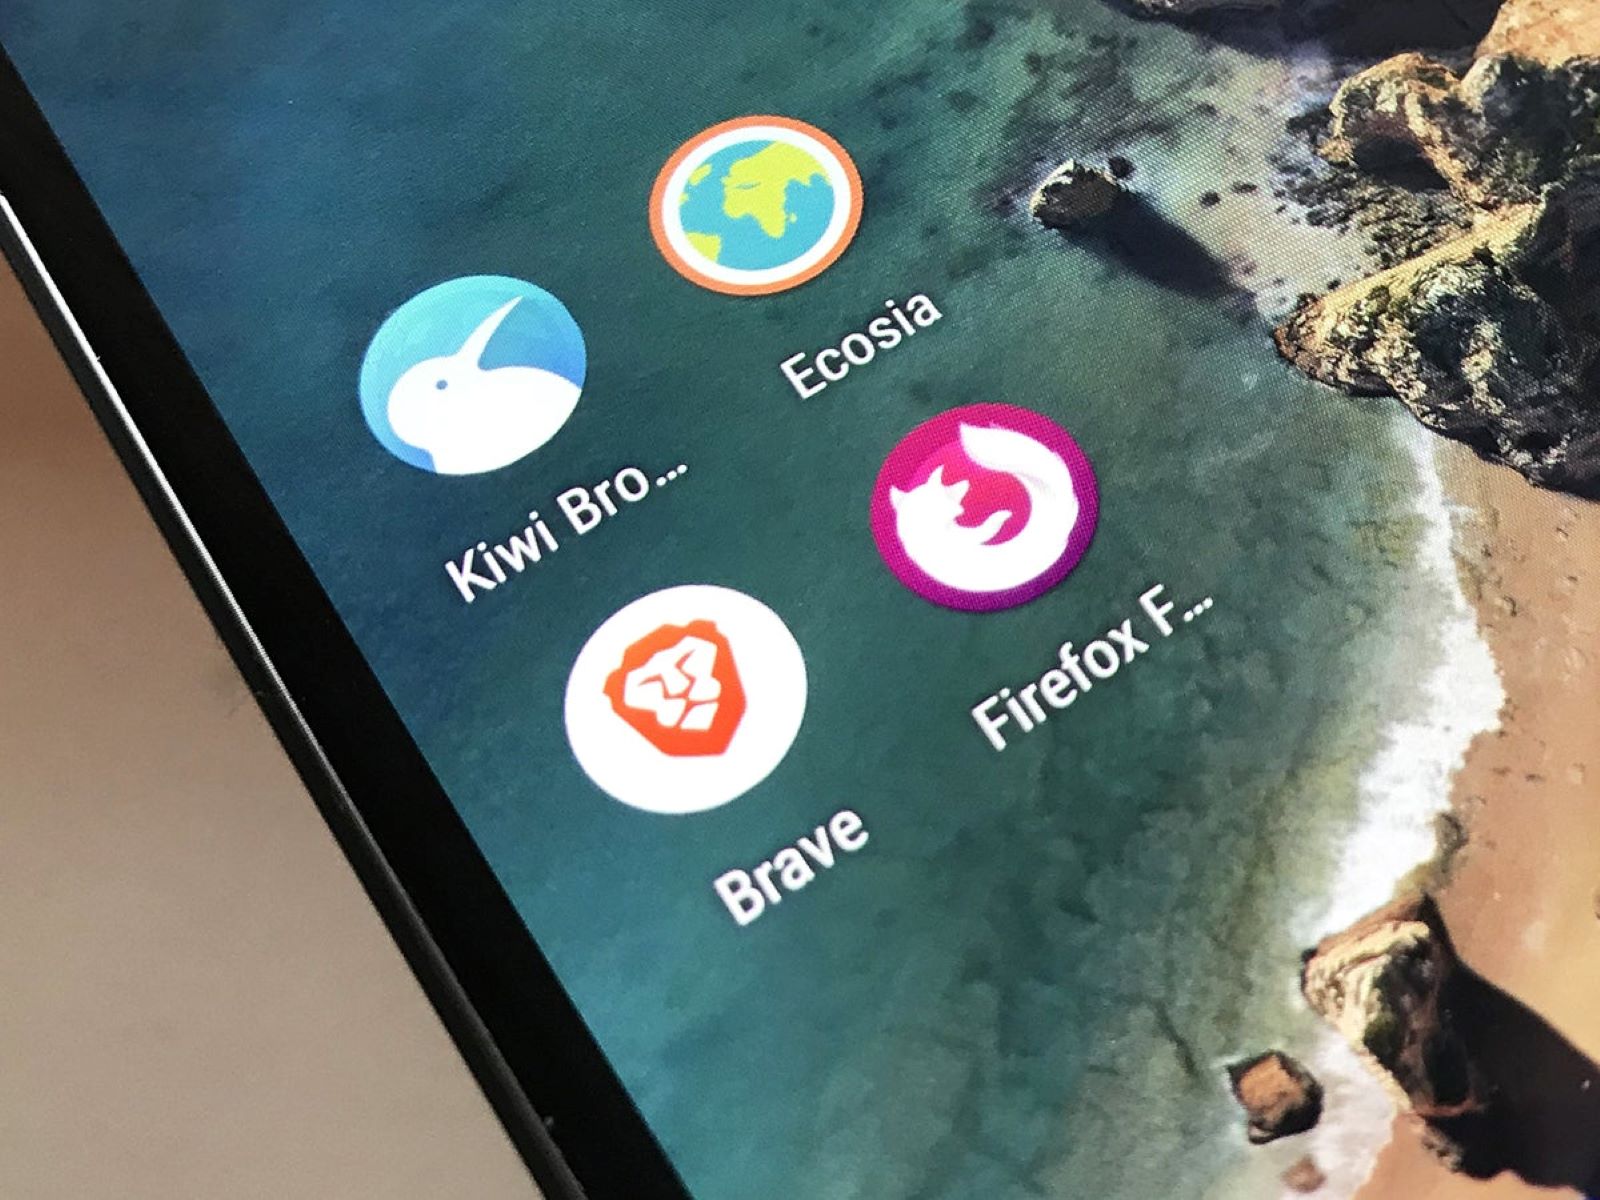
Welcome to the world of Android customization! One of the great features of Android devices is the ability to customize various aspects of the user interface, including app icons. App icons are the small graphic symbols that represent different applications on your Android device’s home screen or app drawer. They not only serve a functional purpose but also add visual appeal to your device.
While the default app icons that come with your Android device may be fine, you might want to give your device a personal touch by changing the icons to something more unique or visually appealing. Fortunately, you don’t need to be an expert or have any technical knowledge to change your app icons on Android. There are a few simple methods that allow you to easily customize the look of your app icons.
In this article, we will explore two popular methods for changing app icons on Android: using a launcher app and using an icon pack. These methods give you the flexibility to transform the appearance of your app icons according to your preferences and style.
What are app icons on Android?
App icons are small visual representations that are used to identify and access different applications on your Android device. They provide a quick and easy way to locate and launch specific apps from your home screen or app drawer. Each app on your device has its own unique icon, which is designed to reflect the purpose or functionality of the app.
App icons play an essential role in the user experience, as they help users easily navigate through the various applications installed on their Android devices. They are typically displayed as square or round-shaped graphics, often with distinct colors, symbols, or logos associated with the corresponding app.
App icons are not only functional but also contribute to the overall aesthetic appeal of your Android device. Many developers invest time and effort in designing visually appealing icons that stand out and represent their apps effectively. The prominence of app icons on your home screen makes them an important aspect of personalizing and customizing your Android device.
By default, Android devices come with a set of pre-designed app icons that match the device’s operating system or the specific manufacturer’s branding. However, as an Android user, you have the freedom to change these icons and choose alternatives that suit your personal taste and style.
Now that we understand app icons and their significance let’s explore how you can change them using different methods. Whether you want to give your device a fresh new look or simply want to express your individuality, changing app icons on Android is a fun and creative way to add a personal touch to your device.
How to change app icons using a launcher
If you want to change app icons on your Android device, using a launcher app is one of the easiest and most effective methods. A launcher app allows you to customize various aspects of your device’s user interface, including the appearance of app icons. Here’s how you can change app icons using a launcher:
Step 1: Download a launcher app from the Google Play Store
To begin, you’ll need to download a launcher app from the Google Play Store. There are many launcher apps available, each offering different features and customization options. Some popular launcher apps include Nova Launcher, Microsoft Launcher, and Apex Launcher. Choose the one that suits your preferences and install it on your device.
Step 2: Install and open the launcher app
After downloading the launcher app, open it and follow the on-screen instructions to set it as your default launcher. This will replace your device’s stock launcher and allow you to customize app icons and other aspects of the user interface.
Step 3: Customize the app icons
Once the launcher app is set as your default launcher, you can start customizing the app icons. Most launcher apps provide a settings or customization menu where you can access the icon customization options. Look for options like “Icon packs,” “Themes,” or “App drawer settings.”
Step 4: Select the new app icon
In the customization menu, you’ll find a list of available app icons or icon packs. Browse through the options and select the one you want to use for a specific app. Some launcher apps also allow you to import custom icon packs downloaded from external sources.
Step 5: Apply the changes
After selecting the desired app icons, apply the changes or save the settings. The launcher app will replace the default app icons with the new ones you selected. You can now go to your home screen or app drawer to see the updated app icons.
Changing app icons using a launcher app gives you the flexibility to experiment with different icon designs and styles. You can also switch back to the default app icons at any time by changing the settings in the launcher app.
Step 1: Download a launcher app from the Google Play Store
The first step in changing app icons on your Android device using a launcher is to download a launcher app from the Google Play Store. A launcher app is a third-party application that allows you to customize the appearance and functionality of your device’s home screen, app drawer, and various other aspects of the user interface.
When it comes to choosing a launcher app, the Google Play Store offers a wide range of options to suit different preferences and needs. Some of the popular launcher apps include Nova Launcher, Microsoft Launcher, Apex Launcher, and Action Launcher, among others. You can browse through the Play Store and read user reviews and ratings to help you make an informed decision.
Once you have decided on a launcher app, follow these steps to download and install it:
Step 1: Launch the Google Play Store app
Open the Google Play Store app on your Android device. You can usually find it on your home screen or in the app drawer. Tap on the Play Store icon to open it.
Step 2: Search for the launcher app
In the search bar at the top of the Play Store screen, type in the name of the launcher app you want to download. As you type, the Play Store will suggest relevant options. Select the launcher app from the search results.
Step 3: Tap on the “Install” button
On the launcher app’s page in the Play Store, you will see an “Install” button. Tap on it to start the download and installation process. The launcher app will begin downloading and installing on your device.
Step 4: Open the launcher app
Once the installation is complete, you can tap on the “Open” button on the launcher app’s page in the Play Store, or you can find the app in your device’s app drawer and tap on it to open it.
Step 5: Set the launcher app as the default launcher
When you launch the newly installed launcher app for the first time, it will prompt you to set it as the default launcher. Tap on the “Set as default” or “Use as default” option to make the launcher app your device’s default launcher. This step is crucial as it allows the launcher app to take over the home screen and app drawer functions.
Once you have completed these steps, you will have successfully downloaded and installed a launcher app from the Google Play Store. You can now proceed to the next steps in customizing your app icons with the help of the launcher app.
Step 2: Install and open the launcher app
After downloading a launcher app from the Google Play Store, the next step is to install and open the app on your Android device. This is where you will begin customizing your device’s home screen and app icons. Follow these steps to install and open the launcher app:
Step 1: Locate the launcher app
Once the download is complete, go to your device’s app drawer or home screen to locate the launcher app. It is usually represented by an icon with the app’s logo or name. Scroll through your app drawer or home screen to find the app.
Step 2: Install the launcher app
If you haven’t already, tap on the launcher app icon to install it on your device. This may take a few moments depending on your internet connection and the size of the app. Once the installation is complete, you will see a notification or confirmation message.
Step 3: Set the launcher app as the default
After the launcher app is installed, you will need to set it as the default launcher. This will allow the launcher app to replace the default interface of your device, giving you control over the customization options. When prompted, select the launcher app as the default option. If the prompt does not appear automatically, go to your device’s settings, navigate to the “Home Screen” or “Default Apps” section, and choose the launcher app as the default.
Step 4: Open the launcher app
Once the launcher app is set as the default, tap on its icon to open it. This will launch the launcher app’s interface, which may differ from the default launcher you were previously using. Take a moment to familiarize yourself with the app’s settings and customization options.
Step 5: Customize your home screen and app icons
With the launcher app open, you can now start customizing your home screen and app icons. Depending on the launcher app you chose, the customization options may vary, but most launcher apps allow you to change app icons, organize your home screen, apply themes, and add widgets. Explore the app’s settings and options to customize your device’s interface according to your preferences.
By following these steps, you have successfully installed and opened the launcher app on your Android device. You are now ready to proceed with customizing your app icons and giving your device a fresh new look.
Step 3: Customize the app icons
Once you have installed and opened the launcher app on your Android device, it’s time to start customizing your app icons. The customization options may vary depending on the launcher app you are using, but here is a general guide on how to customize app icons:
Step 1: Access the customization menu
Navigate to the settings or customization menu within the launcher app. This can typically be found by tapping on the app’s icon or by long-pressing on an empty area of the home screen and selecting “Settings” or “Customization” from the options that appear. Look for options specifically related to app icons or icon packs.
Step 2: Choose an icon pack or individual app icons
Within the customization menu, you will have the option to select from a variety of icon packs or to customize individual app icons. Icon packs are sets of professionally designed icons that can completely change the look and style of your app icons in one go. If you prefer more control over individual app icons, you can choose to customize them one at a time.
Step 3: Browse and preview icon options
When selecting an icon pack or customizing individual icons, you will typically have the ability to browse and preview different options. This allows you to see how the new icons will look on your home screen before applying them. Take some time to explore the available icon designs and find the ones that best suit your preferences.
Step 4: Apply the new icons
Once you have chosen your desired icon pack or custom icons, apply the changes. Depending on the launcher app, this may involve simply tapping an “Apply” or “Save” button. The launcher app will replace the default app icons with the new ones you selected, instantly transforming the look of your home screen and app drawer.
Step 5: Customize additional icon-related settings
Many launcher apps offer additional customization options related to app icons. Explore the settings menu to see if you can further customize the size, shape, or other visual aspects of the icons. Some launcher apps even allow you to create your own customized icons by selecting an image from your gallery.
By following these steps, you can easily customize your app icons using a launcher app. Enjoy the freedom to personalize your device’s home screen and create a unique look that reflects your style and preferences.
Step 4: Select the new app icon
After customizing the app icons using a launcher app on your Android device, the next step is to select the new app icon for each individual application. Here is a guide on how to select the new app icons:
Step 1: Access the app icon customization
Open the launcher app and access the settings or customization menu once again. Look for the specific option that allows you to change the app icons. Depending on the launcher app, this option may be labeled as “App icons,” “Icon settings,” or “Icon customization.”
Step 2: Select an individual app
From the list of installed applications, select the app for which you want to change the icon. This will open a sub-menu or pop-up window that displays the available icon options for that particular app.
Step 3: Browse through the icon choices
Within the sub-menu or pop-up window, you will see a range of icon choices for the selected app. These could be different variations of the app’s logo, alternative designs, or icons from the icon pack you have chosen. Scroll through the options and take your time to find the one that suits your preferences.
Step 4: Preview the new app icon
As you browse through the available icon choices, the launcher app will typically provide a preview of how the selected app icon will look on your home screen. This allows you to get a better idea of how the new icon will fit in with the overall aesthetic of your device.
Step 5: Apply the new app icon
Once you have decided on the new app icon, apply the changes. This can usually be done by tapping on an “Apply” or “Save” button within the app icon customization sub-menu or pop-up window. The launcher app will replace the old app icon with the new one you selected.
Step 6: Repeat for other apps
If you want to change the app icon for multiple applications, repeat the process for each app individually. Select the app, browse through the icon choices, preview them, and apply the changes. This way, you can customize the appearance of all the apps on your home screen and app drawer.
By following these steps, you can easily select the new app icons within a launcher app. Enjoy the freedom to personalize your device’s app icons and create a visually appealing and cohesive look on your home screen.
Step 5: Apply the changes
Once you have selected the new app icons using a launcher app on your Android device, it’s time to apply the changes and see the new look on your home screen and app drawer. Follow these steps to apply the changes:
Step 1: Save or apply the changes
Within the launcher app, look for a “Save,” “Apply,” or “Confirm” button to save the changes you have made to the app icons. This button is typically located at the bottom or top of the customization menu or within the icon selection screen.
Step 2: Wait for the changes to take effect
Once you have saved or applied the changes, the launcher app will proceed to update the app icons on your device’s home screen and app drawer. The time it takes for the changes to take effect may vary depending on your device’s processing power and the amount of customization you have made.
Step 3: Check your home screen and app drawer
After a few moments, navigate to your home screen or app drawer to see the updated app icons. They should now reflect the new designs or icon packs that you selected within the launcher app. Take a moment to appreciate the refreshed and personalized look of your device.
Step 4: Test the functionality of the app icons
Once the changes are applied and the new app icons are visible, it’s important to ensure that they still function as intended. Tap on each app icon to open the respective application and verify that it works correctly. In rare cases, certain launcher apps may require additional configuration for the app icons to function properly.
Step 5: Make further adjustments if necessary
If you are not fully satisfied with the new app icons or want to make additional changes, you can revisit the launcher app’s settings or customization menu. From there, you can select different icon packs, customize app icons further, or revert back to the default app icons if desired.
By following these steps, you can easily apply the changes you have made to the app icons using a launcher app. Enjoy the personalized and visually appealing look of your home screen and app drawer, tailored to your preferences and style.
How to change app icons using an icon pack
If you want to change app icons on your Android device using a different approach, you can opt for an icon pack. An icon pack is a collection of custom-designed icons that can completely transform the visual appearance of your app icons. Here is a step-by-step guide on how to change app icons using an icon pack:
Step 1: Download an icon pack from the Google Play Store
Start by browsing the Google Play Store for an icon pack that suits your preferences. There are numerous options available, ranging from minimalistic designs to vibrant and artistic styles. Once you find an icon pack that catches your eye, proceed to download and install it on your device.
Step 2: Install and open the icon pack app
After the installation is complete, locate the icon pack app on your device’s home screen or app drawer. Tap on the app icon to launch it. The icon pack app allows you to customize and apply the new icon designs to your app icons.
Step 3: Select the desired app icon
Within the icon pack app, you will typically find a library of available icons. Browse through the various categories or search for a specific app icon that you want to change. Tap on the desired icon to select it. Some icon pack apps also offer the option to customize individual icons further.
Step 4: Apply the new icon to the app
Once you have selected the new icon, you need to apply it to the corresponding app on your device. Depending on the icon pack app, this can be done directly within the app by following the on-screen instructions. Alternatively, you may need to access your device’s settings or launcher app to apply the new icons.
Step 5: Verify the changes
After applying the new icon, navigate to your device’s home screen or app drawer to see the updated app icon. The new icon should now be visible for the corresponding app. Tap on the app icon to ensure that it still functions correctly and opens the desired application.
Step 6: Repeat for other app icons
If you want to change multiple app icons using the same icon pack, repeat the previous steps for each app icon individually. This way, you can customize the appearance of all your desired app icons uniformly throughout your device.
By following these steps, you can easily change your app icons using an icon pack. Enjoy the customization options and find the perfect icon designs to give your device a unique and personalized look.
Step 1: Download an icon pack from the Google Play Store
To change app icons on your Android device using an icon pack, the first step is to download an icon pack from the Google Play Store. Icon packs are collections of customized app icons that can completely transform the look and feel of your device’s interface. Here’s how you can download an icon pack:
Step 1: Open the Google Play Store app
Launch the Google Play Store app on your Android device. You can usually find the app icon on your home screen or in the app drawer. Tap on the icon to open the Play Store.
Step 2: Search for an icon pack
Use the search bar at the top of the Play Store screen to search for “icon pack.” You will be presented with a wide range of options to choose from. Browse through the various icon packs available and read user reviews and ratings to help you make an informed decision.
Step 3: Select and download the icon pack
Once you have found an icon pack that you like, tap on it to view its details. Read through the description and reviews to ensure it meets your requirements. If you are satisfied, tap on the “Install” button to start the download and installation process.
Step 4: Wait for the installation to complete
After tapping the “Install” button, the icon pack will begin downloading and installing on your device. The time it takes to complete the installation may vary depending on the size of the icon pack and your internet connection speed. You will see a progress bar indicating the installation status.
Step 5: Open the icon pack app
Once the installation is finished, tap on the “Open” button to launch the icon pack app. You can also find the app in your device’s app drawer and tap on it to open it. Opening the app will allow you to further customize and apply the new icon designs.
Step 6: Explore the customization options
Within the icon pack app, you will find a variety of customization options. You can usually browse through different categories of icons, search for specific app icons, and preview how they will look on your device. Take your time to explore the available customization options and find the perfect icons for your app.
By following these steps, you can easily download an icon pack from the Google Play Store and prepare to customize your app icons with new and exciting designs. Enjoy the flexibility and creativity that come with changing app icons using an icon pack.
Step 2: Install and open the icon pack app
After downloading an icon pack from the Google Play Store, the next step is to install and open the icon pack app on your Android device. This is where you will find all the customization options and apply the new icon designs to your app icons. Follow these steps to install and open the icon pack app:
Step 1: Locate the icon pack app
Once the download is complete, go to your device’s app drawer or home screen to locate the icon pack app. It is usually represented by an icon with the app’s logo or name. Scroll through your app drawer or home screen to find the app.
Step 2: Install the icon pack app
If you haven’t already, tap on the icon pack app icon to install it on your device. This may take a few moments depending on your internet connection and the size of the app. Once the installation is complete, you will see a notification or confirmation message.
Step 3: Open the icon pack app
After the installation is successful, tap on the app’s icon to open it. This will launch the icon pack app’s interface, which contains all the customization options and the library of available icon designs.
Step 4: Familiarize yourself with the app
Once the icon pack app is open, take a few moments to explore its features and options. Some icon pack apps offer additional customization settings, such as icon size, shape, or even wallpapers. This allows you to customize your device’s interface beyond just the app icons.
Step 5: Apply the new icon pack
In the icon pack app, you will find the option to apply the new icon pack to your device’s app icons. This process varies depending on the app, but it usually involves tapping on an “Apply” or “Set” button within the app. Once you confirm the action, the app icons on your home screen and app drawer will be replaced with the new icon designs from the icon pack.
Step 6: Verify the changes
After applying the new icon pack, navigate to your device’s home screen or app drawer to see the updated app icons. They should reflect the new designs that you selected within the icon pack app. Tap on the app icons to ensure that they still open the corresponding applications correctly.
By following these steps, you can easily install and open the icon pack app on your Android device. Start customizing your app icons with exciting and fresh designs, enhancing the visual aesthetics of your device’s interface.
Step 3: Select the desired app icon
Once you have installed and opened the icon pack app on your Android device, it’s time to select the desired app icon for each individual application. This step allows you to personalize your app icons with new, visually appealing designs from the icon pack. Here’s how to select the desired app icon:
Step 1: Browse through the available icons
Within the icon pack app, you will find a library of available icons. Depending on the app, these icons may be organized into different categories or displayed in a grid. Take your time to scroll through the options and explore the various designs that the icon pack offers.
Step 2: Search for a specific app icon
If you are looking for a specific app icon, you can use the search function within the icon pack app. Simply type the name of the app in the search bar and the app icons related to that app will be displayed. This makes it easier to find the desired icon quickly.
Step 3: Preview the app icons
Most icon pack apps allow you to preview how the selected app icons will look on your device’s home screen or app drawer. This is a handy feature that helps you visualize how the new app icons will fit into your device’s overall aesthetic. Take advantage of this preview function to make an informed decision.
Step 4: Select the desired app icon
When you come across an app icon that you like, tap on it to select it as the new icon for that particular app. The selected app icon will usually be marked or highlighted in some way to indicate that it has been chosen. Repeat this process for each app for which you want to change the icon.
Step 5: Fine-tune the selection if necessary
If the icon pack app offers further customization options, you can fine-tune the selected app icons to suit your preferences. Some icon pack apps allow you to adjust the size, shape, or color of the icons. Take advantage of these options to create a more personalized look for your app icons.
Step 6: Confirm the selection
After selecting the desired app icon for each app, find the confirmation or apply button within the icon pack app. This button may be labeled as “Apply,” “Set icons,” or something similar. Tap on it to confirm your selection and apply the new app icons to your device’s home screen and app drawer.
By following these steps, you can easily select the desired app icon using an icon pack app. Enhance the visual appeal of your device by customizing your app icons with beautiful designs that reflect your individual style.
Step 4: Apply the new icon to the app
Once you have selected the desired app icons using an icon pack app on your Android device, it’s time to apply the new icons to the corresponding applications. This step allows you to see the visual transformation of your app icons. Follow these steps to apply the new icon to the app:
Step 1: Access the app customization settings
Open the icon pack app and look for a section or option that allows you to customize individual app icons. This section may be labeled as “Icon settings,” “App icon customization,” or something similar. Tap on this option to proceed.
Step 2: Locate the app for icon customization
Within the app customization settings, you will see a list of installed applications. Scroll through the list or search for the specific app for which you want to change the icon. Tap on the app to proceed with the icon customization process.
Step 3: Select the new icon
Once you have chosen the app for icon customization, you will be presented with a selection of icons from the icon pack you downloaded. Browse through the available options and choose the new icon that you want to apply to the app. Tap on the selected icon to confirm your choice.
Step 4: Save or apply the changes
After selecting the new icon, you will usually find a button or option to save or apply the changes. Tap on this button to save the new icon for the app. The icon pack app will update the app icon on your device’s home screen and app drawer.
Step 5: Verify the changes
Navigate back to your device’s home screen or app drawer to see the updated app icon. The new icon that you selected from the icon pack should now be visible for the corresponding app. This allows for easy identification and gives your device a fresh and personalized look.
Step 6: Repeat for other app icons
If you want to change the icons for multiple apps, repeat the previous steps for each app individually. Select the app, choose the new icon, save or apply the changes, and verify the updated icon on your device’s interface. This way, you can customize the appearance of all the desired app icons.
By following these steps, you can easily apply the new icon to the app using an icon pack app. Enjoy the customized and visually appealing app icons that reflect your personal style and preferences.
Conclusion
Changing app icons on your Android device is a simple yet effective way to personalize your device and make it reflect your style and preferences. With the help of launcher apps or icon packs, you can easily customize the appearance of your app icons, giving your device a fresh new look.
In this article, we explored two popular methods for changing app icons on Android. Using a launcher app allows you to not only change the app icons but also offers additional customization options for your device’s home screen and user interface. On the other hand, using an icon pack provides you with a collection of stunning and cohesive app icons that can completely transform the visual aesthetic of your device.
Whether you choose to use a launcher app or an icon pack, the process is straightforward. Download the desired app from the Google Play Store, install and open it on your device, and then follow the steps provided to customize and apply the new app icons. Both methods offer flexibility and allow you to easily revert to the default app icons if desired.
Remember to take some time to explore the available app icons and find designs that resonate with your personal style. Previewing and customizing the icons ensures that you create a cohesive and visually appealing look on your device’s home screen and app drawer.
Lastly, changing app icons is just one aspect of Android customization. Don’t be afraid to further explore other customization options like themes, widgets, and wallpapers, to create a fully personalized and unique user experience on your device.
So go ahead and give your Android device a fresh new look by changing app icons. Embrace your creativity, experiment with different designs, and make your device truly yours.