Introduction
Changing the wallpaper on your Android device can give it a fresh new look and add a personal touch to your device. Whether you want to change it to a photo of your loved ones, a scenic landscape, or an abstract artwork, Android makes it easy to customize your wallpaper. In this article, we will guide you through the step-by-step process of changing the wallpaper on your Android device.
With a myriad of options available, you can choose from a wide range of pre-installed wallpapers, select an image from your gallery, or even download wallpapers from the internet. Whether you have a Samsung, Google Pixel, OnePlus, or any other Android device, the process of changing your wallpaper remains relatively similar across different models and versions of Android.
So, if you’re ready to hit refresh on your device’s wallpaper, let’s get started with our simple guide on how to change the wallpaper on your Android device.
Step 1: Go to the Settings Menu
The first step to changing the wallpaper on your Android device is to access the Settings menu. The Settings menu is where you can find various options and configurations for your device.
To access the Settings menu, you need to locate the app icon on your home screen or app drawer. The icon typically looks like a gear or a set of sliders. Once you find the icon, tap on it to open the Settings menu.
Alternatively, you can swipe down from the top of your screen to access the notification panel and tap on the gear icon to quickly open the Settings menu.
Once you have successfully opened the Settings menu, you will be greeted with a plethora of options and settings categorized into different sections. These sections may vary slightly depending on the make and model of your Android device, but the overall structure remains similar.
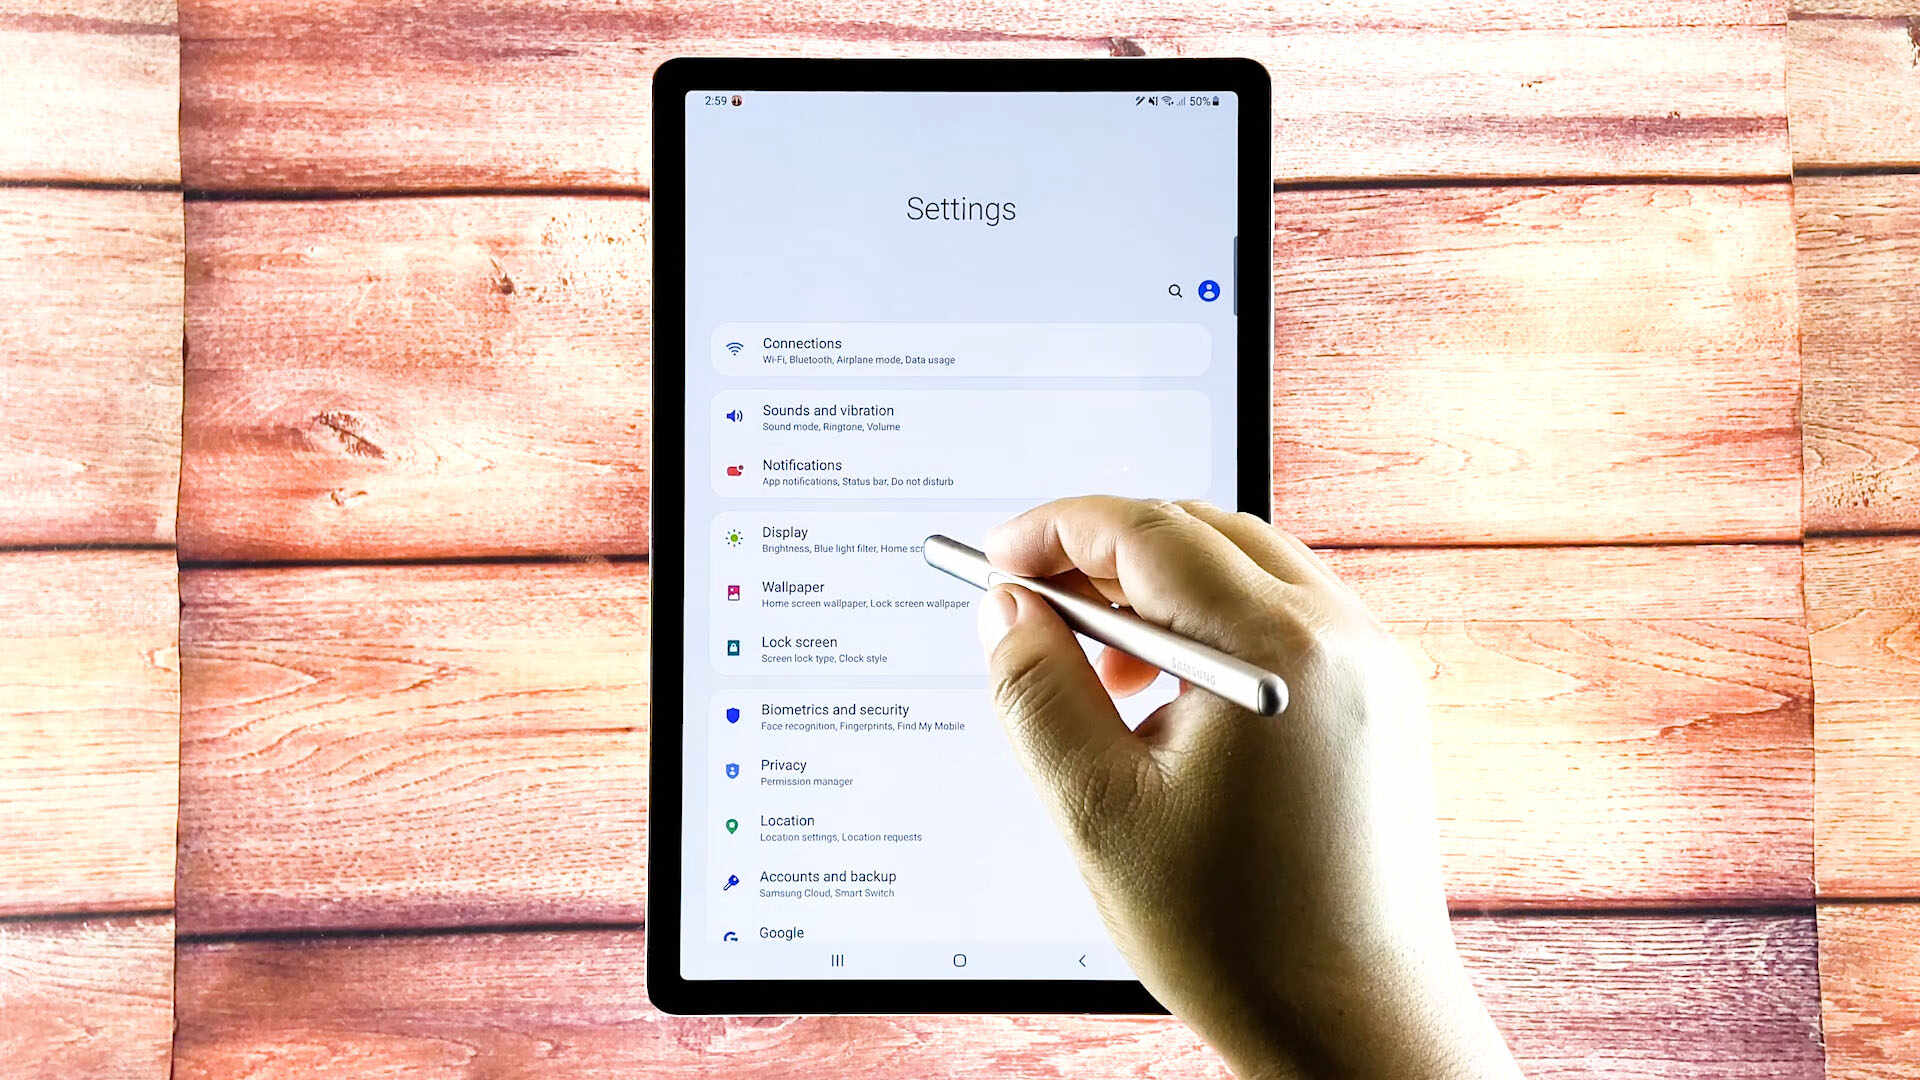
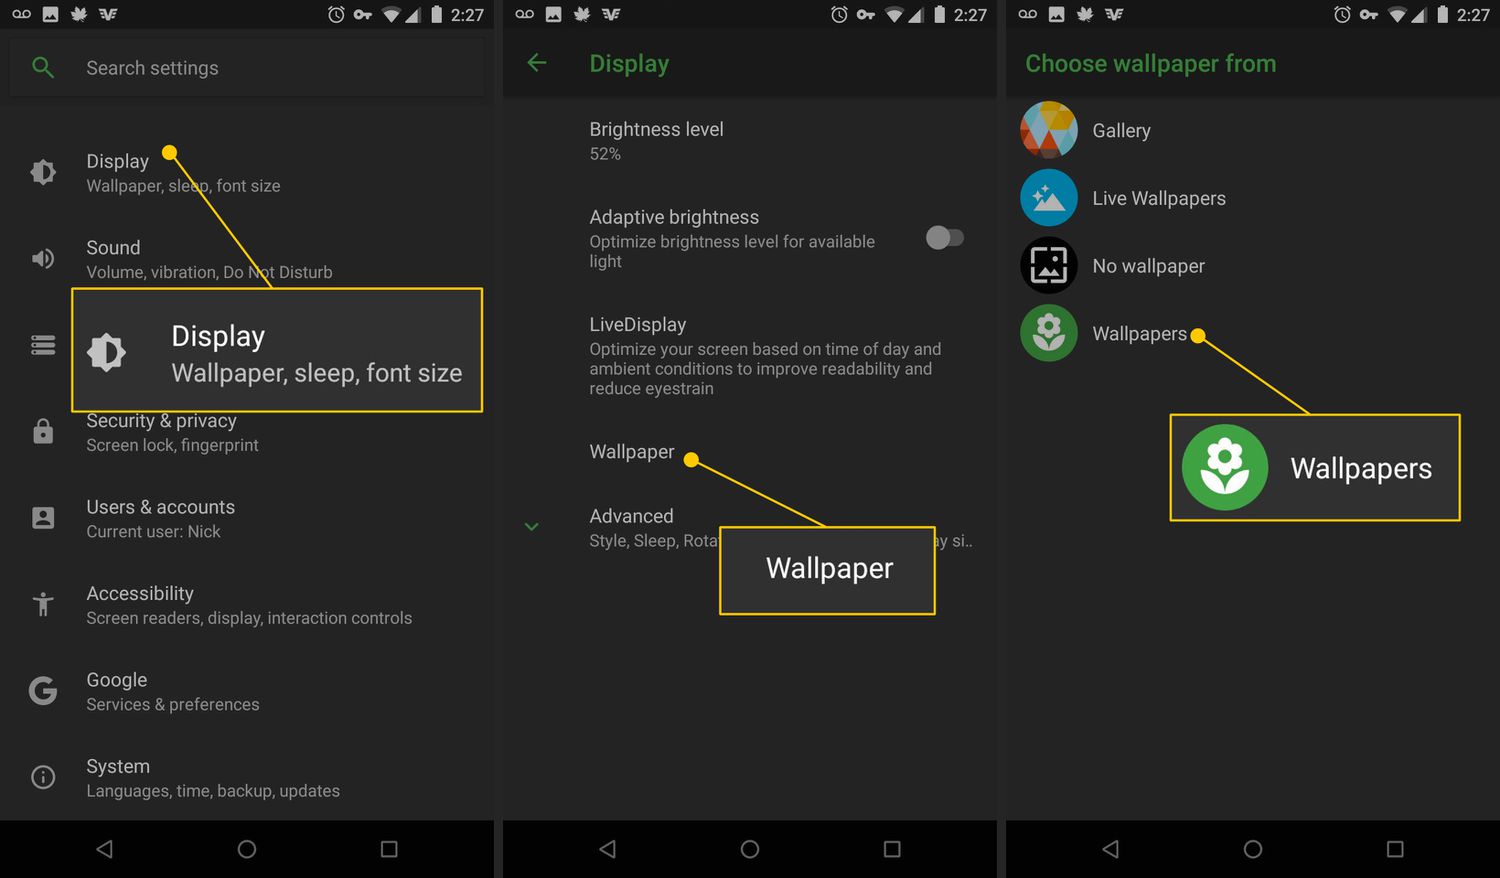
Scroll through the list of options and look for the section labelled “Display” or “Display & Brightness”. This section is where you can find all the settings related to your device’s display, including the wallpaper.
Tap on the “Display” or “Display & Brightness” section to proceed to the next step of changing your wallpaper.
Step 2: Locate the Wallpaper Option
After accessing the “Display” or “Display & Brightness” section in the Settings menu, it’s time to locate the specific option for changing your wallpaper.
Scroll through the options in this section until you find the option labelled “Wallpaper” or “Wallpaper settings” or something similar. This is the option that allows you to customize and change the wallpaper on your Android device.
Depending on the device and Android version you are using, the wallpaper option may be directly visible in the “Display” section, or you may need to access a sub-menu to find it. Some devices may refer to it as “Home screen wallpaper” or “Lock screen wallpaper” if you want to change the wallpaper for a specific screen.
Tap on the wallpaper option to explore the available wallpaper settings and customization options.
Once you enter the wallpaper settings, you may see a list of pre-installed wallpapers to choose from. These wallpapers are already stored on your device and are designed to fit the screen dimensions perfectly.
If you want to use one of the pre-installed wallpapers, simply select the desired wallpaper from the list and proceed to the next step. However, if you want to use a custom image as your wallpaper, read on to the next step for more instructions.
Step 3: Choose an Image or Wallpaper Source
Now that you have entered the wallpaper settings, it’s time to choose the source of the image or wallpaper you want to set as your background.
Android devices offer various sources from which you can select wallpapers. The available sources may include:
- Gallery: If you have a favorite photo or image already saved in your device’s gallery, you can select it as your wallpaper.
- Wallpapers: Android provides a range of pre-installed wallpapers that you can choose from. These wallpapers are categorized into different themes and styles, such as nature, abstract, or solid colors.
- Live Wallpapers: Live wallpapers are dynamic backgrounds that can display animations, interactive elements, or changing scenes on your device’s home screen or lock screen.
- Wallpaper Apps: There are numerous third-party wallpaper apps available on the Google Play Store. These apps offer a wide selection of high-quality wallpapers for you to choose from.
- Downloaded Images: If you have downloaded an image from the internet or received one via messaging apps, you can use it as your wallpaper.
To choose an image or wallpaper source, tap on the respective option in the wallpaper settings. This will open a new window or screen where you can browse through the available options.
If you decide to use an image from your device’s gallery or a downloaded image, you will typically be presented with a grid or list of thumbnail previews. Tap on the desired image to select it as your wallpaper.
If you opt for pre-installed wallpapers or wallpaper apps, you can browse through the available options by swiping left or right. Once you find a wallpaper that you like, tap on it to preview it and proceed to the next step.
Now that you have chosen your image or wallpaper source, it’s time to move on to the next step of cropping and adjusting the image to fit your screen perfectly.
Step 4: Crop and Adjust the Image
After selecting the image or wallpaper source, it’s time to crop and adjust the image to fit your device’s screen dimensions perfectly. This step ensures that the wallpaper looks visually appealing and doesn’t appear distorted or pixelated.
When you tap on the image or wallpaper you have chosen, you will be presented with options to crop, resize, or edit the image. These options may vary depending on the default gallery app or wallpaper settings on your Android device.
To crop the image, simply drag and adjust the cropping frame to select the area of the image you want to use as your wallpaper. Most devices allow you to drag the corners or sides of the cropping frame to resize it as needed.
It’s important to ensure that the cropped area aligns well with your device’s screen dimensions. Pay attention to the aspect ratio of your screen to avoid any stretching or distortion of the image. Most Android devices have a standard aspect ratio of 16:9 or 18:9.
Once you have adjusted the cropping frame, tap on the “Apply” or “Set Wallpaper” button to confirm your changes. You will then be taken back to the wallpaper settings screen.
In addition to cropping, you may have further options to adjust the image position, zoom level, or apply special effects. Explore the available options based on your Android device and personal preferences.
Now that you have cropped and adjusted the image, it’s time to set it as your wallpaper and see the new look of your Android device’s home screen or lock screen. Let’s move on to the final step.
Step 5: Set the Wallpaper
After cropping and adjusting the image to your liking, it’s time to set it as your wallpaper and enjoy the new look of your Android device.
In the wallpaper settings screen, you will typically find a confirmation or apply button to finalize your wallpaper selection. It may be labeled as “Set wallpaper,” “Apply,” or a similar term.
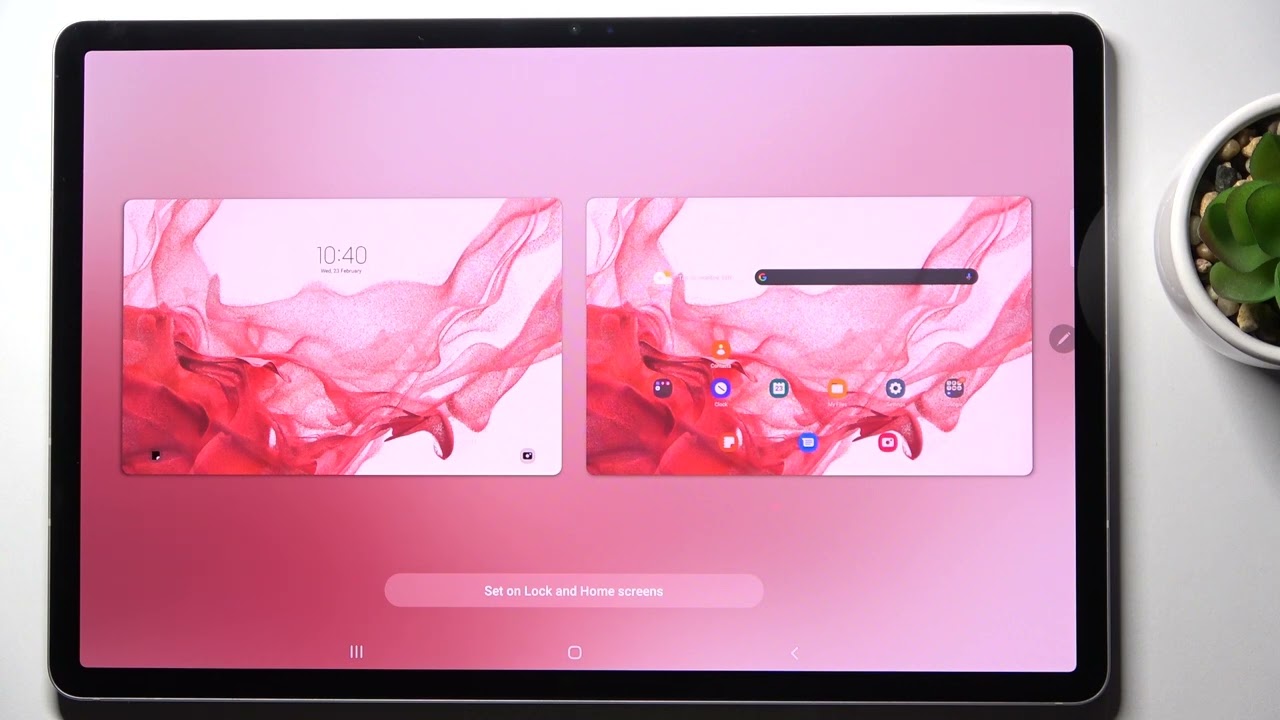
Tap on the appropriate button to proceed. You may be presented with additional options at this stage, such as choosing whether to set the image as the home screen wallpaper, lock screen wallpaper, or both. Select your preferred choice based on your desired customization.
Once you confirm your selection, the wallpaper will be set and applied to your Android device’s home screen or lock screen. Take a moment to admire the new wallpaper and how it enhances the overall look and feel of your device.
Keep in mind that different Android devices and versions may have slight variations in the final steps of setting the wallpaper. Some devices may allow you to preview the wallpaper before applying it, while others may apply it directly without any additional steps.
If you ever want to change your wallpaper again in the future, simply follow these steps and select a new image or wallpaper source to customize your Android device according to your mood, style, or preferences.
Congratulations! You’ve successfully changed the wallpaper on your Android device. Enjoy the personalized and refreshed look of your home screen or lock screen.
Conclusion
Changing the wallpaper on your Android device is a fun and easy way to personalize and refresh its appearance. With just a few simple steps, you can replace the default wallpaper with an image or wallpaper source that reflects your style, mood, or interests.
In this article, we guided you through the step-by-step process of changing the wallpaper on your Android device. We started by accessing the Settings menu and locating the Wallpaper option. Then, we discussed how to choose an image or wallpaper source, whether from your device’s gallery, pre-installed wallpapers, live wallpapers, wallpaper apps, or downloaded images.
Next, we explained the importance of cropping and adjusting the image to ensure it fits your device’s screen perfectly, without any distortion or pixelation. Finally, we walked you through the final step of setting the wallpaper and enjoying the refreshed look of your Android device.
Remember, the specific steps and options may vary slightly depending on the make and model of your Android device and the version of Android you are using. However, the overall process remains relatively similar across devices.
So, go ahead and unleash your creativity by changing the wallpaper on your Android device. Elevate its visual appeal and make it truly your own. Explore different images, wallpapers, and sources to find the perfect background that reflects your personality and style.
Thank you for reading this guide on how to change the wallpaper on your Android device. We hope you found it helpful and that you enjoy the fresh new look of your device’s home screen or lock screen.