Introduction
Welcome to this guide on how to cancel your Amazon Music Unlimited subscription. Amazon Music Unlimited is a popular streaming service that offers a vast library of songs, albums, and playlists for subscribers to enjoy. However, there may come a time when you no longer wish to continue your subscription. Whether you have found an alternative service or simply want to take a break, canceling your Amazon Music Unlimited subscription is a straightforward process.
In this article, we will walk you through the step-by-step process of canceling your Amazon Music Unlimited subscription. We will guide you on how to access your Amazon account, navigate to your Amazon Music settings, and ultimately cancel your subscription. Following these steps will ensure that you properly terminate your subscription and avoid any future charges.
Please note that this guide is specifically for canceling your Amazon Music Unlimited subscription and not the basic Amazon Prime Music service, which is included with an Amazon Prime membership. If you are subscribed to Amazon Music Unlimited, you will need to follow the steps outlined in this guide to cancel your subscription. Let’s get started!
Step 1: Log in to your Amazon Account
The first step in canceling your Amazon Music Unlimited subscription is to log in to your Amazon account. If you already have an Amazon account, follow these steps:
- Open a web browser on your computer or mobile device and go to www.amazon.com.
- Click on the “Account & Lists” option located at the top-right corner of the Amazon homepage.
- Enter your email address and password in the designated fields, then click on the “Sign-In” button.
If you have forgotten your password, you can click on the “Forgot Password?” link to initiate the password recovery process.
If you do not have an Amazon account, you will need to create one in order to access your Amazon Music settings and cancel your subscription. Simply click on the “Create your Amazon account” option and follow the instructions provided.
Once you have successfully logged in to your Amazon account, you are ready to proceed to the next step.
Step 2: Go to Your Amazon Music Settings
After logging in to your Amazon account, you need to navigate to your Amazon Music settings to access your subscription details. Follow these steps to get there:
- From the Amazon homepage, click on the “Account & Lists” option located at the top-right corner of the page.
- In the dropdown menu, scroll down and click on “Your Amazon Music” under the “Digital content and devices” section.
- You will be redirected to the Amazon Music page. If prompted, sign in again to access your Amazon Music settings.
- On the Amazon Music homepage, click on the gear icon in the upper-right corner of the screen. This will open the settings menu.
- From the settings menu, select “Account Settings” to proceed to the next step.
Once you have reached the account settings page, you are one step closer to canceling your Amazon Music Unlimited subscription.
Note: If you are using the Amazon Music mobile app, the steps may vary slightly. Look for the “Settings” or “Account” option within the app to access your subscription settings.
Step 3: Manage Your Subscription
Now that you have accessed your Amazon Music settings, it’s time to manage your subscription and proceed with canceling Amazon Music Unlimited. Here’s what you need to do:
- On the Account Settings page, locate the “Amazon Music Unlimited” section.
- Click on the “Manage Your Subscription” link or button next to it. This will take you to the subscription management page.
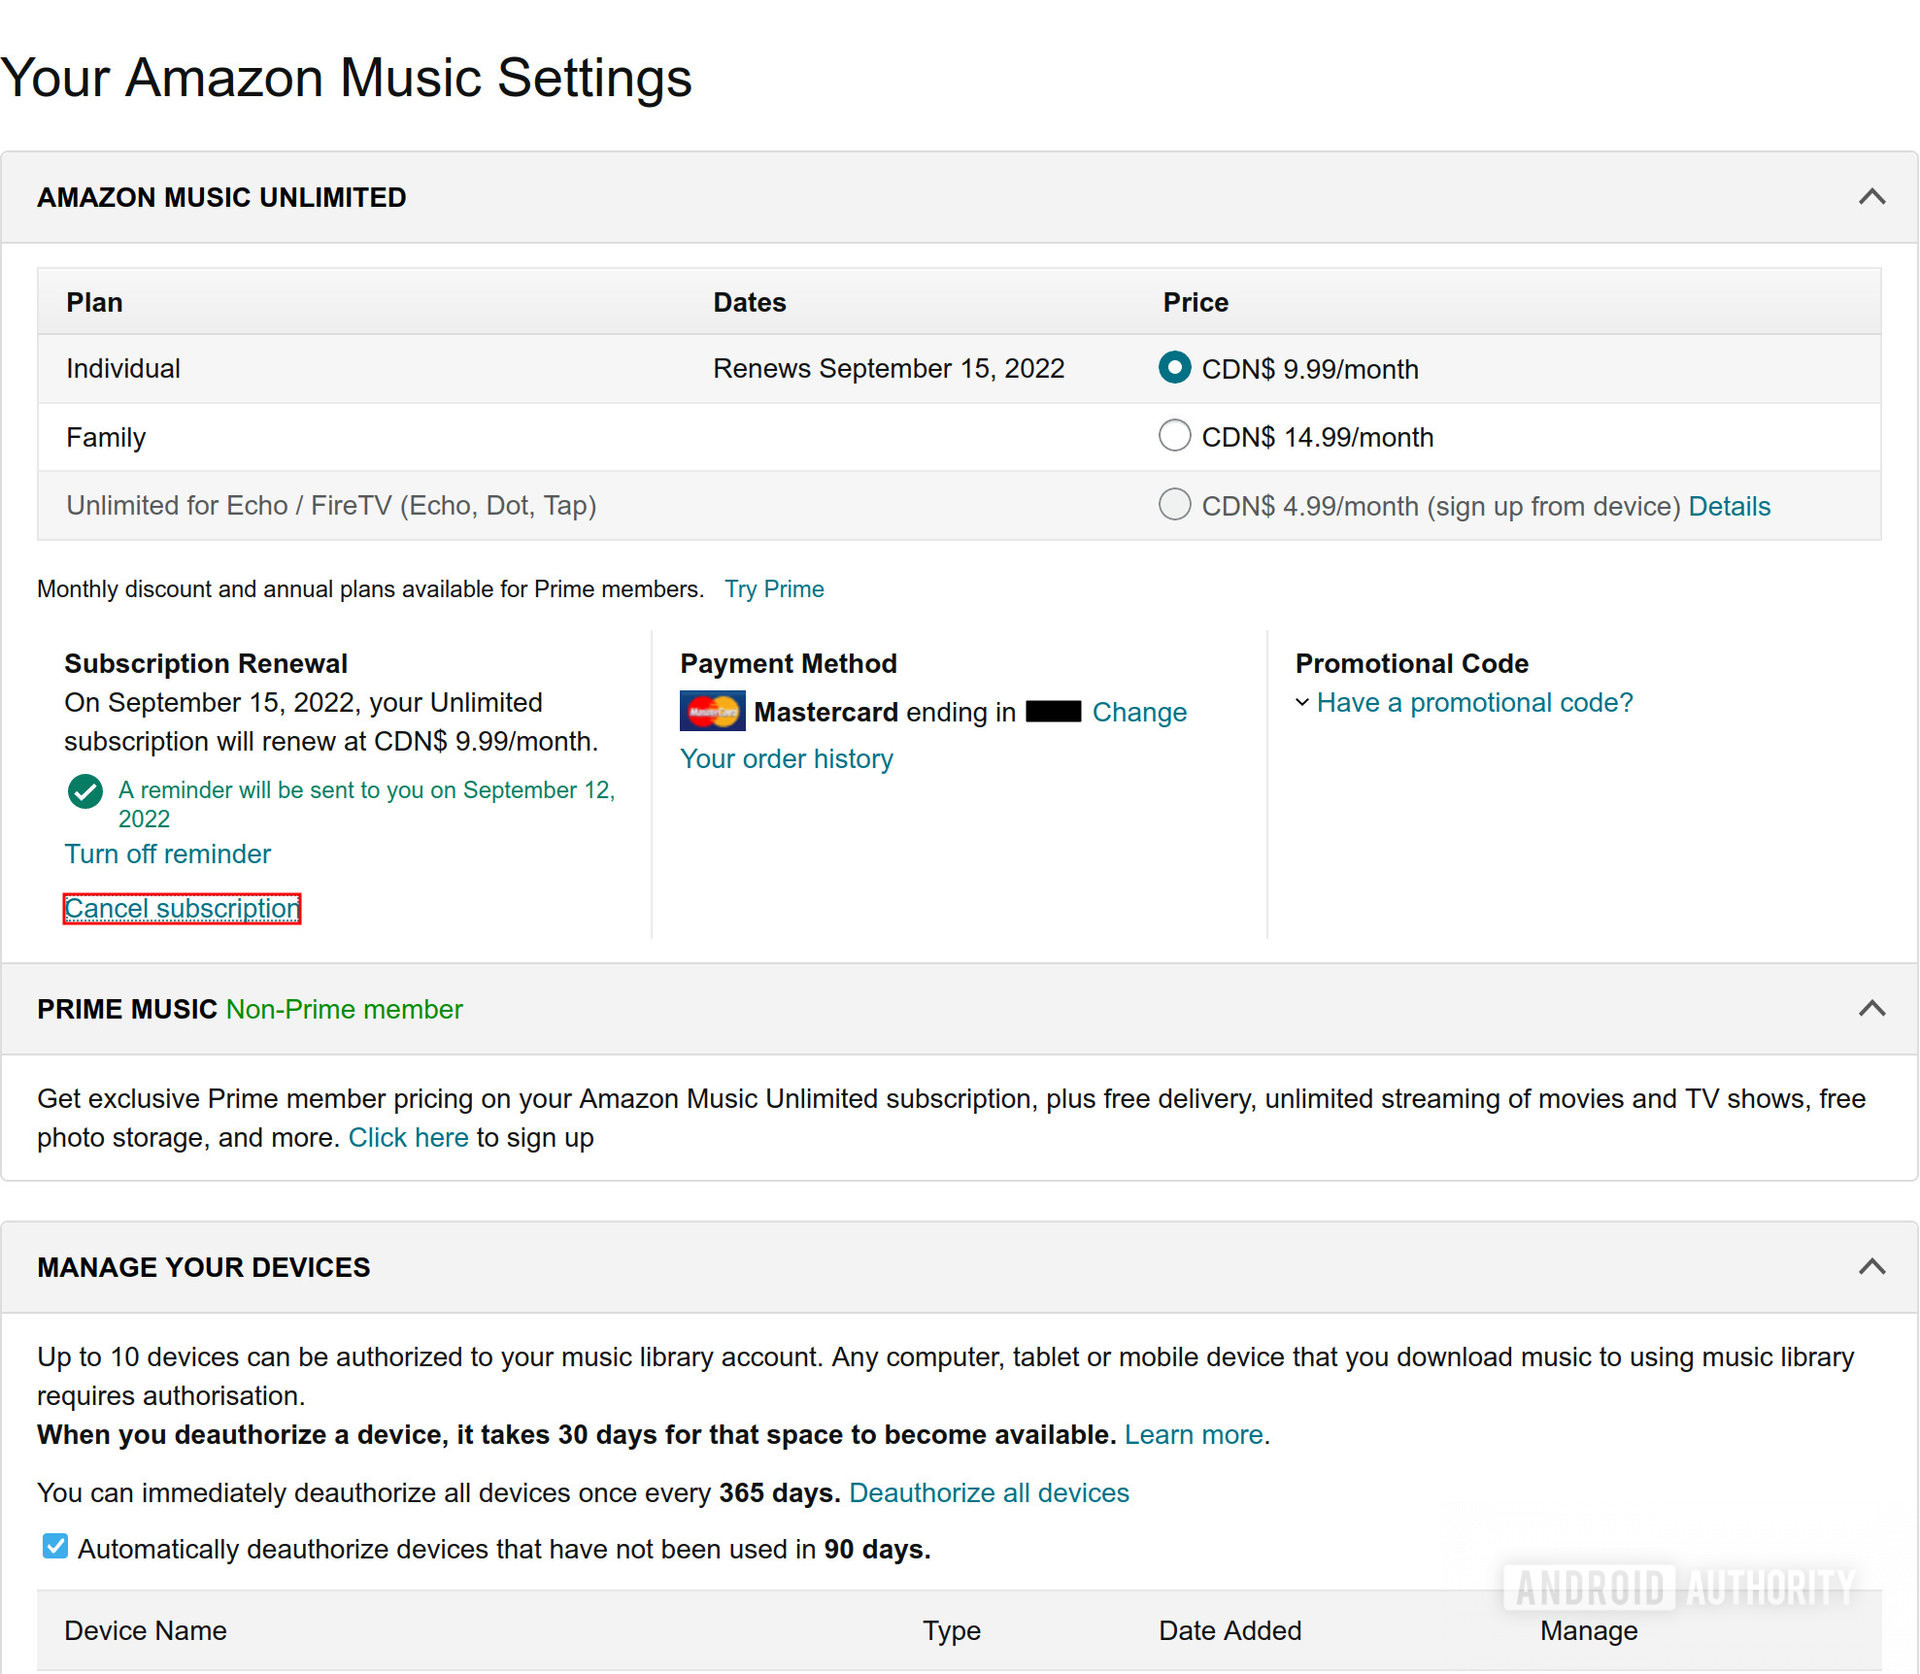
- On the subscription management page, you will see details about your Amazon Music Unlimited subscription, including its duration and renewal date.
- Review the information to ensure you are canceling the correct subscription.
- Take note of any important information, such as the remaining days of your current billing cycle.
- Next, click on the “Cancel Subscription” button or link to proceed with the cancellation process.
At this stage, it’s essential to read any additional information or instructions provided on the cancellation page. Some subscription services may offer alternative options, such as downgrading to a lower plan instead of canceling completely. Make sure to review all available options before finalizing your decision.
Once you have confirmed your intention to cancel, you are ready to move on to the next step.
Step 4: Cancel Amazon Music Unlimited
Now that you have reached the cancellation page, it’s time to cancel your Amazon Music Unlimited subscription. Follow these steps:
- On the cancellation page, you may be asked to provide a reason for canceling. This step is optional, but your feedback can help Amazon improve their services in the future.
- After selecting or skipping the reason, click on the “Confirm Cancellation” or “Cancel Subscription” button. The exact wording may vary.
- You may be prompted with a confirmation message or an offer to extend your subscription at a discounted rate. Read the information carefully before making a decision.
- If you are sure about canceling, click on the “Confirm Cancellation” or similar button to proceed.
Once you have confirmed the cancellation, your Amazon Music Unlimited subscription will be terminated at the end of your current billing cycle. You will still have access to the service until that time.
Note: If you change your mind before the end of the billing cycle, you may be able to reactivate your subscription by visiting the Amazon Music settings and selecting the appropriate option.
Now that you have successfully canceled your Amazon Music Unlimited subscription, you can move on to other streaming services or explore different music options.
Step 5: Confirm Cancellation
After completing the cancellation process, it is important to confirm that your Amazon Music Unlimited subscription has been successfully canceled. Here’s how to confirm the cancellation:
- Return to your Amazon Music settings by clicking on the “Account & Lists” option at the top-right corner of the Amazon homepage.
- Navigate to the “Your Amazon Music” section under the “Digital content and devices” category.
- If your subscription has been canceled, you will see a message indicating the cancellation and the date it will take effect.
- Double-check to ensure that the subscription has indeed been terminated and that you will not be charged for future billing cycles.
It is always a good practice to keep a record of the cancellation confirmation for your reference. You can take a screenshot or save a copy of the confirmation message in case you need it for any future inquiries or disputes.
After confirming the cancellation, feel free to explore other music streaming services or take a break from music subscriptions altogether. Remember, you can always join Amazon Music Unlimited again in the future if you decide to come back.
That’s it! You have successfully canceled your Amazon Music Unlimited subscription and confirmed the cancellation. Enjoy exploring other music options or continue to enjoy the basic Amazon Prime Music service included with your Amazon Prime membership.
Conclusion
Cancelling your Amazon Music Unlimited subscription is a simple process that can be done through your Amazon account settings. By following the step-by-step instructions outlined in this guide, you can easily navigate through the cancellation process and terminate your subscription.
Remember, before cancelling, make sure to review the details of your subscription and consider any alternative options that may be available. Additionally, be aware of the remaining days in your billing cycle to ensure you can fully utilize the service until the cancellation takes effect.
Once you have cancelled your subscription, don’t forget to confirm the cancellation through your Amazon Music settings. This step is crucial to ensure that your subscription has been successfully terminated and that you will not be charged for any future billing cycles.
Whether you decide to explore other music streaming services or take a break from music subscriptions altogether, cancelling Amazon Music Unlimited gives you the freedom to find the right music experience that best suits your needs.
We hope that this guide has provided you with the necessary information to cancel your Amazon Music Unlimited subscription. If you ever decide to rejoin in the future, you can easily reactivate your subscription through your Amazon account.
Thank you for following this guide, and we wish you all the best in your music streaming journey!