Overview
If you’re looking to cancel your Amazon Music subscription, you’ve come to the right place. Whether you’re not satisfied with the service or you simply want to explore other music streaming options, cancelling your subscription is relatively straightforward. In this guide, we’ll walk you through the step-by-step process to help you cancel your Amazon Music subscription hassle-free.
Amazon Music offers a vast library of songs, albums, and playlists, but if it no longer meets your needs, cancelling your subscription is a simple process. Before proceeding, it’s important to note that cancelling your Amazon Music subscription will terminate your access to all its features, including ad-free listening, unlimited skips, and offline downloads.
Regardless of whether you’re using the Amazon Music app or the website, the steps to cancel your subscription remain the same. So, without further ado, let’s dive into the cancellation process.
Keep in mind that cancelling your subscription may differ slightly based on the device or platform you’re using, but overall, the steps are similar. We’ll be focusing on the general process that applies to most scenarios.
Remember, if you’re uncertain about cancelling, you can always explore other options within Amazon Music, such as downgrading to a lower subscription tier or pausing your subscription temporarily instead of cancelling it completely.
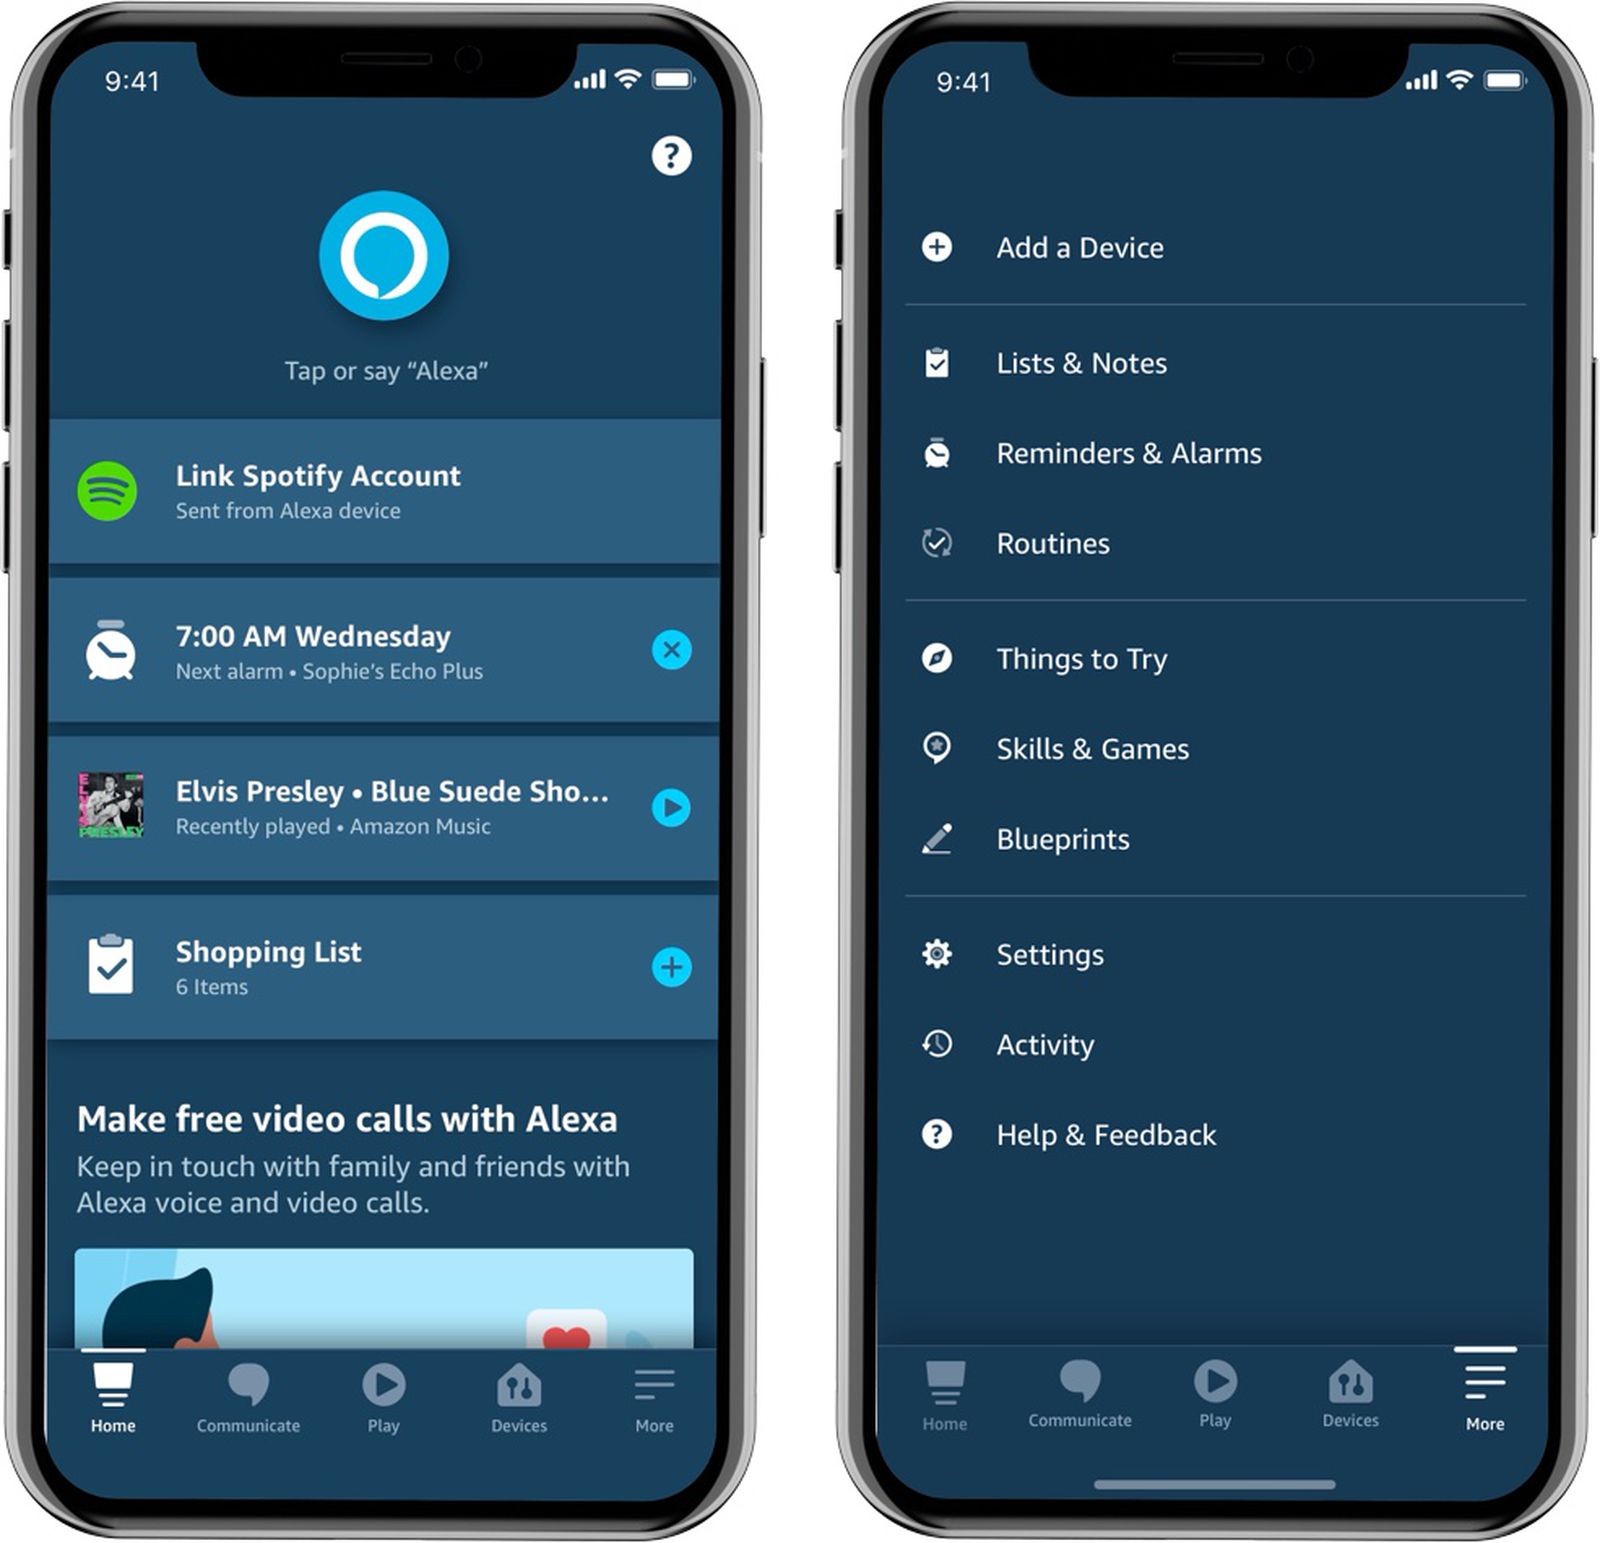
Step 1: Open the Amazon Music app
The first step in cancelling your Amazon Music subscription is to open the Amazon Music app on your device. Whether you’re using an iPhone, Android phone, tablet, or Kindle Fire, make sure you have the Amazon Music app installed and logged in to your account.
If you don’t have the app yet, you can download it for free from the App Store or Google Play Store. Once installed, launch the app and log in using your Amazon account credentials. If you’re already logged in, skip to the next step.
Once you’re inside the Amazon Music app, you’ll be greeted with a clean and intuitive interface that showcases the various music options available to you. Take a moment to familiarize yourself with the app’s layout and navigation.
Keep in mind that the process of cancelling your subscription might vary slightly depending on the specific version of the app you’re using, but the general steps remain the same.
So, whether you’re a new or existing user of the Amazon Music app, open it up and get ready to cancel your subscription in just a few simple steps.
Step 2: Go to the Settings menu
Once you have opened the Amazon Music app on your device, the next step in cancelling your subscription is to navigate to the Settings menu. The Settings menu is where you can access various options and preferences related to your Amazon Music account.
To find the Settings menu, look for the “More” or “Menu” icon typically located in the bottom right or top left corner of the app, represented by three horizontal lines or dots. Tap on this icon to open the additional options.
Within the Settings menu, you may see a list of different settings and account options. Scroll through the list until you find the section related to your Amazon Music account. In some cases, you may need to navigate through several nested menus to locate the specific subscription settings.
Keep in mind that the location of the Settings menu may vary slightly depending on the version of the app you are using. However, it is usually easily accessible, providing you with the necessary options to manage your subscription.
Once you have located the Settings menu, proceed to the next step to find and select the option related to Amazon Music Unlimited, which is where you can manage your subscription.
Step 3: Select “Amazon Music Unlimited”
After accessing the Settings menu in the Amazon Music app, the next step in cancelling your subscription is to select the option for “Amazon Music Unlimited”. This is the section where you can manage and make changes to your subscription settings.
Within the Settings menu, look for the “Subscription” or “Account” tab, which typically includes options related to your Amazon Music subscription. Tap on this tab to reveal the available subscription settings.
Scroll through the options until you find “Amazon Music Unlimited” or a similar option that represents your subscription. This is the section specifically dedicated to the management of the Amazon Music subscription service.
Once you have located “Amazon Music Unlimited”, tap on it to access the detailed settings and options for your subscription. Here, you can make changes, upgrade or downgrade your subscription, or, in this case, proceed with cancelling your subscription.
It’s important to note that the specific wording and placement of the “Amazon Music Unlimited” option may vary slightly depending on the version of the app you are using. However, with a little exploration, you should be able to locate the appropriate section without much difficulty.
Now that you have selected “Amazon Music Unlimited”, it’s time to move on to the next step, where you’ll find the option to cancel your subscription.
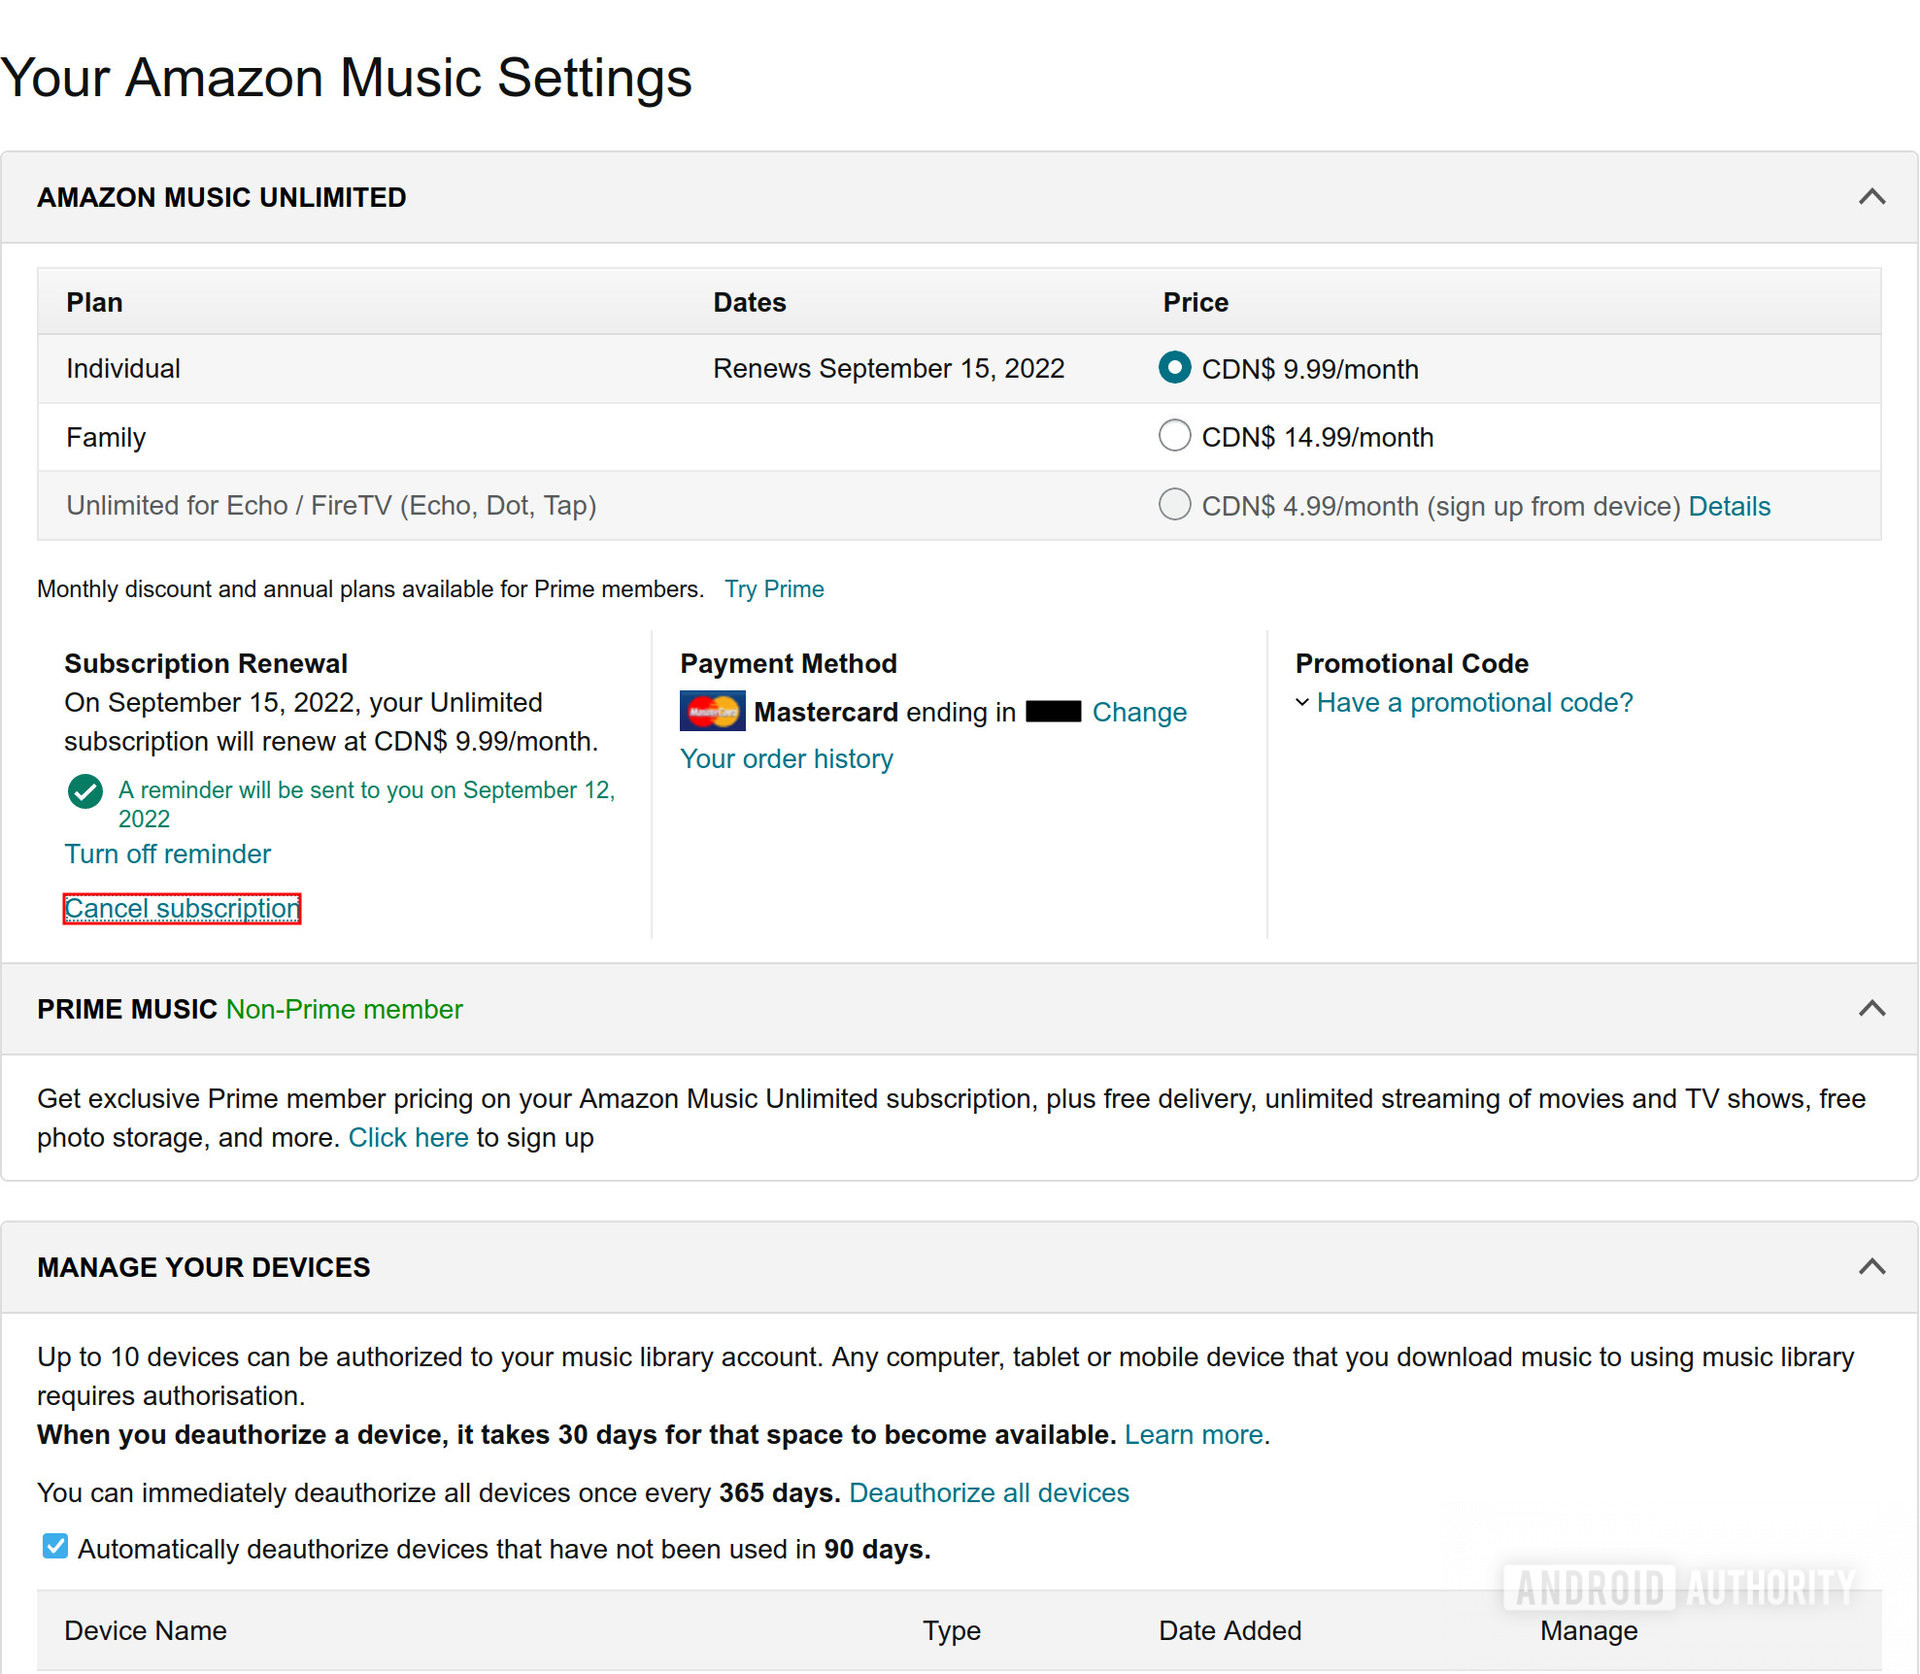
Step 4: Manage your subscription
After selecting “Amazon Music Unlimited” in the Settings menu of the Amazon Music app, you will find yourself in the section where you can manage your subscription. This is where you can make changes to your subscription, including cancelling it if desired.
Within the subscription management section, you may see various options and settings related to your subscription. Take a moment to review these options, as there may be alternatives to cancelling that better suit your current needs.
If you’re set on cancelling your subscription, look for the option that says “Cancel Subscription” or something similar. This is the option that allows you to proceed with ending your Amazon Music Unlimited subscription.
Some apps may require you to click on your subscription plan or choose between different tiers of service before reaching the cancellation option. If this is the case, simply follow the prompts and navigate through the different screens until you find the cancellation option.
It’s worth noting that Amazon Music may also offer you alternative options, such as downgrading to a lower subscription tier or pausing your subscription temporarily. These options can be useful if you’re considering cancelling but still want to maintain some level of access to the service.
Once you have located the cancellation option or have gone through the necessary selection process, you’re ready to move on to the next step, where you will confirm the cancellation of your subscription.
Step 5: Choose “Cancel Subscription”
After managing your Amazon Music subscription in the previous step, you will now come across the option to “Cancel Subscription”. This step is crucial as it confirms your decision to cancel your Amazon Music subscription.
When you select the “Cancel Subscription” option, you may be prompted to provide a reason for your cancellation. This is purely optional, but it can help Amazon Music gather valuable feedback to improve their service. Feel free to select the most relevant reason or simply proceed without providing additional feedback.
Once you’ve made your selection, confirm your cancellation by tapping on the “Cancel Subscription” button or similar option. It’s essential to ensure that you want to proceed with cancelling your subscription, as this action cannot be undone.
At this point, you may encounter additional prompts or offers to entice you to continue your subscription. It’s common for streaming services to try and retain customers, so be mindful of any potential offers or alternatives that might be presented to you.
Remember that cancelling your subscription means you’ll lose access to all the benefits of Amazon Music Unlimited, including ad-free listening, unlimited skips, and offline downloads. Take a moment to consider if there are any other factors you might want to take into account before finalizing the cancellation.
After selecting “Cancel Subscription” and confirming your decision, you’re almost done with the cancellation process. The next step will provide you with a chance to review the details and ensure your subscription has been successfully cancelled.
Step 6: Confirm cancellation
After choosing to cancel your Amazon Music subscription, the next step is to confirm the cancellation. This step ensures that your subscription is officially terminated and that you will no longer be charged for the service.
Once you have selected the option to cancel your subscription, you will generally be redirected to a confirmation screen. This screen will display important details regarding your subscription cancellation, including the date on which it will take effect.
Take a moment to carefully review the information on this screen to ensure that everything is correct. Verify that the cancellation date aligns with your expectations and that all other details are accurate.
If you’re satisfied with the information provided, proceed with confirming your cancellation. Depending on the app or platform you’re using, you may be prompted to re-enter your Amazon account password or complete an additional verification step to secure your cancellation request.
Double-check that you have performed all the necessary steps and entered the correct information before confirming the cancellation. This additional confirmation step helps to prevent accidental cancellations and ensures that your intention to cancel your subscription is clear.
Once you have successfully confirmed the cancellation, you can be confident that your Amazon Music subscription has been officially terminated. However, it’s worth noting that you will continue to have access to the service and its features for the remaining period of your paid subscription.
Now that you have confirmed the cancellation, let’s move on to the next step, where you can review the details of your cancellation and ensure everything has been processed correctly.
Step 7: Review cancellation details
After confirming the cancellation of your Amazon Music subscription, it’s important to take a moment to review the details of your cancellation. This step allows you to ensure that everything has been processed correctly and that you have a clear understanding of the changes that will occur.
Typically, after confirming the cancellation, you will be presented with a confirmation screen or email that contains the specific details of your cancellation. This may include information such as the cancellation date, the remaining period of your paid subscription, and any other relevant information regarding the termination of your subscription.
It’s crucial to carefully review this information to confirm that it aligns with your expectations. Pay close attention to the cancellation date, as this will indicate the exact point at which you will no longer have access to Amazon Music Unlimited and its features.
If you have any questions or concerns about the cancellation details, don’t hesitate to reach out to Amazon Music’s customer support. They will be able to provide you with additional clarification and address any issues you might have.
By reviewing the cancellation details, you can ensure that the cancellation process has been successfully initiated and that you have a clear understanding of the changes that will take place.
Now that you have reviewed the cancellation details and have a clear understanding of the process, let’s move on to the final step, where you can enjoy the remaining subscription period before the cancellation takes effect.
Step 8: Enjoy the remaining subscription period
Now that you have successfully cancelled your Amazon Music subscription, you can make the most of the remaining period of your paid subscription. This step allows you to continue enjoying the benefits of Amazon Music Unlimited until the cancellation takes effect.
During this time, feel free to explore and discover new music, create playlists, and enjoy ad-free listening. Take advantage of the unlimited skips and offline downloads that Amazon Music offers to fully immerse yourself in your favorite tunes.
Whether you’re using the Amazon Music app on your smartphone, tablet, or accessing it through the web, make sure to take advantage of all the features and resources available to you. Dive into different genres, explore personalized recommendations, and even discover new artists and songs with Amazon Music’s vast library.
As the end of your subscription period approaches, keep in mind that your access to Amazon Music Unlimited will cease. Take this time to explore alternative music streaming options if you haven’t already, so that you have a plan in place once your Amazon Music subscription ends.
Additionally, be sure to remove any downloaded songs or playlists from your device or app, as these may become inaccessible once the subscription is no longer active. This will help free up storage space and prevent any unwanted confusion in the future.
Finally, make the most of your remaining subscription period by creating memorable playlists, discovering new favorite songs, and savoring the musical experience with Amazon Music. Enjoy the convenience and variety it offers as you transition to other music streaming options or explore different avenues for your music needs.
Congratulations on successfully cancelling your Amazon Music subscription and taking control of your music streaming preferences. Now, go ahead and enjoy the remaining subscription period before bidding farewell to Amazon Music Unlimited.
Conclusion
Cancelling your Amazon Music subscription is a straightforward process that allows you to explore other music streaming options or reassess your needs and preferences. By following the step-by-step guide outlined in this article, you can successfully cancel your subscription hassle-free.
Remember that the specific steps may vary slightly depending on the version of the Amazon Music app you are using or the device you are accessing it from. However, the general process remains the same, no matter the platform or device.
Starting with opening the Amazon Music app and navigating to the Settings menu, you can easily manage your subscription by selecting “Amazon Music Unlimited”. From there, you can proceed to the cancellation process by choosing the “Cancel Subscription” option.
Confirming your cancellation is the next crucial step, ensuring that your subscription will be officially terminated. Take the time to review the details provided before enjoying the remaining subscription period, making the most of the benefits and features offered by Amazon Music Unlimited.
As you approach the end of your subscription, keep in mind that access to Amazon Music Unlimited will cease. Remember to remove any downloaded songs or playlists to avoid any confusion in the future.
By following these steps, you can successfully cancel your Amazon Music subscription and explore alternative music streaming options that align better with your needs. Whether you’re transitioning to another platform or taking a break from music streaming altogether, the choice is yours.
We hope this guide has been helpful in assisting you with the cancellation of your Amazon Music subscription. Remember, if you ever wish to re-subscribe or have any questions, Amazon Music’s customer support is available to provide further assistance.
So, take control of your music streaming journey and enjoy the path ahead, filled with endless musical possibilities.