Introduction
Are you looking to end your Amazon Music subscription? Whether you no longer need the service or want to explore other platforms, canceling your Amazon Music subscription is a quick and easy process. In this guide, we’ll walk you through the steps to help you efficiently terminate your subscription and avoid any unnecessary charges.
Amazon Music offers an extensive library of songs, albums, and playlists that you can stream and download. With various subscription options, such as Amazon Music Unlimited and Prime Music, it’s important to know how to cancel your subscription to prevent any future billing.
Before canceling, it’s vital to note that Amazon Music subscriptions are linked to your Amazon account. This means that canceling your subscription will also affect other Amazon services or benefits associated with your account, such as Prime Music or discounted pricing for Echo devices. Keep this in mind when deciding to end your Amazon Music subscription.
In the following sections, we’ll guide you through the step-by-step process of canceling your Amazon Music subscription so you can seamlessly transition to a different streaming platform or free up some of your budget.
Step 1: Log in to your Amazon account
The first step in canceling your Amazon Music subscription is to log in to your Amazon account. This ensures that you have the necessary access and permissions to manage your subscription settings.
To log in, open your preferred web browser and go to the Amazon website. Click on the “Sign In” button located at the top right-hand corner of the page. Enter your registered email address or mobile number associated with your Amazon account, followed by your password. Once you’ve entered this information, click on the “Sign In” button to proceed.
If you have trouble remembering your password, you can click on the “Forgot Password” link and follow the instructions to reset it. Additionally, if you don’t have an Amazon account, you’ll need to create one before proceeding with canceling your Amazon Music subscription.
After successfully signing in, you will be directed to your Amazon account homepage. Make sure to verify that you are in the correct account, as some users might have multiple Amazon accounts linked to different email addresses.
With the login process complete, you are now ready to move on to the next step, which involves accessing your Amazon Music settings.
Step 2: Go to your Amazon Music settings
Once you are logged in to your Amazon account, the next step is to navigate to your Amazon Music settings. This is where you will find the options to manage and control your subscription.
On the top right-hand corner of the Amazon homepage, you will see a dropdown menu with various account options. Click on the “Account & Lists” button to access the account settings.
In the dropdown menu, select the “Your Account” option. This will take you to a new page where you can view and modify your account details, settings, and preferences.
Scroll down the page until you find the “Digital Content and Devices” section. Within this section, you will see a subheading titled “Amazon Music.” Click on the “Amazon Music Settings” link to proceed.
This will direct you to the Amazon Music settings page, which includes various options for managing your subscription and personalizing your music experience.
Take a moment to review the settings available to you. You may find additional features and settings that you can explore and customize to enhance your Amazon Music experience. Once you are familiar with the settings, we can move on to the next step, which is managing your Amazon Music subscription.
Step 3: Manage your Amazon Music subscription
Now that you have accessed your Amazon Music settings, you can proceed to manage your subscription. In this step, we will guide you through the process of canceling or modifying your Amazon Music subscription.
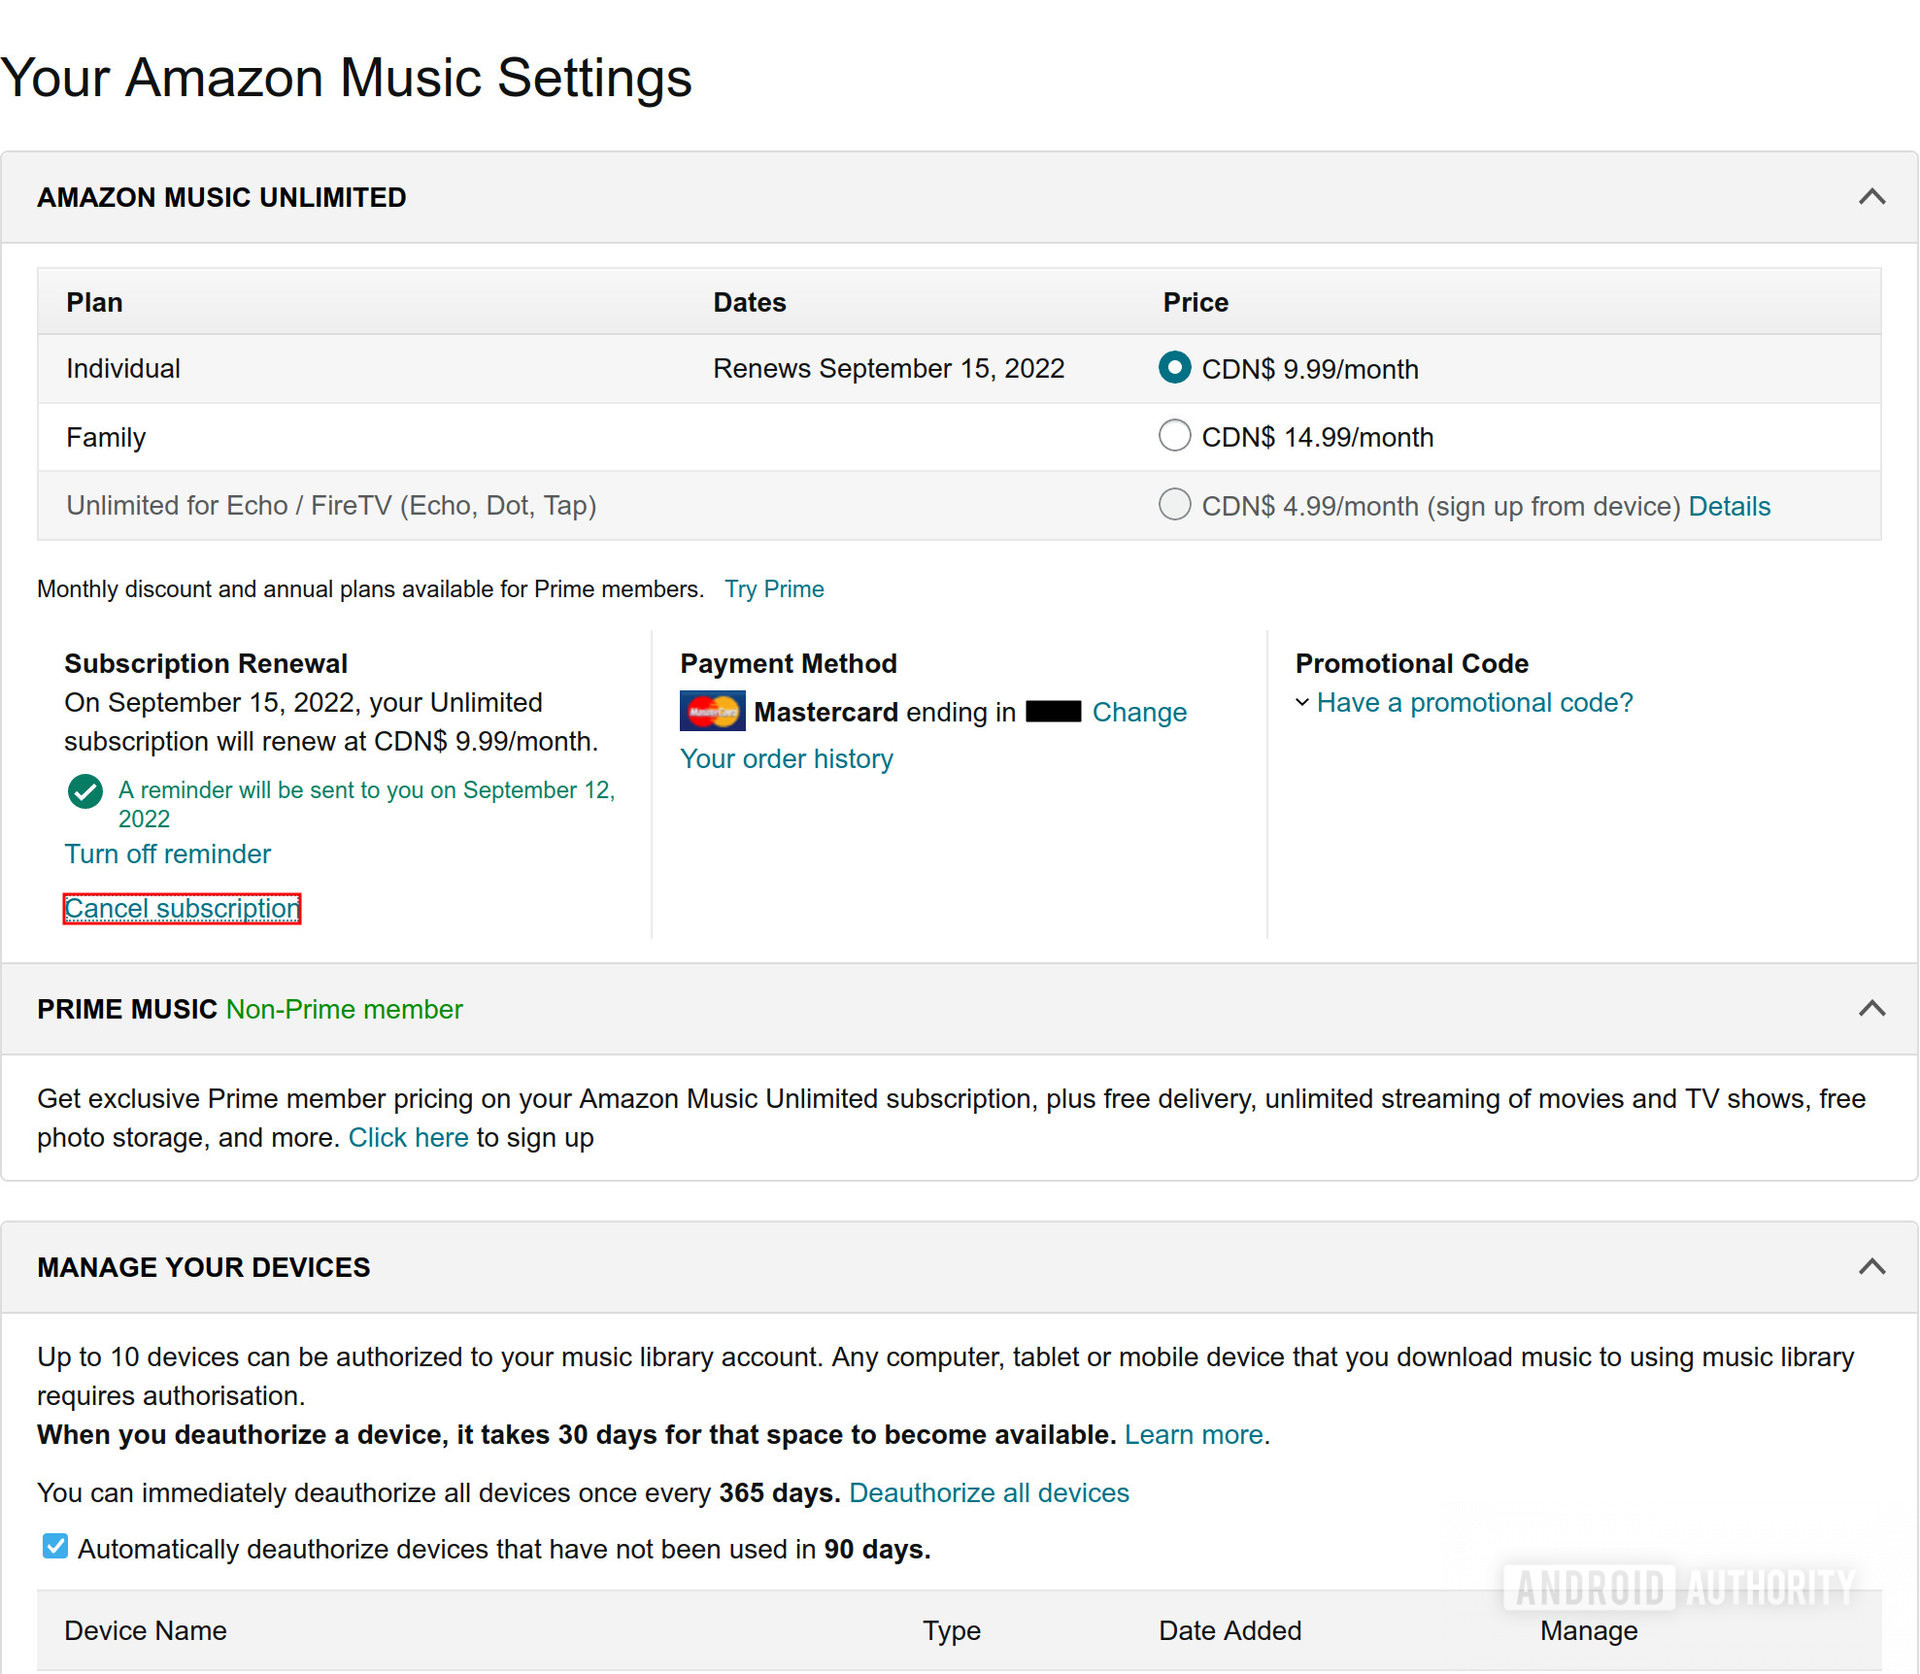
On the Amazon Music settings page, you will find a section called “Subscription Renewal.” Under this section, you will see information about your current subscription plan, such as the type of subscription (e.g., Amazon Music Unlimited or Prime Music) and the billing details.
To manage your subscription, click on the “Actions” button next to the subscription information. This will reveal a dropdown menu with various options.
If you wish to cancel your Amazon Music subscription, select the “Cancel Subscription” option from the dropdown menu. This will initiate the cancellation process.
If you want to change your subscription plan, such as upgrading or downgrading to a different tier of Amazon Music, select the “Change Subscription” option from the dropdown menu. This will allow you to select a new plan that better suits your preferences.
After selecting the appropriate action, you may be prompted to confirm your decision. Amazon may also provide additional offers or incentives to encourage you to keep your subscription. Consider these options carefully before proceeding.
Once you have made your decision and confirmed the action, you will be one step closer to ending your Amazon Music subscription. The final step is to confirm the cancellation, which we will discuss in the next section.
Step 4: Cancel or end your Amazon Music subscription
Now that you have managed your Amazon Music subscription, it’s time to take the final step and cancel or end your subscription. This step ensures that you won’t be billed for future subscription periods and effectively terminates your access to Amazon Music.
Depending on the action you took in the previous step, the cancellation process may vary slightly:
-
If you selected “Cancel Subscription”:
After confirming your decision, Amazon will guide you through the cancellation process. You may be asked to provide a reason for canceling, but this is optional. Follow the prompts and instructions provided by Amazon to complete the cancellation.
Once the cancellation is confirmed, you will no longer have access to Amazon Music after the current subscription period ends. However, any previously downloaded or purchased music will still be available for offline listening.
-
If you selected “Change Subscription”:
If you opted to change your subscription plan instead of canceling, follow the instructions provided by Amazon to select the new plan that suits your needs. Review the details of the new plan, including any changes in pricing or features, before confirming the switch.
The change will take effect immediately, and you will continue to have access to Amazon Music based on your new subscription plan. No further action is needed to end the subscription unless you decide to cancel or modify it again in the future.
Once you have canceled or ended your Amazon Music subscription, it’s important to verify the cancellation status to ensure the changes have been applied successfully. You can do this by checking the subscription details on your Amazon Music settings page or contacting Amazon customer support for assistance if needed.
With the cancellation process completed, you are now free to explore other music streaming platforms or adjust your budget as desired.
Step 5: Confirm the cancellation
After taking the necessary steps to cancel or end your Amazon Music subscription, it’s essential to confirm that the cancellation process has been successfully completed. This ensures that you won’t be charged for any future subscription periods, and your access to Amazon Music is terminated.
To confirm the cancellation, follow these steps:
-
Check your email:
Amazon typically sends a confirmation email regarding the cancellation of your subscription. Open your email inbox and look for a message from Amazon Music. Be sure to check your spam or promotions folder in case the email has been filtered.
Inside the email, you should find information confirming the cancellation of your Amazon Music subscription. Read through the email carefully to ensure that all the details are correct.
-
Review your account:
Log in to your Amazon account and navigate to the Amazon Music settings page. Verify that your subscription details indicate the cancellation status.
Confirm that the subscription plan display shows that the subscription has been canceled or ended. If the status has not changed, or if you have any doubts, contact Amazon customer support for further assistance.
-
Monitor your billing:
Keep an eye on your credit card statement or bank account to ensure that you are not billed for any additional subscription periods after the cancellation request.
In case you notice any unexpected charges, promptly reach out to Amazon customer support and provide them with the necessary information to resolve the issue.
By confirming the cancellation, you can have peace of mind knowing that your Amazon Music subscription has been successfully terminated and you won’t be charged moving forward.
Remember to uninstall or delete the Amazon Music app from your devices to avoid any automatic renewals or accidental reactivation of your subscription.
With your cancellation confirmed, you are now free to explore other music streaming services or enjoy the freedom of not being tied to a subscription.
Conclusion
Cancelling an Amazon Music subscription is a straightforward process that allows you to end your subscription and explore alternative music streaming options. By following the step-by-step guide provided in this article, you can successfully navigate through the cancellation process and avoid any future charges.
Remember, before canceling your Amazon Music subscription, consider the impact it may have on other Amazon services or benefits associated with your account. Take the time to review your subscription details and ensure that you are making an informed decision.
Once you’ve logged in to your Amazon account, accessed the Amazon Music settings, and managed your subscription by either canceling or modifying it, it’s crucial to confirm the cancellation. Check your email for a confirmation message from Amazon and review your account to verify the cancellation status.
Keep an eye on your billing statements to ensure that you are not charged for any additional subscription periods after the cancellation. If you encounter any issues or have further questions, don’t hesitate to contact Amazon customer support for assistance.
With your Amazon Music subscription successfully canceled, you are now free to explore other music streaming platforms or enjoy a break from paid subscriptions. Whether you’re switching to another service or choosing to enjoy free music options, the choice is yours.
Continue to make the most of your music listening experience and enjoy discovering new tunes through alternative avenues. Stay tuned for more music-related tips and guides to enhance your musical journey!