Why Backing Up Your MacBook is Important
Backing up your MacBook is an essential task that should never be overlooked. Whether you use your MacBook for work, personal use, or both, your data is valuable and irreplaceable. Here are a few compelling reasons why backing up your MacBook is vital:
- Data Loss Protection: Accidents happen, and technical failures can occur at any time. Your MacBook’s hard drive can fail, or you may inadvertently delete important files. Without a backup, you risk losing valuable documents, photos, videos, and other critical data forever.
- Protection Against Theft: We live in an age where laptop theft is a genuine concern. If your MacBook gets stolen, your backup will allow you to restore your data to a new device quickly.
- Security from Malware and Ransomware: Malicious software, like malware and ransomware, can infect your MacBook and hold your files hostage or steal sensitive information. Having a backup ensures that you have clean, uncompromised copies of your data that can be restored if needed, without paying any ransom.
- Seamless Device Migration: Upgrading to a new MacBook or replacing a failing hard drive becomes hassle-free when you have a complete backup. You can simply transfer your data to the new device or restore it on the repaired MacBook, saving time and effort.
- Peace of Mind: Knowing that your important files and memories are safely backed up provides peace of mind. It eliminates the fear and stress associated with potential data loss, giving you confidence and the ability to focus on your tasks.
To ensure thorough data protection, it is recommended to have multiple backups in different locations. This way, if one backup fails or is compromised, you still have other copies to rely on.
In summary, backing up your MacBook is crucial for safeguarding your valuable data, protecting against loss or theft, maintaining security, and facilitating seamless device migration. Make it a priority to establish a regular backup routine to ensure that you never experience the frustration and regret of losing important files.
Using Cloud Storage Services
Cloud storage services offer a convenient and secure way to back up your MacBook. These services allow you to store your data remotely on servers maintained by the service provider. Here are some benefits of using cloud storage for backups:
- Accessibility: With cloud storage, you can access your files from anywhere with an internet connection. This means you can retrieve your data even if you don’t have your MacBook with you, making it ideal for travelers or those who work remotely.
- Automatic Backup: Most cloud storage services offer automatic backup options, where your files are continuously synced to the cloud whenever changes occur. This ensures that your data is always up to date without manual intervention.
- Scalability: Cloud storage services usually offer flexible storage plans, allowing you to scale up or down based on your needs. If you run out of storage space, you can easily upgrade your plan without worrying about physical limitations.
- Security: Reputable cloud storage providers employ robust security measures to protect your data, including encryption and multi-factor authentication. This ensures that your files are safeguarded from unauthorized access.
When using cloud storage services for backups, it’s crucial to choose a provider that aligns with your privacy preferences and has a good track record in terms of data security. Additionally, consider the amount of storage space provided and any potential limitations or additional costs.
Popular cloud storage services for MacBook backups include Dropbox, Google Drive, Microsoft OneDrive, and iCloud. These services often have dedicated applications that make it easy to automatically back up specific folders or your entire MacBook.
In summary, cloud storage services offer convenient, accessible, and scalable options for backing up your MacBook. With the ability to access your files from anywhere and automatic backup features, cloud storage provides peace of mind knowing that your data is securely stored off-site.
Using Time Machine
Time Machine is a built-in backup feature on macOS that provides an easy and efficient way to back up your MacBook. Here are some key features and benefits of using Time Machine:
- Automatic and Continuous Backup: Once set up, Time Machine automatically and continuously backs up your entire MacBook, capturing every change and version of your files. This ensures that you have the most recent backup of your data.
- Easy Recovery of Lost Files: Time Machine makes it effortless to recover lost or deleted files. You can browse through the timeline of backups and restore specific files or entire folders with just a few clicks.
- System Recovery: Time Machine not only backs up your files but also creates a snapshot of your entire system. In case of a catastrophic event or system failure, you can restore your MacBook to a previous state, including applications, settings, and preferences.
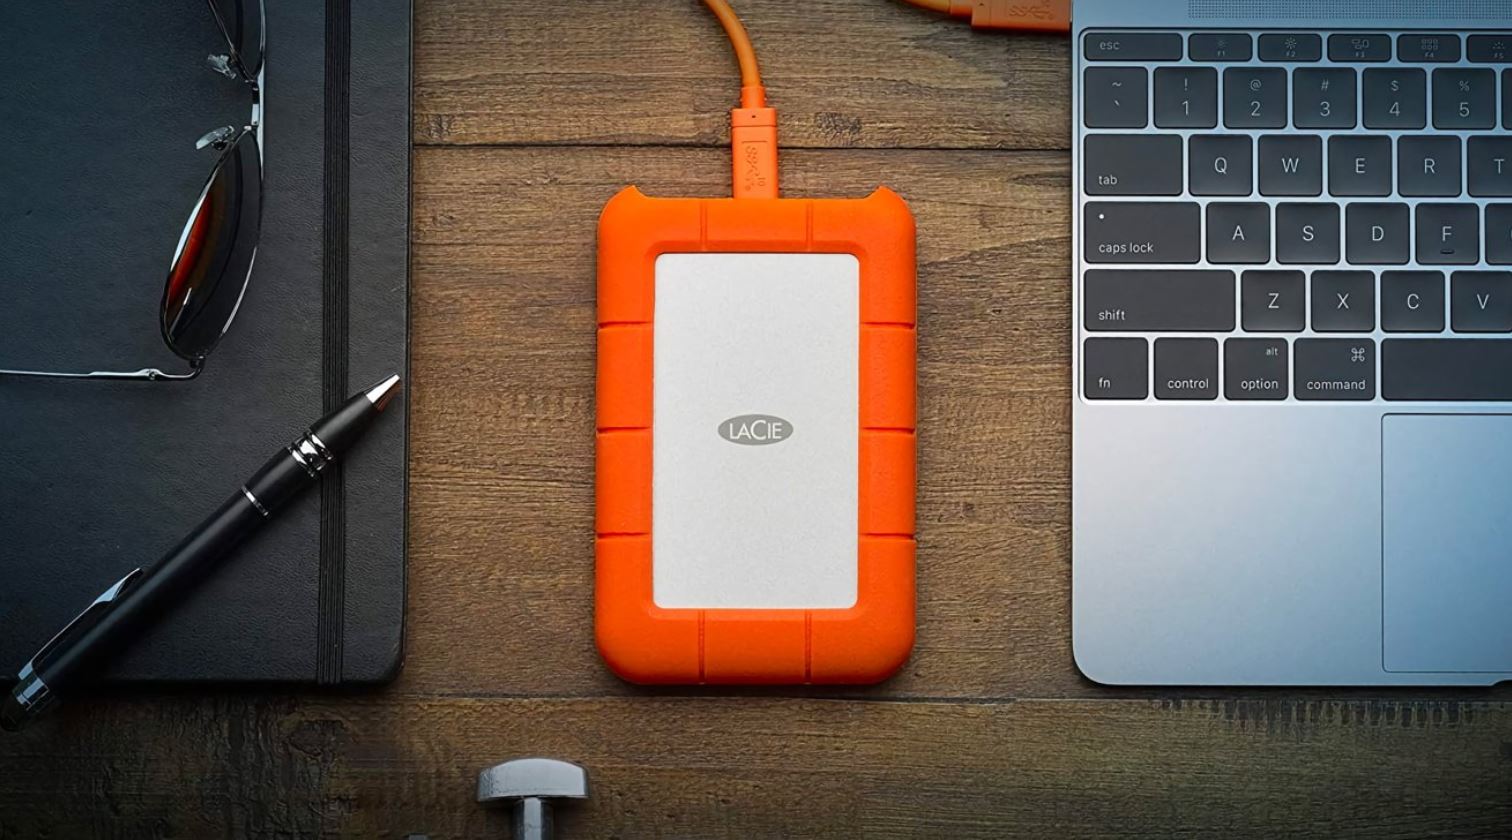
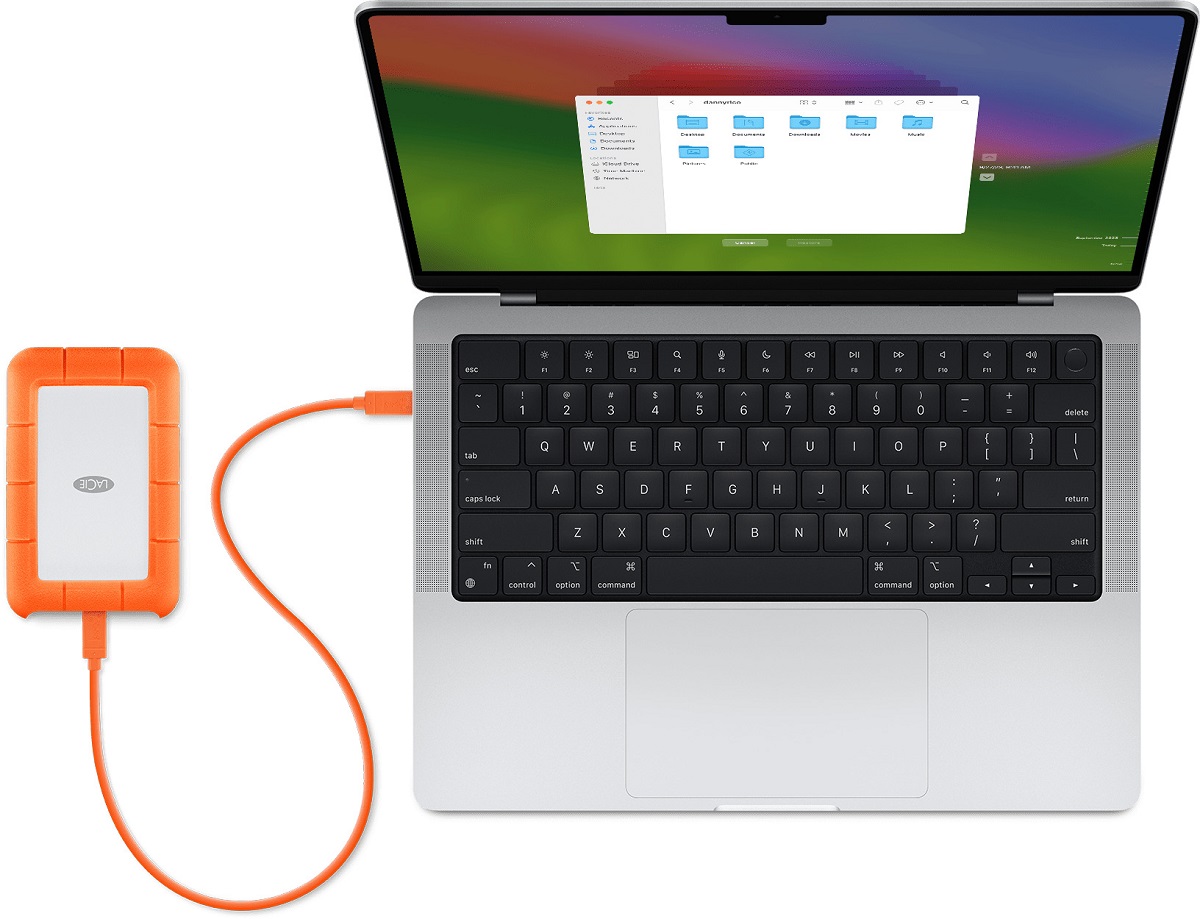
- External Hard Drive Integration: Time Machine works seamlessly with external hard drives, allowing you to connect a dedicated drive to your MacBook for backups. This provides the advantage of keeping your backup physically separate from your MacBook.
- Customizable Backup Exclusions: Time Machine gives you the flexibility to exclude specific folders or files from the backup process. This can be useful for excluding large, non-essential files or sensitive data that you prefer not to store on the backup drive.
Setting up Time Machine is straightforward. All you need is an external hard drive with sufficient storage capacity. Connect the drive to your MacBook, and macOS will prompt you to use the drive as a Time Machine backup device. Once configured, Time Machine will automatically perform incremental backups, saving only the changes made since the last backup, saving storage space and reducing backup time.
It is worth noting that Time Machine backups are not accessible via the internet, so you need to have physical access to the backup drive to restore your data.
In summary, Time Machine is a powerful built-in backup solution for MacBooks with automatic, continuous, and customizable backup capabilities. By regularly using Time Machine with an external hard drive, you can ensure that your valuable data is protected and easily recoverable in case of accidents or system failures.
Backing Up to an External SSD
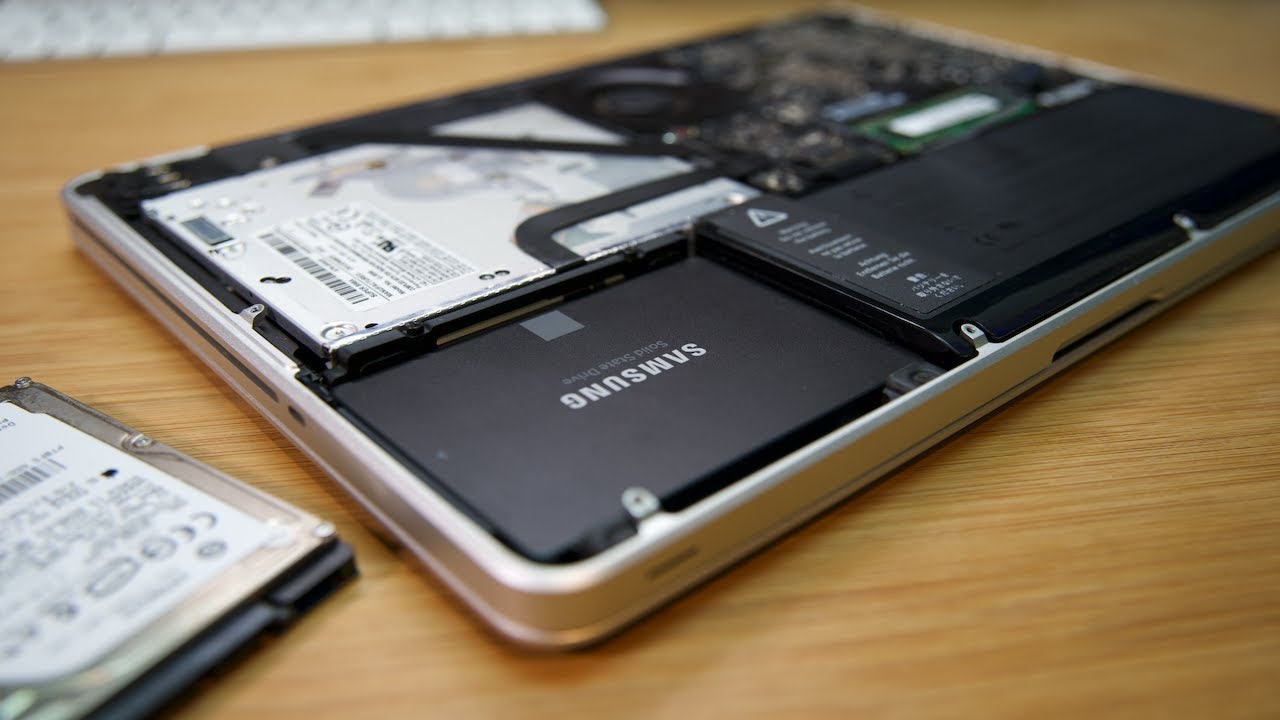
Backing up your MacBook to an external solid-state drive (SSD) is an excellent option for those who prioritize speed, durability, and portability. Here are some reasons why using an external SSD for backups is beneficial:
- Speed: External SSDs offer significantly faster data transfer speeds compared to traditional hard drives. This means that your backups will be completed in less time, allowing you to get back to work or other activities quickly.
- Durability: SSDs have no moving parts, making them more resistant to physical shocks and vibrations. This makes them a reliable choice for backups, especially if you plan on carrying the drive with you or storing it in different locations.
- Portability: Most external SSDs are compact and lightweight, making them easy to transport and store. This makes them ideal for users who need to take their backups on the go or switch between different devices.
- Compatibility: External SSDs can be easily connected to your MacBook via a USB or Thunderbolt port. They are compatible with both Mac and Windows systems, making it simple to transfer and access your data on different devices.
- Expandable Storage: If your MacBook’s internal storage is limited, backing up to an external SSD provides an opportunity to expand your available storage space. You can choose an external SSD with a higher capacity than your MacBook’s internal storage, giving you room for additional backups or data.
To back up your MacBook to an external SSD, connect the drive to your MacBook using the appropriate cable. Then, use macOS’s built-in Time Machine feature to configure the SSD as your backup location. Time Machine will automatically perform regular backups to the SSD, ensuring that your data is up to date.
It’s important to note that external SSDs can be more expensive than external hard drives, especially for higher capacities. However, the speed, durability, and portability advantages make them a worthwhile investment for users who prioritize these factors in their backups.
In summary, backing up your MacBook to an external SSD offers the benefits of speed, durability, portability, compatibility, and expandable storage. With an external SSD, you can enjoy fast and reliable backups while having the flexibility to take your data with you wherever you go.
Backing Up to Network Attached Storage (NAS)
Backing up your MacBook to a Network Attached Storage (NAS) device provides a centralized and accessible solution for data backup. NAS devices are specialized storage devices connected to your local network, offering several advantages for backups:
- Centralized Storage: NAS devices provide a dedicated and centralized location for storing backups. This enables easy access to your backup files from any device connected to the same network, making it convenient to restore files or access them from different devices.
- Expandable Storage: NAS devices often support multiple hard drives, allowing you to scale up your storage capacity as needed. This scalability is particularly useful for users with large amounts of data or those who anticipate future growth in their backup requirements.
- Redundancy and Data Protection: NAS devices usually offer RAID (Redundant Array of Independent Disks) options, allowing your data to be protected against drive failure. RAID configurations can provide data redundancy by mirroring your data across multiple drives, ensuring data integrity and reducing the risk of data loss.
- Automatic and Scheduled Backups: Many NAS devices come equipped with backup software that supports automatic and scheduled backups for your MacBook. You can customize the backup frequency and choose the specific files and folders to be included in the backup, providing flexibility and ease of use.
- Remote Access: Some NAS devices offer remote access capabilities, allowing you to access your backup files securely from anywhere outside your local network. This remote access feature can be essential when you need to retrieve files or perform backups while away from home or the office.
To back up your MacBook to a NAS device, connect the device to your local network and configure it to work with macOS Time Machine. Once set up, you can select the NAS device as the backup destination within the Time Machine preferences on your MacBook. Time Machine will then back up your data to the NAS device, providing a reliable and accessible backup solution.
When choosing a NAS device, consider factors such as storage capacity, supported RAID configurations, ease of setup and management, and security features. Additionally, ensure that the NAS device is compatible with macOS and offers reliable manufacturer support.
In summary, backing up your MacBook to a Network Attached Storage (NAS) device offers the benefits of centralized storage, expandable storage capacity, data redundancy, automatic backups, and remote access. Consider using a NAS device to create a robust and accessible backup solution that fits your data storage and protection needs.
Using Disk Utility
Disk Utility is a powerful built-in tool on macOS that can be utilized for various purposes, including backing up your MacBook. Here are some ways you can use Disk Utility for backups:
- Create Disk Images: Disk Utility allows you to create disk images of your MacBook’s internal storage or specific folders. A disk image is a single file that contains an exact copy of the data you choose to back up. This method is useful when you want to create an offline backup on external storage.
- Restore from Disk Images: In addition to creating disk images, Disk Utility enables you to restore your MacBook from a disk image. This is helpful when you need to recover your entire system or retrieve specific files from a previous backup.
- Clone Your Hard Drive: Using Disk Utility, you can clone your MacBook’s hard drive to another external drive. Cloning creates a bit-by-bit copy of your entire hard drive, including the operating system, applications, and data. This method is useful when you want to create a bootable backup that can be easily restored to a new MacBook if needed.
- Verify and Repair Disks: Disk Utility allows you to verify and repair the health and integrity of your MacBook’s internal drive. Regularly performing these disk checks can help identify and fix potential issues before they lead to data loss. However, it is essential to note that disk verification and repair should not be considered a substitute for regular backups.
To access Disk Utility, go to the Applications folder, then the Utilities folder. Launch Disk Utility, and you will see a list of all connected storage devices. From here, you can select the desired disk or partition and choose the appropriate action, such as creating disk images, restoring from disk images, or performing disk verification and repair.
Keep in mind that while Disk Utility provides useful backup features, it is primarily a disk management tool and may not offer the same level of convenience and automation as Time Machine or cloud storage services. It is recommended to use Disk Utility in combination with other backup methods to ensure comprehensive data protection.
In summary, Disk Utility is a versatile tool that can be used for creating disk images, restoring from disk images, cloning hard drives, and verifying and repairing disks. Consider using Disk Utility as part of your overall backup strategy to add flexibility and versatility to your data backup and recovery options.
Backing Up to a Different Partition on Your MacBook’s Internal Storage
Backing up your MacBook to a different partition on your internal storage offers a convenient and space-efficient solution for data backup. By creating a separate partition specifically for backups, you can ensure that your valuable data remains safely stored on your MacBook itself. Here are some benefits of backing up to a different partition:
- Easy Accessibility: Having your backups on a separate partition means you can access them quickly and easily, without the need for external storage devices. This can be especially useful when you need to restore specific files or folders without the hassle of connecting external drives.
- Cost and Portability: Since you’re utilizing your MacBook’s internal storage, there are no additional costs associated with external storage devices. It also eliminates the need to carry around external drives, making it a convenient option for users on the go.
- Controlled Environment: Storing backups on a different partition on your MacBook ensures that your important files are within your control. It reduces the risk of physical damage or loss that may occur with external drives.
- Time Efficiency: Unlike transferring data to an external drive, which can take a significant amount of time, backing up to a different partition on your MacBook’s internal storage allows for faster backup and recovery speeds. This is particularly beneficial if you frequently need to access or update your backups.
To create a separate partition on your MacBook, you can utilize the Disk Utility tool. Open Disk Utility from the Utilities folder within the Applications folder and select your internal storage. Choose the Partition tab, click the “+” button to add a new partition, and adjust the size according to your backup needs. After creating the partition, you can then use built-in macOS backup tools like Time Machine to back up your data to the newly created partition.
It is crucial to note that while backing up to a different partition on your MacBook’s internal storage can offer convenience and cost-effectiveness, it may not provide the same level of protection against physical damage, theft, or hardware failures as external backups. Therefore, it is still recommended to have additional backup methods, such as external drives or cloud storage, to ensure redundancy and data security.
In summary, backing up to a different partition on your MacBook’s internal storage can be a practical and efficient way to store your backups. It offers easy accessibility, cost-effectiveness, control, and faster backup and recovery speeds. By creating a separate partition, you can have peace of mind knowing that your backup data is stored within your MacBook itself.
Using Online Backup Services
Online backup services, also known as cloud backup services, offer a secure and convenient way to back up your MacBook’s data to remote servers. These services provide several advantages and features that make them an appealing choice for data backup:
- Automatic Backup: Online backup services typically offer automatic and continuous backup options. Once set up, your files are automatically backed up in the background, ensuring that you have the most recent version of your data without manual intervention.
- Off-Site Storage: Storing your backups on remote servers provides an added layer of protection. In the event of a physical disaster, such as fire or flood, your data remains safe and accessible from anywhere with an internet connection.
- Scalability: Online backup services usually offer scalable storage options, allowing you to increase or decrease your storage needs as required. This flexibility ensures that you only pay for the storage you need, without worrying about running out of space.
- Security: Reputable online backup services use robust encryption protocols to protect your data during transmission and storage. This ensures that your files are secure and private, safeguarded from unauthorized access.
- Multi-Device Syncing: Many online backup services offer cross-platform compatibility, allowing you to synchronize your data seamlessly across multiple devices. This is useful if you have multiple MacBooks, or if you need to access your files from different devices.
- File Versioning and Recovery: Online backup services often provide file versioning, allowing you to access previous versions of your files. This can be beneficial if you accidentally overwrite or delete a file and need to revert to a previous state.
- Sharing and Collaboration: Some online backup services come with sharing and collaboration features, allowing you to easily share files or folders with others and collaborate on projects, making them not only backup solutions but also productivity tools.
To use an online backup service, you typically need to sign up for an account and install the provider’s application on your MacBook. You can then select the files and folders you want to back up and customize the backup settings according to your preferences. Once set up, the backup service will automatically sync and back up your data to their remote servers.
Popular online backup services for MacBooks include Backblaze, Carbonite, Dropbox, Google Drive, Microsoft OneDrive, and iCloud. Each service offers different storage plans, features, and pricing, so it’s important to choose one that suits your needs and budget.
In summary, using an online backup service offers automatic backup, off-site storage, scalability, security, multi-device syncing, file versioning and recovery, and sharing and collaboration options. By utilizing an online backup service, you can ensure that your data is protected, always accessible, and securely stored in the cloud.