Why is it important to backup your contacts on Android?
Backing up your contacts on Android is a crucial step to protect and secure your valuable data. Your contacts list contains important information such as phone numbers, email addresses, and other contact details that are essential for staying connected with friends, family, and colleagues. Losing this information can be frustrating and inconvenient, as it may result in the loss of important communication threads, missed opportunities, or even difficulties in reaching out to someone in case of emergencies.
There are several reasons why it’s important to backup your contacts on Android:
1. Prevent data loss:
Accidents happen, and your phone can be lost, stolen, or damaged at any moment. Without a backup, you risk losing all your contacts. By regularly backing up your contacts, you can ensure that your data is protected and easily restored in case of an unexpected event.
2. Seamless device transition:
When you upgrade to a new Android device or switch to a different phone, having a backup of your contacts makes the transition seamless. You can quickly restore all your contacts onto the new device, saving you time and effort in manually transferring each contact.
3. Sync across multiple devices:
Many of us use multiple Android devices like smartphones and tablets. By backing up your contacts, you can easily sync them across all your devices, ensuring that you have access to the same contact information no matter which device you’re using.
4. Protection against accidental deletion:
There’s always a risk of mistakenly deleting contacts on your Android device. However, with a backup in place, you have a safety net. If you accidentally delete a contact, you can restore it from your backup without any worries.
5. Peace of mind:
Backing up your contacts provides peace of mind. You can rest assured knowing that your important contacts are safe and accessible at all times, regardless of any unforeseen circumstances or technical issues that may arise.
Overall, the importance of backing up your contacts on Android cannot be understated. It not only protects your valuable data but also ensures seamless device transitions, syncs across multiple devices, protects against accidental deletion, and gives you peace of mind. Don’t wait until it’s too late – take the necessary steps to backup your contacts regularly and stay connected with confidence.
Different methods to backup contacts on Android
When it comes to backing up your contacts on Android, there are various methods available to suit your preferences and needs. Let’s explore some of the most commonly used methods:
1. Using the Google Account to backup contacts:
One of the easiest and most convenient ways to backup your contacts is through your Google Account. Android devices are typically linked to a Google Account, which automatically syncs contacts to your Google Contacts. To enable this feature, go to your device’s settings, find the Google Account section, and make sure the “Contacts” option is turned on. With this method, your contacts will be stored securely in the cloud and can be easily restored on any Android device associated with your Google Account.
2. Using your device’s built-in backup feature:
Many Android devices come with built-in backup features that allow you to backup your contacts and other data. These options can usually be found in the settings menu, under the “Backup & Restore” or “Accounts & Backup” section. By enabling the backup feature, your contacts will be regularly backed up to the device’s internal storage or an external SD card. This method ensures that your contacts are safe, even if you don’t have an active internet connection.
3. Using a third-party app for contact backup:
There are several third-party apps available on the Google Play Store that specialize in contact backup. These apps offer additional features and customization options beyond the built-in backup methods. Some popular apps in this category include “Super Backup & Restore,” “My Contacts Backup,” and “Sync.ME.” Simply download and install the app of your choice, follow the instructions, and backup your contacts with ease.
4. Exporting contacts to a .vcf file:
If you prefer a manual approach, you can export your contacts as a .vcf (Virtual Contact File) file. To do this, open your contacts app, go to the settings menu, and look for the “Export” or “Share” option. Select the contacts you want to backup, choose the .vcf file format, and save the file to your desired location, such as your device’s internal storage or an SD card. This file can then be transferred to a computer or another device for safekeeping.
5. Syncing contacts with cloud storage services:
Another option is to sync your contacts with cloud storage services like Google Drive, Dropbox, or OneDrive. By connecting your contacts app to a cloud storage account, your contacts will be automatically backed up and synced to the cloud. This method ensures that your contacts are accessible from anywhere, and you can easily restore them on any device by logging in to your cloud storage account.
Choose the method that works best for you and regularly backup your contacts to ensure their safety. Whether it’s using your Google Account, the built-in backup feature, third-party apps, exporting to a .vcf file, or syncing with cloud storage services, taking the time to backup your contacts is a wise decision to protect your valuable data.
Method 1: Using the Google Account to backup contacts
One of the most convenient and reliable ways to backup your contacts on Android is by utilizing your Google Account. As most Android devices are linked to a Google Account, this method allows you to sync your contacts with Google Contacts, ensuring that they are safely stored in the cloud. Here’s how you can backup your contacts using your Google Account:
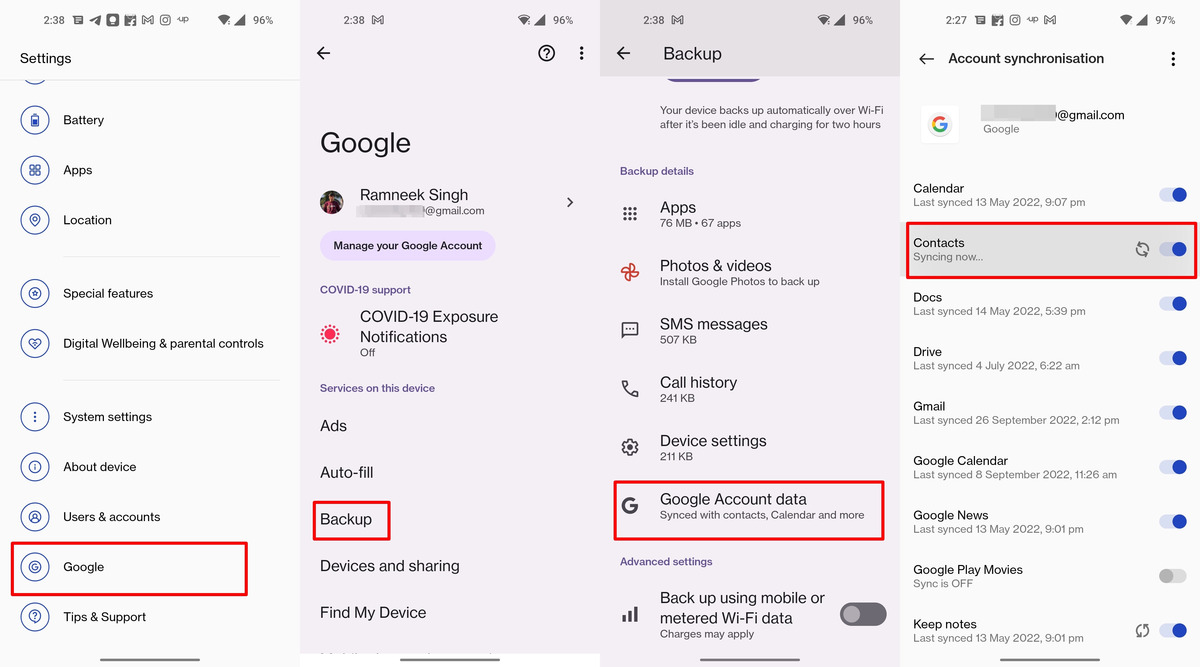
Step 1: Enable contact syncing:
Open the Settings app on your Android device and scroll down to find the “Accounts” or “Users & accounts” section. Tap on it and select your Google Account from the list. Ensure that the “Contacts” option is enabled. This will automatically sync all your contacts with your Google Account.
Step 2: Verify the backup:
Once contact syncing is enabled, your contacts will be regularly backed up to Google Contacts. To verify that your contacts are being backed up, you can open your web browser on a computer, navigate to Google Contacts (https://contacts.google.com/), and sign in with the same Google Account. You should see all your contacts listed there.
Step 3: Restore contacts:
In case you switch to a new Android device or need to restore your contacts on the same device, follow these steps:
- On the new device or the existing device, add your Google Account in the Settings app under “Accounts” or “Users & accounts”.
- Enable contact syncing for the Google Account, just like you did in Step 1.
- Your contacts will automatically be restored to the device from Google Contacts.
It’s important to note that this method requires an active internet connection for the initial backup and subsequent syncing. Additionally, make sure that you sign in to the same Google Account on all your Android devices to ensure a seamless backup and restore process.
Using your Google Account to backup contacts offers several advantages. Firstly, it provides a secure and reliable backup solution, as your contacts are stored in the Google cloud. Secondly, it allows you to easily access and restore your contacts on any Android device associated with your Google Account. Lastly, by utilizing Google’s infrastructure, it ensures that your contacts are synced in real-time, so any changes or additions you make to your contacts are instantly reflected across all your devices.
By following the simple steps outlined above, you can leverage the power of your Google Account to backup your contacts and enjoy peace of mind knowing that your valuable contact information is safe and easily accessible.
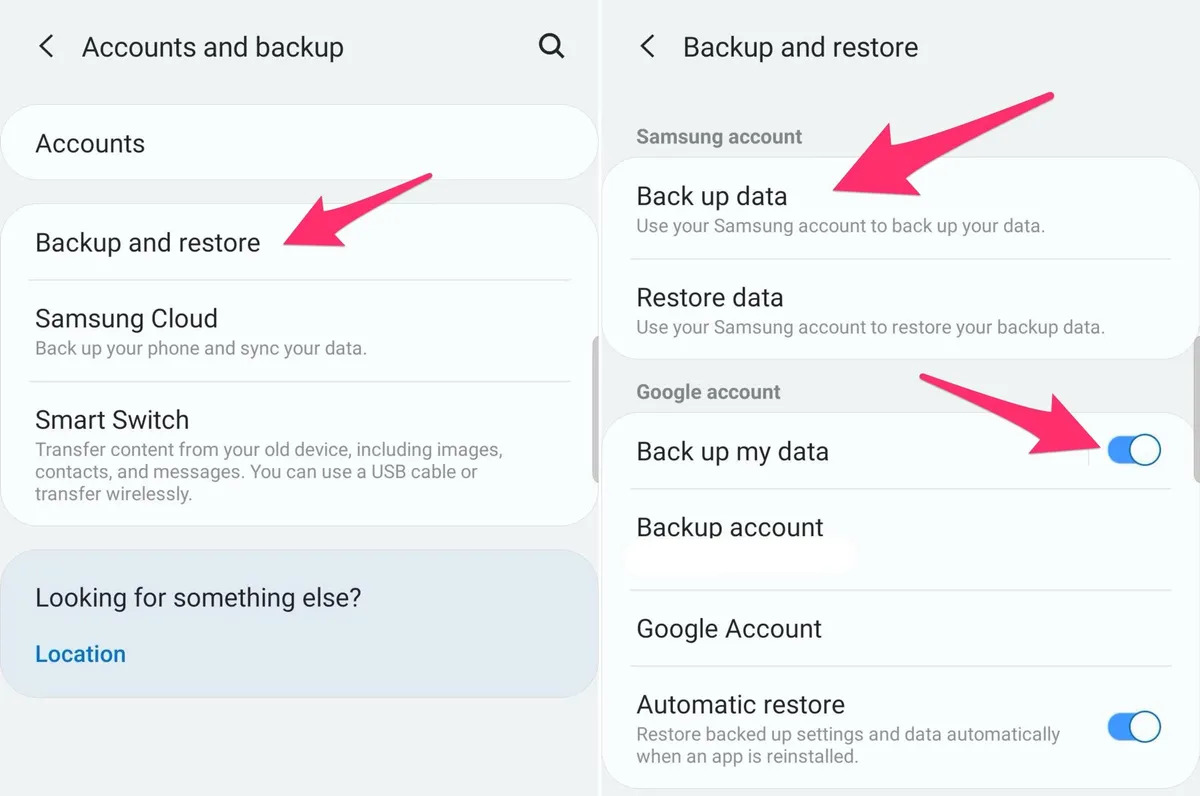
Method 2: Using your device’s built-in backup feature
Many Android devices come equipped with a built-in backup feature that allows you to easily backup your contacts and other data. This feature is often found in the settings menu of your device and provides a convenient way to protect your contact information. Here’s how you can use your device’s built-in backup feature to backup your contacts:
Step 1: Access the Backup & Restore settings:
Open the Settings app on your Android device and look for the “Backup & Restore” or “Accounts & Backup” section. The exact location and name of this section may vary depending on your device and its operating system version.
Step 2: Enable contact backup:
Within the Backup & Restore settings, you should see an option to enable contact backup. Make sure this option is turned on to initiate the backup process. Some devices may provide additional customization options, such as selecting specific contact groups or setting the backup frequency. Adjust these settings according to your preferences.
Step 3: Verify the backup:
Once contact backup is enabled, your device will regularly backup your contacts to its internal storage or an external SD card. To verify that the backup is happening successfully, you can navigate to the same Backup & Restore settings and look for a confirmation message or icon indicating that the backup is complete.
Step 4: Restore contacts:
If you need to restore your contacts on the same device or a new Android device, follow these steps:
- Access the Backup & Restore settings again on the device where you want to restore the contacts.
- Look for the option to restore contacts and select it.
- Choose the backup file or source from which you want to restore your contacts. It could be from the device’s internal storage, an SD card, or a cloud storage service if your device offers that capability.
- Follow the prompts to complete the contact restoration process.
Using your device’s built-in backup feature provides a straightforward and hassle-free method of backing up your contacts. It offers the advantage of storing your contacts locally on your device, ensuring that you can easily restore them even without an active internet connection. Just remember to periodically check that the backup is happening as expected and make any necessary adjustments to the settings to ensure your contacts remain protected.
While this method may not offer the same level of synchronization and accessibility across multiple devices as some other backup options, it is still a reliable and convenient way to safeguard your contacts on your Android device.
Take advantage of your device’s built-in backup feature today and never worry about losing your valuable contact information again.
Method 3: Using a third-party app for contact backup
If you prefer more customization and additional features, using a third-party app for contact backup on Android can be an excellent option. These apps provide convenient and flexible ways to backup and restore contacts, offering various functionalities beyond the built-in backup methods. Here’s how you can use a third-party app for contact backup:
Step 1: Choose a reliable app:
Search the Google Play Store for contact backup apps. Some popular options include “Super Backup & Restore,” “My Contacts Backup,” and “Sync.ME.” Read user reviews and ratings to ensure you choose a reliable and trustworthy app.
Step 2: Download and install the app:
On the Google Play Store, select the app of your choice and tap the “Install” button to download and install it on your Android device. Once installed, open the app to get started.
Step 3: Backup your contacts:
Depending on the app you choose, the backup process may vary slightly. Generally, you’ll find an option to backup contacts within the app’s interface. Tap on the backup option and follow the prompts to initiate the backup process. You may be asked to select the contacts you want to backup or choose a backup location, such as your device’s internal storage or an external SD card.
Step 4: Restore contacts:
If you ever need to restore your contacts from the backup, simply open the app and look for the restore option. Select the backup file or source from which you want to restore your contacts and follow the instructions to complete the restoration process.
One of the key advantages of using a third-party app for contact backup is the additional features they offer. Some apps may allow you to schedule automatic backups, sync contacts with multiple accounts, or even merge duplicate contacts. These features can help you keep your contacts organized, up to date, and free from any redundancies.
It’s important to note that not all third-party apps are created equal, and some may require additional permissions or have certain limitations. Therefore, it’s important to research and choose a reputable app from a trusted developer. Additionally, make sure to regularly update the app to ensure it remains compatible with your Android device’s operating system.
Using a third-party app for contact backup provides flexibility and advanced features compared to the built-in backup options. These apps allow you to take control of your contact backups, ensuring that your valuable information is safe and easily accessible whenever you need it.
Explore the available options on the Google Play Store, choose the app that best suits your needs, and take advantage of the additional functionalities to better manage your contacts on Android.
Method 4: Exporting contacts to a .vcf file
If you prefer a manual approach and want to have full control over your contact backup, you can export your contacts as a .vcf (Virtual Contact File) file. This allows you to save your contacts on your Android device and easily transfer them to other devices or share them with others. Here’s how you can export your contacts to a .vcf file:
Step 1: Open the Contacts app:
Go to the app drawer on your Android device and locate the “Contacts” app. Tap on it to open the app and access your contacts.
Step 2: Access the export options:
In the Contacts app, look for the menu or settings icon, usually located in the top-right corner of the screen. Tap on it to open the options menu.
Step 3: Choose the export format:
In the options menu, look for an option related to exporting contacts or creating a backup. Depending on your device and the version of Android, this option may be named differently. Look for terms like “Export Contacts,” “Share Contacts,” or “Backup Contacts.” Tap on the appropriate option.
Step 4: Select contacts to export:
Once you’ve chosen the export option, you may be prompted to select the contacts you want to export. You can usually select all contacts or choose specific ones by tapping on them.
Step 5: Export contacts as .vcf file:
After selecting the contacts, you’ll have the option to choose the export file format. Look for the .vcf or vCard format option and select it. Then, choose the destination where you want to save the exported .vcf file, such as your device’s internal storage or an SD card.
Once the export process is complete, you’ll have a .vcf file containing all the selected contacts. This file can be easily transferred to another device, shared with others via email or messaging apps, or stored as a backup.
When you need to import the contacts from the .vcf file, it’s usually as simple as opening the file and confirming the import. On most devices, you can achieve this by opening the file manager app, locating the .vcf file, and tapping on it. Then, follow the prompts to import the contacts to the desired location, such as the Contacts app on your Android device or another device.
Exporting contacts to a .vcf file gives you full control over the backup process and allows for easy sharing and transferability. Keep in mind that this method requires manual intervention and regular exports to ensure your contacts database is up to date.
By utilizing the export to .vcf file method, you can easily backup your contacts and have a portable and shareable format that gives you peace of mind knowing your valuable contact information is safely stored and accessible whenever you need it.
Method 5: Syncing contacts with cloud storage services
With the increasing popularity of cloud storage services, syncing your contacts using these services has become a convenient and efficient method of backup. By utilizing cloud storage, you can keep your contacts securely stored in the cloud and easily access them from any device. Here’s how you can sync your contacts with cloud storage services:
Step 1: Choose a cloud storage service:
There are several popular cloud storage services available, such as Google Drive, Dropbox, or OneDrive. Choose the one that suits your needs and set up an account if you don’t already have one. Ensure that the cloud storage service offers contact syncing capabilities.
Step 2: Install the cloud storage app on your Android device:
On your Android device, open the Google Play Store and search for the app of the chosen cloud storage service. Download and install the app on your device. Be sure to sign in to the app with your cloud storage account credentials.
Step 3: Enable contact syncing:
Once the cloud storage app is installed and you’re signed in, find the settings or options within the app to enable contact syncing. Different cloud storage apps may have different locations for this setting, so explore the app’s interface or consult their documentation for guidance.
Step 4: Sync contacts to the cloud:
After enabling contact syncing, your Android device will initiate the process of syncing your contacts with the cloud storage service. Depending on the number of contacts and your internet connection, this process may take a few moments. Ensure a stable internet connection and wait for the sync to complete.
Step 5: Access contacts on other devices:
Once your contacts are synced with the cloud storage service, you can easily access them from other devices. Install the cloud storage app on the new device and sign in to your account. The contacts should automatically sync to the new device, providing you with seamless access to your contact information.
Syncing contacts with cloud storage services offers several advantages. Firstly, it ensures that your contacts are securely stored in the cloud, protecting them from device loss or damage. Secondly, it provides a centralized location for your contacts, making them easily accessible from any device with the cloud storage app installed. Lastly, it allows for automatic syncing, ensuring that any changes or additions to your contacts are updated in real-time across all devices.
Make sure to regularly check the settings of the cloud storage app to ensure that contact syncing is enabled and any necessary updates are applied. This will guarantee that your contacts remain up to date and properly backed up in the cloud.
By syncing your contacts with cloud storage services, you can enjoy peace of mind knowing that your contact information is safely stored and readily available, no matter which device you’re using.
Tips to ensure successful contact backup on Android
Backing up your contacts on Android is crucial to ensure the safety and accessibility of your valuable contact information. To ensure a successful and reliable contact backup process, consider implementing the following tips:
1. Regularly update your backup preferences:
Check your device’s settings or backup app regularly to ensure that contact backup settings are enabled and up to date. Stay informed about any updates or changes in the backup process to ensure your contacts are continually protected.
2. Enable automatic backups:
Whenever possible, enable automatic backups for your contacts. This allows for regular and seamless backups without requiring manual intervention. Automatic backups ensure that your contacts are consistently protected, even if you forget to perform a backup yourself.
3. Double-check your backup location:
Make sure you are backing up your contacts to the intended location, whether it’s your Google Account, the device’s internal storage, an external SD card, or a cloud storage service. Verify that the backup location has sufficient storage space to accommodate your contacts.
4. Verify backups on a computer or different device:
Periodically verify that your contacts are being successfully backed up by accessing them on a computer or a different Android device. This adds an additional layer of confidence and ensures that your backup process is working as intended.
5. Keep your contact list organized:
Regularly review and clean up your contact list by removing duplicate entries, outdated information, and irrelevant contacts. An organized contact list reduces the size of the backup file and makes it more manageable and efficient.
6. Use multiple backup methods:
Consider using multiple backup methods concurrently to ensure redundancy and minimize the risk of data loss. For example, you could backup your contacts using both your Google Account and a third-party app. This provides an extra layer of protection and ensures that you have backups accessible from different sources.
7. Test the restore process:
Periodically test the restore process on your Android device to ensure that you can successfully retrieve your contacts from the backup. This helps identify any issues or complications in the restoration process beforehand, allowing you to address them promptly.
8. Keep your Android device updated:
Regularly update your Android device’s operating system and associated apps to ensure compatibility with the latest backup and restore features. This minimizes the risk of compatibility issues and improves the overall stability of the backup process.
9. Secure your backup:
If your backup is stored in the cloud or on external storage, ensure that it is protected with strong and unique passwords. Take advantage of encryption options provided by cloud storage services to add an extra layer of security to your backup files.
By following these tips, you can enhance the reliability and effectiveness of your contact backup process on Android. Taking proactive measures ensures that your valuable contact information remains protected and easily accessible, no matter what circumstances may arise.
Conclusion
Backing up your contacts on Android is essential to protect your valuable contact information from loss and to ensure easy accessibility. Throughout this article, we explored different methods to backup contacts on Android, including using your Google Account, utilizing your device’s built-in backup feature, using third-party apps, exporting contacts to a .vcf file, and syncing contacts with cloud storage services.
By using your Google Account, you can take advantage of automatic syncing and easily restore your contacts on any Android device associated with your account. The built-in backup feature on your device offers a convenient way to backup contacts directly to your device’s internal storage or an external SD card. Third-party apps provide additional features and customization options, allowing you to manage and backup your contacts with more control. Exporting contacts to a .vcf file gives you the flexibility to share and transfer your contacts across devices. Syncing contacts with cloud storage services provides centralized storage and easy accessibility from any device with the cloud storage app installed.
To ensure a successful contact backup process, follow tips such as regularly updating backup preferences, enabling automatic backups, verifying backup locations, and keeping your contact list organized. Using multiple backup methods, regularly testing the restore process, keeping your Android device updated, and securing your backup provide further protection and assurance.
By implementing these methods and tips, you can safeguard your valuable contact information and enjoy peace of mind knowing that your contacts are protected, easily accessible, and can be restored in case of any unexpected events or device transitions.
Take the time to backup your contacts regularly, explore the different methods available, and choose the ones that best suit your needs and preferences. Don’t wait until it’s too late – start backing up your contacts on Android today!