Introduction
One of the most important tasks you can do to protect your valuable data is to back up your MacBook regularly. Accidents happen, hard drives can fail, and data loss can occur at any time. That’s why having a reliable backup of your files is essential. While macOS provides the Time Machine feature for easy backups, you may prefer to use an external hard drive to back up your MacBook without relying on Time Machine.
Backing up your MacBook to an external hard drive gives you control over the backup process and allows you to customize your backup strategy. Whether you want to back up specific files and folders or create a complete system backup, this guide will walk you through the steps to back up your MacBook to an external hard drive without Time Machine.
By following these methods, you can rest assured that your important documents, photos, videos, and other files are securely backed up and protected from accidental deletion, hardware failure, or other unforeseen circumstances. Plus, having a backup enables you to easily restore your data in case of a system crash or when you need to transfer your files to a new MacBook.
Why you should back up your MacBook
Backing up your MacBook is not just a precautionary measure – it is an essential practice that can save you from potential data loss and its associated consequences. Here are some important reasons why you should prioritize backing up your MacBook regularly:
1. Data Protection: Your MacBook houses significant data, including important documents, cherished photos, and personal files. By backing up your data, you can safeguard against accidental deletion, computer crashes, or hardware failures.
2. Security: Having a backup of your MacBook ensures that your data is protected from cyber threats such as ransomware attacks or malware infections. In the event of an attack, you can easily restore your data from the backup without compromising its integrity.
3. Disaster Recovery: Natural disasters, accidents, or theft can result in the loss or damage of your MacBook. By regularly backing up your data, you can easily recover and restore your files on a new system or external hard drive.
4. System Updates: Operating system updates or software installations can sometimes lead to unexpected errors or data corruption. Having a backup ensures that you can revert to a previous working state if any issues arise during the update process.
5. Peace of Mind: Knowing that your valuable data is securely backed up gives you peace of mind. You can work without the fear of losing hours, days, or even years of important data and memories.
By taking the time to back up your MacBook, you are proactively protecting yourself against potential data loss. It is a small investment of time that can save you from significant stress, frustration, and potential financial loss in the long run.
What you need to back up your MacBook
Before you start backing up your MacBook to an external hard drive without Time Machine, there are a few things you need to ensure a successful backup process. Here’s what you’ll need:
1. External hard drive: You’ll need an external hard drive with enough storage capacity to accommodate the files you want to back up. It’s recommended to choose a high-quality drive with ample space and reliable data transfer speeds.
2. MacBook with sufficient free space: Make sure that your MacBook has enough free space to create a backup. This includes the space required for temporary files during the backup process.
3. USB or Thunderbolt connection: Ensure that your external hard drive supports either a USB or Thunderbolt connection, depending on the ports available on your MacBook. This will ensure fast and stable data transfer speeds.
4. File organization: It’s helpful to have your files organized and categorized before initiating the backup. This will make it easier to select specific files or folders for backup and ensure that you don’t miss any important data.
5. Backup software (optional): While not necessary, you may consider using third-party backup software for added features, such as scheduling backups, incremental backups, or encryption. There are several reliable backup software options available for macOS that can simplify the backup process.
By ensuring that you have these essentials in place, you’ll be well-prepared to back up your MacBook to an external hard drive without relying on Time Machine. Having these requirements met will contribute to a smoother and more efficient backup process, giving you peace of mind knowing that your crucial data is protected.
Method 1: Manual file transfer
One way to back up your MacBook to an external hard drive without Time Machine is by manually transferring your files. This method gives you the freedom to choose which files and folders to back up and allows for greater flexibility in organizing your data. Here’s a step-by-step guide on how to back up your MacBook using manual file transfer:
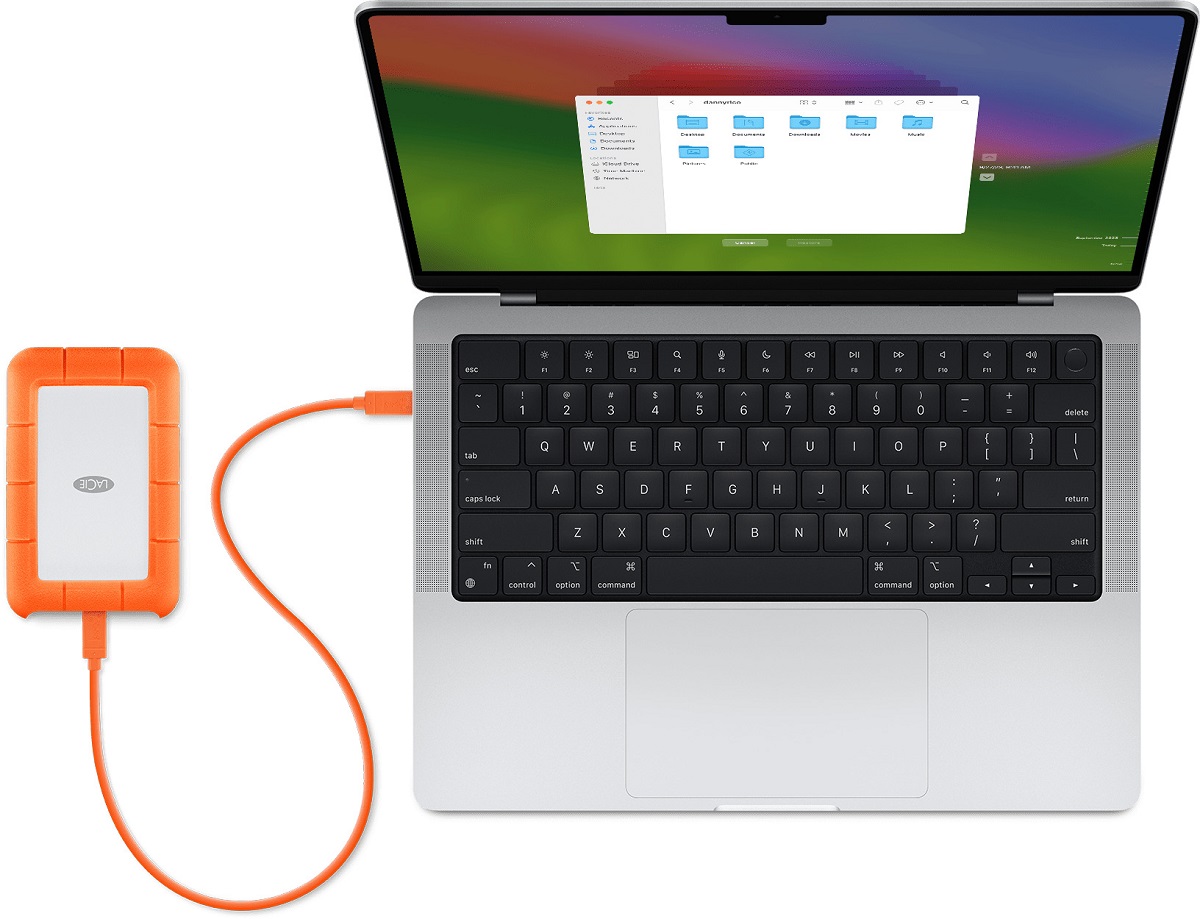
1. Connect the external hard drive: Start by connecting your external hard drive to your MacBook using a USB or Thunderbolt cable. Ensure that the connection is secure and stable.
2. Open Finder: Open a new Finder window by clicking on the Finder icon in your Dock or selecting it from the Applications folder.
3. Select files and folders: Navigate to the files and folders that you want to back up. You can select individual files or entire folders by holding down the Command key and clicking on the items you wish to include in the backup.
4. Copy the selected files: Once you’ve selected the files and folders, right-click on one of the selected items and choose “Copy” from the context menu. Alternatively, you can use the keyboard shortcut Command+C to copy the files.
5. Paste the files onto the external hard drive: Go to the location on your external hard drive where you want to store the backup. Right-click in the desired location and choose “Paste” from the context menu. You can also use the keyboard shortcut Command+V to paste the files onto the external hard drive.
6. Monitor the transfer process: Depending on the size and number of files being transferred, the process may take some time. Keep an eye on the progress indicator or transfer status to ensure that all files are successfully copied to the external hard drive.
7. Verify the backup: Once the transfer is complete, it’s important to double-check that all the files have been copied correctly. Open the backup folder on the external hard drive and verify that the files and folders are present and accessible.
By following these steps, you can manually back up your MacBook to an external hard drive without relying on Time Machine. This method allows you to have full control over what files are backed up and gives you the flexibility to organize your data according to your preferences.
Method 2: Using a third-party software
Another method to back up your MacBook to an external hard drive without Time Machine is by using third-party backup software. These software solutions offer advanced features and a more streamlined backup process. Here’s a step-by-step guide on how to back up your MacBook using third-party software:
1. Choose reliable backup software: Research and select a reputable third-party backup software that is compatible with macOS. Look for features like incremental backups, encryption, and scheduling options to enhance your backup experience.
2. Download and install the backup software: Visit the official website of the backup software and download the appropriate version for your MacBook. Follow the installation instructions to install the software on your system.
3. Connect the external hard drive: Connect your external hard drive to your MacBook using a USB or Thunderbolt cable. Ensure that the connection is secure and stable.
4. Launch the backup software: Open the backup software you installed and familiarize yourself with the user interface and available options.
5. Select the backup source: Choose the files, folders, or the entire system that you want to back up from your MacBook. Some software may allow you to customize the backup by selecting specific file types or excluding certain directories.
6. Choose the external hard drive as the backup destination: Select the connected external hard drive as the destination where the backup files will be stored. Ensure that you have sufficient free space on the external hard drive for the backup.
7. Configure backup settings: Depending on the software you’re using, you may have additional options to configure backup settings. This includes options to encrypt the backup, schedule automatic backups, or adjust the backup frequency.
8. Start the backup: Once you have set up the backup settings and confirmed the source and destination, initiate the backup process. The software will start backing up your selected files and folders onto the external hard drive.
9. Monitor the backup process: Keep an eye on the backup progress indicator or logs provided by the software. This will help you ensure that the backup is running smoothly and all your important data is being successfully backed up.
10. Verify the backup: After the backup is completed, take the time to verify the backup files on the external hard drive. Ensure that you can access and restore the files as needed.
By following these steps and using a reliable third-party backup software, you can easily back up your MacBook to an external hard drive without relying on Time Machine. These software solutions offer more advanced features and automation, allowing for a more seamless and efficient backup process. Remember to regularly update and maintain your backup to ensure the safety of your data.
Step-by-step guide to backing up your MacBook without Time Machine
If you prefer not to use Time Machine or want more control over your backups, you can follow these steps to manually back up your MacBook. This method allows you to select specific files and folders to back up, providing you with flexibility and customization options. Here’s a step-by-step guide to backing up your MacBook without Time Machine:
1. Connect your external hard drive: Start by connecting your external hard drive to your MacBook using a USB or Thunderbolt cable. Make sure it is properly connected and recognized by your computer.
2. Create a backup folder: Open Finder and create a new folder on your external hard drive. This will serve as the destination for your backup.
3. Select files and folders: Decide which files and folders you want to back up. You can choose specific documents, media files, or even entire directories. Select the desired items by clicking on them while holding down the Command key.
4. Copy selected files: Right-click on the selected files and choose “Copy” from the context menu. Alternatively, you can use the keyboard shortcut Command+C to copy the files.
5. Paste the files in the backup folder: Go to the backup folder on your external hard drive and right-click inside the folder. Choose “Paste” from the context menu or use the keyboard shortcut Command+V to paste the files into the folder.
6. Monitor the file transfer: Depending on the size and number of files, the transfer process may take some time. Keep an eye on the progress indicator to ensure that all files are successfully copied to the backup folder.
7. Verify the backup: Once the transfer is complete, access the backup folder on your external hard drive and verify that all the files are present and accessible. Open a few files to make sure they are intact and readable.
8. Update your backup regularly: To ensure your backup stays up to date, periodically repeat the process and copy any new or modified files to the backup folder on your external hard drive. This step is essential to maintain an accurate backup of your MacBook.
By following these steps, you can manually back up your MacBook without Time Machine. This method provides you with control and flexibility over your backups, allowing you to choose exactly what files and folders to back up. Remember to update your backup regularly to ensure the safety of your data in case of any unforeseen circumstances or data loss on your MacBook.
Troubleshooting tips
While backing up your MacBook without Time Machine is a straightforward process, you may encounter some challenges along the way. Here are some common troubleshooting tips to help you overcome any issues you may encounter during the backup process:
1. Ensure stable connections: Make sure that the connections between your MacBook, external hard drive, and cables are secure and stable. Loose connections can cause disruptions or interruptions in the backup process.
2. Check available storage space: Ensure that both your MacBook and the external hard drive have enough free space to accommodate the backup. Insufficient space can lead to incomplete backups or errors during the transfer process.
3. Restart your MacBook and the external hard drive: Sometimes, a simple restart can resolve connection or compatibility issues between your MacBook and the external hard drive. Try restarting both devices and attempt the backup process again.
4. Verify file system compatibility: Ensure that the external hard drive file system is compatible with macOS. Some drives may come formatted with a file system that is not natively supported by macOS. If necessary, reformat the drive using the Disk Utility application with the appropriate file system.
5. Check for software and system updates: Ensure that your MacBook and the backup software, if you are using one, are up to date. Software updates often include bug fixes and improvements that can enhance the backup process.
6. Avoid file conflicts: If you encounter file conflicts during the backup process, such as files with the same name or file paths, choose the option to replace the existing file or append a unique identifier to the file name to avoid overwriting any data.
7. Attempt the backup on another computer: If you are still encountering issues, try connecting the external hard drive to another computer to see if the problem persists. This can help determine whether the issue lies with the MacBook or the external hard drive.
8. Seek professional assistance: If you are still unable to resolve the issues or encounter recurring problems during the backup process, consider reaching out to professional IT support or the manufacturer of your external hard drive for further assistance.
By following these troubleshooting tips, you can overcome common challenges during the backup process and ensure a successful backup of your MacBook. Remember, patience and perseverance are key when troubleshooting, and don’t hesitate to seek help if needed.
Conclusion
Backing up your MacBook to an external hard drive without relying on Time Machine is a crucial step in protecting your valuable data. By following the methods outlined in this guide, you can safeguard your files, documents, photos, and other important data from accidental loss, hardware failures, or cyber attacks.
In Method 1, the manual file transfer method gives you the flexibility to choose specific files and folders for backup. This method allows you to have full control over the backup process and ensures that your data is securely transferred to the external hard drive.
For a more streamlined backup process, Method 2 involves using third-party backup software. These software solutions offer advanced features such as incremental backups, encryption, and scheduling options, making the backup process more efficient and automated.
Regardless of the method you choose, it is essential to regularly update your backup to keep it synchronized with any changes or additions to your MacBook. This will ensure that your backup is up to date and ready for any unforeseen events.
Remember to troubleshoot any issues that may arise during the backup process by ensuring stable connections, checking available storage space, and verifying file system compatibility. If necessary, seek professional assistance to resolve any persistent problems.
By implementing a regular backup strategy for your MacBook, you can enjoy peace of mind knowing that your important files and data are securely stored and protected. Whether it’s manual file transfer or using third-party software, take the time to back up your MacBook and safeguard your valuable digital assets.
So, don’t delay – start backing up your MacBook to an external hard drive today and enjoy the peace of mind that comes with knowing your data is safe and secure.