Introduction
Welcome to the world of gaming! Whether you’re a casual gamer or a hardcore enthusiast, you know that a smooth and immersive gaming experience is what makes playing games truly enjoyable. However, you may have noticed that some games run sluggishly or experience lag, which can be frustrating and hinder your overall gaming experience. One factor that can greatly affect game performance is the amount of RAM allocated to the game. In this article, we’ll explore why allocating more RAM to a game is important and discuss various methods to achieve this.
Random Access Memory (RAM) is a crucial component of your computer system that temporarily stores and provides quick access to data needed by running programs. When it comes to gaming, having sufficient RAM is vital for smooth gameplay, as it allows the game to load and store necessary information without constantly retrieving data from the slower hard drive or solid-state drive (SSD). Allocating more RAM to a game ensures that the game has enough memory to store and process all the required data, resulting in improved performance, reduced loading times, and a smoother gaming experience overall.
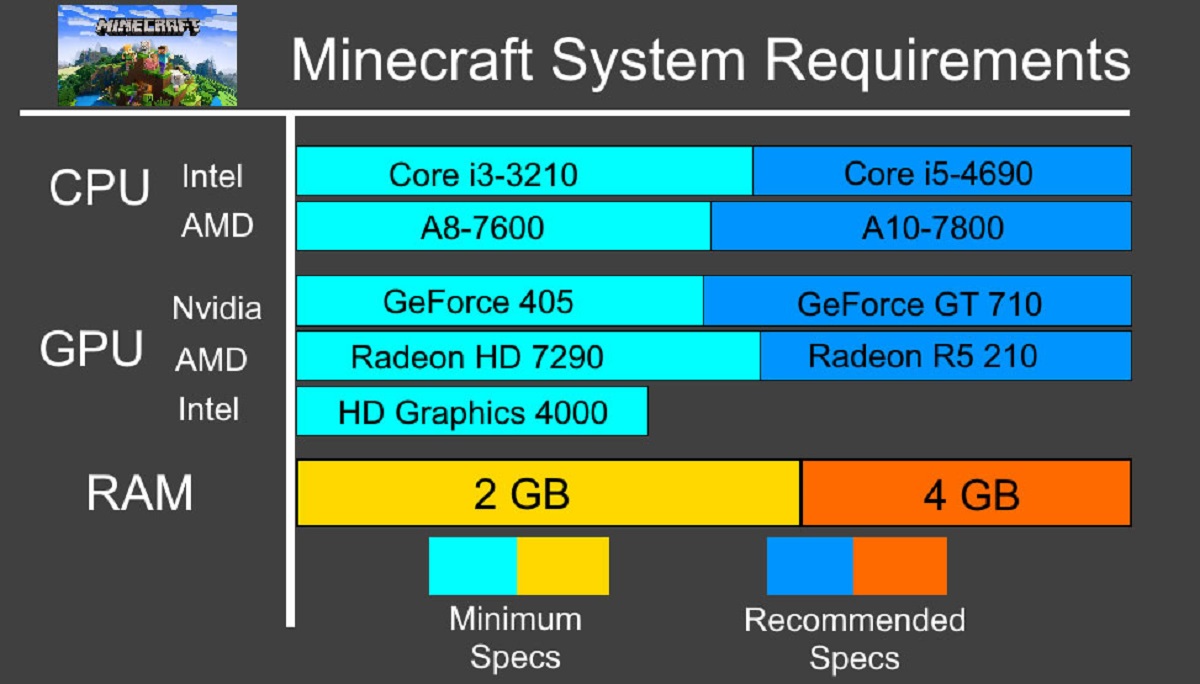
Before we delve into the methods of allocating more RAM to a game, it’s important to check the system requirements of the game you’re playing. Each game has its own minimum and recommended system requirements, including RAM specifications. Make sure that your computer meets or exceeds the minimum requirements to ensure optimal performance.
Now that we understand the importance of allocating more RAM to a game, let’s explore how to check the current RAM allocation of your system and understand which game settings can impact RAM usage. We’ll also discuss methods like adjusting in-game graphics quality, closing unnecessary background processes, allocating more RAM through game launchers, and manually allocating more RAM. Additionally, we’ll touch on the importance of updating drivers and system software to optimize gaming performance.
So, if you’re ready to elevate your gaming experience and overcome those pesky performance issues, let’s dive into the various methods of allocating more RAM to your games!
Why Allocating More RAM to a Game is Important
Allocating more RAM to a game can significantly improve its performance and enhance your gaming experience. Here are a few reasons why this is important:
1. Faster Loading Times: When you allocate more RAM to a game, it can load and store game assets more quickly. This means shorter loading times and faster transitions between different game levels or areas. You won’t have to wait as long for the game to load, allowing you to jump right into the action.
2. Smoother Gameplay: Insufficient RAM can cause lag and stuttering during gameplay. By allocating more RAM, your computer has extra space to store the game’s data and assets, resulting in smoother gameplay without interruptions. You’ll experience seamless character movements, fluid graphics, and responsive controls.
3. Improved Graphics and Visuals: Many modern games have stunning graphics and detailed visuals that require significant amounts of memory to render smoothly. Insufficient RAM can lead to lowered graphic settings or reduced visual quality. Allocating more RAM ensures that the game has enough memory to render high-quality graphics, resulting in a visually captivating gaming experience.
4. Enhanced Multiplayer Performance: For gamers who enjoy playing with others online, allocating more RAM is crucial. Multiplayer games often require more system resources to handle multiple players, their actions, and the game world seamlessly. By allocating more RAM, you’ll be able to handle the demands of online multiplayer gaming without experiencing performance lags or slowdowns.
5. Future-Proofing your System: Games are becoming more demanding as technology advances. By allocating more RAM to a game now, you’re future-proofing your system to handle upcoming games that require higher system requirements. This means you can continue enjoying the latest games without needing to upgrade your hardware right away.
By allocating more RAM to your games, you’re maximizing your computer’s potential and allowing it to perform at its best. Whether you’re exploring vast open worlds, engaging in intense battles, or experiencing immersive storylines, having sufficient RAM ensures a smooth and enjoyable gaming experience.
Checking System Requirements
Before allocating more RAM to a game, it’s crucial to check the system requirements to ensure compatibility and optimal performance. Here’s how you can do it:
1. Game Documentation: The first and most reliable source of information regarding system requirements is the game’s own documentation. Check the game’s manual or readme file, which usually provides detailed information about the minimum and recommended system requirements, including RAM specifications. Make sure your computer meets or exceeds these requirements to avoid potential performance issues.
2. Official Game Websites: Visit the official website of the game you’re interested in. Most game developers provide a dedicated page that lists the system requirements for their games. Look for a “System Requirements” or “Technical Specifications” section on the game’s website where you can find information about RAM requirements. Ensure your computer meets these requirements for the best gaming experience.
3. Online Gaming Communities and Forums: Online gaming communities and forums can be a valuable resource for gathering information about system requirements. Visit forums dedicated to the particular game you’re interested in and browse through discussions or ask questions regarding the RAM requirements. The gaming community can often provide insights and personal experiences that can help you make an informed decision.
4. Software Tools: There are various software tools available that can analyze your computer’s hardware and check its compatibility with specific games. These tools can automatically scan your system and provide detailed reports, including information about RAM requirements. Some popular tools include Steam’s “Can You Run It?” feature and system scanner software like Speccy. These tools can help you determine if your computer has enough RAM to meet the game’s requirements.
By thoroughly researching and checking the system requirements, you can ensure that your computer meets the necessary specifications for running the game smoothly. Once you’ve confirmed that your system meets the requirements, you can proceed with the process of allocating more RAM to enhance your gaming experience.
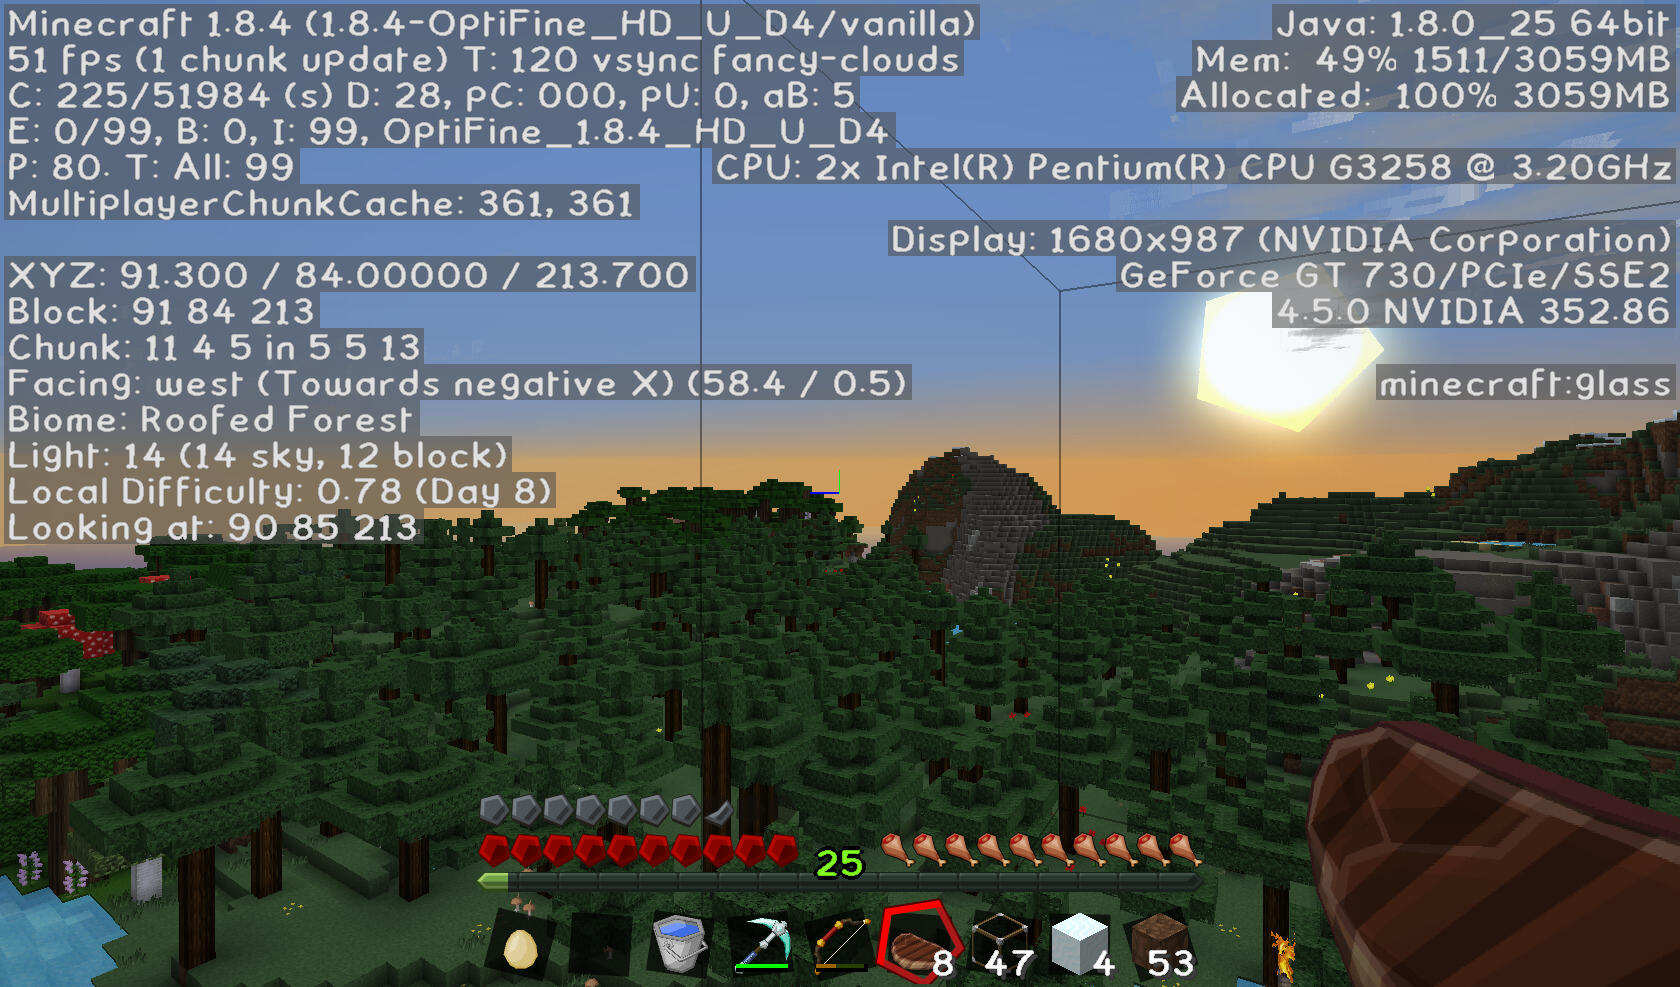
How to Check Current RAM Allocation
Before allocating more RAM to a game, it’s important to assess your computer’s current RAM allocation. This will give you an idea of how much RAM is currently being used and how much is available. Here are a few methods to check your system’s RAM allocation:
1. Task Manager (Windows): On Windows computers, the Task Manager provides a convenient way to monitor RAM usage. To access it, press Ctrl+Shift+Esc or right-click on the taskbar and select “Task Manager.” In the Task Manager window, navigate to the “Performance” tab and select “Memory.” Here, you’ll see a graph that shows the current RAM usage. The “In Use” and “Available” sections display the amount of RAM being used and the amount that is free, respectively.
2. Activity Monitor (Mac): For Mac users, the Activity Monitor serves as a similar tool to check RAM allocation. To open it, go to “Applications” > “Utilities” > “Activity Monitor.” In the Activity Monitor window, click on the “Memory” tab. This will display the current RAM utilization, with categories such as “App Memory,” “Wired Memory,” “Compressed,” and “Cached Files.”
3. Command Line (Both Windows and Mac): Another way to check RAM allocation is through the command line interface. On Windows, open the Command Prompt by pressing the Windows key + R, typing “cmd,” and pressing Enter. Then, enter the command “wmic computersystem get totalphysicalmemory” to view the total RAM installed in your system. On Mac, open the Terminal by going to “Applications” > “Utilities” > “Terminal.” Enter the command “sysctl -n hw.memsize” to see the total RAM installed in your Mac.
4. Third-Party Software: Various third-party software tools are available that provide detailed information about your system’s hardware, including RAM allocation. Programs like CPU-Z, Speccy, or HWiNFO can offer comprehensive insights into your computer’s RAM usage along with other hardware details.
By checking your system’s current RAM allocation, you can determine how much RAM is being used and whether there is room for improvement. If you notice that the RAM usage is consistently high or close to the maximum capacity, allocating more RAM to a game can help improve performance and enhance your overall gaming experience.
Understanding Game Settings
When it comes to optimizing a game’s performance, understanding and adjusting the game settings can make a significant difference. Here’s a breakdown of some important game settings to consider:
1. Graphics Quality: Most games provide options to adjust the graphics quality or preset. These presets range from low to ultra settings, determining the level of detail, texture resolution, and special effects in the game. Lowering the graphics quality can reduce the strain on your system’s resources, including RAM, and improve overall performance. Experiment with different presets to find the right balance between performance and visual quality.
2. Display Resolution: The display resolution defines the number of pixels on your screen. Higher resolutions generally result in sharper graphics but require more processing power and memory. Lowering the resolution can lessen the workload on your system, allowing it to allocate more resources, including RAM, to improve gameplay performance.
3. V-Sync: Vertical sync, or V-Sync, is a setting that synchronizes the game’s frame rate with your monitor’s refresh rate. Enabling V-Sync can eliminate screen tearing but may cap the frame rate, potentially affecting performance. Disabling V-Sync can lead to a smoother gameplay experience, as it allows your system to utilize more resources, including RAM, for better performance.
4. Shadow Quality: Shadows add depth and realism to a game’s visuals but can be demanding on system resources. Adjusting the shadow quality or disabling shadows altogether can alleviate the strain on your system’s resources, including RAM. Experiment with different shadow settings to find the right balance between visual fidelity and performance.
5. Texture Resolution: The texture resolution determines the level of detail in textures applied to the game’s objects and environments. Higher texture resolutions provide sharper and more detailed visuals but require more VRAM (Video RAM) or system RAM. Lowering the texture resolution can help reduce the memory load on your system and allow more RAM to be allocated for other critical game operations.
6. Anti-Aliasing: Anti-aliasing smooths jagged edges and removes graphical artifacts, enhancing the overall visual quality. However, anti-aliasing can be resource-intensive. Adjusting the anti-aliasing settings or disabling it can free up system resources, including RAM, for better performance.
7. Post-Processing Effects: Post-processing effects, such as motion blur, depth of field, and ambient occlusion, can enhance visual immersion but may impact performance. Consider adjusting or disabling these effects to lessen the strain on your system’s resources, including RAM.
By understanding and adjusting the various game settings, you can optimize the game’s performance to suit your system’s capabilities. It’s important to experiment with different settings and find the right balance between performance and visual quality, ensuring that your games run smoothly and provide an immersive gaming experience.
Adjusting In-Game Graphics Quality
One of the most effective ways to optimize a game’s performance is by adjusting the in-game graphics quality settings. By finding the right balance between visual fidelity and performance, you can ensure a smoother gaming experience. Here are some steps to adjusting the graphics quality:
1. Start with Presets: Most games offer preset graphics settings ranging from low to ultra. Begin by selecting a preset that matches your system’s capabilities. If you’re experiencing performance issues, start with a lower preset and gradually increase it until you achieve the desired balance between visual quality and performance.
2. Adjust Individual Settings: If the preset options don’t provide the desired results, you can fine-tune individual graphics settings. Common settings include texture quality, shadow quality, anti-aliasing, post-processing effects, and view distance. Lowering these settings can significantly reduce the strain on your system’s resources, including RAM, and improve performance.
3. Experiment with Resolution: Lowering the display resolution can greatly impact performance. If you’re experiencing frame rate drops or sluggishness, consider reducing the resolution. Keep in mind that lower resolutions may result in less sharp visuals, but the trade-off can lead to smoother gameplay and improved RAM allocation.
4. Disable or Reduce Resource-Intensive Effects: Some graphical effects, such as motion blur, depth of field, and ambient occlusion, can be resource-intensive. Disabling or reducing these effects can free up system resources, including RAM, for other critical tasks. Experiment with these settings to find the right balance for your system.
5. Use FPS Limiters: Many games provide the option to set a framerate cap or limit. Setting a cap slightly below your monitor’s refresh rate can help maintain a steady frame rate, reducing the strain on your system, including RAM. This can result in smoother gameplay and prevent unnecessary resource consumption.
6. Monitor Performance: After adjusting the graphics settings, keep an eye on the system’s performance. Use tools like the FPS counter provided by game launchers or third-party software to monitor the frame rate. If you notice any performance issues or variability, revisit the settings and make further adjustments as needed.
Remember, there isn’t a one-size-fits-all solution when it comes to adjusting in-game graphics quality. The optimal settings may vary depending on your system’s specifications and the specific game you’re playing. Therefore, it’s important to experiment, find the right balance for your system, and regularly monitor performance to ensure a smooth and visually appealing gaming experience.
Closing Unnecessary Background Processes
When it comes to optimizing your system’s performance for gaming, closing unnecessary background processes can have a significant impact. By freeing up system resources, including RAM, you can allocate more power to the game and ensure smoother gameplay. Here are some steps to close unnecessary background processes:
1. Task Manager/Activity Monitor: Open the Task Manager on Windows or the Activity Monitor on Mac to identify resource-intensive processes running in the background. Look for applications or processes that consume a significant amount of CPU or memory. Right-click on these processes and select “End Task” (Windows) or press the “X” button (Mac) to close them.
2. Disable Startup Programs: Some programs automatically launch when you start your computer, consuming valuable system resources even when not in use. Access the startup programs list on Windows by opening the Task Manager and navigating to the “Startup” tab. On Mac, go to “System Preferences” > “Users & Groups” > “Login Items.” Disable or remove programs that you don’t need to have running in the background during gaming sessions.
3. System Tray/Applications: Check the system tray (Windows) or menu bar (Mac) for running applications that can be closed without affecting gameplay. These applications often run in the background and consume system resources. Right-click on their icons and choose “Exit” or “Quit” to close them.
4. Background Services: In addition to applications, background services can also affect system performance. Adjust the settings of unnecessary services by going to the “Services” tab in the Task Manager (Windows) or “Activity Monitor” (Mac). Be cautious and research before disabling any services to ensure that they are not critical for system functionality.
5. System Optimization Tools: Utilize system optimization tools to automatically close unnecessary background processes and services. These tools, such as CCleaner, Advanced SystemCare, or CleanMyMac, can help streamline your system’s performance for gaming by closing resource-consuming processes and freeing up RAM.
6. Adjust Power Settings: Check your computer’s power settings and ensure they are set to high-performance mode. By doing so, you ensure that your system allocates maximum resources, including RAM, to support gaming activities. Adjusting power settings can be done through the control panel (Windows) or system preferences (Mac).
By closing unnecessary background processes, you can maximize your system’s resources and allocate more RAM to the game, resulting in improved performance and smoother gameplay. Remember to strike a balance though, as some essential processes, such as antivirus software or system drivers, should remain running to ensure the overall security and stability of your system.
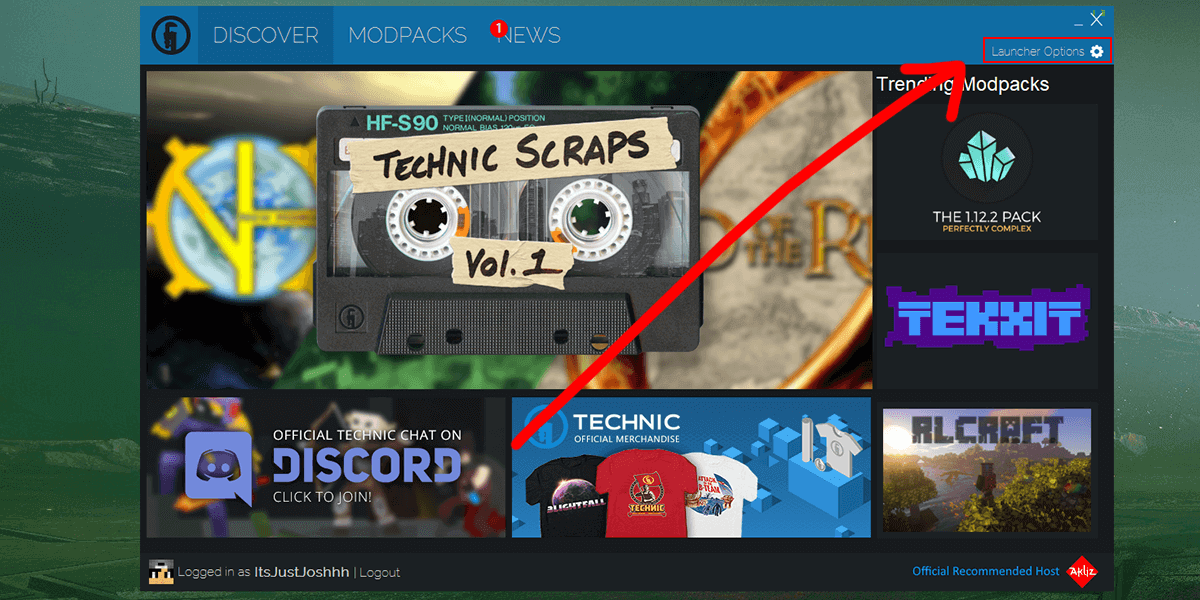
Allocating More RAM through Game Launchers
Many game launchers and platforms offer built-in settings that allow you to allocate more RAM to a specific game. By adjusting these settings, you can ensure that the game receives the necessary resources for optimal performance. Here’s how you can allocate more RAM through game launchers:
1. Steam: If you’re using Steam as your game launcher, you can allocate more RAM to a game by following these steps:
- Open your Steam library and right-click on the game you want to adjust.
- Select “Properties” from the dropdown menu.
- In the Properties window, go to the “General” tab and click on the “Set Launch Options” button.
- In the Launch Options box, type “-heapsize [desired amount of RAM in megabytes]” (without the quotes).
- Replace “[desired amount of RAM in megabytes]” with the amount of RAM you want to allocate to the game. For example, to allocate 4GB of RAM, you’d type “-heapsize 4096”.
- Click “OK” to save the changes.
2. Epic Games Store: If you’re using the Epic Games Store, you can allocate more RAM to a game by following these steps:
- Launch the Epic Games launcher and click on your Library.
- Locate the game you want to adjust, and click on the “Settings” button (three horizontal dots) next to the game’s name.
- In the Settings menu, select “Additional Command Line Arguments”.
- In the input box, type “-d3d12allowupsidedown -useallavailablecores” (without the quotes).
- Click “Save” to apply the changes.
3. Other Game Launchers: Other game launchers, such as Uplay, Origin, or GOG Galaxy, may have unique configurations for allocating more RAM. Consult the launcher’s documentation or support pages to find instructions specific to each launcher. They may provide additional options or settings for allocating more RAM to games.
By allocating more RAM through game launchers, you can ensure that the game receives an appropriate amount of memory to process data and assets more efficiently. However, keep in mind that not all games and launchers provide these options, and the effectiveness may vary depending on the specific game and your system’s capabilities.
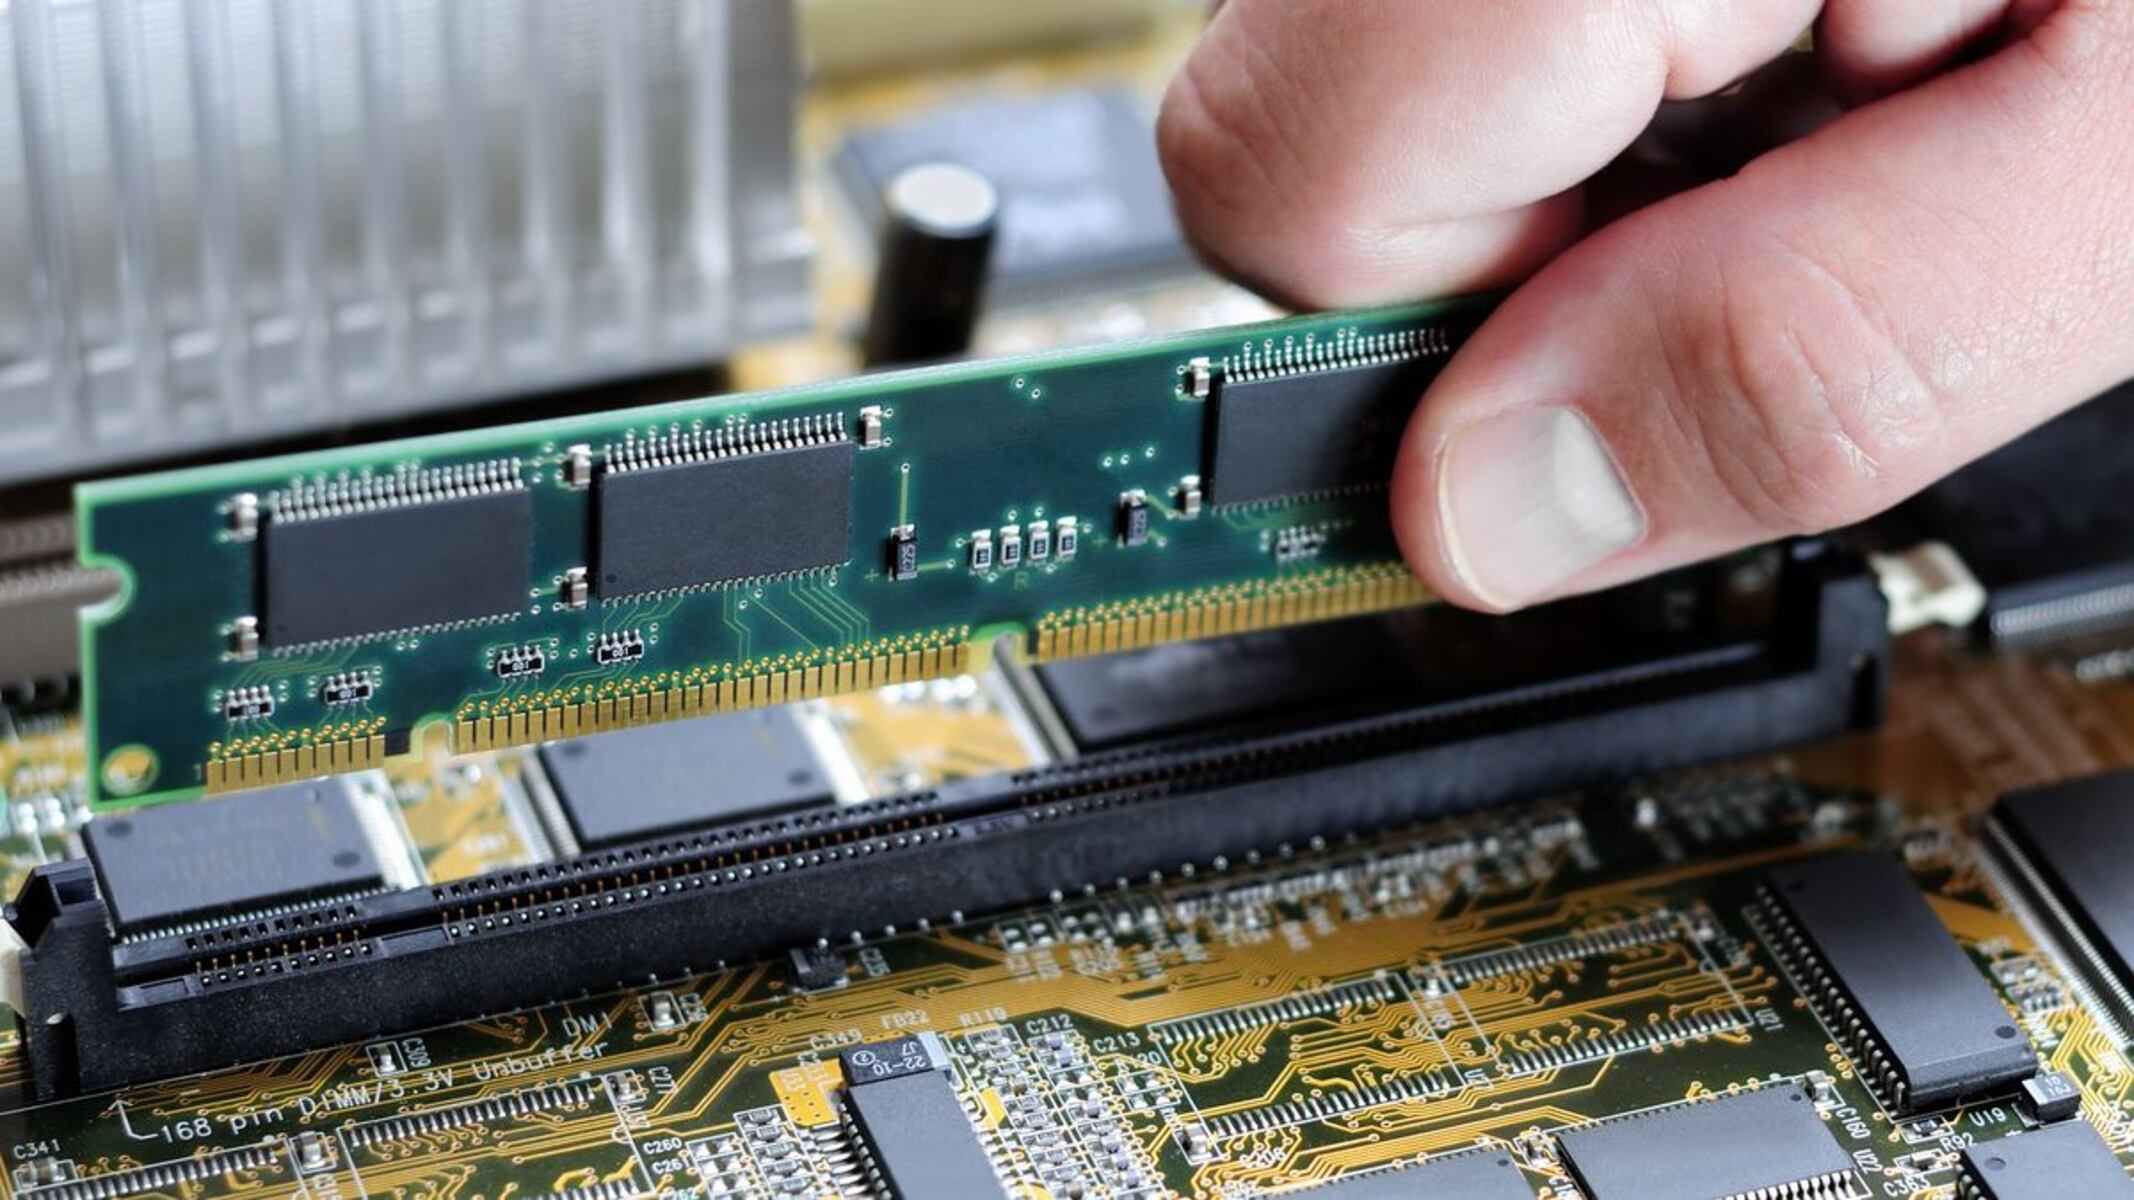
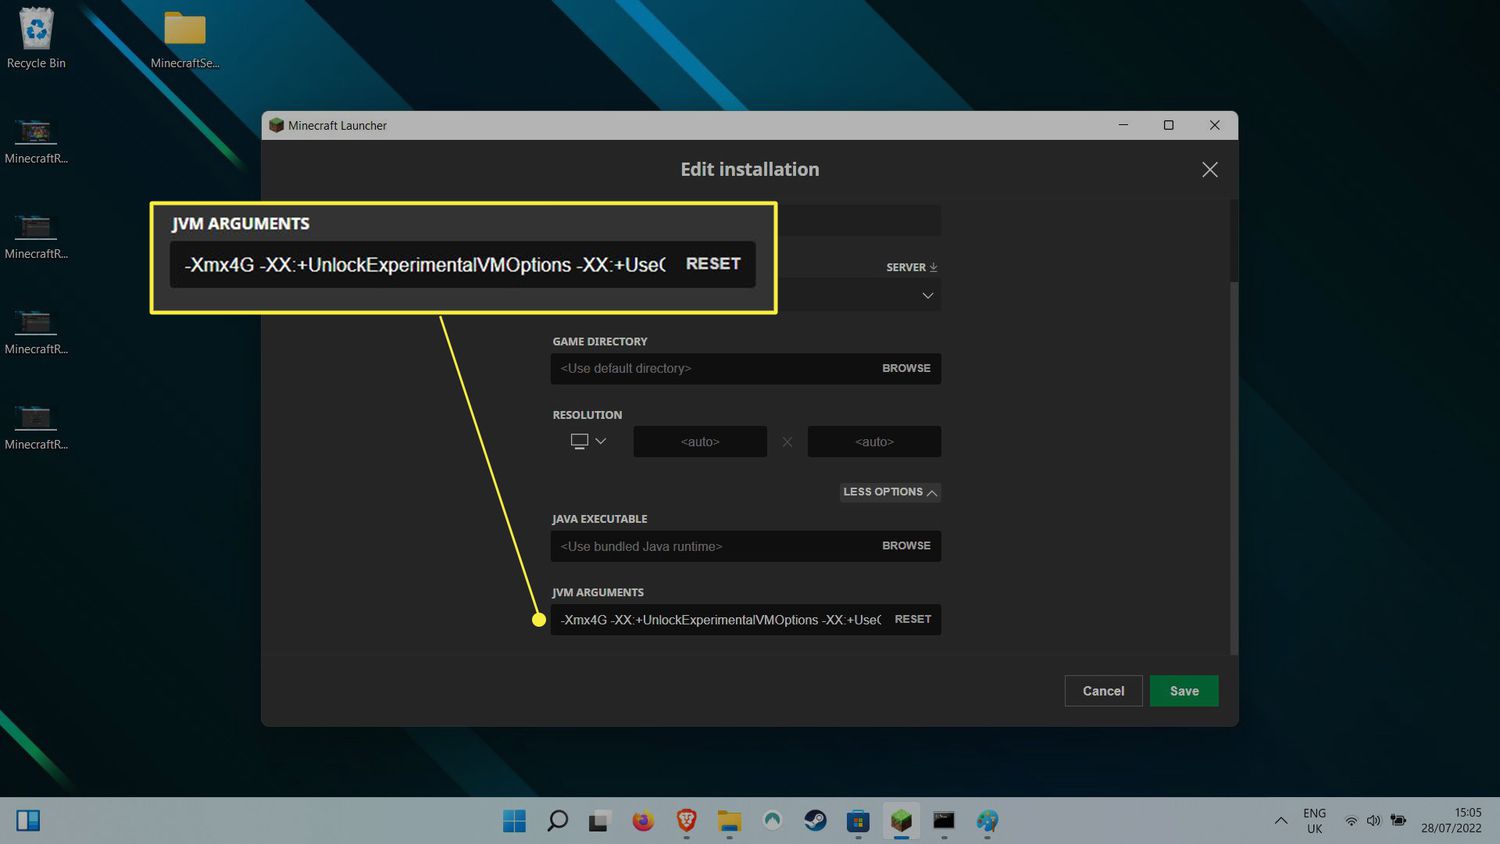
Allocating More RAM Manually
If your game launcher doesn’t have an option to allocate more RAM or if you prefer to have more control over the process, you can manually allocate more RAM to a game. Here’s how you can do it:
1. Open Task Manager: Begin by opening the Task Manager on your Windows computer. You can do this by pressing Ctrl+Shift+Esc or by right-clicking on the taskbar and selecting “Task Manager.”
2. Navigate to the Details/Processes Tab: In the Task Manager, click on the “Details” tab (Windows 10 and newer) or the “Processes” tab (Windows 7 and older) to view the list of running processes.
3. Locate the Game’s Process: Locate the process associated with the game you want to allocate more RAM to. It’s usually listed with the name of the game or the game’s executable file. Note that the process may have a .exe extension.
4. Right-Click on the Game’s Process: Right-click on the game’s process and select “Set Priority” or “Set Affinity” from the context menu.
5. Set CPU Priority: In the “Set Priority” submenu, you’ll see several options ranging from “Realtime” to “Low.” Choose a higher priority setting, such as “Above Normal” or “High,” to allocate more CPU resources to the game. Note that setting the priority too high might affect other processes running in the background.
6. Set CPU Affinity: If the “Set Affinity” option is available, click on it to access the CPU affinity settings for the game’s process. Here, you can choose which CPU cores are assigned to the game. Enable as many CPU cores as you have available to maximize the game’s performance.
7. Adjust Virtual Memory (Pagefile) Settings: In addition to CPU priority and affinity, you can manually adjust the virtual memory settings, also known as the pagefile. To do this, go to the “Performance” tab in the Task Manager, click on “Virtual Memory,” and then “Change.” Here, you can manually set the initial and maximum size of the virtual memory. Increasing the maximum size can provide additional memory resources for the game. However, note that this only affects virtual memory and not physical RAM.
By manually adjusting the CPU priority, CPU affinity, and virtual memory settings, you can direct more resources towards the game, improving its performance and potentially allocating more RAM indirectly. Keep in mind that manually adjusting these settings requires caution and experimentation to find the optimal configuration for your system. Improper adjustments can lead to system instability or other performance issues, so proceed with care.
Updating Drivers and System Software
Keeping your drivers and system software up to date is essential for optimizing your gaming experience and ensuring compatibility with the latest games. Outdated drivers and software can cause performance issues, including high RAM usage or compatibility conflicts. Here’s how you can update your drivers and system software:
1. Graphics Drivers: Your graphics card drivers play a crucial role in delivering optimal performance and compatibility for games. Visit the manufacturer’s website for your graphics card (e.g., NVIDIA, AMD, or Intel) and download the latest drivers for your specific model. Install the drivers and follow any instructions provided. Updating your graphics drivers can significantly improve game performance and reduce RAM-related issues.
2. Chipset Drivers: Chipset drivers enable communication between various components of your motherboard. Visit your motherboard manufacturer’s website to download and install the latest chipset drivers. Ensure you select the correct drivers for your motherboard model to maintain system stability and compatibility with games.
3. System Updates: Install any pending updates for your operating system, such as Windows Updates (for Windows users) or macOS updates (for Mac users). These updates often include performance enhancements, bug fixes, and security patches that can improve overall system stability and performance, including RAM management.
4. Peripheral Drivers: In addition to graphics and chipset drivers, other peripherals such as sound cards, network adapters, and input devices may require driver updates. Check the manufacturer’s website for each peripheral and download the latest drivers to ensure optimal functionality and compatibility with games.
5. Firmware Updates: Some hardware components, such as BIOS/UEFI firmware or SSD firmware, may require updates to improve performance. Visit the manufacturer’s website for your specific hardware and follow the instructions provided to update the firmware. Firmware updates can enhance overall system performance, which directly affects RAM utilization and gaming performance.
6. Automatic Driver Update Tools: Consider using automatic driver update tools, such as Driver Booster or Driver Easy, that scan your system, detect outdated drivers, and automatically download and install updates. These tools can simplify the process of keeping your drivers up to date and ensure that you’re running the latest versions for optimal performance.
Regularly updating your drivers and system software is vital to maintain system stability, compatibility, and optimal performance for gaming. By keeping your hardware and software up to date, you’ll minimize potential issues, including high RAM usage, and maximize your gaming experience.
Conclusion
Allocating more RAM to a game can significantly enhance its performance and provide a smoother gaming experience. By ensuring that the game has sufficient memory to store and process data, you’ll reduce loading times, minimize lag, and improve overall gameplay. Throughout this article, we’ve explored various methods for allocating more RAM to a game.
We began by emphasizing the importance of checking the system requirements of the game to ensure compatibility. Understanding the game settings and adjusting them accordingly, such as graphics quality and resolution, can optimize performance and help allocate more RAM effectively. Additionally, we discussed the benefits of closing unnecessary background processes and how to do so through the Task Manager or other system optimization tools.
We also explored allocating more RAM through game launchers, such as Steam or the Epic Games Launcher, as well as the option to manually allocate more RAM using priority and affinity settings. Lastly, we highlighted the significance of updating drivers and system software to ensure optimal performance and compatibility.
It’s important to note that every system is unique, and the effectiveness of allocating more RAM may vary depending on the specific game, system specifications, and available resources. It’s essential to experiment, monitor performance, and find the right balance between allocating more RAM and other system requirements for a smooth gaming experience.
By following these guidelines and implementing the appropriate methods to allocate more RAM, you can overcome performance issues, make the most of your hardware capabilities, and enjoy an immersive and enjoyable gaming experience. So, go ahead and optimize your system to fully unlock the potential of your favorite games!