Introduction
Welcome to our guide on how to set CPU priority. As computer users, we are constantly looking for ways to optimize our systems and improve performance. One aspect that can greatly impact the speed and efficiency of our computers is the CPU priority. In this article, we will explain what CPU priority is and why it is important to understand and manage it.
CPU priority refers to the level of importance given to different processes and tasks running on your computer’s central processing unit (CPU). Essentially, it determines the order in which tasks are executed and how much processing power is allocated to each task. By adjusting the CPU priority, you can ensure that critical processes receive the necessary resources, resulting in a smoother and more responsive system.
Why should you be concerned about CPU priority? The answer lies in the multitasking nature of modern computers. With numerous applications and processes running simultaneously, the CPU needs to juggle and allocate resources effectively. If certain processes have a higher priority than others, they will have access to more CPU resources, allowing them to perform their tasks more quickly and efficiently. On the other hand, lower-priority processes may struggle for resources, leading to slowdowns, lag, and overall sluggish performance.
Now that we understand the importance of CPU priority, let’s dive into the steps you can take to set CPU priority on different operating systems. We will cover instructions for Windows, Mac, and Linux systems, so regardless of what device or platform you are using, you’ll be able to optimize your CPU performance.
What is CPU Priority?
CPU priority refers to the level of importance assigned to different processes that are running on your computer’s central processing unit (CPU). In simpler terms, it determines the order in which tasks are executed and how much processing power is allocated to each task.
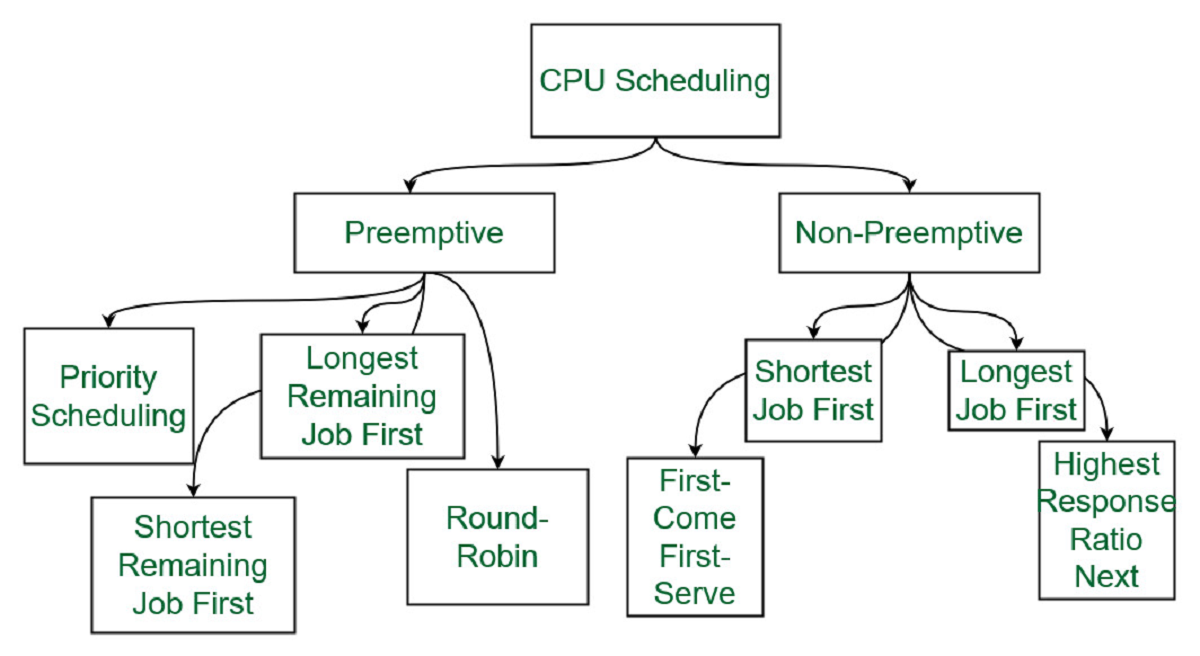
Every computer and operating system has a scheduler that manages the CPU’s workload. The scheduler ensures that each running process gets its fair share of CPU time and resources. The CPU priority setting allows you to modify this allocation and prioritize certain processes over others.
Processes can have different levels of priority, usually represented by a numeric value or a priority class. The higher the priority of a process, the more CPU time and resources it will receive. By adjusting the CPU priority of a process, you can control its access to the CPU and optimize the overall performance of your system.
It’s worth noting that not all processes require equal CPU resources. Certain tasks, such as background system processes, might not need a significant amount of processing power, while others, like resource-intensive applications or games, might require higher priority to run smoothly.
The CPU priority setting comes into play when your computer is running multiple processes simultaneously. When resources are limited, the CPU prioritizes processes with higher priority, ensuring that crucial tasks receive the necessary attention.
For example, let’s say you are working on a document while also running a virus scan in the background. In this scenario, you’d want your document editing process to have a higher CPU priority so that it remains responsive and smooth, while the virus scan may be allocated a lower CPU priority to avoid impacting your work too much.
By understanding and managing CPU priority, you can ensure that critical processes receive the necessary CPU resources, resulting in improved performance and a more responsive system.
Why Should You Set CPU Priority?
Setting CPU priority can have several benefits for your computer’s performance and overall user experience. Here are a few reasons why you should consider adjusting CPU priority:
1. Improved System Responsiveness: By assigning higher priority to essential processes or applications that you frequently use, you can ensure that they get the necessary CPU resources. This can result in smoother performance, reduced lag, and increased responsiveness of these critical tasks.
2. Enhanced Multitasking: If you often find yourself running multiple applications simultaneously, adjusting CPU priority can help balance resource allocation. By prioritizing tasks based on importance, you can allocate more CPU power to applications that require it, while lower-priority tasks run in the background without significantly impacting performance.
3. Optimal Gaming Performance: Gamers can benefit greatly from setting CPU priority. By assigning higher priority to the game process, you can ensure smoother gameplay, reduced stuttering, and improved frame rates. This is especially important for resource-intensive games that demand significant processing power to run seamlessly.
4. Resource Management: Some processes or applications may hog system resources unnecessarily, leading to a slowdown in other tasks. By adjusting CPU priority, you can limit the impact of such resource-intensive processes, ensuring that your computer remains responsive even when demanding applications are running.
5. Preventing System Freezes and Crashes: In certain scenarios, a misbehaving application or process can consume excessive CPU resources, causing the system to freeze or crash. By setting lower priority for problematic processes, you can reduce the chances of system instability and maintain a stable computing environment.
Overall, understanding and managing CPU priority allows you to optimize resource allocation on your computer, resulting in improved performance, enhanced multitasking capabilities, and an overall smoother user experience.
How to Set CPU Priority on Windows
Windows provides several methods to set CPU priority for processes. Here are a few ways you can adjust CPU priority on a Windows system:
1. Task Manager: The Task Manager is a built-in utility in Windows that allows you to monitor and manage running processes. To set CPU priority using Task Manager, right-click on the taskbar and select “Task Manager” from the context menu. In the Task Manager window, go to the “Details” or “Processes” tab (depending on your Windows version), right-click on the process you want to modify, hover over “Set Priority,” and choose the desired priority level.
2. Control Panel: The Control Panel offers another method to adjust CPU priority. Open the Control Panel by pressing the Windows key + X and selecting “Control Panel” from the menu. In the Control Panel, navigate to “System and Security” > “System” > “Advanced system settings.” Under the “Advanced” tab, click on the “Settings” button in the “Performance” section. In the Performance Options window, go to the “Advanced” tab and click on the “Change” button in the “Virtual memory” section. Uncheck the “Automatically manage paging file size for all drives” option, select the desired drive, and click on the “Custom size” radio button. Enter an initial and maximum size for the paging file and click “Set” to save the changes.
3. Command Prompt: You can also use the Command Prompt to adjust CPU priority. Open the Command Prompt by pressing the Windows key + X and selecting “Command Prompt” or “Command Prompt (Admin)” from the menu. In the Command Prompt window, type “wmic process where name=’process_name.exe’ CALL setpriority priority_level” and replace “process_name.exe” with the name of the process you want to modify and “priority_level” with the desired priority level (values range from 0 to 31, where 0 is lowest and 31 is highest).
4. Third-Party Software: There are also third-party software applications available that provide more advanced options for setting CPU priority. These tools often offer a user-friendly interface and additional features to manage CPU priority more efficiently.
It’s important to note that modifying CPU priority can have unintended consequences on system stability and performance, so it’s recommended to exercise caution and only make changes if necessary. Additionally, be aware that some processes may require administrative privileges to modify their priority. Always research and understand the implications before making any adjustments to CPU priority on your Windows system.
How to Set CPU Priority on Mac
Adjusting CPU priority on a Mac can help optimize performance and resource allocation for specific processes. Although macOS does not provide a native way to modify CPU priority directly, you can achieve similar results through alternative methods. Here’s how you can set CPU priority on a Mac:
1. Activity Monitor: Activity Monitor is a built-in utility on macOS that allows you to monitor and manage running processes. To access Activity Monitor, go to “Applications” > “Utilities” > “Activity Monitor” or use the Spotlight search by pressing Command + Space and typing “Activity Monitor.” In the Activity Monitor window, select the process you want to modify, click on the “Info” button (i) in the toolbar, and navigate to the “Inspector” tab. Under the “General” section, you can adjust the process’s priority by selecting a different value from the “Nice” dropdown menu (values range from -20 to 20, where lower values indicate higher priority).
2. Terminal: The Terminal app allows you to execute commands on a macOS system. To open Terminal, go to “Applications” > “Utilities” > “Terminal” or search for it using Spotlight. In the Terminal window, you can set CPU priority using the “nice” command followed by the process name. For example, type “sudo nice -n value process_name” to adjust the priority of a specific process. Replace “value” with the desired priority level (values range from -20 to 20), and “process_name” with the name of the process you want to modify. Note that using the “sudo” command may require administrator privileges.
3. Third-Party Software: There are also third-party applications available for Mac that offer more advanced options for managing CPU priority. These tools often provide a user-friendly interface and additional features to customize CPU performance and prioritize processes effectively. Research and choose a reputable application that suits your needs.
Before modifying CPU priority, it’s important to understand the potential impact on system stability and performance. Only make changes if necessary and consider the requirements of specific processes. Adjust CPU priority with caution and remember to research the implications beforehand to ensure a smooth and stable user experience on your Mac system.
How to Set CPU Priority on Linux
Linux provides several methods to adjust CPU priority for processes. Here are a few ways to set CPU priority on a Linux system:
1. Renice Command: The “renice” command allows you to change the priority of running processes on a Linux system. Open a terminal window and use the following syntax: “renice priority_level -p process_id” or “renice priority_level -g process_group”. Replace “priority_level” with the desired value (values range from -20 to 19, where lower values indicate higher priority). “process_id” represents the specific process ID, and “process_group” stands for the process group ID.
2. Top Command: The “top” command provides real-time monitoring of system processes and allows you to modify CPU priority. Open a terminal window and enter “top” to launch the “top” command interface. Press the “r” key to set the CPU priority for a particular process. Enter the process ID and the new priority level when prompted, and save the changes.
3. Nice and Renice Commands: The “nice” command is used to launch a new process with a modified priority, and the “renice” command is used to change the priority of an already running process. Open a terminal window and use the “nice” command followed by the desired priority level and the command you want to execute. For example, “nice -n priority_level command_to_execute”. To change the priority of an existing process, use the “renice” command with the appropriate options and parameters.
4. Cgroups: Control Groups, or Cgroups, is a feature in Linux that allows you to manage and allocate system resources, including CPU, to groups of processes. Cgroups provide more advanced control over CPU priority and resource allocation. However, configuring and managing Cgroups may require more in-depth knowledge of Linux administration and command line usage.
5. Process Priority in Task Manager: Some Linux desktop environments provide a graphical task manager application that allows you to modify CPU priority. These task managers often have a user-friendly interface where you can view and adjust the priority of running processes.
Linux offers various ways to manage CPU priority, from command-line tools to graphical interfaces. Depending on your level of expertise and specific requirements, you can choose the method that works best for your Linux distribution and environment.
Tips for Setting CPU Priority Efficiently
When adjusting CPU priority, it’s important to do so efficiently and with careful consideration to avoid any unintended consequences. Here are some tips to help you set CPU priority effectively:
1. Identify Critical Processes: Determine which processes are essential for your computer’s performance and prioritize them accordingly. This includes tasks such as system services, antivirus programs, or resource-intensive applications that you frequently use.
2. Understand Process Requirements: Different processes have varying resource requirements. Take the time to understand the needs of each process and allocate CPU resources accordingly. Resource-intensive tasks like gaming or video editing may require higher CPU priority, while background tasks can usually be assigned lower priority.
3. Monitor Resource Usage: Use system monitoring tools, such as Task Manager or Activity Monitor, to identify processes that consume significant CPU resources. By monitoring resource usage, you can better determine which processes may benefit from a priority adjustment.
4. Test and Observe: After setting CPU priority, observe how your system performs under different workloads. Pay attention to any performance improvements or potential issues that may arise. Adjust priorities as needed to optimize performance for your specific needs.
5. Consider Power Management: Some operating systems offer power management options that can affect CPU performance and priority. Balance your CPU priorities with power-saving settings to optimize energy efficiency without sacrificing performance.
6. Use Automation Tools: Consider using automation tools or scripts to automatically set CPU priority based on specific criteria or triggers. These tools can help streamline the process and ensure consistent optimization based on predefined conditions.
7. Be Mindful of System Stability: Modifying CPU priority can impact system stability if not done carefully. Avoid setting excessively high priorities for processes, as this can lead to increased resource contention and potential system crashes. Maintain a balance in priority settings to ensure stability while maximizing performance.
8. Regularly Update Software: Keeping your operating system and applications up to date can help optimize performance and address any known issues with CPU resource allocation. Regular updates can also introduce improvements in managing CPU priority.
By following these tips and understanding the specific needs of your system and processes, you can set CPU priority more efficiently and effectively, resulting in optimized performance and a smoother computing experience.
Conclusion
In conclusion, understanding and managing CPU priority can significantly impact the performance and responsiveness of your computer. By adjusting the CPU priority of processes, you can allocate resources more efficiently and ensure that critical tasks receive the necessary attention. This can result in improved system responsiveness, enhanced multitasking capabilities, and optimal performance for resource-intensive applications and games.
Whether you are using Windows, Mac, or Linux, there are various methods available to set CPU priority. Native tools like Task Manager, Activity Monitor, and command-line utilities allow you to modify priority levels, while third-party software offers more advanced options and user-friendly interfaces. It is important to exercise caution when adjusting CPU priority, as improper settings can lead to system instability or unintended consequences.
When setting CPU priority, it is essential to identify critical processes, understand their resource requirements, and monitor resource usage. Testing and observing the performance of your system under different workloads will help you determine the most efficient CPU priority settings. Additionally, considering power management options, using automation tools, and maintaining system stability are important factors to keep in mind.
Regularly updating your operating system and applications can also contribute to optimal CPU resource allocation. By staying up to date, you can benefit from performance enhancements and bug fixes related to CPU priority management.
In summary, understanding how to set CPU priority and utilizing the available methods to optimize resource allocation can greatly improve the performance and efficiency of your computer. By carefully managing CPU priority, you can ensure that critical processes receive the necessary attention while maintaining system stability and achieving a smoother computing experience.