Introduction
Welcome to the world of CPU affinity, where you have the power to fine-tune the performance of your computer’s processor. If you’re an avid user or a tech enthusiast, you may have come across the term “CPU affinity” before. But what exactly does it mean, and why is it important?
CPU affinity refers to the ability to control which processors or processor cores are assigned to run specific tasks or processes on your computer. By setting CPU affinity, you can determine which cores are used by certain applications or services, optimizing resource allocation and potentially improving overall performance.
Imagine your computer as a busy office, with multiple employees (processor cores). Each employee is capable of handling tasks simultaneously, but they may have different strengths and areas of expertise. By assigning specific tasks or processes to the most suitable employee (core), you can maximize efficiency and prevent bottlenecks.
Now, you might be wondering, why would you need to set CPU affinity in the first place? The answer lies in the multitasking nature of modern operating systems and applications.
Operating systems like Windows, macOS, and Linux are designed to manage multiple processes and applications running simultaneously. These processes compete for the limited resources provided by the CPU, such as processing power, cache, and memory bandwidth. Without proper CPU affinity management, tasks and processes can interfere with each other, leading to performance degradation and slowdowns.
What is CPU Affinity?
CPU affinity is a feature that allows you to control and define how your computer’s processor prioritizes and assigns tasks to its cores. It enables you to specify which cores are responsible for executing particular processes or applications, optimizing the distribution of workload and resources. By setting CPU affinity, you can ensure that critical tasks receive dedicated core resources, improving efficiency and performance.
When a program or process runs on your computer, the operating system typically decides which processor cores to utilize. This decision is based on various factors, including the load on each core, power saving settings, and the operating system’s scheduling algorithms.
With CPU affinity, you can override the default processor core assignments and fine-tune the distribution of workload. By assigning specific tasks to dedicated cores, you can prevent processor core conflicts and ensure that critical processes receive the attention they need, without interference from other tasks.
It’s important to note that CPU affinity operates on a per-thread level. A thread represents the smallest unit of execution within a program. In modern multitasking operating systems, programs and processes consist of multiple threads that can run concurrently on different processor cores.
CPU affinity can be beneficial in various scenarios. For instance, in gaming, you may want to allocate specific cores to the game process to minimize interruptions from background processes and ensure smooth gameplay. Similarly, in professional applications like video editing or 3D rendering, you can assign resource-intensive tasks to dedicated cores, maximizing performance and reducing processing time.
However, it’s worth mentioning that CPU affinity is not a universal solution for improving performance. The impact of CPU affinity varies based on the specific application or workload. Some applications are already optimized to distribute their workload efficiently across multiple cores, while others may not benefit significantly from CPU affinity settings.
Why Set CPU Affinity?
Setting CPU affinity can have several advantages and benefits for optimizing the performance and efficiency of your computer. Here are some key reasons why you might consider setting CPU affinity:
Resource Allocation: By assigning specific cores to particular processes or applications, you can ensure that critical tasks receive dedicated resources. This prevents resource contention and helps avoid performance degradation when multiple processes compete for the same resources.
Load Balancing: CPU affinity allows you to distribute the workload evenly across multiple cores. By spreading out tasks, you can take advantage of the full capacity of your processor and avoid overwhelming individual cores.
Reduced Interference: Background processes and system tasks can sometimes interfere with the performance of critical applications. By setting CPU affinity, you can isolate resource-intensive processes from other tasks, minimizing interruptions and maintaining smooth operation.
Improved Responsiveness: Setting CPU affinity for real-time or latency-sensitive applications ensures that they are not delayed or interrupted by other processes. This is particularly beneficial in scenarios where instant responsiveness is crucial, such as gaming or audio/video production.
Power Optimization: By assigning specific tasks to low-power cores or disabling certain cores altogether, you can conserve energy and extend battery life on laptops and mobile devices.
Diagnostic Purposes: CPU affinity can also be useful for troubleshooting and identifying performance issues. By monitoring the CPU usage of specific cores, you can pinpoint which processes or applications are consuming excessive resources and take necessary actions to optimize their performance.
It’s important to note that setting CPU affinity should be done judiciously. Not all applications or processes will benefit from custom affinity settings, and in some cases, it may even lead to decreased performance. It’s recommended to experiment with different settings, monitor system performance, and evaluate the impact before making permanent changes to CPU affinity configurations.
Understanding CPU Cores and Threads
Before delving further into CPU affinity, it’s essential to understand the concept of CPU cores and threads. A CPU (Central Processing Unit) is the brain of a computer, responsible for executing instructions and performing calculations. Each CPU can have one or more cores, with each core capable of executing tasks independently.
A CPU core can be thought of as a separate processing unit within the CPU. It consists of an arithmetic logic unit (ALU) and a control unit, allowing it to perform calculations and execute instructions. The more CPU cores a processor has, the more tasks it can handle simultaneously.
In addition to cores, modern CPUs often utilize a feature called multithreading to further enhance performance. Multithreading allows a single core to handle multiple tasks simultaneously by leveraging virtual cores, known as threads.
A thread is a sequence of instructions that a CPU executes. In a single-threaded application, one thread runs on one core at a time, while in a multi-threaded application, multiple threads can run concurrently on different cores or through thread scheduling techniques like hyper-threading.
Hyper-threading, a technology developed by Intel, simulates additional threads to improve CPU utilization. It allows a single physical core to execute instructions as if it were two logical cores, effectively doubling the number of threads a processor can handle.
Understanding CPU cores and threads is crucial when setting CPU affinity. When you assign CPU affinity to a process or application, you are specifying which cores or threads should be used to execute that particular task. By leveraging the available cores and threads effectively, you can optimize performance and ensure that critical processes receive the necessary resources.
It’s worth noting that the number of CPU cores and threads available depends on the specific processor model and architecture. Different CPUs may have varying core/thread configurations, so it’s essential to consult the technical specifications of your specific CPU to understand its capabilities.
How to View CPU Affinity
Before you can set CPU affinity for specific processes or applications, it’s important to understand how to view the current CPU affinity settings on your operating system. Here’s how you can do it:
In Windows:
- Open the Task Manager by pressing Ctrl + Shift + Esc or by right-clicking on the taskbar and selecting Task Manager.
- Navigate to the Processes or Details tab, depending on the version of Windows you’re using. In the Details tab, you may need to right-click on the column header and enable the Affinity column.
- Look for the processes or applications you’re interested in and examine their respective CPU affinity settings. The affinity is typically displayed as a series of checkmarks, each corresponding to a CPU core that the process can run on.
In macOS:
- Open the Activity Monitor application. You can find it by navigating to Applications > Utilities > Activity Monitor.
- Switch to the CPU tab.
- Look for the processes or applications you want to inspect and examine their Affinity or Processor settings. Similar to Windows, it will show which CPU cores the process is allowed to utilize.
In Linux:
- Open the Terminal application.
- Use the top or htop command to display the active processes and their CPU affinity.
- Look for the specific process you want to analyze and observe the CPU affinity settings. It is typically displayed as a list of CPU cores.
By viewing the CPU affinity settings, you can gather valuable information about how processes and applications are currently utilizing your CPU cores. This knowledge will come in handy when you want to set or modify CPU affinity for specific tasks to optimize performance and resource allocation.
Setting CPU Affinity in Windows
In Windows, you can set CPU affinity for processes or applications using the Task Manager. Follow these steps:
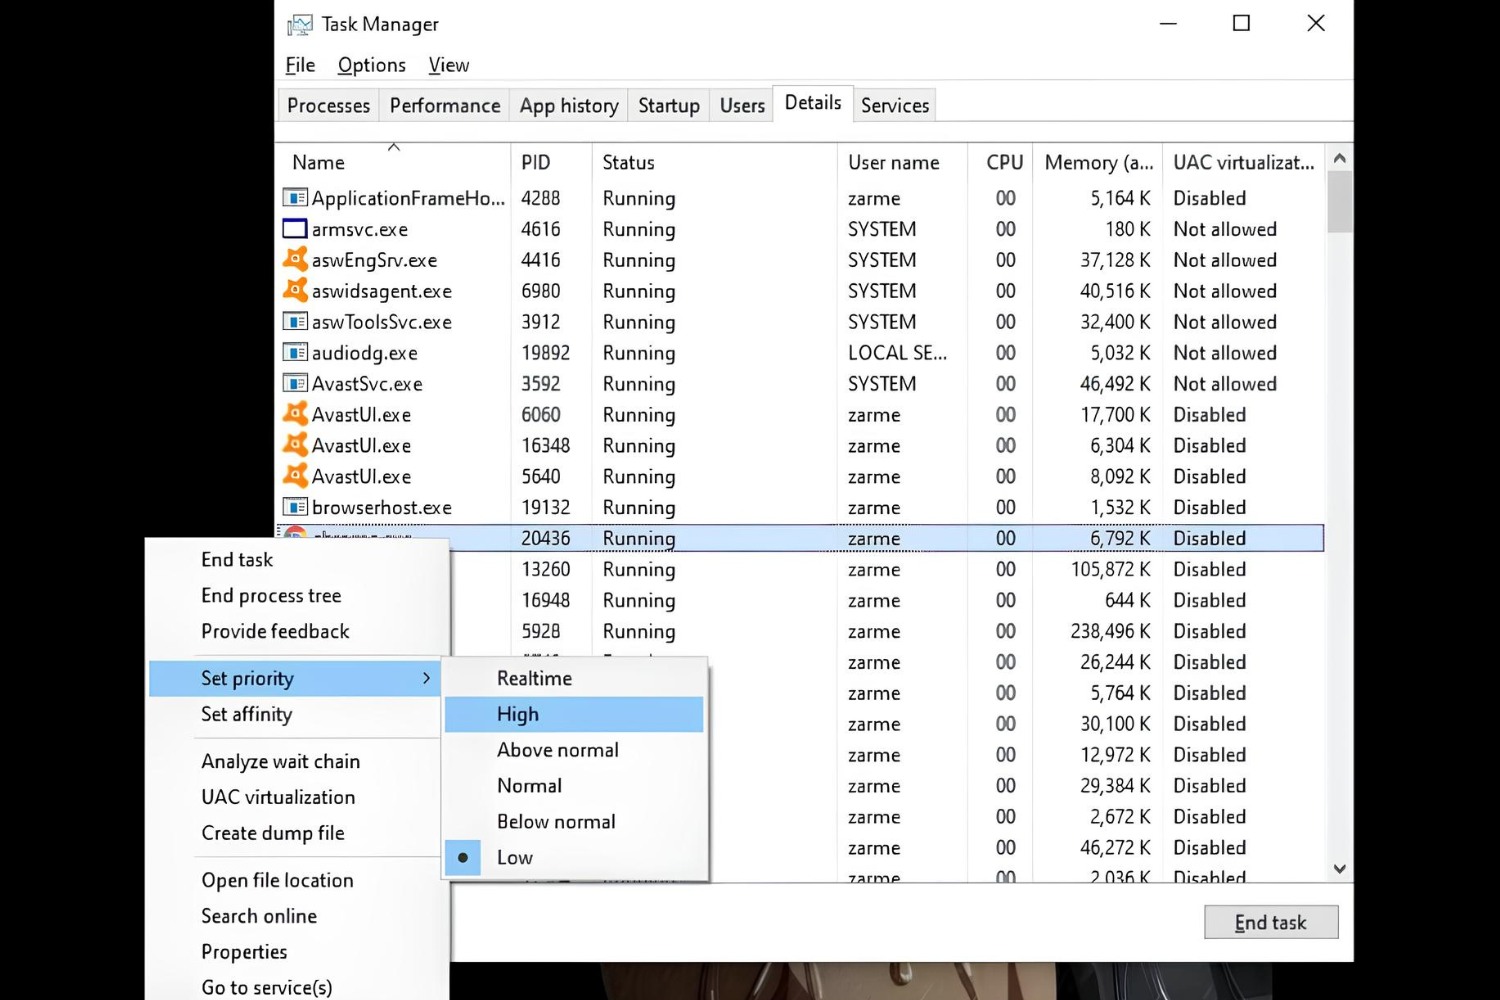
- Open the Task Manager by pressing Ctrl + Shift + Esc or by right-clicking on the taskbar and selecting Task Manager.
- Navigate to the Processes or Details tab, depending on the version of Windows you’re using.
- Locate the process or application you want to modify CPU affinity for.
- Right-click on the desired process and select Set Affinity.
- A dialog box will appear, displaying a list of available CPU cores.
- Check or uncheck the boxes next to the CPU cores you want to allow or disallow for the process. You can select multiple cores or a single core, depending on your requirements.
- Click OK to save the changes.
The process you modify CPU affinity for will now be restricted to the selected CPU cores. This can help optimize performance by ensuring that the process has exclusive access to the specified cores, minimizing interference from other processes.
It’s important to note that modifying CPU affinity settings should be done with caution. Incorrectly setting CPU affinity or assigning too many processes to specific cores can lead to imbalances and potentially degrade performance. It’s recommended to monitor system performance after making changes to CPU affinity and adjust settings as needed.
Additionally, keep in mind that CPU affinity settings are not persistent. They are specific to the instance of the process or application you modify. If you close the application or restart your computer, the CPU affinity settings will reset to default. To make permanent changes to CPU affinity, you may need to explore other methods or utilize third-party tools.
Overall, setting CPU affinity in Windows is a useful tool for fine-tuning performance and resource allocation. By assigning specific CPU cores to processes, you can ensure efficient utilization of your CPU and potentially optimize the performance of critical tasks.
Setting CPU Affinity in macOS
In macOS, you can modify CPU affinity for processes or applications using the built-in Activity Monitor. Here’s how you can do it:
- Open the Applications folder, then go to Utilities and launch the Activity Monitor application.
- In the Activity Monitor window, navigate to the CPU tab.
- Locate the process or application for which you want to adjust CPU affinity.
- Right-click on the process and hover over Set Affinity.
- A menu will appear, displaying a list of available CPU cores.
- Click on the CPU cores you want to allocate to the process. You can select multiple cores.
- Click Done to save the changes.
The process or application will now be restricted to the selected CPU cores, optimizing performance by ensuring dedicated resources. This helps prevent interference from other processes and can improve efficiency.
It’s important to note that modifying CPU affinity in macOS requires administrative privileges. You may be prompted to enter your administrator password to make the necessary changes.
Keep in mind that the CPU affinity settings made through Activity Monitor are specific to the current instance of the process or application. If you close the process or restart your computer, the CPU affinity settings will revert to default. To set permanent CPU affinity or automate the process, you may need to explore third-party tools or utilize command-line options.
Remember to monitor system performance after modifying CPU affinity to ensure it delivers the desired outcome. Adjust the settings as needed to achieve optimal performance and resource allocation.
Setting CPU affinity in macOS gives you control over how processes utilize the available CPU cores, enabling you to allocate resources efficiently and potentially improve performance for critical tasks.
Setting CPU Affinity in Linux
In Linux, you have several options for setting CPU affinity for processes or applications. One common method is to use the taskset command-line tool. Follow these steps to set CPU affinity in Linux:
- Open the Terminal application.
- Run the command
taskset -p [cpu-list] [pid], replacing[cpu-list]with the list of CPU cores you want to assign to the process and[pid]with the Process ID (PID) of the target process. - The command will assign the specified CPU cores to the process. For example, if you want to assign CPU cores 0 and 1 to a process with PID 1234, you would run the command
taskset -p 0,1 1234. - You can also use the
taskset -c [cpu-list] [command]syntax to launch a new process with a specific CPU affinity.
Another option available in newer versions of the Linux kernel is to modify the CPU affinity of a running process using the sched_setaffinity system call. However, this method requires writing or modifying code and may not be as accessible for some users.
It’s important to note that setting CPU affinity in Linux typically requires administrative privileges. You may need to prepend the commands with sudo or run them as the root user.
CPU affinity settings made through the taskset command are specific to the instance of the process and do not persist across system reboots. To automate CPU affinity settings, you may need to explore other solutions such as modifying startup scripts or utilizing specialized tools.
To effectively set CPU affinity in Linux, it’s crucial to understand the available CPU cores on your system. You can use tools like lscpu or cat /proc/cpuinfo to gather information about your CPU cores before making any affinity modifications.
By setting CPU affinity in Linux, you can allocate specific CPU cores to processes or applications, optimizing resource usage and potentially improving performance for critical tasks.
Common Mistakes to Avoid
While setting CPU affinity can be a powerful tool for optimizing performance, it’s important to be aware of common mistakes that can hinder its effectiveness. Here are some common mistakes to avoid:
Assigning Too Many Processes to a Single Core: Allocating too many processes to a single CPU core can lead to congestion and hinder performance. It’s important to distribute the workload evenly across available cores to leverage the full capacity of your CPU.
Setting Inappropriate CPU Affinity: Before modifying CPU affinity, it’s crucial to understand the specific requirements of the process or application. Setting CPU affinity without a clear understanding of the task’s characteristics can result in suboptimal performance or even worsen system responsiveness.
Not Monitoring Performance Effects: After making changes to CPU affinity settings, it’s crucial to monitor system performance to assess the impact. Failing to analyze the effects of CPU affinity modifications can prevent you from identifying potential problems or achieving desired performance enhancements.
Overlooking CPU Core Utilization: Before modifying CPU affinity, it’s important to analyze CPU core utilization using tools like Task Manager or Activity Monitor. Understanding how your computer’s cores are currently utilized can help identify potential bottlenecks and guide your CPU affinity decisions.
Ignoring Application Optimizations: Some applications are already optimized to effectively utilize multiple CPU cores. Before setting CPU affinity, research whether the application automatically distributes workload across cores. Modifying affinity for such applications may not yield significant improvements and can even introduce unnecessary complexity.
Disabling Hyper-Threading without Consideration: While disabling hyper-threading may seem like an easy way to allocate dedicated resources to processes, it’s important to consider its impact carefully. Hyper-threading can provide performance benefits in certain scenarios, and disabling it without thorough analysis may result in diminished performance.
Modifying CPU Affinity Without Experimentation: Each system and workload is unique, so it’s essential to experiment and test different CPU affinity settings to find the most optimal configuration for your specific setup. Relying solely on general recommendations or assumptions may not lead to the best results.
By avoiding these common mistakes, you can maximize the effectiveness of CPU affinity modifications and optimize performance for your system and workload.
Tips for Optimizing CPU Affinity
Optimizing CPU affinity involves finding the right balance between different processes and cores to maximize system performance. Here are some tips to help you optimize your CPU affinity settings:
Analyze Workload: Understand the specific workload and requirements of your applications or processes. Identify resource-intensive tasks that would benefit from dedicated CPU cores and prioritize their CPU affinity settings accordingly.
Monitor System Performance: Continuously monitor system performance after modifying CPU affinity settings to evaluate the impact. Use tools like Task Manager, Activity Monitor, or performance monitoring utilities to assess CPU usage, core utilization, and overall system responsiveness.
Experiment with Different Configurations: Every system and workload is unique, and there is no one-size-fits-all CPU affinity configuration. Experiment with different core assignments and observe the performance results to find the optimal configuration for your specific setup.
Benchmark Applications: Use benchmarking tools to measure the performance of your applications or processes under different CPU affinity settings. This allows you to objectively compare the impact of different configurations and make informed decisions.
Consider NUMA Architectures: If your system utilizes a Non-Uniform Memory Access (NUMA) architecture, take into account the memory locality when setting CPU affinity. Assign processes to CPU cores that are closer to the memory they frequently access, reducing latency and improving performance.
Automate Affinity Settings: For processes that consistently require specific CPU affinity settings, consider automating the affinity configuration using system startup scripts or specialized tools. This ensures that the settings are applied consistently each time the process runs.
Keep Software and Drivers Up to Date: Stay current with software updates, including operating system patches, application updates, and driver updates. These updates often include performance optimizations and enhancements that can improve CPU affinity management.
Consider Task Scheduling Algorithms: Modern operating systems utilize complex task scheduling algorithms. Understanding how these algorithms work can help you make more informed decisions about CPU affinity settings and optimize task scheduling, especially in scenarios where real-time or latency-sensitive performance is critical.
Regularly Review and Refine: As your workload and system requirements evolve, regularly review and refine your CPU affinity settings. What worked well before may not be optimal for new applications or changes in workload patterns.
Remember, optimizing CPU affinity is an ongoing process. It requires constant evaluation, analysis, and adjustment to ensure the best performance for your specific system and workload.
Conclusion
CPU affinity is a powerful tool that allows you to control how your computer’s processor allocates resources to different processes and applications. By setting CPU affinity, you can optimize performance, enhance efficiency, and ensure critical tasks receive the necessary resources. However, it’s important to approach CPU affinity with careful consideration and avoid common mistakes that can hinder its effectiveness.
Understanding CPU cores, threads, and how they interact is crucial when setting CPU affinity. It allows you to make informed decisions about which cores to assign to specific processes and allocate resources effectively.
Whether you’re using Windows, macOS, or Linux, each operating system provides methods to view and modify CPU affinity settings. Familiarize yourself with the tools available, such as the Task Manager in Windows, Activity Monitor in macOS, or command-line utilities in Linux.
When modifying CPU affinity, it’s essential to monitor system performance, experiment with different configurations, and consider the specific requirements and workload of your applications. Keep in mind that CPU affinity settings may need adjustment over time as your workload changes and new applications are introduced.
It’s worth noting that while CPU affinity can potentially improve performance in certain scenarios, it may not always provide significant benefits. Some applications are already optimized to distribute workload efficiently across multiple cores, and modifying CPU affinity might not yield noticeable improvements. Therefore, it’s important to assess the impact of CPU affinity modifications and consider other performance optimization techniques when necessary.
In conclusion, CPU affinity is a valuable tool for fine-tuning the performance of your computer’s processor. By setting CPU affinity appropriately and avoiding common mistakes, you can optimize resource allocation, improve efficiency, and enhance the overall system performance for your specific workload.