Introduction
Allocating more RAM to a program can significantly improve its performance, especially when dealing with resource-intensive tasks or large datasets. RAM, or Random Access Memory, is a crucial component in any computer system, as it allows programs to store and access data quickly for efficient operation.
By increasing the allocated RAM for a program, you give it more room to work with, enabling it to handle more complex operations or process larger amounts of data without slowing down or crashing. This is particularly beneficial for programs such as video editing software, 3D rendering applications, and virtual machines, which require substantial memory resources to function optimally.
Understanding how to allocate more RAM to a program is important, as it empowers you to optimize the performance of specific applications according to your needs. In this article, we will explore different methods for adjusting the RAM allocation for programs on various operating systems, including Windows, Mac, and Linux.
Understanding RAM Allocation
Before diving into the process of allocating more RAM to a program, it’s crucial to have a clear understanding of how RAM allocation works. When you run a program on your computer, it requires a certain amount of memory to store and process data. This memory is allocated from the available RAM in your system.
RAM allocation can be considered as a dynamic process, where the operating system decides how much memory to assign to each program based on its needs and the overall system requirements. The operating system continuously manages and redistributes the available RAM among different programs to ensure efficient utilization and avoid system performance issues.
When a program is allocated insufficient RAM, it may experience slowdowns, crashes, or be unable to handle the workload effectively. On the other hand, allocating excessive RAM to a program does not necessarily result in better performance. It’s essential to strike a balance and allocate an appropriate amount of RAM based on the program’s requirements and the available resources.
To determine how much RAM a program needs, factors such as the program’s complexity, the amount of data it processes, and the workload it handles must be considered. Resource-intensive applications like video editing software, graphic design tools, and gaming applications generally require more RAM to function smoothly.
It’s worth noting that while allocating more RAM to a program can enhance its performance, it is not the ultimate solution for all performance issues. Other factors like CPU speed, storage performance, and software optimization also play significant roles in overall program performance.
In the next sections, we will explore different methods to check the available RAM and adjust the RAM allocation for a program on various operating systems, enabling you to optimize the performance of your favorite programs according to your needs.
Checking Available RAM
Before allocating more RAM to a program, it’s essential to determine the amount of available RAM in your system. Different operating systems provide various methods to check the available memory. Here are some ways to do it:
- Windows Operating System:
On Windows, you can check the available RAM using the Task Manager. To access the Task Manager, press Ctrl+Shift+Esc or right-click on the taskbar and select “Task Manager.” In the Task Manager window, go to the “Performance” tab and look for the “Memory” section. Here, you’ll find the total amount of installed RAM and the amount currently in use. The difference between the two represents the available RAM.
- Mac Operating System:
On a Mac, you can check the available RAM through the Activity Monitor. To open the Activity Monitor, go to “Finder,” navigate to “Applications,” then “Utilities,” and finally double-click on “Activity Monitor.” In the Activity Monitor window, select the “Memory” tab. Here, you’ll find information about your memory usage, including the total memory, memory used, and memory available.
- Linux Operating System:
On Linux, you can check the available RAM using the command-line tool “free.” Open a terminal and type “free -h” to display the memory information in a readable format. The “Mem” section provides details about the total memory, used memory, free memory, and available memory.
By checking the available RAM, you can have a better understanding of the resources you have to allocate to specific programs. This knowledge will help you make informed decisions when adjusting the RAM allocation to enhance the performance of your desired programs.
Changing RAM Allocation for a Program
Once you have assessed the available RAM on your system, you can proceed to adjust the RAM allocation for a specific program. The process varies depending on the operating system you are using. Here, we will explore methods for changing RAM allocation on the most common operating systems: Windows, Mac, and Linux.
- Windows Operating System:
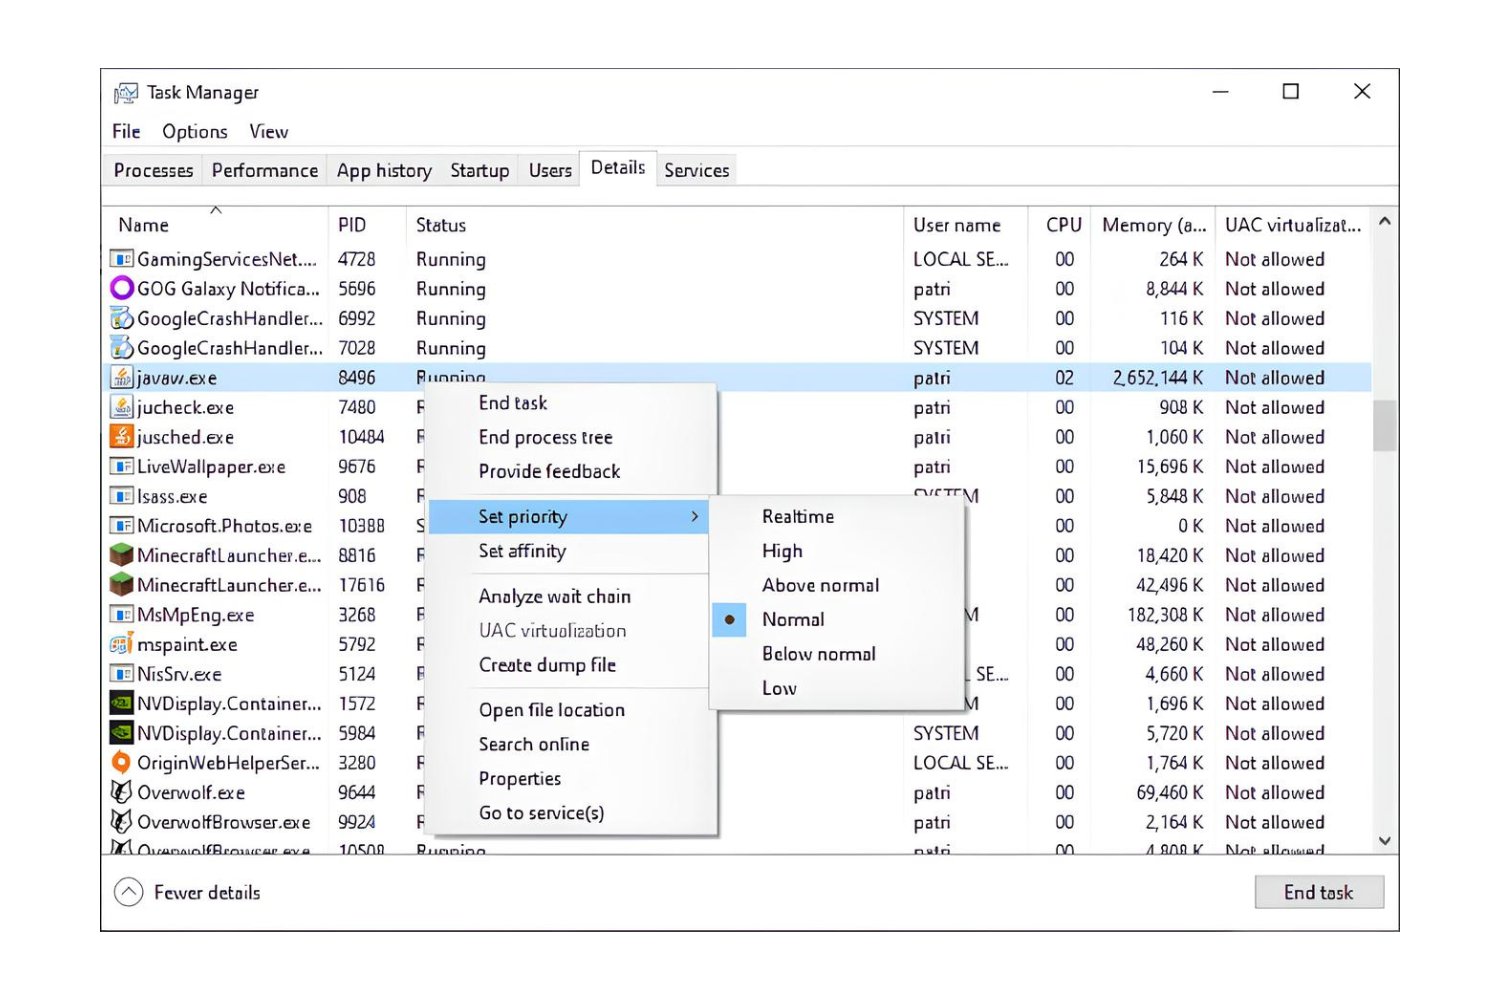
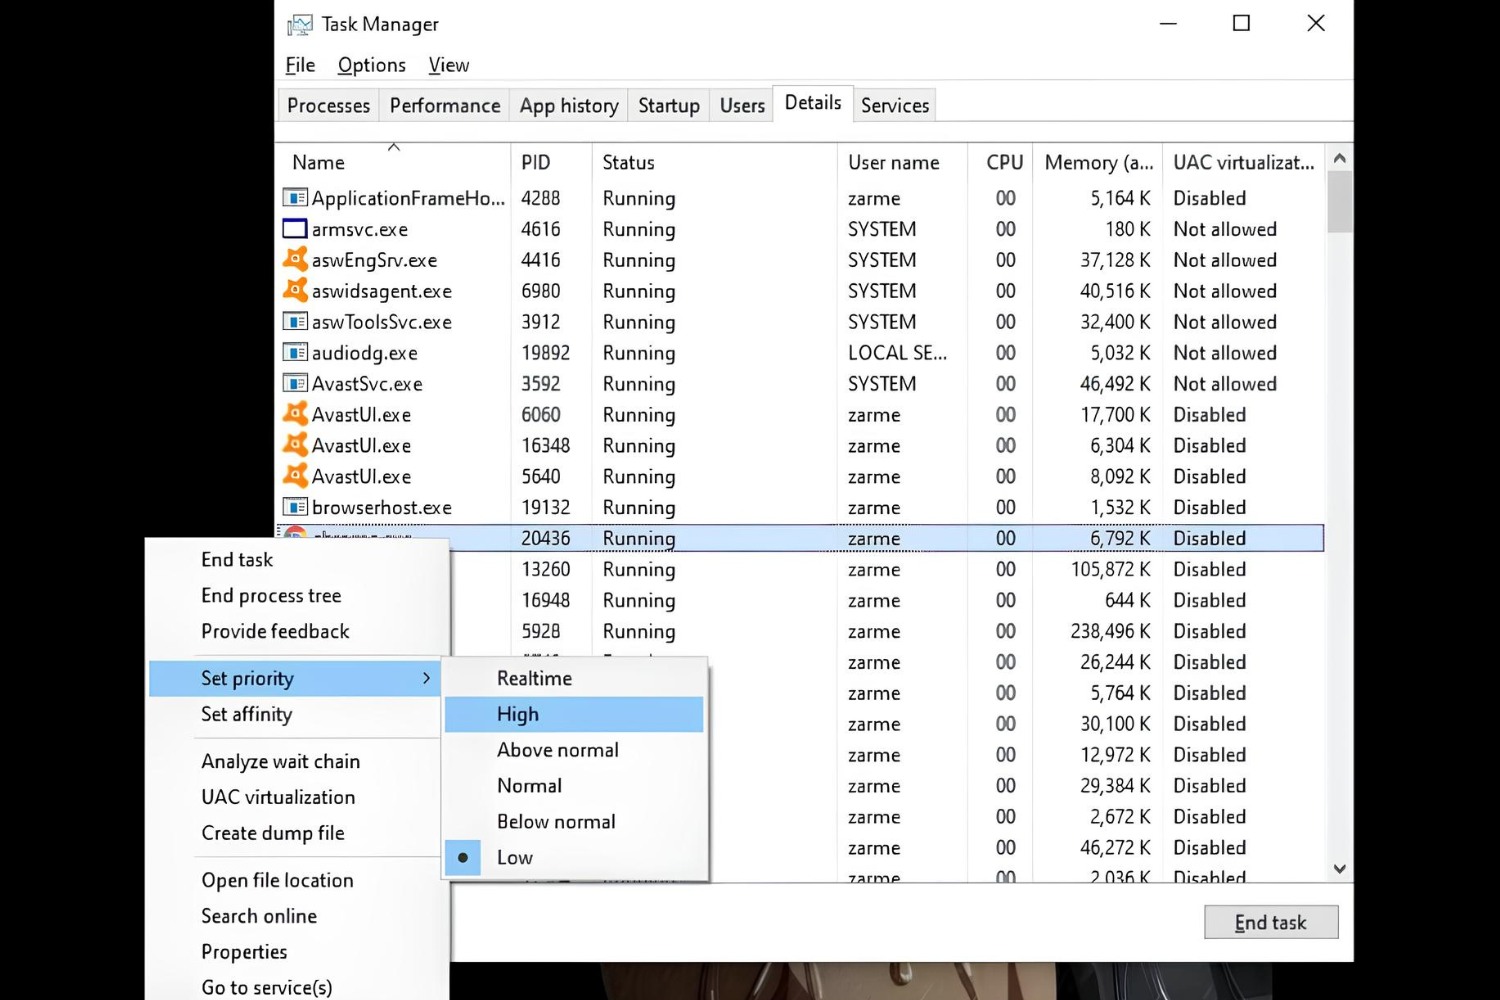
On Windows, you can change the RAM allocation for a program using either the Command Line Interface (CLI) or the Graphical User Interface (GUI) method. The CLI method involves using the “wmic” command to modify the program’s memory allocation. Open the Command Prompt by pressing Windows Key + R, then typing “cmd” and pressing Enter. In the Command Prompt, enter the command:
wmic process where name="program_name.exe" CALL setpriority "ProcessPriority"
Replace “program_name” with the name of the program you wish to modify, and “ProcessPriority” with the desired priority level (0-31).
For the GUI method, right-click on the program’s executable file or shortcut and select “Properties.” In the Properties window, go to the “Compatibility” tab and click on “Change high DPI settings.” Check the box that says “High DPI scaling override” and choose the desired option from the drop-down menu.
- Mac Operating System:
On a Mac, changing the RAM allocation for a program can be done using the “Activity Monitor” application. Open “Activity Monitor” from the “Applications/Utilities” folder. In the Activity Monitor window, find the program you want to modify and select it. Click on the “X” button in the toolbar and choose the “Quit Process” option. Relaunch the program, and the system will reallocate the RAM based on its needs.
- Linux Operating System:
On Linux, the RAM allocation for a program can be adjusted using the “taskset” command. Open a terminal and type “taskset -c -p
By adjusting the RAM allocation for a program, you can enhance its performance by providing it with the necessary resources to handle demanding tasks or large datasets. It’s important to note that altering RAM allocation should be done carefully, considering the overall system resources and the specific requirements of the program.
Windows Operating System
In the Windows operating system, there are several methods available to adjust the RAM allocation for a program. Here, we will explore two popular methods: the Command Line Interface (CLI) method and the Graphical User Interface (GUI) method.
The CLI method allows you to change the RAM allocation for a program using the Windows Management Instrumentation Command-line (WMIC) utility. To adjust the RAM allocation through the CLI, follow these steps:
- Open the Command Prompt by pressing the Windows key + R, typing “cmd”, and pressing Enter.
- In the Command Prompt, type the following command, replacing “program_name” with the name of the program you want to modify and “ProcessPriority” with the desired priority level (0-31):
wmic process where name="program_name.exe" CALL setpriority "ProcessPriority" - Press Enter to execute the command.
This command adjusts the priority and memory allocation for the specified program.
The GUI method, on the other hand, provides a more user-friendly interface for adjusting RAM allocation. To modify the RAM allocation for a program through the GUI, follow these steps:
- Find the executable file or shortcut of the program you want to modify.
- Right-click on the file or shortcut and select “Properties” from the drop-down menu.
- In the Properties window, navigate to the “Compatibility” tab.
- Click on the “Change high DPI settings” button.
- Check the box that says “Override high DPI scaling behavior” and choose the desired option from the drop-down menu.
- Click Apply and then OK to save the changes.
By adjusting the RAM allocation for a program on Windows, you can allocate more memory resources to it and potentially improve its performance, especially when dealing with resource-intensive tasks or large datasets. Before making any changes, it is important to consider the available system resources and the specific requirements of the program to ensure optimal performance and stability.
Mac Operating System
In the Mac operating system, adjusting the RAM allocation for a program can help improve its performance. Fortunately, macOS provides a straightforward method to achieve this. Here’s how you can change the RAM allocation for a program on a Mac:
- Open the “Finder” and navigate to the “Applications” folder.
- Locate and open the “Utilities” folder.
- Double-click on the “Activity Monitor” application to launch it.
- In the Activity Monitor window, you’ll see a list of running processes and programs.
- Select the program you want to modify.
- Click on the “X” button in the toolbar, and a drop-down menu will appear.
- Choose the “Quit Process” option to quit the selected program.
- Relaunch the program, and macOS will reallocate the RAM based on its needs.
By quitting the program and relaunching it, macOS will automatically adjust the RAM allocation based on the program’s demands and the availability of system resources. This method allows macOS to effectively allocate memory to the program to ensure optimal performance.
It’s worth noting that macOS is designed to manage memory allocation efficiently, so manually adjusting RAM allocation is not always necessary. However, in some cases, it can be beneficial, especially for resource-intensive programs or tasks that require a significant amount of memory.
When adjusting the RAM allocation for a program on a Mac, it’s crucial to consider the overall system resources and the specific requirements of the program. Allocating too much or too little RAM can impact system stability and performance. Therefore, it’s recommended to monitor the program’s performance after making any changes to ensure it aligns with your expectations.
Linux Operating System
Linux offers great flexibility and control when it comes to adjusting the RAM allocation for a program. There are several methods available, including both command-line and graphical user interface options. Let’s explore how you can change the RAM allocation for a program on a Linux operating system.
One common method to adjust RAM allocation on Linux is by using the “taskset” command. Follow these steps to modify the RAM allocation for a program:
- Open a terminal by pressing Ctrl+Alt+T or searching for “Terminal” in the application launcher.
- Type the command “taskset -c -p
“. Replace “ ” with the desired core number and “ ” with the ID of the program’s process. - Press Enter to execute the command.
This command sets the affinity of the specified program to the specified CPU core, effectively allocating RAM to it. This method provides fine-grained control over RAM allocation on a per-program basis.
In addition to the command-line approach, some Linux distributions also offer graphical tools to adjust RAM allocation. These tools provide a user-friendly interface for managing system resources. However, the availability and features of graphical tools may vary depending on your Linux distribution and desktop environment.
It’s important to note that adjusting RAM allocation on Linux requires careful consideration of system resources and the specific requirements of the program. Allocating too much memory to a program can cause unnecessary resource consumption, while allocating too little memory can result in performance degradation. Monitoring the program’s performance after making changes is essential to ensure optimal results.
Linux provides the flexibility and control needed to fine-tune RAM allocation, allowing you to optimize the performance of your programs according to their specific memory requirements. By carefully managing RAM allocation, you can enhance the performance of resource-intensive programs and ensure efficient system resource utilization.
Command Line Interface Method
The Command Line Interface (CLI) method is a powerful way to adjust the RAM allocation for a program, offering granular control over system resources. It allows you to modify the RAM allocation for a program by executing specific commands in the terminal. Here’s how you can use the CLI method to change the RAM allocation on various operating systems.
- Windows Operating System:
On Windows, you can use the Windows Management Instrumentation Command-line (WMIC) utility to adjust RAM allocation. Open the Command Prompt by pressing the Windows key + R, then typing “cmd” and pressing Enter. In the Command Prompt, enter the following command, replacing “program_name” with the name of the program you wish to modify and “ProcessPriority” with the desired priority level (0-31):
wmic process where name="program_name.exe" CALL setpriority "ProcessPriority"
This command modifies the priority and memory allocation for the specified program.
- Mac and Linux Operating Systems:
On Mac and Linux, you can use the “taskset” command to adjust RAM allocation. Open a terminal and type “taskset -c -p
It’s important to note that using the CLI method requires a basic understanding of command-line interfaces and system processes. Manipulating system resources through the command line should be done with caution, as improper modifications can result in instability or undesirable consequences. It is recommended to research and understand the command’s syntax and its effects before executing it.
The CLI method provides extensive control over RAM allocation, allowing you to tailor the memory resources for specific programs. However, it requires manual intervention and may not be ideal for casual users. For a more user-friendly approach, graphical user interface (GUI) methods are available, which provide easier accessibility and visualization of RAM allocation settings.
Using the CLI method, you can fine-tune the RAM allocation for programs on various operating systems, optimizing system resources and enhancing the performance of resource-intensive tasks.
Graphical User Interface Method
The Graphical User Interface (GUI) method provides a user-friendly approach to adjusting RAM allocation for a program. It offers a visual interface, making it easier for users to modify system resources without the need for complex command-line operations. Here’s how you can use the GUI method to change RAM allocation on various operating systems.
- Windows Operating System:
On Windows, you can change the RAM allocation for a program through the program’s properties. Right-click on the executable file or shortcut of the program you want to modify and select “Properties” from the drop-down menu. In the Properties window, navigate to the “Compatibility” tab. Click on the “Change high DPI settings” button. Check the box that says “Override high DPI scaling behavior,” and choose the desired option from the drop-down menu. Click Apply and then OK to save the changes. This method allows you to specify the high DPI scaling behavior, indirectly influencing the RAM allocation.
- Mac Operating System:
On a Mac, adjusting RAM allocation through GUI involves quitting and relaunching the program. Open the “Finder” and navigate to the “Applications” folder. Locate the “Utilities” folder and double-click on the “Activity Monitor” application to launch it. In the Activity Monitor window, find the program you want to modify and select it. Click on the “X” button in the toolbar, and a drop-down menu will appear. Choose the “Quit Process” option to quit the selected program. Relaunch the program, and macOS will reallocate the RAM based on its needs.
- Linux Operating System:
On Linux, graphical tools for adjusting RAM allocation may vary depending on the distribution and desktop environment you are using. One commonly used tool is the System Monitor. You can typically access it from the Applications menu or the system tray. In the System Monitor, navigate to the processes or resource section, locate the program you wish to modify, and adjust the priority or affinity settings accordingly. These changes will indirectly affect the RAM allocation for the program.
The GUI method simplifies the process of adjusting RAM allocation by providing a visual interface. It is particularly useful for users who are not familiar with command-line operations or prefer a more intuitive approach. However, it’s important to note that the available options may vary depending on the operating system and the specific program’s settings.
By utilizing the GUI method, you can easily modify the RAM allocation for specific programs, allowing you to optimize system resources and enhance performance without the need for complex command-line operations.
Recommendations and Considerations
When adjusting the RAM allocation for a program, there are several recommendations and considerations to keep in mind. These will help ensure optimal performance and stability of both the program and the overall system. Here are some important factors to consider:
- Program Requirements: Take into account the specific requirements of the program you are adjusting the RAM allocation for. Resource-intensive applications like video editing software or virtual machines may require a significant amount of RAM to function efficiently. Research the program’s recommendations or consult its documentation for guidance on suitable RAM allocation.
- System Resources: Consider the available resources on your system when allocating RAM to a program. Avoid allocating too much RAM, as it may lead to unnecessary memory consumption and potential resource contention with other programs. Conversely, allocating too little RAM may result in performance degradation or even program instability.
- Monitor Performance: After adjusting the RAM allocation, pay attention to the performance of the program. Monitor its memory usage, responsiveness, and overall system stability. If you notice any negative impacts or unexpected behaviors, revisit the RAM allocation and make necessary adjustments.
- Balance Resources: RAM allocation is just one aspect of optimizing program performance. Take into account other system resources like CPU, storage, and network bandwidth. Strive for a balanced allocation of resources to ensure that all components work harmoniously together.
- Virtual Memory Management: Remember that the operating system also manages virtual memory, which uses hard disk space as additional memory when needed. Adjusting the RAM allocation will impact how the system uses virtual memory. Be aware of this and understand the trade-offs between physical RAM and virtual memory performance.
- Operating System Limitations: Different operating systems have their own limitations and mechanisms for managing RAM allocation. Familiarize yourself with the specific limits and restrictions imposed by your operating system to avoid exceeding them or compromising system stability.
It’s important to approach the RAM allocation process with caution and always consider the specific needs of your programs and system. Making informed decisions based on program requirements, system resources, and careful monitoring will ensure effective utilization of memory resources while maintaining overall system performance and stability.
Conclusion
Allocating more RAM to a program can be a valuable strategy to optimize its performance, especially in resource-intensive tasks or when dealing with large datasets. By providing a program with sufficient memory resources, you can enhance its ability to handle complex operations and improve overall efficiency.
Throughout this article, we explored different methods for adjusting RAM allocation on various operating systems. Whether using the Command Line Interface (CLI) or the Graphical User Interface (GUI), each method offers flexibility and control over how system resources are allocated.
On Windows, the CLI method using the WMIC utility or the GUI method through program properties allows users to modify RAM allocation based on each program’s needs. Mac users can modify RAM allocation through the GUI method by quitting and relaunching the program. Linux users have the flexibility of command-line tools like “taskset” or graphical tools like system monitors to adjust RAM allocation.
When modifying RAM allocation, it is crucial to consider factors such as program requirements, available system resources, and monitoring the program’s performance after making changes. Striving for a balanced allocation of resources and taking into account other system components like CPU and storage can further optimize overall performance.
Lastly, it’s important to approach RAM allocation adjustments with caution and understand the limitations and mechanisms of the operating system being used. Adhering to recommended practices and being mindful of the trade-offs between physical RAM and virtual memory will help maintain stability and optimal system performance.
Ultimately, by intelligently allocating more RAM to programs, you can unlock their full potential and ensure smooth and efficient operation. Experiment with different strategies, monitor performance, and fine-tune the allocation as needed to maximize the productivity and effectiveness of your favorite applications.