Introduction
Adding subtitles to videos has become increasingly popular in today’s digital age. Whether you’re a content creator, filmmaker, or simply someone who enjoys creating videos, adding subtitles can greatly enhance the accessibility and overall viewing experience of your content. Subtitles allow viewers to follow along with the dialogue, making it easier for those who are hearing impaired, speak a different language, or prefer to watch videos without sound.
Capcut, a widely-used video editing software, offers a straightforward and user-friendly way to add subtitles to your videos. With its intuitive interface and powerful editing capabilities, you can create professional-looking videos with accurate and visually appealing subtitles. In this article, we will guide you through the step-by-step process of adding subtitles using Capcut, from opening the software to exporting your final video.
Whether you’re adding subtitles to a vlog, promotional video, or tutorial, Capcut makes it easy to ensure that your message reaches a wider audience. By providing clear and concise subtitles, you can effectively communicate with viewers from various backgrounds and engage with a larger audience.
In the following sections, we will walk you through the process of opening Capcut and starting a new project, importing your video file, adding subtitles, adjusting the timing, formatting the subtitles, customizing their appearance, adding multiple sets of subtitles, and finally exporting your video with subtitles.
How to Open Capcut and Start a New Project
Before you can start adding subtitles to your videos using Capcut, you’ll need to open the software and create a new project. Follow these simple steps to get started:
- Launch the Capcut app on your device. If you don’t have it already, you can download it from the App Store (iOS) or Google Play Store (Android).
- Once the app is open, you’ll be greeted with the Capcut logo and a variety of video editing options. Tap on the “Create” button to begin a new project.
- Next, you’ll be prompted to select the aspect ratio for your video. Capcut offers a range of options, including square (1:1), landscape (16:9), and vertical (9:16), to suit different platforms and purposes. Choose the aspect ratio that best fits your video’s intended use and tap on it.
- After selecting the aspect ratio, you’ll be taken to the project editor screen. Here, you’ll find a variety of video editing tools and features.
- To import your video file, tap on the plus (+) icon at the bottom of the screen. This will bring up the media library, where you can access videos from your device’s gallery or cloud storage.
- Navigate to the location of your video file and tap on it to select it. Capcut will then import the video into your project, and you’ll see a thumbnail of it in the timeline.
- Now that you have opened Capcut and started a new project, you’re ready to begin adding subtitles to your video. Continue reading to learn how to add subtitles using Capcut’s easy-to-use features.
Remember, opening Capcut and starting a new project is the first step towards enhancing your videos with subtitles. By following these steps, you’ll have a blank canvas ready for you to unleash your creativity and make your videos more accessible to a wider audience.
Importing Your Video File into Capcut
Once you have opened Capcut and started a new project, the next step is to import your video file. Capcut provides a convenient way to access your videos and bring them into your project. Follow these steps to import your video file:
- On the project editing screen, locate the timeline at the bottom. This is where you’ll be working with your video and subtitles.
- Tap on the plus (+) icon at the bottom of the screen to open the media library.
- In the media library, you can choose to import a video from your device’s gallery or cloud storage. Navigate to the desired location and select your video file.
- Once you have selected your video, Capcut will begin importing it into your project. The duration of the import process will depend on the size and length of your video file.
- After the import is complete, you will see a thumbnail of your video in the timeline.
By importing your video file into Capcut, you have successfully prepared your project for adding subtitles. Now, you can move on to the next step and start adding engaging and informative subtitles to your video.
It’s worth noting that Capcut supports a wide range of video formats, so you can import videos in various file types without worrying about compatibility issues. Whether your video is in MP4, MOV, WMV, or any other commonly used format, Capcut has got you covered.
With your video imported into Capcut, you’re one step closer to creating captivating videos with subtitles. Continue reading to learn how to add subtitles to your video in just a few simple steps.
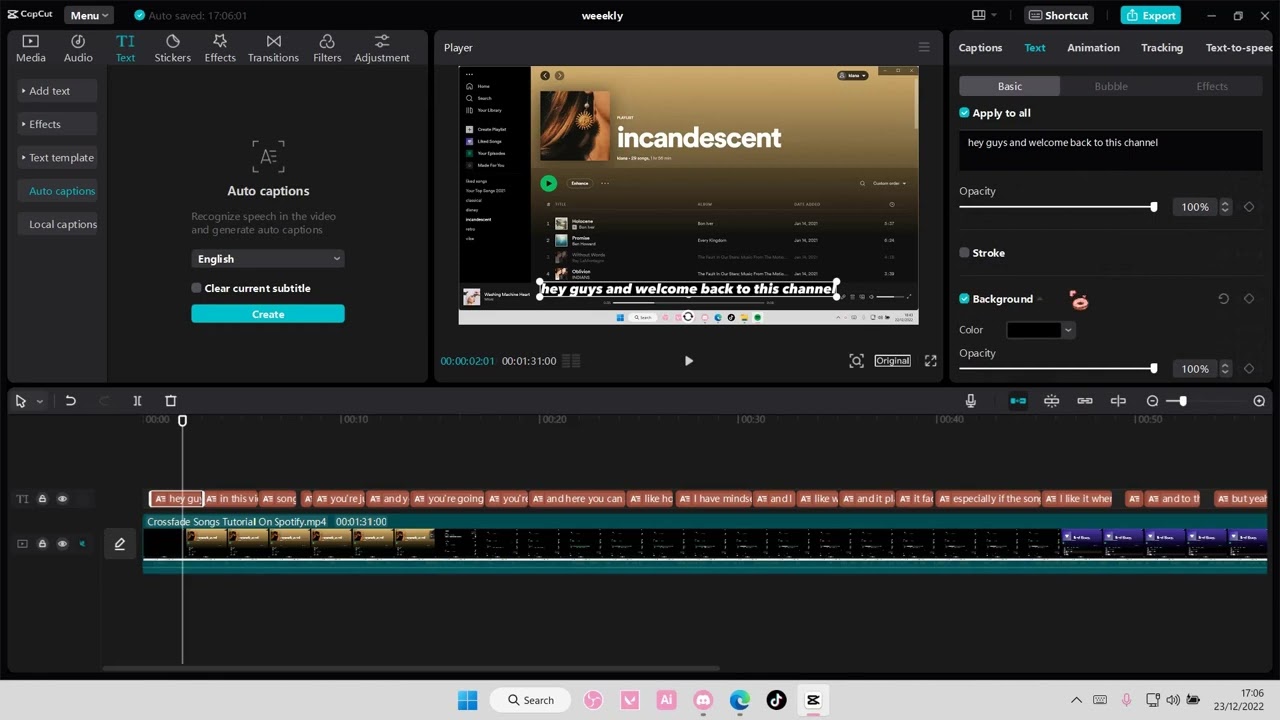
Adding Subtitles to Your Video
Now that you have imported your video file into Capcut, it’s time to add subtitles and make your content more accessible. Capcut offers a user-friendly interface and a variety of tools to help you seamlessly integrate subtitles into your video. Follow these steps to add subtitles:
- Make sure you’re on the project editing screen, with your video file displayed in the timeline.
- Below the video preview, you’ll find a toolbar with different editing options. Tap on the “Subtitle” icon, which looks like a speech bubble, to access the subtitle editing features.
- In the subtitle editing panel, you’ll see a text box where you can input your subtitles. Tap on it to start typing your desired subtitle.
- As you type, the subtitle will appear on the video preview, positioned at the bottom by default.
- Continue adding your subtitles, segmenting them based on the timing and content of the dialogue.
- You can also customize the font size, style, and color of your subtitles to enhance their visibility and aesthetics. Simply tap on the “Text Style” option to access these settings.
- If needed, you can adjust the duration of each subtitle by dragging the handles on the timeline or by using the precise time controls available.
- Repeat the process to add the desired number of subtitles throughout your video.
By adding subtitles to your video using Capcut’s intuitive editing tools, you are not only improving accessibility but also enhancing the viewer’s engagement and understanding. Subtitles can convey important information, emphasize key points, and create a more immersive experience for your audience.
Now that you have successfully added subtitles to your video, it’s time to fine-tune the timing and formatting to ensure that your subtitles are perfectly synchronized and visually pleasing. Continue reading to learn how to adjust the subtitles’ timing and format them according to your preferences.
Adjusting the Subtitles’ Timing
After adding subtitles to your video in Capcut, it’s crucial to ensure that they are properly synchronized with the audio and appear at the right moments. Capcut offers convenient tools to help you adjust and fine-tune the timing of your subtitles. Follow these steps to adjust the subtitles’ timing:
- Make sure you’re on the project editing screen with your video and subtitles displayed in the timeline.
- Tap on the subtitle you want to adjust to select it. You’ll notice the subtitle becomes highlighted, indicating that it’s selected.
- Drag the subtitle left or right along the timeline to adjust its starting point. This will determine when the subtitle appears in relation to the video’s audio.
- If needed, you can also adjust the duration of the subtitle by dragging the handles on the subtitle itself or by using the precise time controls available.
- Continue adjusting the timing of each subtitle to ensure that they appear and disappear at the most appropriate moments.
- To further refine the timing, you can use the playback controls in Capcut to preview your video and subtitles in real-time. This will help you identify any discrepancies or areas that require fine-tuning.
By taking the time to adjust the timing of your subtitles in Capcut, you can ensure that viewers can easily follow along with the dialogue and fully understand the content of your video. Properly synchronized subtitles enhance the viewing experience and make it easier for different audiences to engage with your video.
Now that you have fine-tuned the timing of your subtitles, you can move on to the next step and explore the different formatting options available in Capcut. Formatting your subtitles not only improves their readability but also adds a creative touch to your video. Continue reading to learn how to format your subtitles to make them visually appealing.
Formatting the Subtitles
Formatting your subtitles can greatly enhance their readability and make your video more visually appealing. Capcut offers a range of formatting options that allow you to customize the appearance of your subtitles. Here’s how you can format your subtitles in Capcut:
- Ensure you’re on the project editing screen with your video and subtitles displayed in the timeline.
- Select the subtitle you want to format by tapping on it. You’ll see various formatting options appear on the screen.
- To change the font style of your subtitles, tap on the “Text Style” option. Here, you can choose from a variety of fonts available in Capcut and select the one that best suits your video’s style.
- Next, you can adjust the font size of your subtitles by tapping on the “Font Size” option. Use the slider to increase or decrease the size of the subtitles according to your preference.
- If you want to add emphasis or highlight specific words or phrases, you can change the color of your subtitles. Tap on the “Font Color” option and select the desired color from the available palette.
- Capcut also allows you to apply a background or outline to your subtitles for better visibility. Simply tap on the “Background” or “Outline” options and choose the appropriate settings.
- Repeat these steps to format each subtitle in your video according to your desired style.
By formatting your subtitles in Capcut, you can add a personal touch to your video and ensure that the subtitles are clear, easy to read, and complement the overall visual aesthetic. The right combination of font style, size, color, and other formatting options can greatly enhance the viewer’s experience and make your video more engaging.
Now that you have formatted your subtitles, it’s time to explore how you can add multiple sets of subtitles to your video in Capcut. Adding multiple sets of subtitles can be particularly useful when targeting audiences who speak different languages or have diverse needs. Continue reading to learn how to add multiple sets of subtitles in Capcut.
Customizing the Subtitles’ Appearance
Capcut allows you to customize the appearance of your subtitles, giving you full creative control over how they look and feel in your video. By customizing the subtitles’ appearance, you can create a cohesive and visually captivating video experience. Here’s how you can customize the appearance of your subtitles in Capcut:
- Ensure you’re on the project editing screen with your video and subtitles displayed in the timeline.
- Select the subtitle you want to customize by tapping on it. This will open a toolbar with various customization options.
- Tap on the “Edit” icon, which resembles a pencil, to access the editing menu for the selected subtitle.
- In the editing menu, you’ll have the option to change the position and alignment of the subtitle. You can choose to position the subtitle at the top, bottom, or center of the video, as well as adjust its horizontal alignment.
- If you want to give your subtitles a unique style, you can apply animations or effects to them. Tap on the “Animation” option and explore the diverse range of animation presets available in Capcut.
- Capcut also offers the option to add a background or border to your subtitles. Tap on the “Background” or “Border” option to experiment with different settings and make your subtitles stand out.
- Additionally, you have the freedom to adjust the transparency or opacity of your subtitles. This can be useful if you want to overlay the subtitles on top of other visuals in your video.
- Continue customizing the appearance of each subtitle in your video, experimenting with different styles and effects.
By customizing the appearance of your subtitles in Capcut, you can create a visually stunning video that captures viewers’ attention and enhances their overall experience. Remember to strike a balance between style and readability to ensure that your subtitles are clear and accessible to your audience.
Now that you have customized the appearance of your subtitles, you’re ready to explore adding multiple sets of subtitles in Capcut. This feature can be beneficial when targeting diverse audiences or catering to different language preferences. Read on to learn how to add multiple sets of subtitles to your video.
Adding Multiple Sets of Subtitles
Capcut offers the flexibility to add multiple sets of subtitles to your video, allowing you to cater to a diverse audience or provide translations for different languages. This feature enables you to create a more inclusive and globally accessible video. Here’s how you can add multiple sets of subtitles in Capcut:
- Ensure you’re on the project editing screen with your video and subtitles displayed in the timeline.
- To add a new set of subtitles, tap on the “Subtitle” icon, which looks like a speech bubble, in the toolbar below the video preview.
- In the subtitle editing panel, enter the text for the new set of subtitles. This can be a translation of the existing subtitles or a completely different caption.
- You can control the timing and duration of the new subtitle set by adjusting the positioning along the timeline and the handles.
- Repeat these steps to add as many sets of subtitles as needed. Each set can have its own language or purpose.
- To manage the visibility of the different subtitle sets, you can toggle them on or off using the eye icon next to each set.
- Capcut allows you to customize the appearance of each subtitle set individually, giving you the flexibility to differentiate them using different styles, colors, or animations.
Adding multiple sets of subtitles in Capcut opens up new possibilities for reaching a larger audience and accommodating various language preferences. Whether you want to provide translations, captions, or additional information in different languages, this feature empowers you to create a more inclusive and accessible video experience.
Now that you have added multiple sets of subtitles, it’s time to export your video with subtitles intact. In the next section, we will guide you through the process of exporting your video in Capcut, ensuring that your subtitles are preserved in the final result. Read on to learn how to export your video with subtitles.
Exporting Your Video with Subtitles
Once you have added and customized your subtitles in Capcut, it is time to export your video while ensuring that the subtitles are included in the final output. Follow these steps to export your video with subtitles:
- Ensure you are on the project editing screen in Capcut.
- Tap on the “Export” button, typically represented by a downward arrow, located at the top-right corner of the screen.
- A settings menu will appear, allowing you to adjust various export options.
- Make sure the “Subtitle” option is enabled. This ensures that the subtitles you added will be included in the exported video.
- Choose the desired output format for your video. Capcut provides a range of format options to suit different platforms and devices.
- Customize any other export settings, such as video resolution, quality, and file size, according to your specific requirements.
- Tap on the “Export” or “Start Exporting” button to initiate the export process. Depending on the length and complexity of your video, this process may take some time.
- Once the export is complete, Capcut will notify you, and your video with subtitles will be saved to your device’s gallery or specified location.
By exporting your video with subtitles intact, you ensure that your carefully crafted captions are preserved in the final output. This allows viewers to enjoy your video with subtitles on various platforms and devices.
With your video exported, you can now share it with your audience, whether it’s on social media, your website, or any other platform. Remember to consider the specific requirements of each platform and choose appropriate settings when exporting your video in Capcut.
Congratulations! You have successfully added subtitles to your video and exported it with Capcut. By incorporating subtitles, you have made your video more accessible, inclusive, and engaging. Experiment with different styles, timings, and formats to create captivating videos that resonate with your audience.
Conclusion
Adding subtitles to your videos using Capcut is not only a practical way to improve accessibility but also a creative means to enhance the visual appeal and engagement of your content. Throughout this article, we have explored the step-by-step process of opening Capcut, importing video files, adding subtitles, adjusting the timing, formatting, customizing appearance, adding multiple sets of subtitles, and exporting your final video with subtitles intact.
By incorporating subtitles, you can reach a broader audience, including those who are hearing impaired, speaking different languages, or prefer to watch videos without sound. Capcut provides an intuitive and user-friendly interface that empowers you to seamlessly integrate subtitles into your videos and customize them to suit your unique style and audience preferences.
Remember to strike a balance between readability and creativity when adding subtitles, ensuring that they are clear, well-timed, and visually appealing. Take advantage of Capcut’s features to experiment with different fonts, colors, animations, and formatting options to make your subtitles stand out and complement your video’s overall aesthetic.
Adding multiple sets of subtitles offers the opportunity to cater to diverse audiences and language preferences, making your content more inclusive and globally accessible. Whether you are translating your subtitles or providing additional information, Capcut enables you to create a more immersive and engaging experience for your viewers.
Once you have added and customized your subtitles, the final step is to export your video with the subtitles included. By enabling the “Subtitle” option during the export process, you ensure that your carefully crafted captions remain intact in the final output, ready to be shared on various platforms and devices.
With Capcut’s robust features and your creative touch, you have the tools to create captivating videos with subtitles that resonate with your audience. So, take advantage of this powerful tool and explore the possibilities of adding subtitles to your videos using Capcut.