Introduction
Welcome to the world of homemade ice cream with the Ninja Ice Cream Maker! If you’ve ever wondered how you can enjoy rich and creamy ice cream made right in your own kitchen, then you’re in for a treat. The Ninja Ice Cream Maker is a revolutionary appliance that allows you to create delicious frozen desserts in just minutes.
This innovative device combines the power of freezing and blending to produce smooth and luscious ice cream, creamy sorbets, and refreshing frozen yogurts. Gone are the days of waiting hours for your ice cream to be ready. With the Ninja Ice Cream Maker, you can indulge in your favorite frozen treats whenever the craving strikes.
Are you curious about how this magic machine works? In this article, we will delve into the inner workings of the Ninja Ice Cream Maker, uncovering the secrets behind its ability to churn out delectable frozen delights with ease.
From understanding the freezing process to learning how the blending function creates the perfect texture, we will explore every step of the journey to ice cream bliss. Additionally, we will provide tips on how to elevate your homemade creations and ensure smooth operation of the Ninja Ice Cream Maker.
So, if you’re ready to embark on a tasty adventure and become an ice cream master in your own kitchen, let’s dive into the wonderful world of the Ninja Ice Cream Maker!
Understanding the Ninja Ice Cream Maker
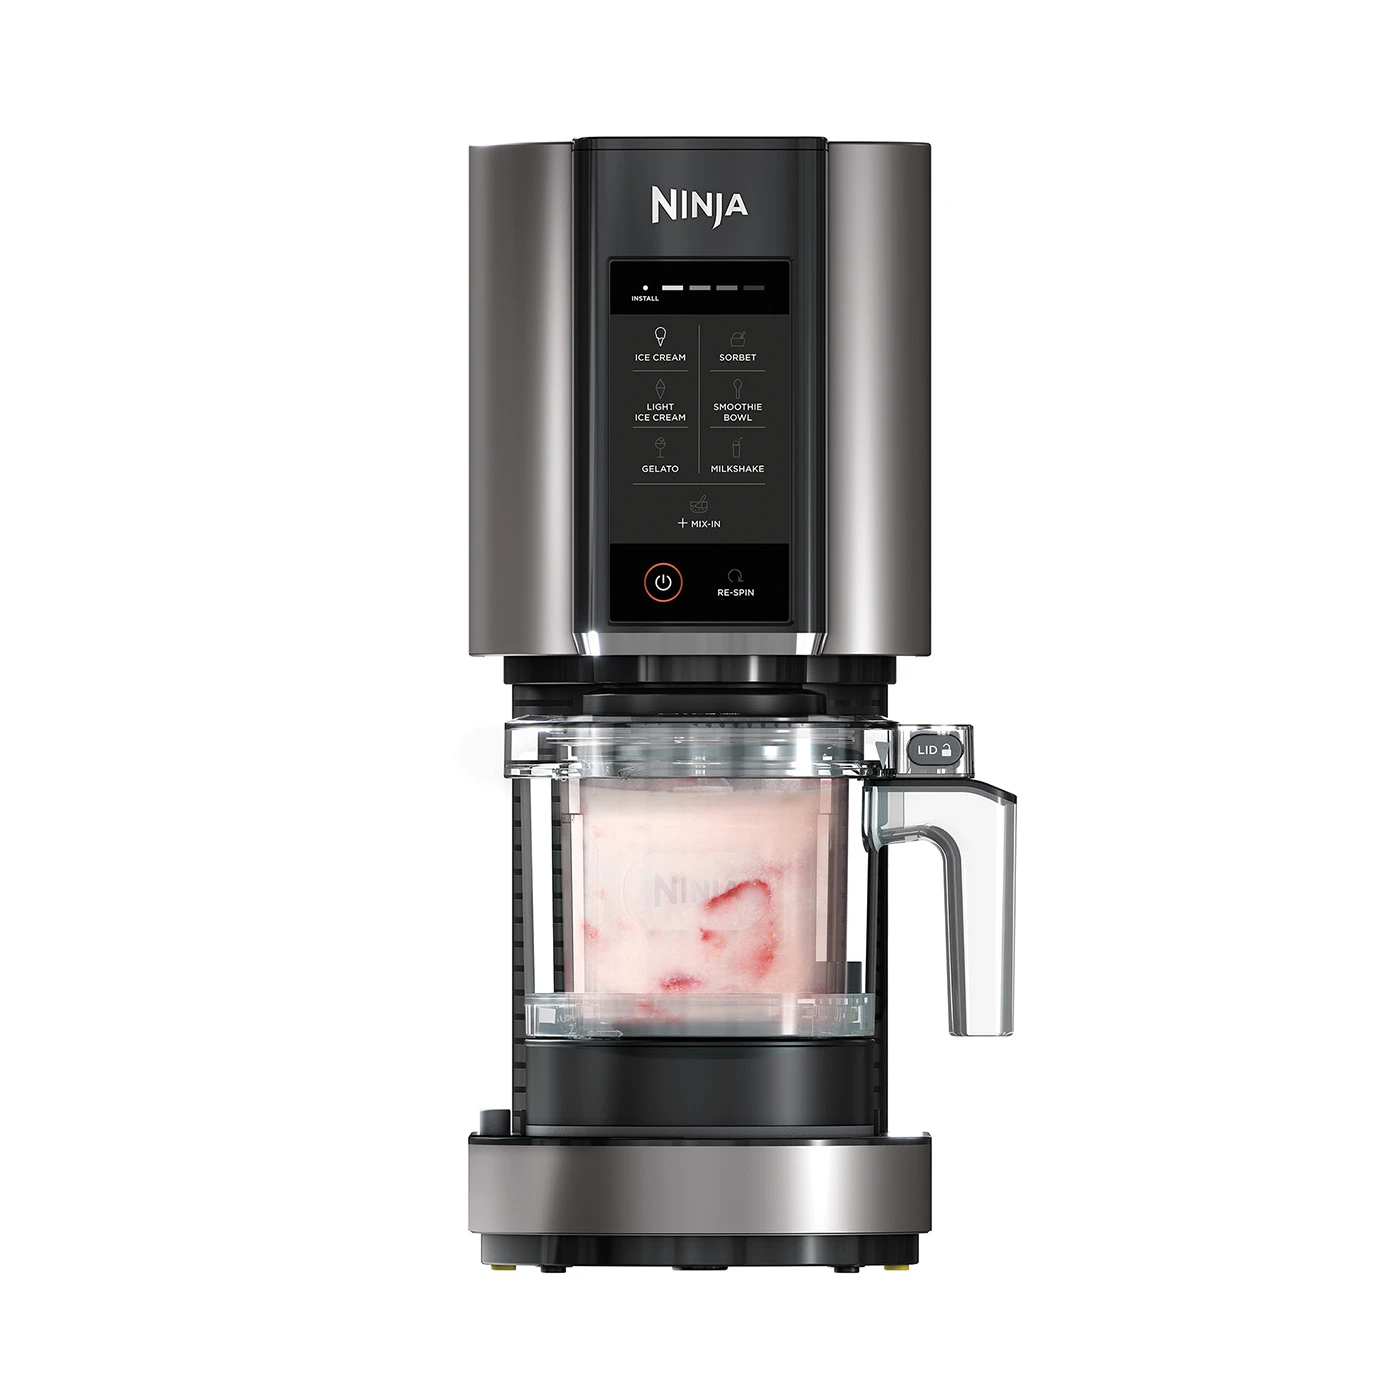
The Ninja Ice Cream Maker is a versatile appliance that combines the functions of a freezer and a blender to transform simple ingredients into a creamy ice cream base. The machine is equipped with a freezing chamber and a blending paddle that work in conjunction to create the perfect consistency for your frozen desserts.
When you first set up the Ninja Ice Cream Maker, you’ll need to pre-freeze the freezing chamber. This is an essential step to ensure that the mixture you pour into the machine freezes properly. Simply place the freezing chamber in the freezer for a few hours or overnight until it is completely frozen.
Once the freezing chamber is frozen, you’re ready to start making your ice cream. The next step is to prepare your ice cream base. This can be as simple as mixing together cream, sugar, and flavorings like vanilla extract or cocoa powder. You can also experiment with adding fruits, nuts, or other mix-ins to customize your flavors.
Pour your prepared ice cream base into the frozen freezing chamber. It’s important not to overfill the chamber, as the mixture will expand as it freezes. Leave some room for the mixture to expand and make sure to securely attach the blending paddle to the lid before placing it onto the freezing chamber.
Once everything is in place, it’s time to start the freezing and blending process. Turn on the Ninja Ice Cream Maker and let it do its magic. The freezing chamber will begin to freeze the mixture while the blending paddle stirs it continuously. This dual-action creates a smooth and creamy texture without any ice crystals forming.
The Ninja Ice Cream Maker typically takes around 15-20 minutes to transform your liquid ice cream base into a frozen delight. However, the exact time may vary depending on the recipe and the desired consistency. Keep an eye on the machine and check the texture occasionally to ensure it reaches your preferred level of firmness.
Once the ice cream has reached your desired consistency, you can stop the machine and remove the freezing chamber. The ice cream is now ready to be served or transferred to a lidded container for further freezing. It’s best to let the ice cream firm up in the freezer for a few hours before enjoying for optimal taste and texture.
Now that you have a better understanding of how the Ninja Ice Cream Maker works, let’s explore the freezing and blending process in more detail in the next section.
The Freezing Process
The freezing process is a crucial step in creating delicious ice cream with the Ninja Ice Cream Maker. This innovative appliance utilizes a freezing chamber to rapidly freeze your ice cream base, transforming it into a creamy and smooth frozen treat.
When you pour your ice cream base into the freezing chamber and turn on the machine, the freezing process begins. The freezing chamber is designed to reach extremely low temperatures, freezing the liquid mixture quickly. As the mixture freezes, ice crystals start to form, and the mixture thickens.
One of the key advantages of the Ninja Ice Cream Maker is its ability to freeze the ice cream base evenly. The blending paddle inside the freezing chamber continuously turns and mixes the mixture while it freezes. This constant movement prevents ice crystals from forming, resulting in a velvety texture.
It’s important to note that the freezing time can vary depending on various factors, including the temperature of your ice cream base and the consistency you desire. Generally, it takes around 15-20 minutes for the mixture to freeze into a semi-firm texture, but you can adjust the time based on your preferences.
If you prefer a softer consistency, you can opt for a shorter freezing time. On the other hand, if you like your ice cream to be more firm, you can extend the freezing time slightly. Experimenting with different freezing times will help you discover your perfect balance of creaminess and firmness.
During the freezing process, it’s important to avoid overfilling the freezing chamber. Overfilling can lead to overflow as the mixture expands during freezing. It’s best to leave some space for expansion, ensuring that your ice cream doesn’t overflow and that the freezing process proceeds smoothly.
Once the freezing process is complete and your ice cream has reached the desired consistency, you can stop the machine and remove the freezing chamber from the Ninja Ice Cream Maker. Now you’re ready to move on to the next step: the blending process.
With a better understanding of the freezing process, we can now dive into the blending process in more detail in the next section.
The Blending Process
Once the freezing process is complete and your ice cream base has reached the desired consistency, the Ninja Ice Cream Maker seamlessly transitions into the blending process. The blending paddle attached to the lid of the freezing chamber plays a vital role in creating a smooth and creamy texture for your homemade ice cream.
When you turn on the Ninja Ice Cream Maker, the blending paddle starts to rotate within the freezing chamber. This continuous motion helps break up any ice crystals that may have formed during the freezing process, resulting in a creamy and indulgent texture.
The blending process ensures that all the ingredients in your ice cream base are thoroughly mixed together. It helps distribute the flavors evenly and creates a homogenous mixture. Whether you’re making a classic vanilla or experimenting with unique flavor combinations, the blending process ensures that each spoonful of your ice cream is bursting with flavor.
The speed and effectiveness of the blending process are enhanced by the powerful motor of the Ninja Ice Cream Maker. This motor ensures that the blending paddle can smoothly rotate and thoroughly incorporate all the ingredients in your ice cream base.
As the blending paddle spins within the freezing chamber, it also helps incorporate air into the mixture. This process is known as churning. Churning adds volume to your ice cream, making it light and airy. It also contributes to the overall smoothness and creaminess of the frozen dessert.
While the ice cream is being blended, it’s important to monitor the texture to achieve your desired consistency. If you prefer a softer ice cream, you can stop the blending process slightly earlier. Conversely, if you prefer a denser and more solid ice cream, you can let the blending process continue for a bit longer.
The blending process typically takes place simultaneously with the freezing process. As the mixture is being blended, it continues to freeze, ensuring that the ice cream is ready to be enjoyed as soon as the blending process is complete.
With the blending process complete, your homemade ice cream is now perfectly creamy and ready to be enjoyed. However, if you’d like to add any mix-ins or additional ingredients, we’ll explore that in the next section.
Mixing in Ingredients
One of the joys of making homemade ice cream with the Ninja Ice Cream Maker is the ability to customize your flavors by adding mix-ins and additional ingredients. From chunks of chocolate and swirls of caramel to fruity bits and crunchy nuts, the possibilities are endless.
After the blending process is complete and your ice cream base has reached the desired consistency, it’s time to mix in any additional ingredients. This step allows you to add extra flavors, textures, and surprises to your homemade ice cream.
If you’re planning to add mix-ins, it’s best to prepare them in advance. Chop up your desired mix-ins into small, bite-sized pieces to ensure they are evenly distributed throughout the ice cream. Popular mix-in options include chocolate chips, cookie crumbles, fruit chunks, crushed candies, and even mini marshmallows.
Once your mix-ins are prepared, simply remove the freezing chamber from the Ninja Ice Cream Maker and carefully fold in the ingredients by hand. You can use a spatula or a wooden spoon to gently mix the additional ingredients into the partially frozen ice cream base. Take care not to overmix as this can lead to a loss of airiness in the final ice cream.
When adding mix-ins, it’s important to consider the freezing properties of the ingredients. Some ingredients may become too hard when frozen, detracting from the overall texture of the ice cream. If you’re working with ingredients that are prone to hardening, like chocolate chunks or caramel, you can slightly warm them beforehand to maintain a desirable consistency after freezing.
In addition to mix-ins, you can also experiment with flavorings and extracts to elevate the taste of your ice cream. Add a few drops of vanilla extract, a sprinkle of cinnamon, or a dash of peppermint oil to infuse your ice cream with unique flavors. The Ninja Ice Cream Maker is a canvas for your creativity, so feel free to get experimental and create delightful flavor combinations.
Once your additional ingredients are evenly distributed throughout the mixture, return the freezing chamber to the Ninja Ice Cream Maker and let it continue freezing and blending for a few more minutes. This helps ensure that the mix-ins are properly incorporated into the ice cream and that the texture remains consistent.
By mixing in your choice of ingredients, you can create a personalized ice cream creation that suits your taste preferences. Adding a variety of mix-ins and flavorings truly allows you to put your own spin on classic ice cream recipes.
Now that you’ve mastered the art of mixing in ingredients, let’s move on to some tips to help you achieve the best results with your Ninja Ice Cream Maker.
Tips for Using the Ninja Ice Cream Maker
Using the Ninja Ice Cream Maker is a breeze, but a few tips and tricks can help you achieve perfect results every time. Whether you’re a beginner or a seasoned ice cream maker, these tips will enhance your experience and ensure that your homemade frozen treats turn out fantastic.
1. Pre-chill your ingredients: Before making your ice cream base, make sure that the ingredients are properly chilled. This will help the freezing process to be more efficient and result in smoother ice cream. Ingredients like cream and milk should be refrigerated beforehand.
2. Freeze the freezing chamber adequately: Ensure that the freezing chamber is frozen for the recommended time before beginning the ice cream-making process. Ideally, the freezing chamber should be frozen for at least 8 hours or overnight for optimal results.
3. Experiment with recipes: While the Ninja Ice Cream Maker comes with some delicious recipes, feel free to experiment with your own creations. Adjust the ratios of ingredients and try different flavor combinations to discover unique and tasty ice creams that suit your preferences.
4. Add mix-ins at the right time: If you’re planning to incorporate mix-ins like chocolate chips or cookie dough, add them during the last few minutes of the blending process. This ensures even distribution and prevents the mix-ins from sinking to the bottom.
5. Let it firm up in the freezer: After the initial freezing and blending process, transfer the ice cream to a lidded container and let it firm up in the freezer for a few hours. This additional time allows the ice cream to set and develop its full flavor and texture.
6. Keep it simple: While it’s tempting to add a wide range of mix-ins and flavors, remember that sometimes simplicity is key. Allowing the natural flavors of quality ingredients to shine through can result in truly impressive ice cream creations.
7. Experiment with different consistencies: The freezing time and blending time can be adjusted to achieve different consistencies. If you prefer a softer, more soft-serve-like texture, shorten the freezing and blending time. For a firmer and more scoopable texture, extend the time slightly.
8. Clean as soon as possible: After you’ve finished making your ice cream, clean the freezing chamber and blending paddle as soon as possible. This prevents any residue from hardening and makes cleaning easier, ensuring that your Ninja Ice Cream Maker is always ready for the next batch.
By following these tips, you’ll be able to make the most out of your Ninja Ice Cream Maker and create delicious frozen treats that will impress your friends and family. Now, let’s move on to the final section and talk about cleaning your Ninja Ice Cream Maker.
Cleaning the Ninja Ice Cream Maker
Cleaning your Ninja Ice Cream Maker is a simple and straightforward process that ensures your appliance remains in top condition and ready for the next batch of delicious frozen treats. Proper cleaning also helps to prevent any residual flavors or odors from transferring to your next ice cream creation. Here are some steps to follow to keep your Ninja Ice Cream Maker clean:
1. Unplug the appliance: Before cleaning the Ninja Ice Cream Maker, make sure it is unplugged and the power is turned off. Safety should always come first when dealing with any electrical appliance.
2. Disassemble the components: Remove the freezing chamber, blending paddle, and lid from the main unit. They can be easily detached, making them accessible for thorough cleaning.
3. Rinse the components: Rinse the freezing chamber, blending paddle, and lid under warm running water to remove any remaining ice cream residue. Use a soft sponge or cloth to gently scrub the components, ensuring that they are clean and free from debris.
4. Use gentle dish soap if necessary: If there are stubborn stains or residue on the components, you may use a small amount of mild dish soap. Apply the soap to a sponge or cloth, and gently scrub the affected areas. Rinse thoroughly afterwards to remove any soap residue.
5. Air dry or towel dry: After cleaning, allow the components to air dry completely. Alternatively, you can use a soft towel to absorb any excess moisture. Ensure that all the components are completely dry before reassembling the Ninja Ice Cream Maker.
6. Wipe the main unit: Use a damp cloth to wipe the outside of the main unit. Pay attention to any spills or splatters that may have occurred during the ice cream-making process. Dry with a clean cloth to prevent any remaining moisture from affecting the operation of the appliance.
7. Reassemble the components: Once all the components are thoroughly cleaned and dry, reassemble the Ninja Ice Cream Maker. Make sure the freezing chamber is securely attached to the main unit and the blending paddle is fitted properly.
Remember, it’s important to clean the Ninja Ice Cream Maker as soon as possible after each use. This prevents any residue from hardening and becoming difficult to remove. Regular cleaning helps to maintain the performance and longevity of your appliance.
Now that you know how to keep your Ninja Ice Cream Maker clean, you’re all set to embark on more ice cream-making adventures. Enjoy the process and have fun indulging in your homemade frozen delights!
Conclusion
Creating homemade ice cream has never been easier or more fun, thanks to the Ninja Ice Cream Maker. This innovative appliance allows you to whip up creamy, flavorful frozen treats right in the comfort of your own kitchen.
We’ve explored the inner workings of the Ninja Ice Cream Maker, from the freezing and blending processes to mixing in ingredients and cleaning the appliance. Understanding how each step contributes to the final result can help you achieve excellent ice cream creations every time.
With the Ninja Ice Cream Maker, you have the freedom to customize your flavors and experiment with different mix-ins, creating unique and delicious ice cream combinations. From classic vanilla to indulgent chocolate chip cookie dough, the possibilities are endless.
Remember to follow the tips provided to enhance your ice cream-making experience. Pre-chill your ingredients, experiment with recipe variations, and carefully fold in your mix-ins to achieve the perfect texture and flavor. And don’t forget to clean your Ninja Ice Cream Maker promptly to ensure its longevity and maintain its performance.
So, whether you’re planning a family gathering, a summer barbecue, or simply indulging in a sweet treat for yourself, the Ninja Ice Cream Maker is ready to transform simple ingredients into delightful frozen desserts.
Enjoy the process of creating creamy and refreshing ice cream, sorbets, and frozen yogurts, all with the convenience and ease of the Ninja Ice Cream Maker. Let your imagination run wild as you experiment with flavors, textures, and mix-ins to create unique frozen creations that will impress everyone.
Now that you have the knowledge and the tools, it’s time to unleash your inner ice cream artist. So grab your favorite ingredients, chill the freezing chamber, and let the Ninja Ice Cream Maker take you on a delectable journey of homemade ice cream bliss.
Get ready to savor the delicious rewards of your own DIY ice cream shop. Your taste buds will thank you!