Why Undo a Reconciliation?
Reconciling your accounts is an essential part of maintaining accurate financial records in QuickBooks Online. However, there may be instances where you need to undo a reconciliation due to various reasons. Understanding why you might need to undo a reconciliation can help you navigate through the process effectively.
One common reason to undo a reconciliation is when you discover an error or discrepancy in the previously reconciled transactions. It could be a missing transaction, duplicate entry, or incorrect amount. Rectifying these errors promptly is crucial to ensure the accuracy of your financial statements.
Another scenario that may require you to undo a reconciliation is when you mistakenly reconciled the wrong period. It can happen if you accidentally select the wrong statement date, leading to inaccurate reporting.
In addition, if you face issues with your bank feeds, such as duplicated or missing transactions, it may be necessary to undo a reconciliation to correct the data mismatch.
Moreover, if you need to make changes to specific transactions that were previously reconciled, undoing the reconciliation allows you to edit those transactions and reflect the accurate information.
Lastly, if you want to start over the reconciliation process from scratch, undoing the previous reconciliation is the way to go. This could be necessary when there are extensive transactions to review, and you prefer to restart the process to ensure accuracy.
Regardless of the reason, it is important to have a clear understanding of why you need to undo a reconciliation in order to proceed with confidence and accuracy. Remember that reconciling your accounts accurately is crucial for maintaining reliable financial records and making informed business decisions.
Steps to Undo a Reconciliation in QuickBooks Online
If you need to undo a reconciliation in QuickBooks Online, the process is straightforward. Follow these steps to ensure a successful undo of the reconciliation:
- Step 1: Locate the Reconciliation
- Step 2: Select the “Undo” Option
- Step 3: Confirm the Undo Reconciliation
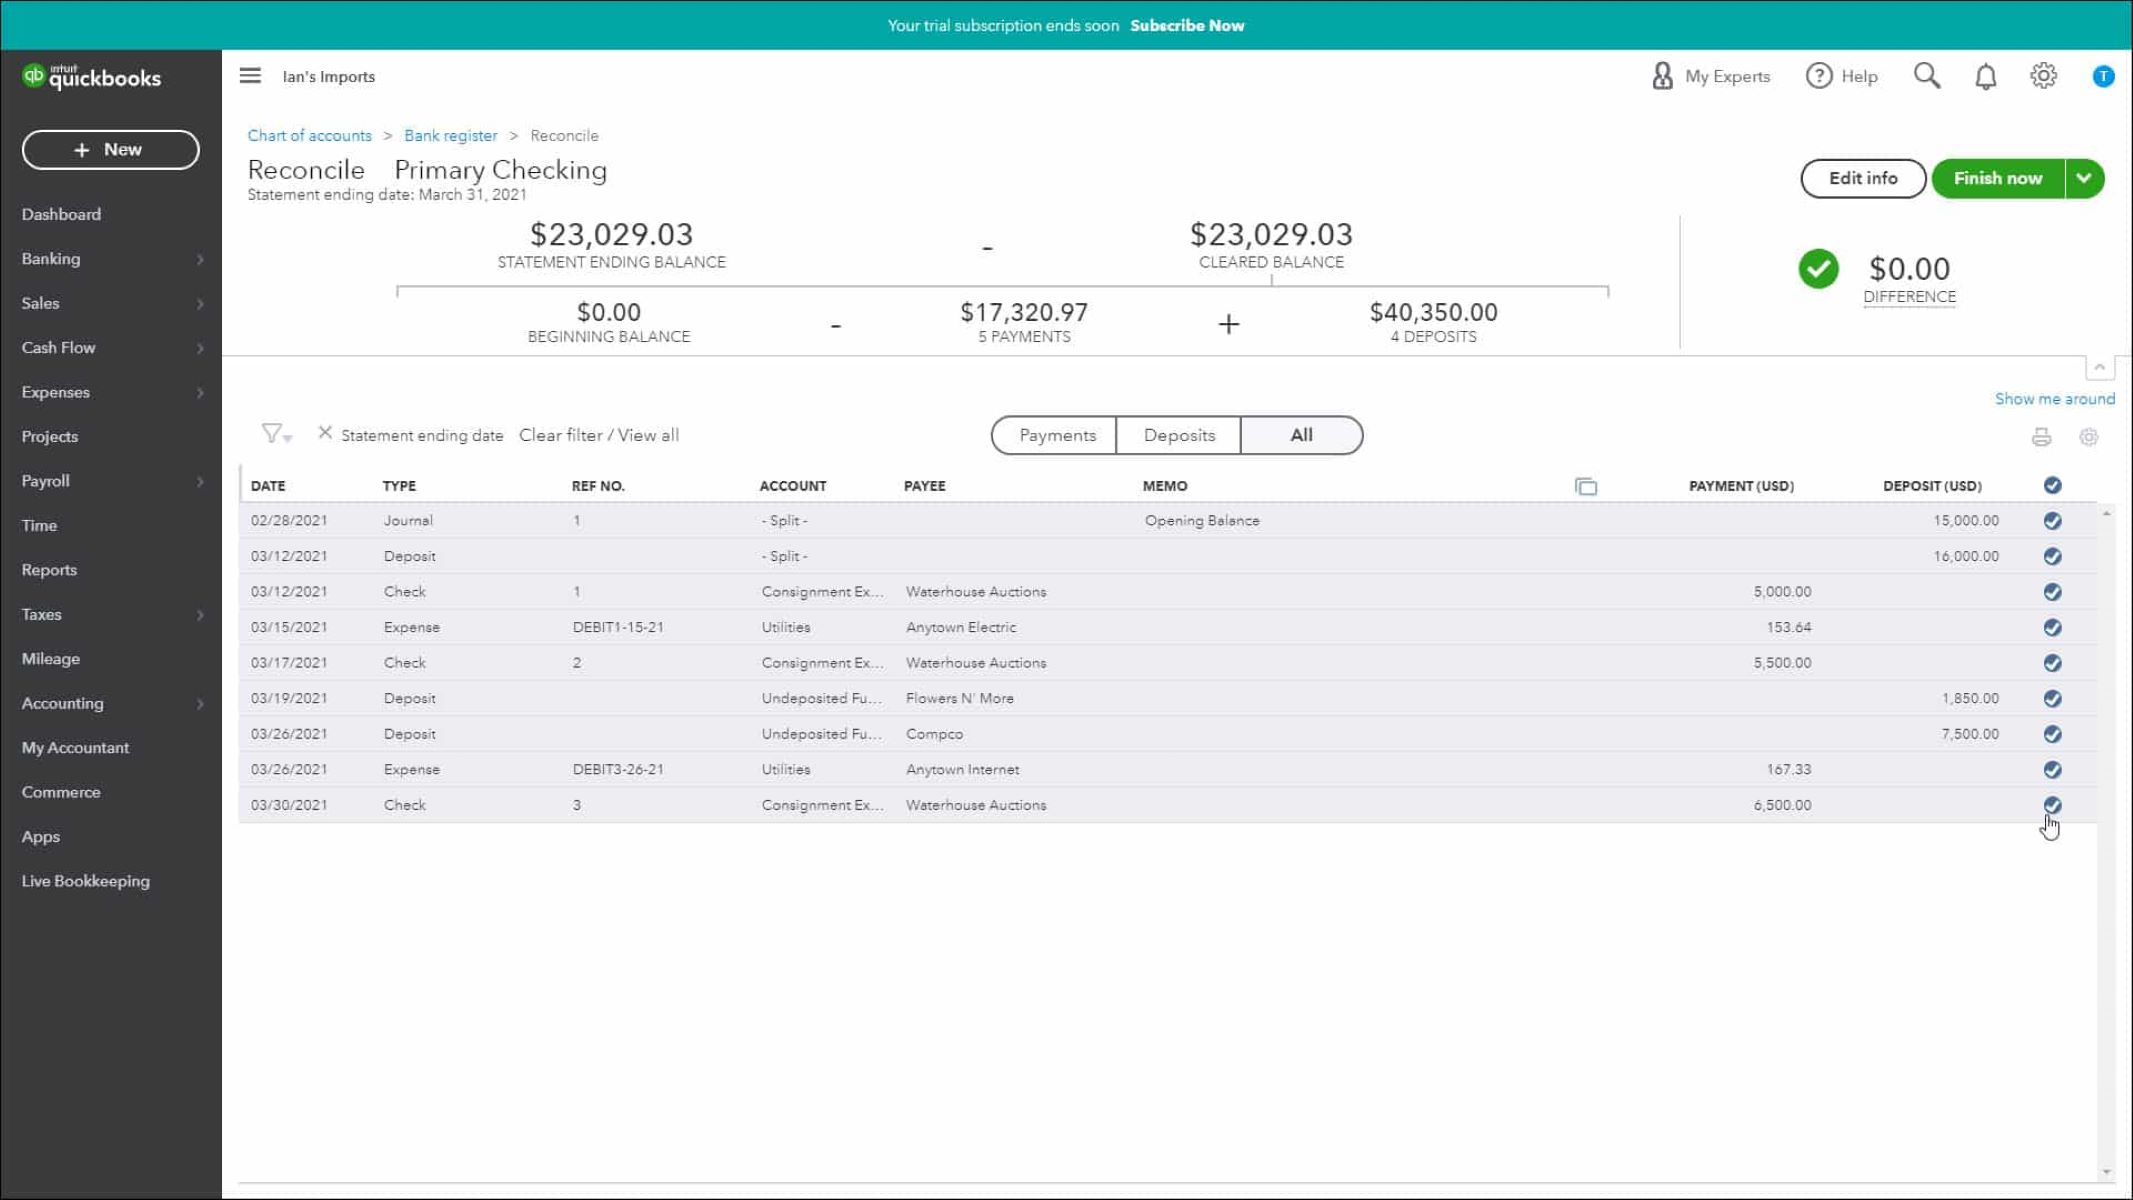
First, navigate to the “Accounting” tab in QuickBooks Online and select “Reconcile” from the drop-down menu. Find the account you wish to undo the reconciliation for and click on “Resume reconciling” to access the reconciliation screen.
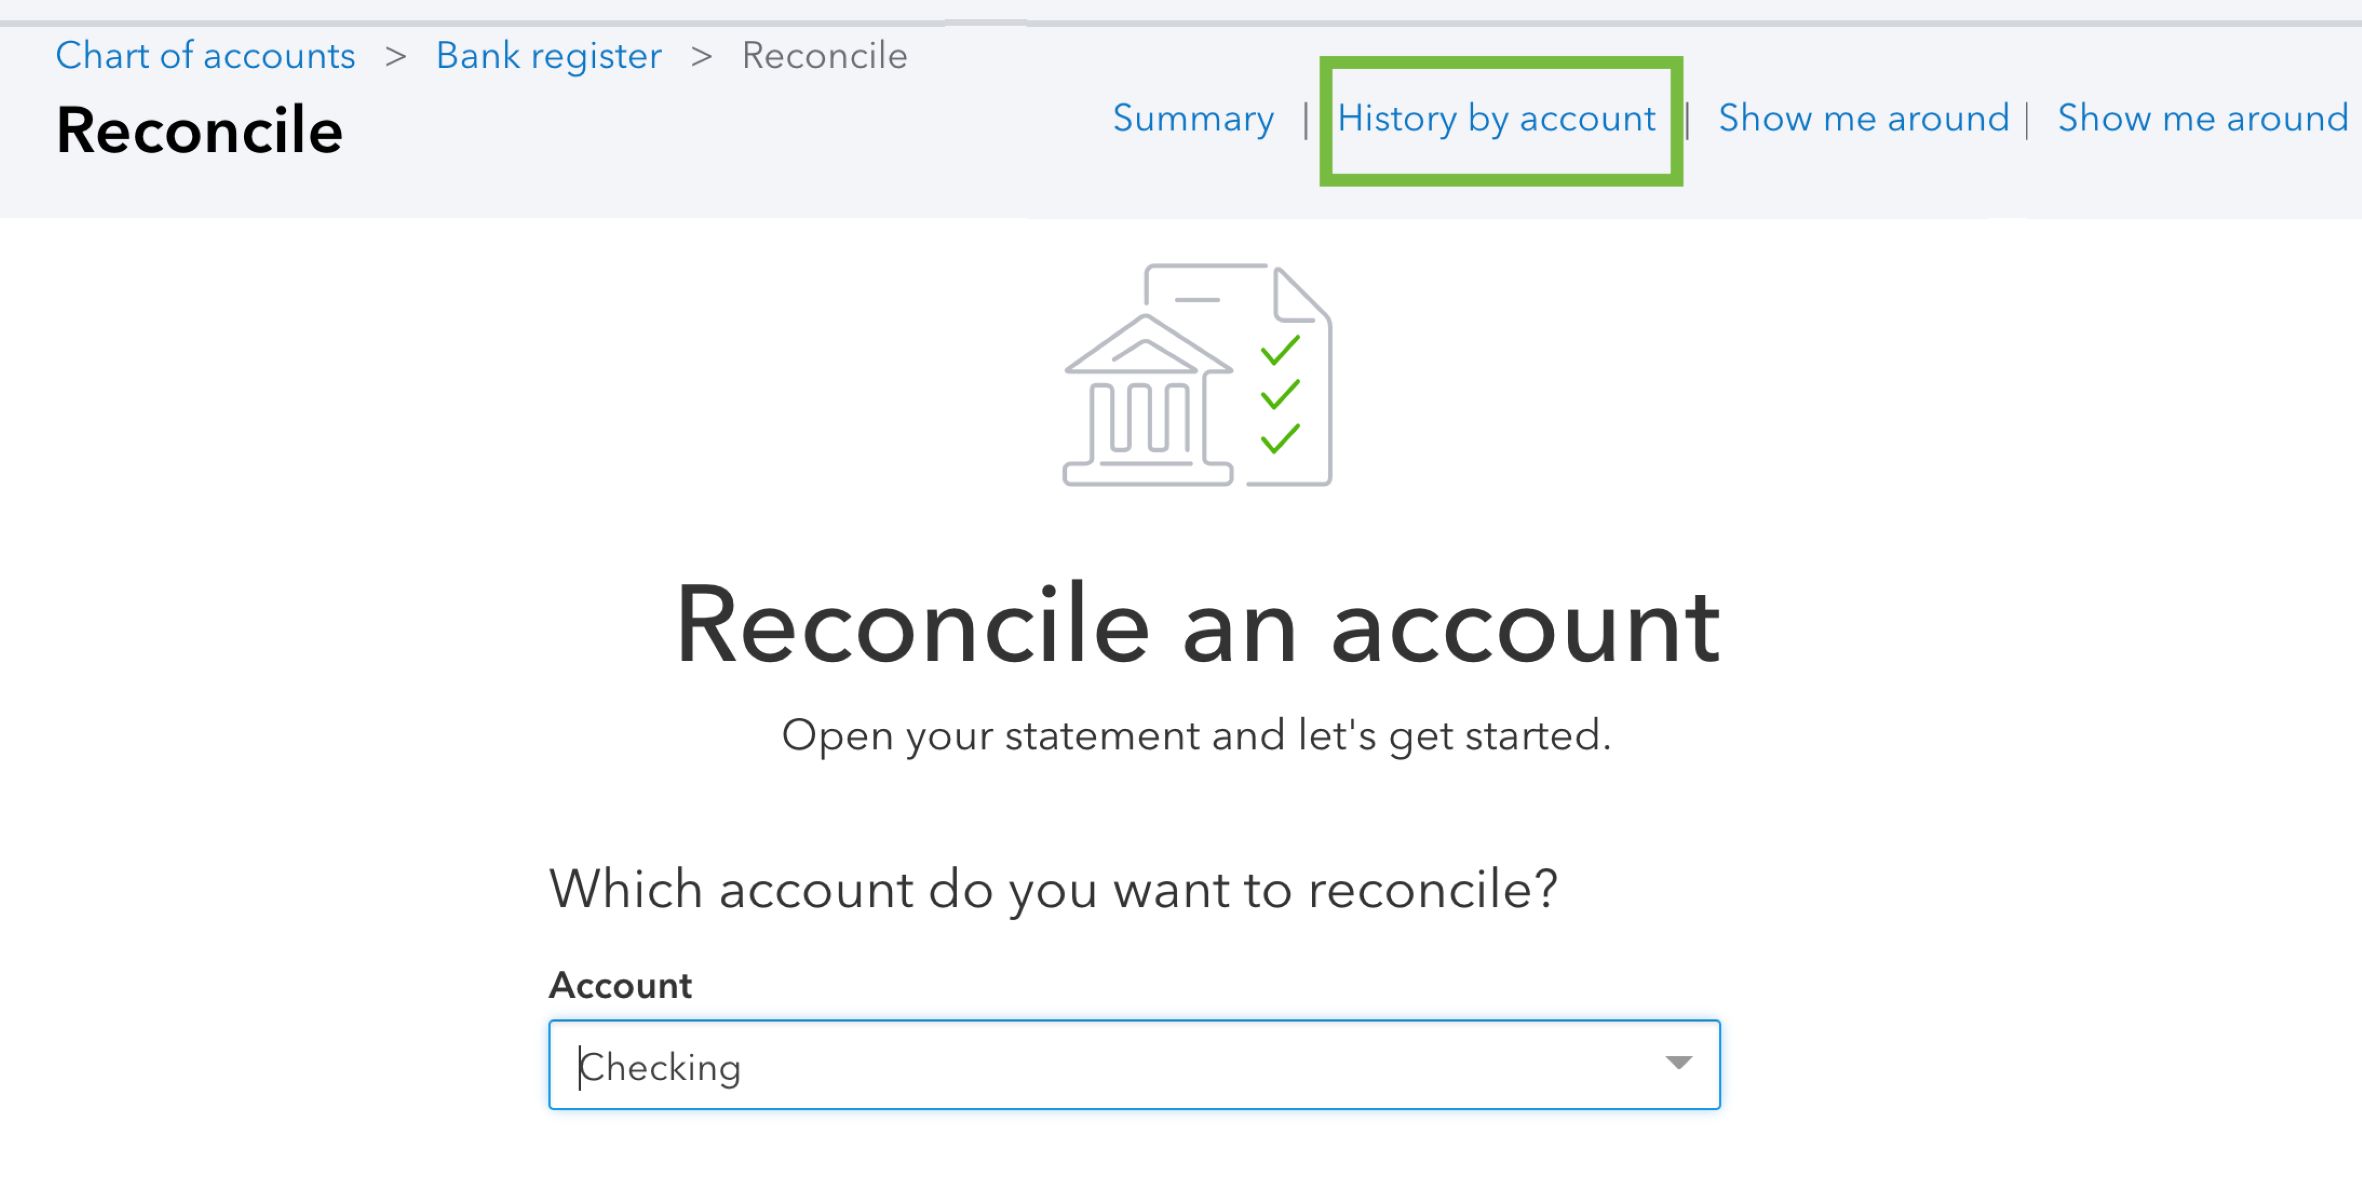
Once you are on the reconciliation screen, locate the “History by account” section on the right-hand side. Under the “Action” column, you will see a dropdown menu next to the reconciliation you want to undo. Click on the dropdown and select “Undo”.
After selecting “Undo”, a confirmation window will appear to ensure that you want to proceed with undoing the reconciliation. Review the statement period and ensure it is correct, then click “Yes” to confirm.
Once you have completed these steps, the reconciliation will be undone, and the status of the previously reconciled transactions will be changed. You can now make the necessary adjustments or corrections to resolve any discrepancies.
It’s worth noting that undoing a reconciliation does not delete or modify any transactions. It simply changes the status of the reconciled transactions, allowing you to make adjustments and start the reconciliation process anew if needed.
By following these steps, you can effectively undo a reconciliation in QuickBooks Online and maintain accurate financial records.
Step 1: Locate the Reconciliation
The first step in undoing a reconciliation in QuickBooks Online is to locate the specific reconciliation you want to undo. Here’s how to find it:
1. Open QuickBooks Online and navigate to the “Accounting” tab at the left-hand side of the screen.
2. From the drop-down menu, select “Reconcile” to access the reconciliation screen.
3. On the Reconcile page, you will see a list of all your accounts. Locate the account for which you want to undo the reconciliation and click on “Resume reconciling”.
4. This will take you to the reconciliation screen for the selected account, where you will find a summary of your previous reconciliations.
5. Look for the specific reconciliation period that you want to undo. The reconciliation periods are usually displayed in chronological order, with the most recent one at the top.
6. Once you locate the specific reconciliation you wish to undo, move on to the next step to proceed with the undo process.
It’s essential to find the correct reconciliation to ensure that you don’t accidentally undo the wrong one. Double-check the reconciliation period and ensure it matches the one you intended to undo.
Locating the reconciliation is the first crucial step in the process of undoing a reconciliation in QuickBooks Online. By following these steps, you can easily find the specific reconciliation you want to undo and proceed to the next steps with confidence.
Step 2: Select the “Undo” Option
After locating the reconciliation you want to undo in QuickBooks Online, the next step is to select the “Undo” option. Here’s how to do it:
- On the reconciliation screen, navigate to the “History by account” section on the right-hand side. This section displays a list of all the reconciliations you have done for that particular account.
- Find the reconciliation you wish to undo in the list. Under the “Action” column for that specific reconciliation, you will see a dropdown menu that contains various options.
- Click on the dropdown menu for the reconciliation you want to undo, and select the “Undo” option from the available choices.
- As soon as you select “Undo,” a confirmation message will appear to ensure that you want to proceed with undoing the reconciliation. Take a moment to review the statement period mentioned in the confirmation message to ensure you have selected the correct reconciliation.
- Once you have confirmed that you want to undo the reconciliation, click on the “Yes” button to proceed.
By selecting the “Undo” option, you initiate the process of undoing the reconciliation. This action will change the status of the previously reconciled transactions and allow you to make any necessary adjustments or corrections.
It’s important to note that once you undo a reconciliation, the system does not delete or modify any transactions. Instead, it changes the status of the reconciled transactions, so you can review and edit them as needed.
Following these steps will guide you through the process of selecting the “Undo” option and moving on to the next step of confirming the undo reconciliation.
Step 3: Confirm the Undo Reconciliation
After selecting the “Undo” option to initiate the undoing of a reconciliation in QuickBooks Online, you need to confirm the undo reconciliation. Here’s how to proceed:
- Once you have clicked on “Undo,” a confirmation window will appear on the screen.
- Review the information displayed in the confirmation window, including the statement period mentioned. Make sure that the statement period aligns with the reconciliation you intend to undo.
- Take a moment to double-check the reconciliation details to ensure that you have chosen the correct one. This step is crucial to avoid mistakenly undoing a reconciliation that you did not intend to undo.
- After verifying the information, click on the “Yes” button in the confirmation window to proceed with the undo reconciliation.
- QuickBooks Online will then process the undo reconciliation command.
Once you confirm the undo reconciliation, QuickBooks Online will update the status of the reconciled transactions, reflecting that they are no longer reconciled. This change allows you to make any necessary adjustments or corrections if there were any discrepancies.
It’s important to note that when you undo a reconciliation, it does not delete or modify any transactions. Instead, it reverses the reconciled status and gives you the flexibility to make changes and redo the reconciliation if required.
By following these steps and confirming the undo reconciliation, you can effectively reverse the reconciliation process and begin resolving any issues or discrepancies identified.
What Happens When You Undo a Reconciliation?
When you choose to undo a reconciliation in QuickBooks Online, several changes occur to ensure the accuracy of your financial records. Here’s what happens when you undo a reconciliation:
- The status of the previously reconciled transactions is changed. Once you undo a reconciliation, the transactions that were previously marked as reconciled will be updated to an unreconciled status. This change allows you to make any necessary adjustments or corrections to the transactions.
- The opening balance for the subsequent reconciliation may need to be adjusted. When you undo a reconciliation, QuickBooks Online automatically revises the opening balance for the account based on the transactions affected by the undo. This adjustment ensures that the subsequent reconciliation starts with the correct opening balance.
- The reconciliation report is updated. The reconciliation report for the account will reflect the changes made when the reconciliation is undone. It will no longer show the previously reconciled transactions as reconciled, giving you a clear view of the revised transaction status.
- The account balance is updated. Undoing a reconciliation can affect the overall balance of the account, especially if adjustments or corrections are made to the transactions. QuickBooks Online will recalculate the account balance based on the updated transaction status and any modifications made.
It’s important to note that when you undo a reconciliation, the system does not delete or modify any transactions. It only changes the status of the reconciled transactions, allowing you to make adjustments and corrections as needed.
By understanding what happens when you undo a reconciliation, you can effectively manage the changes that occur and ensure the accuracy of your financial records in QuickBooks Online.
Common Issues When Undoing a Reconciliation
While undoing a reconciliation in QuickBooks Online is generally a straightforward process, there are a few common issues that users may encounter. Being aware of these issues can help you navigate potential challenges effectively. Here are some of the common issues when undoing a reconciliation:
- Missing transactions: After undoing a reconciliation, it’s possible that some transactions may appear missing from your account register or bank feed. This can occur if those transactions were mistakenly excluded from the reconciliation. In such cases, you may need to manually enter or import the missing transactions.
- Incorrect opening balance: If the opening balance for subsequent reconciliations is calculated incorrectly after undoing a reconciliation, it can affect the accuracy of future reconciliations. It’s crucial to review the opening balance and make any necessary adjustments to ensure accurate reconciliations moving forward.
- Modified transactions: When undoing a reconciliation, you may want to make changes or corrections to certain transactions. However, it’s important to exercise caution and ensure that any modifications are accurate and properly documented. Incorrect modifications can lead to further discrepancies in your financial records.
- Reconciliation reporting: The reconciliation reports may not accurately reflect the changes made when undoing a reconciliation. It’s essential to review and verify the information on the reports to ensure that the updated transaction status and balance are accurately reflected.
- Duplicate reconciliations: If a reconciliation is mistakenly undone and then reconciled again without making any necessary adjustments, it can result in duplicate reconciliations for the same period. This can complicate your financial reporting and require additional steps to resolve the duplicates.
- Loss of reconciliation details: Undoing a reconciliation may cause the loss of detailed information related to the previously reconciled transactions. It’s advisable to keep relevant documentation or notes to retrace or reference the details of the original reconciliation if needed.
When encountering any of these common issues, it’s important to take the necessary steps to address them promptly. This may involve manually entering missing transactions, adjusting opening balances, reviewing and modifying transactions carefully, and ensuring accurate reconciliation reporting.
By being aware of these common issues and taking precautions, you can mitigate potential challenges when undoing a reconciliation and maintain accurate financial records in QuickBooks Online.
Tips and Best Practices for Undoing a Reconciliation
Undoing a reconciliation in QuickBooks Online requires careful attention to detail to ensure accurate financial records. To help guide you through the process, here are some tips and best practices to consider:
- Verify the reconciliation: Before undoing a reconciliation, double-check that you have selected the correct reconciliation period to avoid undoing the wrong reconciliation. Review the statement period and compare it with your records.
- Backup your data: Prior to undoing a reconciliation, it’s always a good practice to create a backup of your data. This ensures that you have a copy of your financial records in case any issues or discrepancies arise during the undo process.
- Review transaction details: Take the time to carefully review the transaction details when undoing a reconciliation. Make any necessary corrections or adjustments to ensure the accuracy of the transaction information before re-reconciling or moving forward.
- Maintain documentation: Throughout the process of undoing a reconciliation, keep detailed records or notes to document any changes or modifications made. This documentation can serve as a reference in case you need to retrace or explain the changes in the future.
- Record adjustment transactions: If you need to make adjustments to correct discrepancies after undoing a reconciliation, consider recording adjustment transactions to accurately reflect the changes. This helps to maintain an audit trail and ensures transparency in your financial records.
- Monitor subsequent reconciliations: After undoing a reconciliation, closely monitor subsequent reconciliations to confirm that the opening balance and account activity align with your records. This helps to catch any potential errors or discrepancies early on.
- Seek professional assistance if needed: If you encounter complex issues or are uncertain about the process of undoing a reconciliation, it’s advisable to seek help from a financial professional or QuickBooks Online expert. They can provide guidance and support to ensure accurate undoing of the reconciliation.
By following these tips and best practices, you can navigate the process of undoing a reconciliation in QuickBooks Online more effectively and maintain reliable financial records for your business.