Introduction
Welcome to the modern age of technology, where connecting your devices to projectors has become easier than ever. If you own a Chromebook and need to present or project your screen onto a larger display, you’ve come to the right place. In this article, we will guide you through the step-by-step process of connecting your Chromebook to a projector.
Projectors are widely used in various settings such as classrooms, offices, and presentations. They offer a larger viewing area, making it easier for everyone to see and understand the content being displayed. Chromebooks, on the other hand, are lightweight laptops that run on the Chrome OS, providing users with a seamless experience for web browsing, productivity, and entertainment.
Whether you’re a student, a professional, or simply someone who wants to share their screen with a larger audience, connecting a Chromebook to a projector is a straightforward task. By following the steps outlined in this article, you’ll be able to effortlessly connect and project your Chromebook’s screen onto a projector in no time.
Before we delve into the specific steps, it’s important to familiarize yourself with the ports and cables involved in the connection process. Additionally, we’ll cover how to turn on the projector and adjust the display settings on your Chromebook to ensure optimal quality. So, without further ado, let’s get started on connecting your Chromebook to a projector.
Step 1: Check the ports and cables
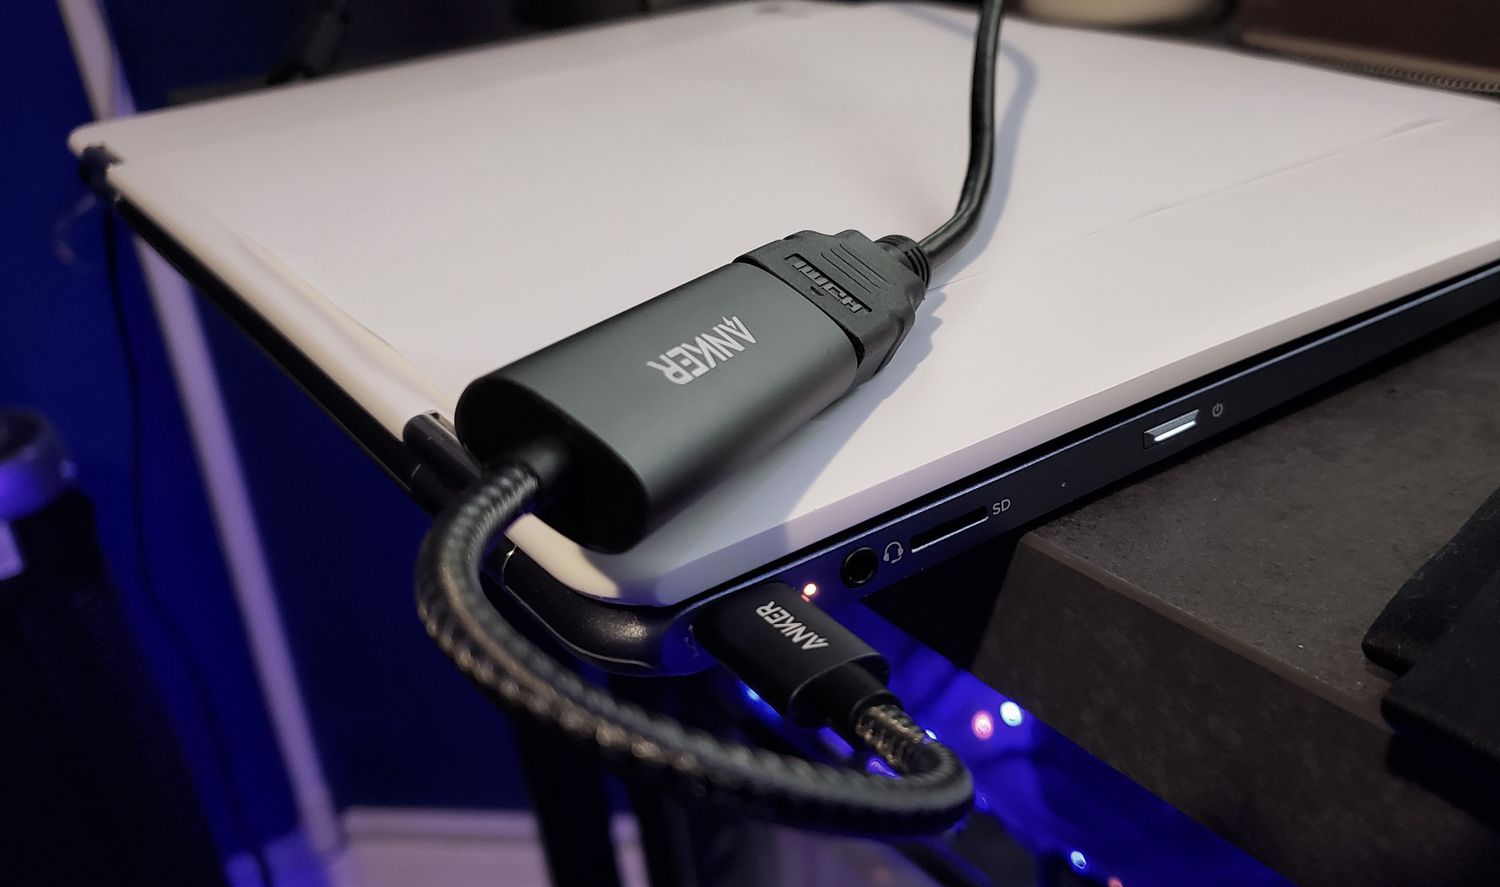
Before you connect your Chromebook to a projector, it’s crucial to check the available ports and cables on both your Chromebook and the projector itself. This will ensure that you have the necessary connectivity options and the right cables for the connection.
Most modern projectors and Chromebooks come equipped with standard ports, such as HDMI and VGA. These ports allow you to easily connect your devices and transfer the video and audio signals from your Chromebook to the projector. However, older projectors may only support VGA ports, so it’s essential to check the compatibility of your devices.
Firstly, examine your Chromebook’s ports. Look for an HDMI or VGA port on the sides or back of the device. HDMI ports are rectangular and usually labeled ‘HDMI’. VGA ports are trapezoidal in shape and labeled ‘VGA’. Note down the ports available on your Chromebook as this will determine the type of cable you’ll need.
Next, locate the ports on the projector. Most projectors have multiple ports, including HDMI and VGA, but the specific ports may vary depending on the model. Consult the projector’s manual or look for labels on the device to identify the available ports.
Once you have determined the ports on both your Chromebook and projector, you need to select the appropriate cable for the connection. If your Chromebook and projector have HDMI ports, you can simply use an HDMI cable. On the other hand, if your projector only supports a VGA connection, you’ll need to use a VGA cable. It’s recommended to use a high-quality cable to ensure optimal video and audio transmission.
By checking the ports and cables, you’ll have a better understanding of the connection options available to you. This will help you proceed with confidence to the next step of connecting your Chromebook to the projector.
Step 2: Turn on the projector
Now that you have identified the ports and cables needed for the connection, it’s time to turn on the projector. This step is crucial to ensure a successful and seamless connection between your Chromebook and the projector.
Start by locating the power button on the projector. It is usually located on the top, front, or side of the device. Press the power button to turn on the projector. Some projectors may have an indicator light that will illuminate once it’s powered on.
While the projector is booting up, it’s a good idea to double-check the power source. Ensure that the projector is connected to a power outlet or has adequate battery power if it is a portable projector.
Allow the projector a few moments to warm up and initialize. During this time, you may hear the fan running or see a loading screen on the projected image. This startup process may vary depending on the model of the projector, so refer to the manufacturer’s instructions if needed.
Once the projector has booted up and is ready, you should see a projection on the screen or wall. It may be a default image or blank screen. If the screen remains blank, try adjusting the focus or source input settings on the projector until the projected image is clear and visible.
By ensuring that the projector is properly turned on and functional, you have set the stage for a successful connection with your Chromebook. With the projector powered up and ready, you’re now ready to proceed to the next step of connecting your Chromebook to the projector.
Step 3: Connect the Chromebook to the projector
With the projector turned on and ready, it’s time to connect your Chromebook to the projector. The process may vary slightly depending on the ports available on both your Chromebook and the projector, but the general steps remain the same.
First, locate the appropriate cable for the connection. If your Chromebook and projector both have HDMI ports, use an HDMI cable. If your projector only supports VGA, use a VGA cable. Make sure the cable is securely plugged into both your Chromebook and the projector.
Once the cable is connected, your Chromebook should automatically detect the projector. In some cases, you may need to adjust the display settings on your Chromebook manually.
On your Chromebook, press the ‘Search’ key or the Launcher key (typically represented by a magnifying glass or the Google logo) and type “display settings” in the search bar. Click on the ‘Display settings’ option that appears in the search results.
In the display settings, you should see an option to identify, enable, or mirror the displays. Choose the appropriate option based on your preference and needs. If you want to extend your display, select the ‘Extend’ option. If you want to duplicate your Chromebook’s screen on the projector, select the ‘Mirror’ option.
Once you’ve made your selection, your Chromebook’s screen should be visible on the projector. If the projected image does not appear or is distorted, double-check the cable connections and ensure that the correct display settings are selected.
With your Chromebook successfully connected to the projector, you’re one step closer to sharing your screen with a larger audience. Before proceeding, make sure the projected image is clear and properly aligned. If necessary, adjust the position and angle of the projector to optimize the viewing experience.
Step 4: Adjust display settings
After connecting your Chromebook to the projector, it’s important to adjust the display settings to ensure optimal clarity and visibility. This step will allow you to fine-tune the projected image, making it easier for your audience to view and comprehend the content.
Start by accessing the display settings on your Chromebook. Press the ‘Search’ key or the Launcher key, and type “display settings” in the search bar. Select the ‘Display settings’ option that appears in the search results.
Within the display settings, you will find various options to adjust the resolution, screen orientation, and aspect ratio. It’s recommended to set the resolution to match the native resolution of your projector for the best image quality. You can usually find the native resolution information in the projector’s manual.
If you notice any distortion or improper alignment on the projected image, you can adjust the screen orientation settings within the display settings. Experiment with different orientations (landscape or portrait) until the projected image appears correctly.
Additionally, you may want to adjust the aspect ratio to match the content you’re presenting. The most common aspect ratios are 4:3 and 16:9. Choose the one that best suits your needs and the capabilities of your projector.
While adjusting the display settings, keep an eye on the projected image and make any necessary changes to enhance the visual experience. If you’re unsure about the optimal settings, you can refer to the projector’s manual or consult the manufacturer’s website for guidance.
Remember to test the changes you make in the display settings by displaying different types of content, such as slideshows or videos, to ensure that the projected image remains clear and properly aligned. Make any additional adjustments as needed.
By taking the time to adjust the display settings, you’ll be able to deliver a more engaging and professional presentation. Your audience will appreciate the crisp and clear visuals displayed on the projector, enhancing their overall viewing experience.
Step 5: Start presenting
Now that your Chromebook is successfully connected to the projector and the display settings are adjusted, it’s time to start presenting your content. This final step will ensure that your audience can fully engage with your presentation or share your screen effectively.
Before you begin, make sure the content you want to present is open and ready on your Chromebook. Whether it’s a slideshow, document, or web page, have it ready to go so you can seamlessly transition into your presentation.
Position yourself in a way that allows you to see both your Chromebook screen and the projected image. This will help you keep track of your presentation and address any technical difficulties that may arise during the session.
Once you’re prepared, consider using presenter mode or fullscreen mode on your Chromebook. Presenter mode allows you to view the current slide, upcoming slides, and any speaker notes while presenting. Fullscreen mode ensures that your entire screen is displayed on the projector for maximum visibility.
When you’re ready to start presenting, use the appropriate controls or shortcuts on your Chromebook to navigate through your content. This may involve clicking or tapping to advance slides, scrolling through documents, or interacting with web pages.
As you present, engage with your audience and maintain eye contact. Speak clearly and confidently to ensure that everyone can hear and understand your message. Take advantage of any interactive features or annotation tools available on your Chromebook to enrich your presentation.
If you encounter any issues during your presentation, such as a frozen screen or audio problems, remain calm and troubleshoot the problem. Check your cable connections, adjust the display settings if necessary, and ensure that your Chromebook and projector are both powered on.
Remember to periodically check the projected image to ensure it aligns with your content and that everything is visible to your audience. Make any necessary adjustments to the positioning or clarity of the projection as needed.
Congratulations! You have successfully connected your Chromebook to the projector and started your presentation. By following these steps and maintaining a smooth presentation flow, you’ll be able to deliver a compelling and impactful presentation that leaves a lasting impression on your audience.
Conclusion
Connecting a Chromebook to a projector may seem like a daunting task, but with the right guidance, it can be a hassle-free process. By following the step-by-step instructions outlined in this article, you can easily connect your Chromebook to a projector and deliver impactful presentations to a larger audience.
We started by checking the ports and cables on both the Chromebook and projector to ensure compatibility. Next, we turned on the projector and made sure it was ready for connection. Then, we connected the Chromebook to the projector using the appropriate cable and adjusted the display settings to optimize the projected image.
Finally, we reached the exciting stage of presenting our content. With the Chromebook connected and the display settings adjusted, we confidently started sharing our screen with the audience. By leveraging presenter or fullscreen mode and engaging with the audience, we delivered a seamless and engaging presentation.
Remember, troubleshooting is part of the process. If any issues arise during the connection or presentation, remain calm and go through the steps again to identify and resolve the problem. Double-check the cable connections, adjust the display settings if needed, and ensure that both the Chromebook and projector are powered on.
With practice and experience, connecting your Chromebook to a projector will become second nature. You will be able to seamlessly share your screen and deliver impactful presentations on any occasion, whether it’s in the classroom, boardroom, or any other setting that requires a larger display.
Now that you have mastered the process of connecting a Chromebook to a projector, go out and confidently share your ideas with the world. Enjoy the flexibility and convenience that technology offers, and make the most of your Chromebook’s capabilities to deliver compelling presentations that captivate your audience.