Introduction
Welcome to the world of Bixby! If you’re ready to upgrade your smartphone experience and enjoy the convenience of a virtual assistant at your fingertips, you’ve come to the right place. Whether you’re a seasoned Bixby user or new to the world of voice-activated technology, this step-by-step guide will help you install and set up Bixby on your device in no time.
Bixby is Samsung’s virtual assistant that is designed to make your life easier and more efficient. From setting reminders and managing your schedule to controlling your device with just your voice, Bixby is packed with features that will revolutionize the way you interact with your smartphone. But before you dive into the world of Bixby, there are a few things you need to know.
First, it’s important to determine if your device supports Bixby. While most recent Samsung devices are equipped with Bixby, it’s always a good idea to double-check. Next, you’ll need to ensure that your device software is up to date, as Bixby may require the latest version to function properly. Once you’ve done that, it’s time to set up Bixby and customize its settings to suit your preferences.
This guide will walk you through each step of the process, from checking device compatibility to mastering the art of using Bixby. By the end of this tutorial, you’ll be well-equipped to harness the full potential of Bixby and take advantage of all its incredible features. So, without further ado, let’s get started on installing and setting up Bixby on your device!
Step 1: Check if your device supports Bixby
The first step in installing Bixby is to check if your device supports this virtual assistant. Most modern Samsung devices come preloaded with Bixby, but there are a few older models that may not have this feature. Follow these simple steps to find out if your device is Bixby-compatible:
- Open the App Drawer: Swipe up from the home screen to access the App Drawer. This is where all the apps on your device are stored.
- Search for the Bixby app: In the App Drawer, use the search bar at the top to search for “Bixby.” If the Bixby app appears in the search results, it means your device supports Bixby.
- No Bixby app found: If you don’t see the Bixby app in the search results, unfortunately, your device does not support Bixby. However, don’t worry! Samsung offers a wide range of devices with Bixby capabilities, so you may consider upgrading to a newer model that supports this virtual assistant.
Once you have confirmed that your device is Bixby-compatible, you’re ready to move on to the next step. It’s important to note that for some devices, Bixby may not be preinstalled but can be downloaded from the Samsung Galaxy Store. So, if you didn’t find the Bixby app in your search results, make sure to check the Galaxy Store for its availability.
Bixby brings a whole new level of convenience and productivity to your Samsung device. From quick access to information and features to hands-free control of your device, Bixby has you covered. So, let’s proceed to the next step and get your device ready for Bixby!
Step 2: Update your device software
Before you can fully enjoy the latest features and functionalities of Bixby, it’s crucial to ensure that your device software is up to date. Updating your device software not only enhances the overall performance and security of your device but also ensures smooth compatibility with Bixby. Follow these steps to check for and install any available software updates:
- Access Settings: Swipe down from the top of your device’s screen to open the notification panel. Then, tap the gear-shaped icon to access the Settings menu.
- Select Software update: In the Settings menu, scroll down and tap on “Software update.” The exact location of this option may vary depending on your device model and operating system (OS) version, but it is generally listed under the “About phone” or “General management” section.
- Check for updates: Once you are in the Software update menu, tap on “Download and install” or a similar option to check for available updates. Your device will then connect to the server and search for the latest software version.
- Install the update: If an update is available, you will be prompted to download and install it. Make sure your device is connected to a stable Wi-Fi network and has sufficient battery life before proceeding with the update. Follow the on-screen instructions to complete the installation process.
- Restart your device: After the update is installed, it is recommended to restart your device to ensure that all changes take effect.
It’s important to keep in mind that software updates might vary based on your device model, carrier, and region. If you experience any difficulties during the update process or if no updates are available, you can reach out to your device manufacturer’s support for further assistance.
By keeping your device software up to date, you not only ensure optimal performance but also guarantee that you have the latest compatibility and functionality for Bixby. Once your device is updated, you’re one step closer to experiencing the full potential of Bixby’s virtual assistant capabilities!
Step 3: Set up Bixby
Now that your device is capable of running Bixby and has the latest software updates, it’s time to set up this virtual assistant and personalize it according to your preferences. Follow these steps to get Bixby up and running:
- Open the Bixby app: Locate the Bixby app on your device. If you couldn’t find it on your home screen or in the App Drawer, you can search for it in the App Drawer or download it from the Samsung Galaxy Store.
- Sign in to your Samsung account: If you haven’t already done so, sign in to your Samsung account. This step is necessary to use Bixby and enjoy all its features. If you don’t have a Samsung account, you can create one during the setup process.
- Agree to the terms and conditions: Read and accept the terms and conditions presented by Samsung. It’s important to review these terms to understand your rights and responsibilities when using Bixby.
- Set your language preference: Select your preferred language for interacting with Bixby. This will determine the language in which Bixby responds to your commands and provides information.
- Turn on voice wake-up: Voice wake-up allows you to activate Bixby by saying the wake-up command, even if your device’s screen is off. Enable this option if you want to use voice commands without having to unlock your device.
- Configure Bixby Home: Bixby Home is a personalized feed that provides quick access to relevant information and recommendations. Customize the Bixby Home settings to display the cards and content that are most useful to you.
- Enable Bixby Voice: Bixby Voice is the heart of Bixby, allowing you to use your voice to interact with your device and control various functions. Make sure to enable Bixby Voice to fully utilize Bixby’s capabilities.
Once you’ve completed the setup process, Bixby will be ready to assist you. Take some time to explore the different features and functions of Bixby, such as setting reminders, sending messages, finding information, and controlling your device with voice commands. The more you use Bixby, the better it becomes at understanding your preferences and providing personalized assistance.
Setting up Bixby is a crucial step in harnessing the power of this virtual assistant. By personalizing your Bixby experience, you can optimize its performance and make it an indispensable companion in your everyday life.
Step 4: Customize Bixby settings
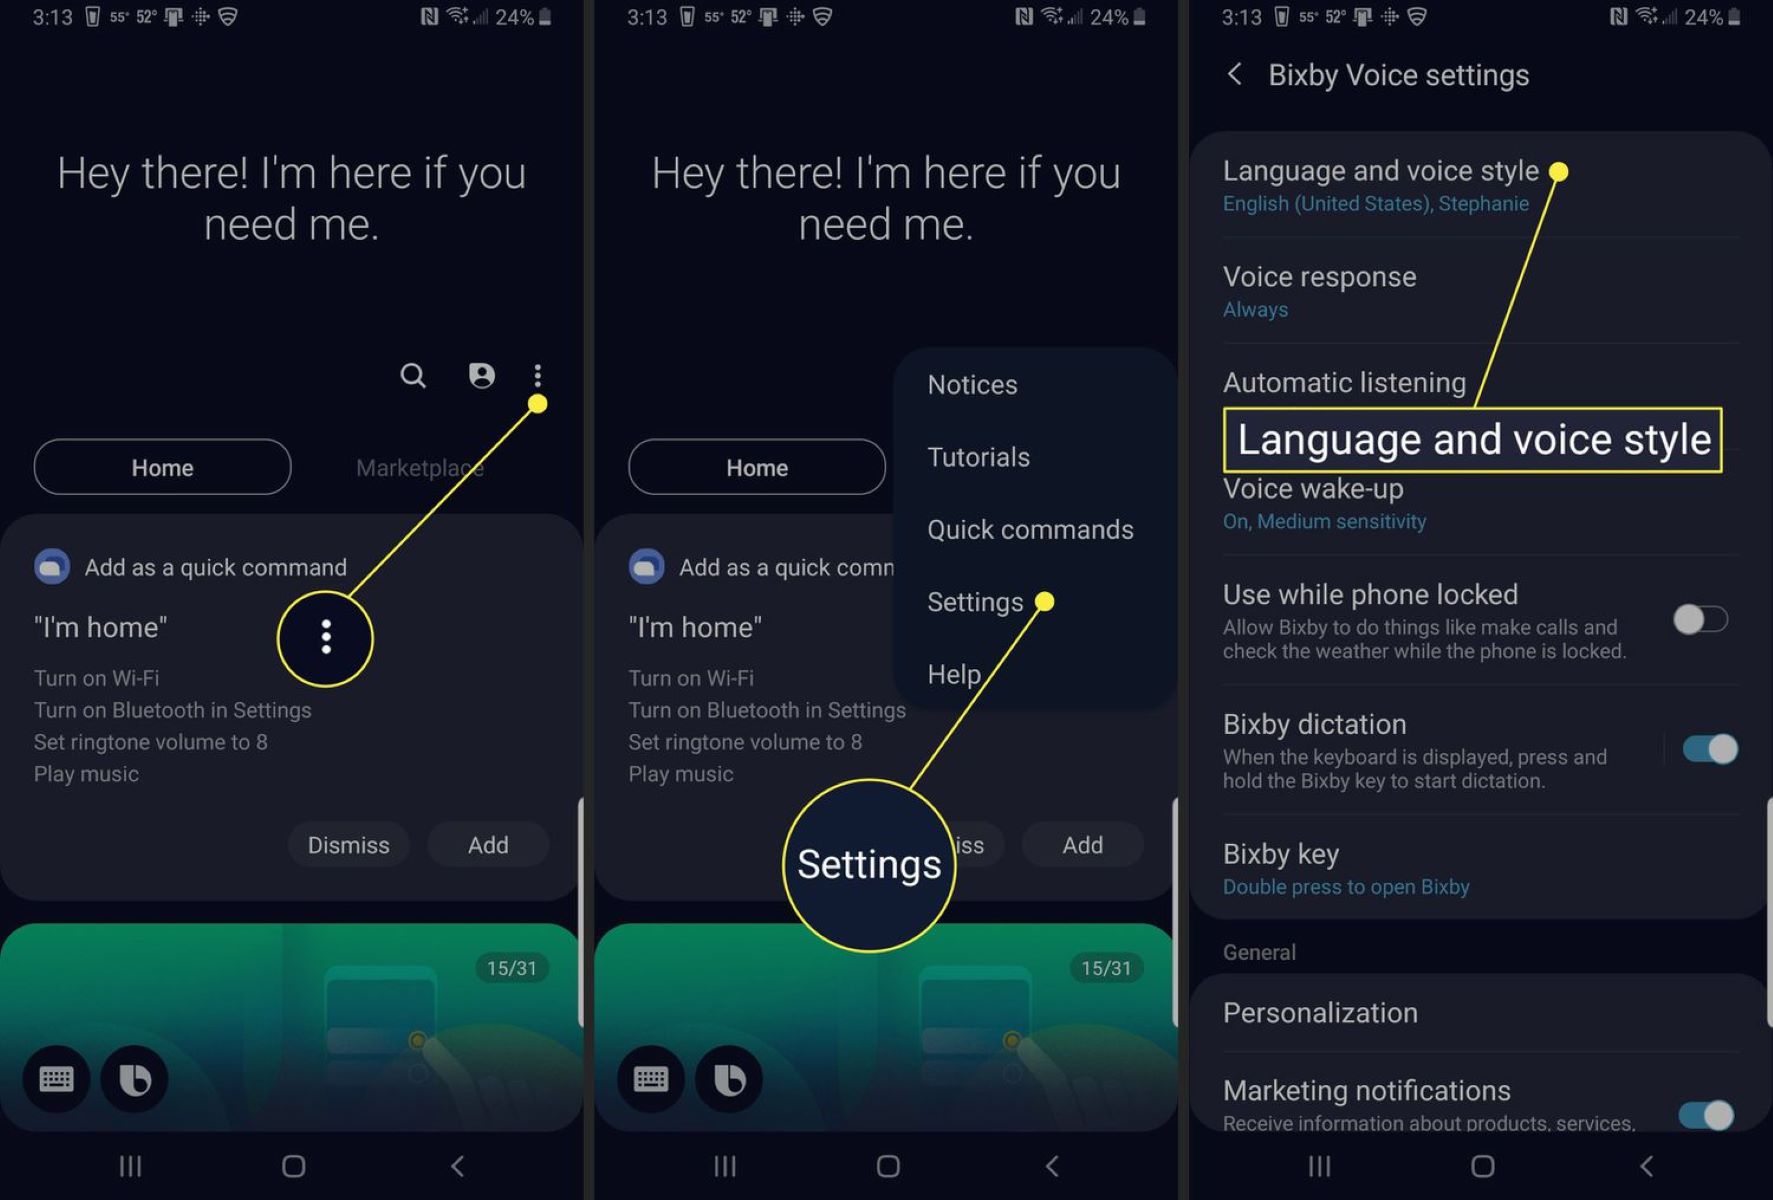
After setting up Bixby, it’s time to make it your own by customizing its settings. Whether you want to tweak the language preference, adjust the voice wake-up sensitivity, or fine-tune Bixby’s responses, customization allows you to tailor Bixby to suit your specific needs. Follow these steps to customize Bixby’s settings:
- Access Bixby settings: Open the Bixby app on your device.
- Tap on the three horizontal lines: In the top-left corner of the Bixby app, you’ll find a menu icon represented by three horizontal lines. Tap on it to open the Bixby settings menu.
- Explore the settings options: In the settings menu, you’ll find a variety of options to customize your Bixby experience. Here are some settings you might want to consider adjusting:
- Language and voice: Modify the language preference for Bixby’s responses and adjust the voice wake-up sensitivity.
- Bixby Home: Manage the cards and content that appear on your Bixby Home feed. Enable or disable cards based on your interests and needs.
- Bixby Voice: Fine-tune Bixby’s voice and choose the speech rate that suits you best.
- Bixby Voice wake-up: Customize the wake-up command that activates Bixby. You can choose a specific phrase or word that feels most natural to you.
- Permissions: Review and manage the permissions granted to Bixby. You can control which apps Bixby can access and interact with.
- Make adjustments and save: Once you have made the desired changes, tap on the save or apply button to save your customized settings.
Customizing Bixby’s settings allows you to tailor its behavior and responses to align with your preferences. It ensures that Bixby understands you better and provides a personalized experience. Experiment with different settings and adjustments to make Bixby truly yours.
Remember, customization is not a one-time process. As you continue to use Bixby and discover new preferences, feel free to revisit the settings menu whenever you want to make further adjustments.
Step 5: Learn how to use Bixby
Now that you have set up and customized Bixby, it’s time to explore its capabilities and learn how to effectively use this virtual assistant. Bixby offers a wide range of features and functions that can simplify your daily tasks and make your smartphone experience more seamless. Follow these tips to get started with Bixby:
- Wake up Bixby: To wake up Bixby, use the wake-up command you set during the setup process. Simply say the command aloud, and Bixby will be ready to assist you.
- Ask questions: Bixby has a vast knowledge database, allowing you to ask questions on a variety of topics. From general knowledge inquiries to specific queries, Bixby can provide you with the information you need.
- Control your device: Bixby can be used to control various functions on your device. You can ask Bixby to make a phone call, send a message, open an app, adjust settings, and more, all through voice commands.
- Set reminders and alarms: Bixby can help you stay organized by setting reminders and alarms. Just let Bixby know the details, such as the time and date, and it will alert you at the specified time.
- Manage your schedule: Bixby can integrate with your calendar and help you manage your schedule. You can ask Bixby to add events, check your upcoming appointments, and even set meeting reminders.
- Get recommendations: Bixby can learn your preferences over time and provide personalized recommendations. From suggesting new restaurants to recommending movies or music, Bixby can help you discover new things based on your interests.
- Control smart home devices: If you have smart home devices compatible with Bixby, you can use Bixby to control them. From adjusting the thermostat to turning on the lights, Bixby can streamline your home automation.
Don’t be afraid to experiment and explore Bixby’s capabilities. The more you use Bixby, the better it becomes at understanding your commands and providing accurate responses. Take advantage of the hands-free experience and let Bixby simplify your daily tasks.
Keep in mind that Bixby is continuously evolving, with new features and updates being introduced regularly. Stay updated with the latest Bixby developments to make the most out of this powerful virtual assistant.
Conclusion
Congratulations! You have successfully installed, set up, and customized Bixby on your device. By following the step-by-step process outlined in this guide, you have unlocked the full potential of this virtual assistant and made your smartphone experience more efficient and convenient. Now, Bixby is ready to assist you with tasks, answer your questions, and make your life easier.
Remember to continue exploring Bixby’s features and functionalities to fully maximize its capabilities. Bixby is designed to learn and adapt to your preferences, so the more you use it, the better it will understand and anticipate your needs.
Don’t hesitate to update Bixby as new versions are released, as these updates often bring improvements and new features that enhance its performance and expand its capabilities.
Whether you’re using Bixby to control your device, manage your schedule, or find information, this virtual assistant has the potential to revolutionize the way you interact with your smartphone. Embrace the convenience and efficiency that Bixby offers, and let it simplify your daily tasks, saving you time and effort along the way.
Enjoy the power of Bixby and make the most out of your Samsung device. Happy exploring!