Introduction
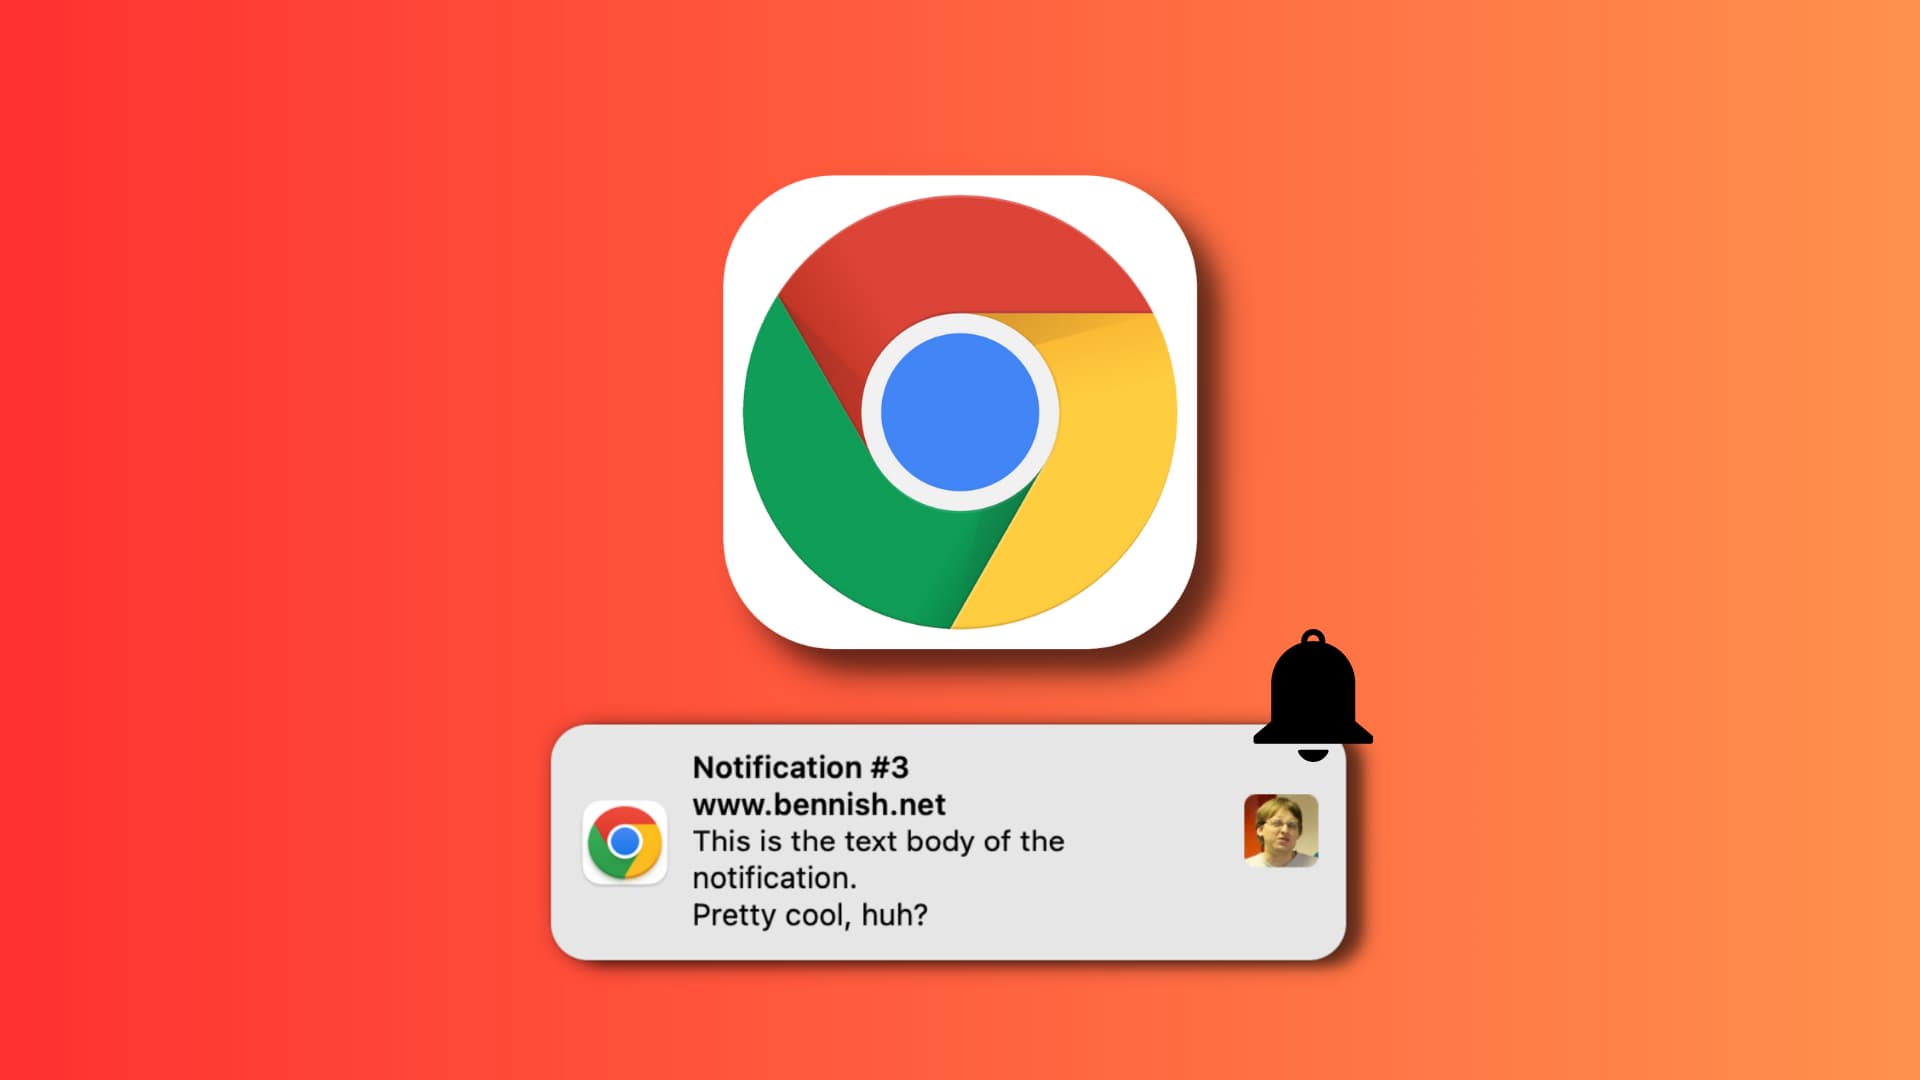
Chrome notifications are a convenient way to stay updated with the latest information from your favorite websites, such as news updates, social media alerts, and important reminders. By enabling notifications in Chrome, you can ensure that you never miss out on important updates and stay connected to the content that matters most to you. Whether you're a news enthusiast, a social media aficionado, or simply someone who values staying informed, turning on notifications in Chrome can greatly enhance your browsing experience.
In this guide, we will walk you through the simple steps to turn on notifications in Chrome, allowing you to customize your browsing experience and receive timely updates from your preferred websites. Whether you're using Chrome on your desktop or mobile device, the process is straightforward and can be easily tailored to suit your individual preferences. With just a few clicks, you can take control of your notification settings and ensure that you are always in the loop with the latest updates from your favorite websites.
By following the steps outlined in this guide, you will gain a deeper understanding of how to manage notifications in Chrome, empowering you to make informed decisions about the type of content you wish to receive updates for. Whether you're looking to streamline your notification preferences or simply explore the various customization options available, this guide will equip you with the knowledge and tools to make the most out of your browsing experience.
So, without further ado, let's dive into the step-by-step process of turning on notifications in Chrome and take the first step towards staying connected to the content that matters most to you.
Step 1: Open Chrome
To begin the process of enabling notifications in Chrome, the first step is to open the Chrome browser on your device. Whether you are using a desktop computer, laptop, or mobile device, launching the Chrome browser is the initial step towards customizing your notification settings.
On a desktop or laptop computer, simply locate the Chrome icon on your desktop or taskbar and double-click to open the browser. Alternatively, you can access Chrome from your list of installed applications by clicking on the Chrome icon in the application menu.
If you are using a mobile device, such as a smartphone or tablet, navigate to your device's home screen and tap on the Chrome app icon to launch the browser. Once the Chrome browser is open, you are ready to proceed to the next step in the process of enabling notifications.
Opening Chrome is the foundational step that sets the stage for customizing your browsing experience and gaining access to a wide range of notification settings. Whether you are a frequent user of Chrome on your desktop or prefer to browse on the go using your mobile device, the process of turning on notifications begins with the simple action of opening the Chrome browser.
By taking this initial step, you are one step closer to harnessing the power of notifications in Chrome and staying connected to the latest updates from your favorite websites. With Chrome now open on your device, you are ready to move on to the next step and continue the process of enabling notifications for a more personalized browsing experience.
Step 2: Click on the three-dot menu
After opening the Chrome browser, the next step in enabling notifications involves accessing the three-dot menu, which is located in the top-right corner of the browser window. This menu, also known as the "More" menu, contains a variety of options for customizing your browsing experience, including access to settings, extensions, and other essential features.
To proceed, direct your attention to the top-right corner of the Chrome browser window, where you will find three vertically aligned dots arranged in a horizontal line. This iconic symbol represents the three-dot menu and serves as a gateway to a multitude of options that allow you to tailor your browsing experience to your preferences.
Upon locating the three-dot menu, click on it to reveal a dropdown menu containing a range of options and settings. This action will open up a world of possibilities for customizing your Chrome browser, including the ability to manage your notification settings and fine-tune your browsing experience.
By clicking on the three-dot menu, you are taking a pivotal step towards gaining access to the inner workings of Chrome and unlocking the potential for a more personalized and tailored browsing experience. This simple yet powerful action sets the stage for the subsequent steps in the process of enabling notifications, allowing you to delve deeper into the customization options available within the Chrome browser.
As you click on the three-dot menu, you are greeted with a user-friendly interface that presents a wealth of options, ranging from basic settings to advanced features. This intuitive design ensures that users can easily navigate through the menu and locate the specific settings they wish to modify, including the essential notification settings that are integral to staying connected to the latest updates from their preferred websites.
With the three-dot menu now open before you, the stage is set for the next phase of the process, where you will delve into the heart of Chrome's settings and take control of your notification preferences. This pivotal step marks the beginning of a journey towards a more personalized and enriched browsing experience, where notifications play a crucial role in keeping you informed and engaged with the content that matters most to you.
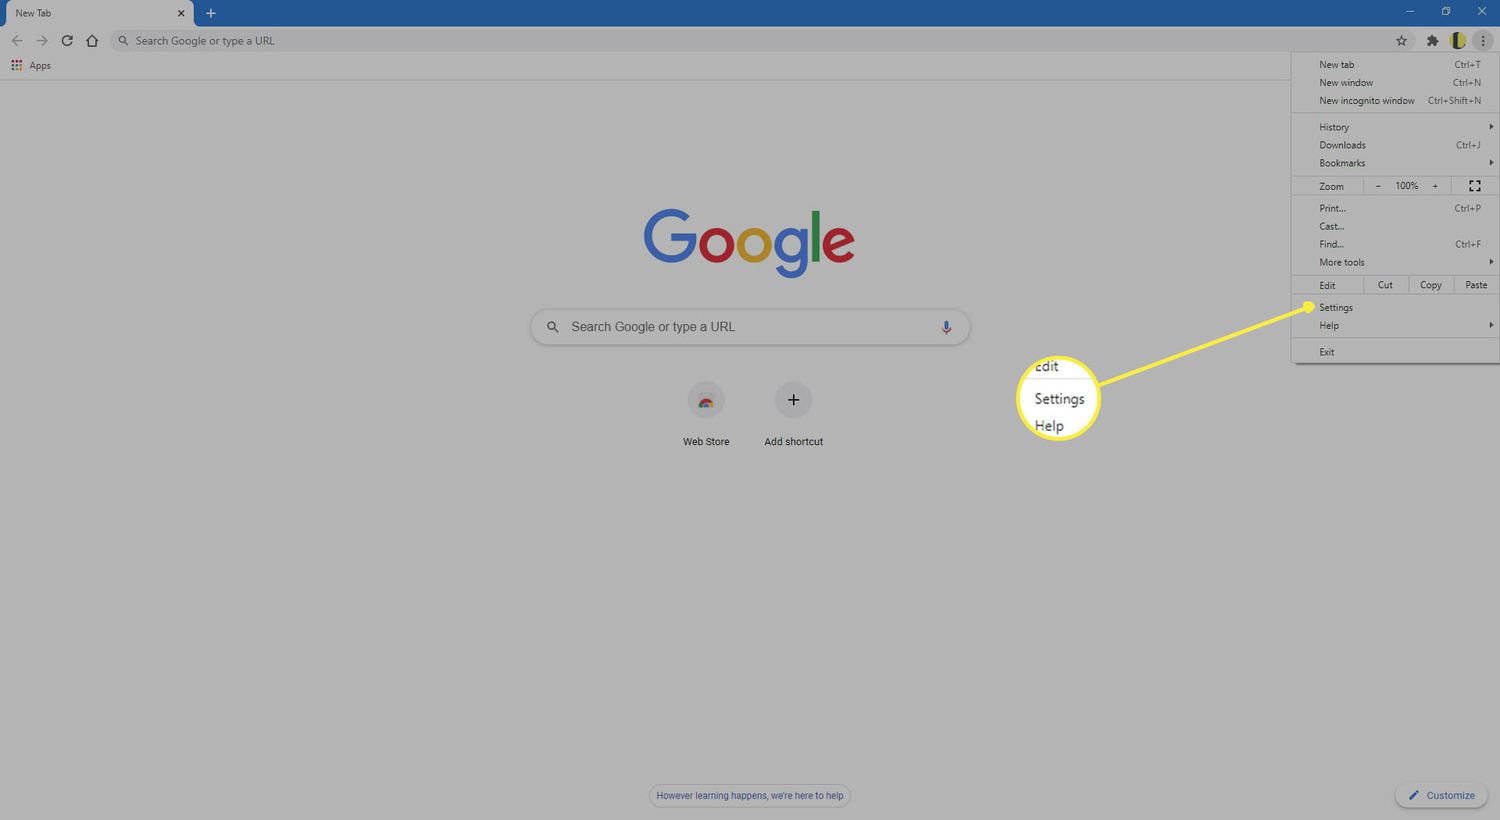
Step 3: Select "Settings"
Upon clicking the three-dot menu in the top-right corner of the Chrome browser window, the next crucial step in the process of enabling notifications is to select "Settings" from the dropdown menu. This action serves as a gateway to a plethora of customization options that allow you to tailor your browsing experience to your specific preferences.
When you click on "Settings," you are presented with a comprehensive array of options that encompass every aspect of the Chrome browser's functionality. From basic settings such as appearance and language preferences to advanced features like privacy and security controls, the "Settings" menu serves as a centralized hub for managing all aspects of your browsing experience.
As you navigate to the "Settings" option within the dropdown menu, you are greeted with a user-friendly interface that is designed to simplify the process of customizing your Chrome browser. The intuitive layout of the "Settings" menu ensures that users can effortlessly locate the specific options they wish to modify, including the essential notification settings that are integral to staying connected to the latest updates from their preferred websites.
Within the "Settings" menu, you will find a dedicated section for "Site Settings," which houses a range of controls related to website permissions, including notifications. By accessing the "Site Settings" section, you gain the ability to fine-tune your notification preferences and manage the websites from which you wish to receive notifications.
The "Settings" menu empowers you to take control of your browsing experience, allowing you to customize your notification settings with precision and ease. Whether you prefer to receive notifications from news websites, social media platforms, or other online sources, the "Settings" menu provides you with the flexibility to tailor your notification preferences according to your individual interests and priorities.
By selecting "Settings" from the three-dot menu, you are embarking on a journey towards a more personalized and enriched browsing experience. This pivotal step marks the continuation of the process, where you will delve deeper into the heart of Chrome's settings and gain the ability to manage your notification preferences with precision and efficiency.
With the "Settings" menu now at your fingertips, you are poised to explore the diverse range of customization options available within Chrome, including the essential controls for managing notifications. This pivotal step sets the stage for the subsequent phases of the process, where you will further refine your notification settings and ensure that you are always in the loop with the latest updates from your favorite websites.
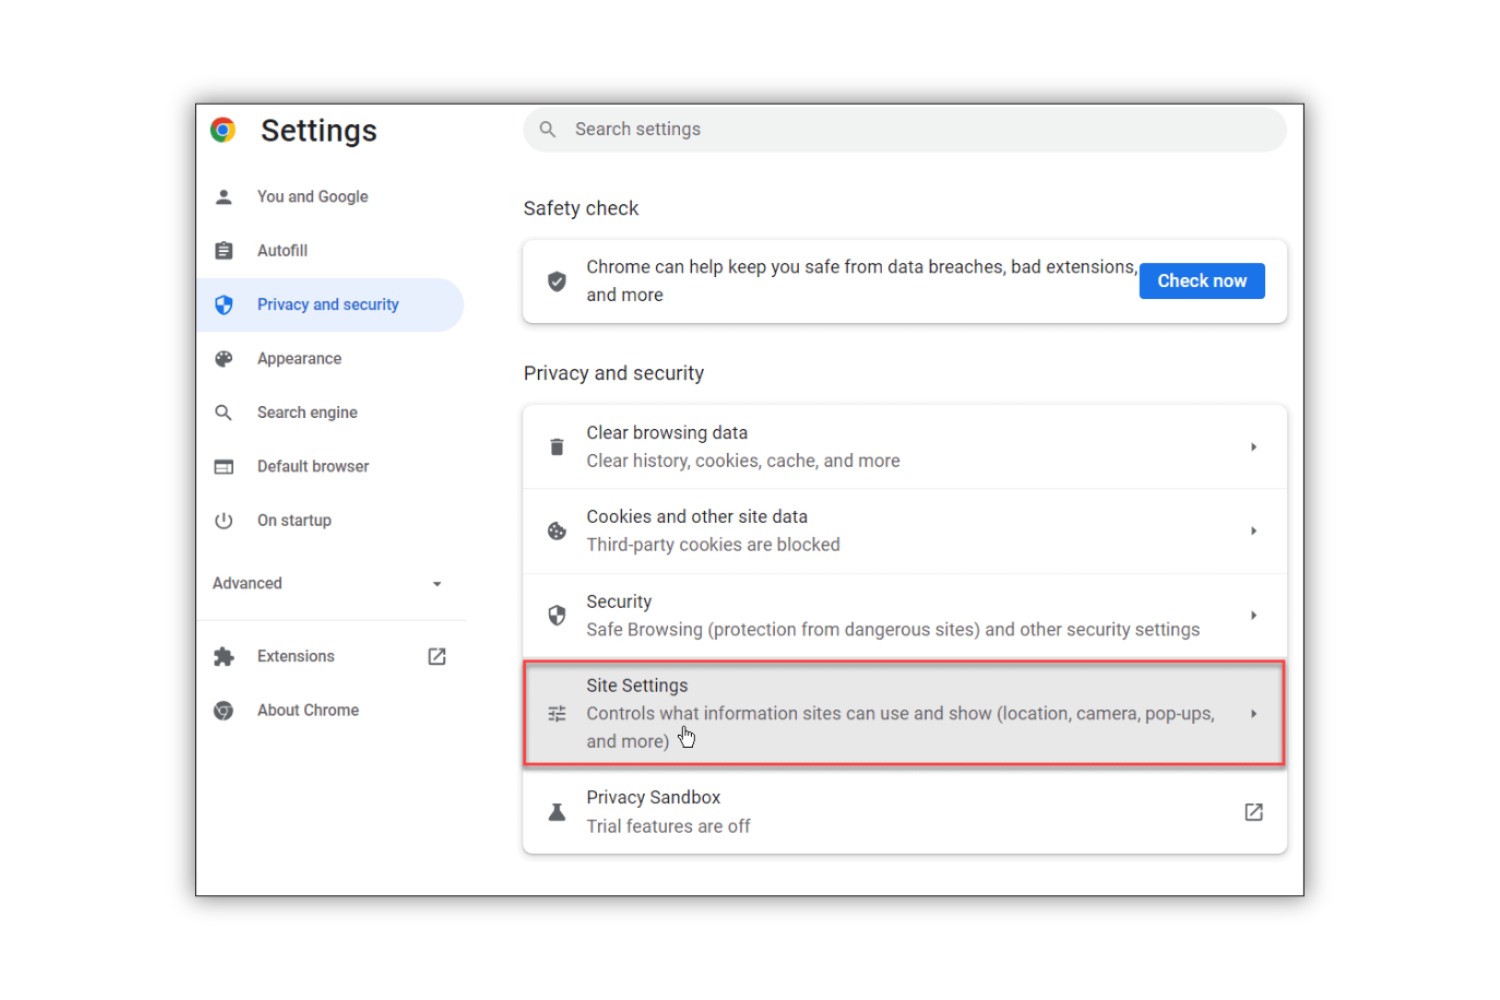
Step 4: Click on "Site Settings"
After accessing the "Settings" menu in Chrome, the next critical step in the process of enabling notifications is to click on "Site Settings." This action directs you to a dedicated section within the Chrome browser where you can manage a wide range of website permissions, including notifications.
Upon clicking on "Site Settings," you are presented with a comprehensive overview of the permissions granted to various websites you have visited. This includes permissions related to notifications, camera access, microphone access, and more. The "Site Settings" section serves as a centralized hub for managing the individual permissions granted to specific websites, allowing you to exercise precise control over your browsing experience.
Within the "Site Settings" menu, the option to manage notifications for individual websites becomes readily accessible. This empowers you to fine-tune your notification preferences on a site-by-site basis, ensuring that you receive updates from the websites that matter most to you while maintaining control over the notifications you wish to receive.
By delving into the "Site Settings" section, you gain the ability to review and modify the notification settings for each website you have visited. This level of granularity allows you to tailor your notification preferences according to the specific content and sources that are most relevant to your interests.
Furthermore, the "Site Settings" menu provides a seamless and intuitive interface for managing notifications, ensuring that you can navigate through the various options with ease. Whether you wish to enable notifications for a news website, a social media platform, or any other online source, the "Site Settings" section offers a streamlined approach to customizing your notification preferences.
By clicking on "Site Settings," you are embarking on a journey towards a more personalized and enriched browsing experience. This pivotal step marks the continuation of the process, where you will further refine your notification settings and ensure that you are always in the loop with the latest updates from your favorite websites.
With the "Site Settings" menu now at your disposal, you are poised to explore the diverse range of customization options available within Chrome, including the essential controls for managing notifications. This pivotal step sets the stage for the subsequent phases of the process, where you will further refine your notification settings and ensure that you are always in the loop with the latest updates from your favorite websites.
Step 5: Turn on notifications for specific websites
Once you have accessed the "Site Settings" section within Chrome, you are presented with the opportunity to turn on notifications for specific websites, allowing you to stay informed about the latest updates from your preferred online sources. This step is instrumental in customizing your browsing experience and ensuring that you receive timely notifications from the websites that matter most to you.
To turn on notifications for a specific website, begin by scrolling through the list of websites for which you have previously granted permissions. As you navigate through the list, identify the website for which you wish to enable notifications and click on it to access the individual site settings.
Within the site-specific settings, locate the "Notifications" option, which allows you to manage the notification preferences for the selected website. By default, notifications may be set to "Blocked" for certain websites, indicating that you are currently not receiving notifications from those sources.
To enable notifications for the chosen website, simply click on the dropdown menu next to the "Notifications" option and select "Allow." This action grants the website permission to send you notifications, ensuring that you stay updated with the latest content and updates from that particular source.
Once you have enabled notifications for the specific website, you can proceed to customize additional notification settings, such as the type of notifications you wish to receive and how they are displayed. This level of customization allows you to tailor your notification preferences according to your individual preferences and browsing habits.
By turning on notifications for specific websites, you are taking a proactive step towards staying connected to the content that matters most to you. Whether you are interested in receiving news alerts, social media updates, or other forms of online notifications, this process empowers you to curate a personalized browsing experience that aligns with your interests and priorities.
Furthermore, the ability to turn on notifications for specific websites ensures that you have direct control over the sources from which you receive updates, allowing you to streamline your browsing experience and stay informed about the content that resonates with you.
In essence, this step represents a pivotal moment in the process of enabling notifications in Chrome, as it empowers you to take charge of your browsing experience and stay connected to the latest updates from your favorite websites. By turning on notifications for specific websites, you are harnessing the power of customization and ensuring that you are always in the loop with the content that matters most to you.
Step 6: Manage notification settings for individual websites
After turning on notifications for specific websites, it's essential to understand how to manage and fine-tune the notification settings for each individual site. This level of granular control allows you to tailor your browsing experience to your precise preferences, ensuring that you receive notifications in a manner that aligns with your needs and interests.
Upon enabling notifications for a specific website, you gain access to a range of customizable settings that empower you to manage the type, frequency, and presentation of notifications from that particular source. This level of control ensures that you can curate a personalized notification experience that enhances your overall browsing experience.
To manage notification settings for an individual website, begin by revisiting the site-specific settings within the "Site Settings" section of Chrome. Locate the website for which you have enabled notifications and click on it to access the detailed site settings.
Within the site-specific settings, you will find a dedicated section for managing notifications. This section provides you with the ability to customize various aspects of the notification experience, including the type of notifications you wish to receive, the sound or visual cues associated with notifications, and the frequency of notifications from the selected website.
Furthermore, you have the option to modify the notification behavior for each individual website, allowing you to tailor the notification settings to suit your browsing habits and preferences. Whether you prefer to receive banner notifications, pop-up alerts, or silent notifications that appear in the notification center, the customization options within the site-specific settings empower you to personalize your notification experience.
Additionally, you can choose to disable notifications for a specific website if you no longer wish to receive updates from that source. This level of flexibility ensures that you have full control over the notifications you receive, allowing you to curate a browsing experience that is tailored to your specific interests and priorities.
By managing notification settings for individual websites, you are taking a proactive approach to customizing your browsing experience and ensuring that you receive notifications in a manner that enhances your overall productivity and engagement with online content. This level of control empowers you to stay connected to the latest updates from your preferred websites while maintaining a seamless and personalized browsing experience.
Conclusion
In conclusion, the process of turning on notifications in Chrome is a pivotal step towards customizing your browsing experience and staying connected to the latest updates from your favorite websites. By following the simple yet impactful steps outlined in this guide, you have gained a deeper understanding of how to manage notification settings with precision and efficiency.
From opening the Chrome browser to accessing the three-dot menu and navigating through the settings to enable notifications for specific websites, you have embarked on a journey towards a more personalized and enriched browsing experience. The ability to fine-tune your notification preferences empowers you to curate a browsing experience that aligns with your individual interests and priorities, ensuring that you receive timely updates from the sources that matter most to you.
By delving into the intricacies of the "Site Settings" section and turning on notifications for specific websites, you have taken proactive steps towards staying informed about the content that resonates with you. The ability to manage notification settings for individual websites further enhances your control over the type, frequency, and presentation of notifications, allowing you to tailor your browsing experience to your precise preferences.
As you navigate through the notification settings within Chrome, you have harnessed the power of customization and ensured that you are always in the loop with the latest updates from your preferred online sources. Whether you are interested in receiving news alerts, social media updates, or other forms of online notifications, the process outlined in this guide has equipped you with the knowledge and tools to curate a personalized notification experience that enhances your overall browsing experience.
In essence, the ability to manage notification settings in Chrome empowers you to stay connected to the content that matters most to you while maintaining control over the notifications you wish to receive. This level of granularity ensures that you can streamline your browsing experience and receive updates in a manner that aligns with your individual preferences and browsing habits.
By embracing the customization options available within Chrome, you have unlocked the potential for a more tailored and enriched browsing experience, where notifications play a crucial role in keeping you informed and engaged with the content that resonates with you. With your notification settings now fine-tuned to your preferences, you are poised to embark on a seamless and personalized browsing journey, where timely updates and relevant notifications enhance your overall productivity and engagement with online content.