Introduction
Google Chrome is a popular web browser known for its user-friendly interface and extensive customization options. While notifications can be helpful for staying updated on important events and activities, they can also become overwhelming when they flood your screen with constant interruptions. If you find yourself bombarded with notifications from various websites while browsing with Google Chrome, you may be wondering how to regain control over this aspect of your online experience.
Thankfully, Google Chrome provides a straightforward method for managing notifications, allowing you to customize your browsing experience according to your preferences. Whether you want to disable notifications from specific websites or block them altogether, Chrome offers the flexibility to tailor your notification settings to suit your needs.
In this guide, we will walk you through the step-by-step process of stopping notifications on Google Chrome. By following these instructions, you can reclaim your browsing experience and enjoy a more focused and uninterrupted time online. Whether you're tired of constant pop-ups or simply seeking a quieter browsing environment, taking control of your notification settings can significantly enhance your overall browsing experience.
So, if you're ready to bid farewell to intrusive notifications and regain control over your browsing experience, let's dive into the simple yet effective methods for stopping notifications on Google Chrome. Whether you're a seasoned Chrome user or just getting started with this popular browser, these steps will empower you to customize your notification settings and enjoy a more peaceful and distraction-free browsing experience.
Step 1: Open Google Chrome
To begin the process of managing notifications on Google Chrome, the first step is to open the browser on your device. Whether you are using a desktop computer, laptop, or mobile device, launching Google Chrome is the initial action required to access the browser's settings and customization options.
On a desktop or laptop computer, you can open Google Chrome by locating the browser's icon on your desktop, taskbar, or application menu. Simply double-click on the icon to launch the browser and access its interface. Alternatively, you can use the search function on your computer to find and open Google Chrome.
If you are using a mobile device such as a smartphone or tablet, you can open Google Chrome by tapping on the browser's icon on your home screen or app menu. Once launched, the browser will open to reveal its familiar interface, providing access to a wide range of features and settings.
Upon opening Google Chrome, you will be greeted by the browser's homepage or the last webpage you visited, depending on your browsing history and settings. From this point, you can proceed to the next steps in the process of managing notifications, which involve accessing the browser's menu and navigating to the appropriate settings.
By successfully opening Google Chrome, you have taken the first step towards gaining control over your notification preferences and customizing your browsing experience. With the browser now accessible on your device, you are ready to move on to the next steps, where you will be guided through the process of adjusting notification settings to suit your preferences and browsing habits.
In summary, opening Google Chrome is the initial step in the process of managing notifications on the browser. By launching the browser on your device, you gain access to the interface and functionality needed to navigate to the settings where notification preferences can be customized and adjusted according to your preferences. With Google Chrome now open and ready for customization, you are prepared to proceed to the subsequent steps and take control of your notification settings.
Step 2: Click on the three-dot menu
Upon opening Google Chrome, you will notice a three-dot icon located at the top-right corner of the browser window. This icon serves as a gateway to a plethora of customization options and settings, including the ability to manage notifications. By clicking on the three-dot menu, you can access the browser's menu, where various features and settings are conveniently organized for easy navigation.
To proceed with managing notifications, simply position your cursor over the three-dot icon and left-click on it. This action will trigger the display of a dropdown menu, unveiling a range of options and functionalities designed to enhance your browsing experience. The three-dot menu serves as a central hub for accessing essential tools and settings, allowing you to tailor Google Chrome to your specific preferences and requirements.
Upon clicking on the three-dot menu, you will be presented with a variety of options, including those related to browsing history, bookmarks, extensions, and more. Additionally, you will find the "Settings" option within the menu, which is pivotal for customizing various aspects of the browser, including notification preferences.
By clicking on the three-dot menu and accessing the browser's menu, you have taken a crucial step towards managing notifications on Google Chrome. This action sets the stage for navigating to the "Settings" section, where you can delve into the specific options related to notification management. With the three-dot menu serving as your gateway to a wealth of customization possibilities, you are now poised to proceed to the next steps in the process of fine-tuning your notification settings.
In summary, clicking on the three-dot menu within Google Chrome's interface provides access to a comprehensive array of features and settings, including the essential "Settings" option. This action marks the beginning of the journey towards managing notifications, empowering you to tailor your browsing experience according to your preferences. With the three-dot menu serving as a pivotal entry point to the browser's customization options, you are now ready to advance to the subsequent steps and further refine your notification settings.
Step 3: Select "Settings"
After clicking on the three-dot menu in the top-right corner of the Google Chrome interface, the next step in managing notifications involves selecting the "Settings" option from the dropdown menu. This action will direct you to the browser's settings interface, where a wide range of customization options and preferences can be accessed and adjusted to suit your browsing habits and requirements.
Upon clicking on the three-dot menu, you will observe a dropdown menu displaying various options and functionalities. Among these options, you will find "Settings," typically located towards the bottom of the menu. To proceed, simply position your cursor over the "Settings" option and left-click on it. This action will transition you to the settings interface, where you can explore and modify numerous aspects of Google Chrome to align with your preferences.
Upon entering the settings interface, you will encounter a user-friendly layout that organizes the browser's customization options into distinct categories, facilitating easy navigation and access to specific features. The settings interface serves as a central hub for adjusting preferences related to privacy and security, appearance, search engine settings, and more. It provides a comprehensive toolkit for tailoring your browsing experience and optimizing the browser's functionality according to your individual needs.
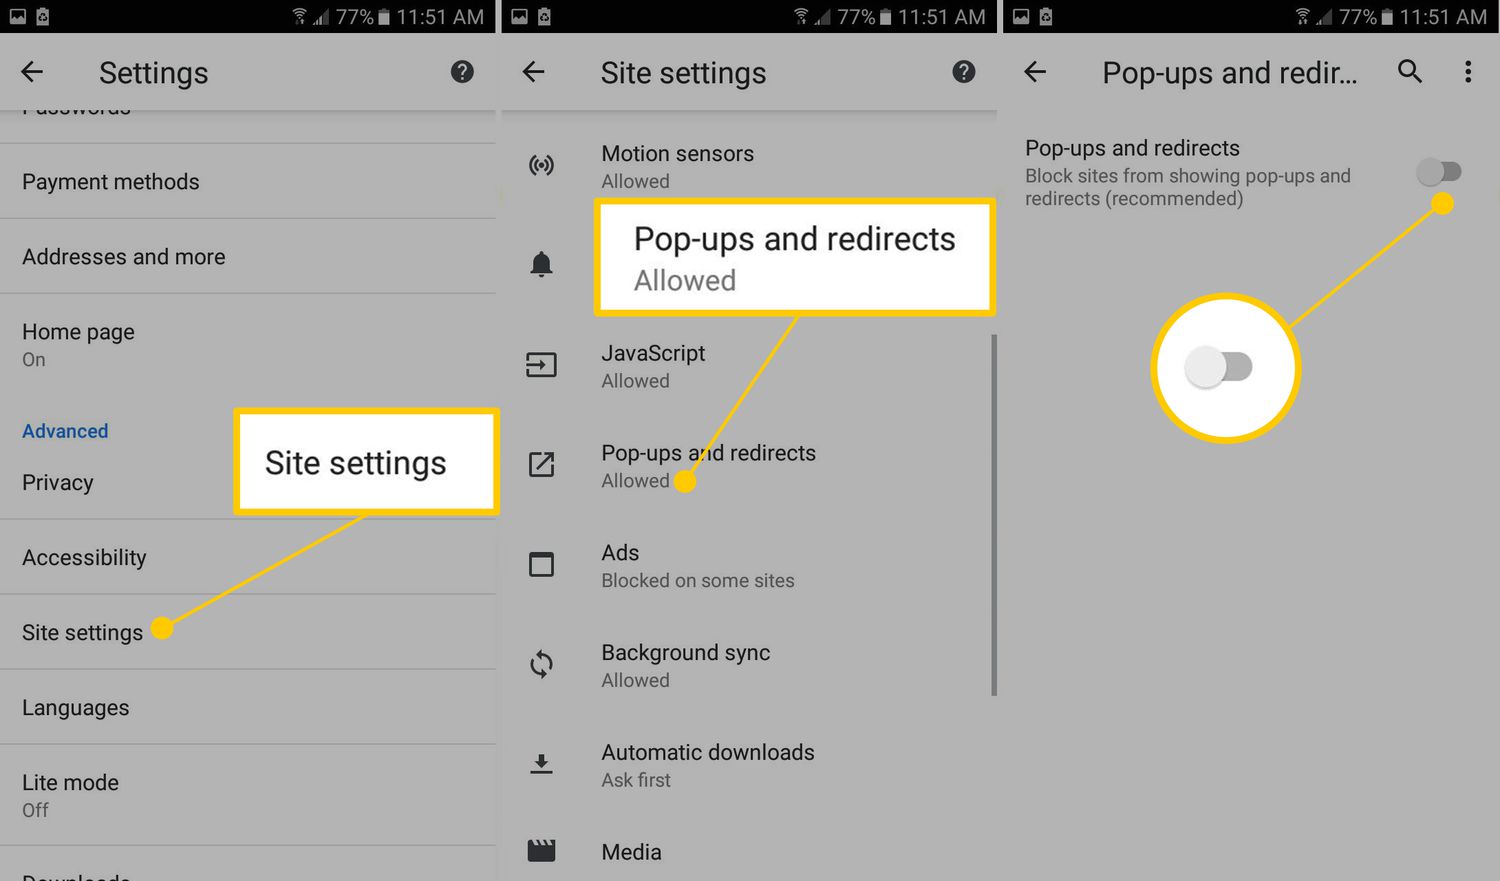
Within the settings interface, you will find a navigation panel on the left-hand side, presenting a list of categories such as "Privacy and security," "Autofill," "Advanced," and others. To manage notifications, you will navigate to the "Privacy and security" section, which encompasses essential settings related to website permissions, content settings, and notifications.
Upon selecting the "Privacy and security" category, you will be presented with a range of options, including "Site settings." This section is pivotal for customizing permissions and preferences for individual websites, including the management of notifications. By clicking on "Site settings," you will gain access to a suite of controls that empower you to fine-tune your browsing experience and tailor notification settings to your liking.
In summary, selecting "Settings" from the three-dot menu within Google Chrome's interface leads you to the browser's settings interface, where a wealth of customization options and preferences await. By navigating to the "Privacy and security" category and accessing "Site settings," you position yourself to delve into the specific controls for managing notifications. This pivotal step sets the stage for further customization, allowing you to refine your notification preferences and enjoy a more personalized and focused browsing experience.
Step 4: Click on "Site Settings"
Upon entering the settings interface in Google Chrome, the next crucial step in managing notifications involves clicking on "Site Settings." This action directs you to a dedicated section where you can fine-tune permissions and preferences for individual websites, including the management of notifications.
By clicking on "Site Settings" within the settings interface, you gain access to a comprehensive array of controls that empower you to customize your browsing experience according to your preferences. This section serves as a centralized platform for managing website permissions, content settings, and notifications, offering a user-friendly interface that facilitates seamless customization.
Upon selecting "Site Settings," you will be presented with a range of options and preferences that can be adjusted to align with your browsing habits and requirements. One of the key features within this section is the ability to manage notifications from specific websites, granting you the flexibility to tailor your browsing experience based on individual preferences.
Within the "Site Settings" section, you will find a list of websites for which you can customize permissions and preferences, including notification settings. This allows you to selectively enable or disable notifications from specific sites, providing a granular level of control over the types of alerts and pop-ups you receive while browsing.
Furthermore, "Site Settings" offers the capability to view and modify permissions for various website features, such as location access, camera and microphone usage, and more. This comprehensive approach to website permissions empowers you to manage your online interactions in a manner that aligns with your privacy and security preferences.
By clicking on "Site Settings" and exploring the available options, you position yourself to take control of your notification preferences and customize your browsing experience to suit your individual needs. Whether you seek to limit notifications from certain websites or fine-tune your overall browsing environment, the "Site Settings" section provides the tools necessary to achieve a personalized and focused online experience.
In summary, clicking on "Site Settings" within the settings interface of Google Chrome leads you to a versatile platform for managing website permissions and preferences, including the customization of notification settings. This pivotal step empowers you to tailor your browsing experience according to your preferences, offering a user-friendly interface that facilitates seamless customization and control over your online interactions.
Step 5: Choose "Notifications"
Upon navigating to the "Site Settings" section within Google Chrome's settings interface, the next critical step in managing notifications involves choosing the "Notifications" option. This pivotal action directs you to a dedicated area where you can fine-tune and customize your notification preferences for individual websites, granting you the flexibility to tailor your browsing experience based on your specific preferences and requirements.
Upon selecting "Notifications," you will be presented with a comprehensive overview of the websites for which you have enabled or disabled notification permissions. This interface provides a clear and organized display of your notification settings, allowing you to easily identify and manage the websites from which you wish to receive or block notifications.
Within the "Notifications" section, you have the ability to review and modify the notification permissions for each individual website, empowering you to make informed decisions about the types of alerts and pop-ups you encounter while browsing. This granular level of control ensures that you can curate your notification experience to align with your preferences, whether you prefer to stay informed about updates from specific websites or minimize interruptions during your browsing sessions.
Furthermore, the "Notifications" interface offers a streamlined approach to managing your notification preferences, providing intuitive controls that enable you to enable or disable notifications for each website with ease. This user-friendly functionality ensures that you can effortlessly customize your notification settings without unnecessary complexity, allowing you to maintain a focused and uninterrupted browsing experience.
By choosing "Notifications" within the "Site Settings" section, you position yourself to take full control of your notification preferences and tailor your browsing experience according to your individual needs. Whether you seek to receive timely updates from select websites or minimize distractions by blocking notifications from others, the "Notifications" interface equips you with the tools necessary to achieve a personalized and optimized online experience.
In summary, choosing "Notifications" within the "Site Settings" section of Google Chrome's settings interface empowers you to customize your notification preferences with precision and ease. This pivotal step provides a streamlined platform for managing website-specific notification settings, ensuring that you can curate your browsing experience to align with your preferences and enjoy a more focused and tailored online interaction.
Step 6: Turn off notifications for specific sites
In the process of managing notifications on Google Chrome, the ability to turn off notifications for specific sites offers a valuable means of customizing your browsing experience to align with your preferences. This feature empowers you to selectively disable notifications from individual websites, providing a tailored approach to managing the alerts and pop-ups you encounter while browsing.
Upon entering the "Notifications" section within the "Site Settings" interface, you will be presented with a list of websites for which you have enabled notification permissions. To turn off notifications for a specific site, simply locate the website in question within the list and proceed to modify its notification settings.
By clicking on the website entry, you will be presented with the option to toggle the notification permissions on or off. This intuitive functionality allows you to disable notifications from the selected website, effectively preventing it from displaying alerts or pop-ups while you browse.
Turning off notifications for specific sites grants you the flexibility to curate your browsing experience according to your preferences. Whether you wish to minimize interruptions from certain websites or create a more focused online environment, this feature empowers you to tailor your notification settings with precision.
Furthermore, the ability to turn off notifications for specific sites reflects Google Chrome's commitment to providing users with granular control over their browsing experience. By offering a straightforward method for managing website-specific notification permissions, the browser ensures that you can customize your online interactions in a manner that suits your individual needs and preferences.
In summary, the option to turn off notifications for specific sites within Google Chrome's "Notifications" section enables you to exercise precise control over the alerts and pop-ups you encounter while browsing. This feature empowers you to curate a personalized and focused online experience, aligning your notification settings with your browsing habits and preferences.
Step 7: Block all notifications
In the realm of managing notifications on Google Chrome, the option to block all notifications serves as a definitive means of creating a distraction-free browsing environment. This feature empowers users to globally disable notifications from all websites, offering a comprehensive approach to minimizing interruptions and maintaining a focused online experience.
Upon entering the "Notifications" section within the "Site Settings" interface, users can explore the option to block all notifications, providing a streamlined method for universally disabling alerts and pop-ups across the browsing experience. By selecting this option, users can effectively prevent any website from displaying notifications, ensuring a serene and uninterrupted browsing environment.
The ability to block all notifications reflects Google Chrome's commitment to empowering users with granular control over their browsing experience. This feature acknowledges the diverse preferences and requirements of users, offering a straightforward solution for those seeking a respite from the constant influx of notifications while browsing.
By choosing to block all notifications, users can curate a tailored online experience that aligns with their individual preferences. Whether seeking a tranquil environment for focused work or simply aiming to minimize distractions during leisurely browsing, this feature provides a versatile tool for customizing the notification landscape according to specific needs.
Furthermore, the global nature of this feature ensures that users can swiftly and comprehensively manage their notification settings without the need for individual adjustments for each website. This streamlined approach simplifies the process of creating a distraction-free browsing environment, allowing users to effortlessly tailor their notification preferences to suit their browsing habits and requirements.
In summary, the option to block all notifications within Google Chrome's "Notifications" section offers a powerful means of customizing the browsing experience to align with individual preferences. By providing a universal method for disabling notifications from all websites, this feature empowers users to create a serene and focused online environment, reflecting the browser's commitment to delivering a personalized and user-centric browsing experience.
Conclusion
In conclusion, the process of stopping notifications on Google Chrome encompasses a series of intuitive steps that empower users to customize their browsing experience according to their preferences. By navigating through the browser's settings and accessing the dedicated sections for managing notifications, users can exercise precise control over the alerts and pop-ups they encounter while browsing. From selectively disabling notifications for specific sites to globally blocking all notifications, Google Chrome offers a versatile toolkit for tailoring the notification landscape to suit individual needs.
The ability to manage notifications reflects the browser's commitment to providing users with a personalized and focused online experience. By offering granular controls that enable users to curate their notification settings with ease, Google Chrome acknowledges the diverse preferences and requirements of its user base. This user-centric approach ensures that individuals can enjoy a browsing environment that aligns with their specific habits and preferences, whether they seek a tranquil space for focused work or a seamless browsing experience free from interruptions.
Furthermore, the streamlined interface and intuitive functionality within Google Chrome's settings empower users to navigate through the notification management process with ease. The clear organization of options and the straightforward methods for adjusting notification settings contribute to a seamless and user-friendly experience, allowing individuals to fine-tune their browsing environment without unnecessary complexity.
Ultimately, the process of stopping notifications on Google Chrome represents a pivotal aspect of customizing the browsing experience to align with individual preferences. By providing users with the tools necessary to exercise precise control over their notification settings, Google Chrome empowers individuals to create a tailored and distraction-free online environment that enhances productivity, focus, and overall browsing satisfaction. Whether users seek to limit interruptions from specific websites or globally disable notifications for a serene browsing experience, Google Chrome's notification management capabilities cater to a diverse range of preferences, reflecting the browser's commitment to delivering a personalized and user-centric browsing experience.