Introduction
Saving images from Safari on your MacBook Air is a simple yet essential skill that allows you to preserve and utilize captivating visuals from the web. Whether you're collecting inspiration for a project, archiving memorable moments, or curating a collection of your favorite images, knowing how to save images from Safari can greatly enhance your browsing experience.
In this guide, we will walk through the step-by-step process of saving images from Safari on your MacBook Air. By following these instructions, you will be able to effortlessly store images from the web onto your device, enabling you to access them at your convenience, even when offline.
Let's embark on this journey to uncover the seamless method of preserving the images that catch your eye while browsing Safari on your MacBook Air. Whether it's a stunning photograph, an informative infographic, or a captivating illustration, you'll soon have the knowledge and skills to save these images with ease. So, let's dive in and explore the simple yet invaluable process of saving images from Safari on your MacBook Air.
Step 1: Open Safari
To begin the process of saving images from Safari on your MacBook Air, you first need to open the Safari web browser. Safari is the default browser on MacBook Air, offering a seamless and intuitive browsing experience. You can easily access Safari by locating it in the Dock, which is typically located at the bottom of the screen. Alternatively, you can use Spotlight Search by pressing Command + Space and typing "Safari" to launch the browser.
Upon opening Safari, you will be greeted by a clean and user-friendly interface, designed to provide a smooth and efficient browsing experience. The browser's minimalist design allows you to focus on the content of the web pages you visit, ensuring that your attention is directed towards the images and information you encounter.
Once Safari is open, you can navigate to your desired web page by entering the URL in the address bar or selecting a bookmark from your saved favorites. Safari's sleek and responsive interface enables you to swiftly move between web pages, making it effortless to explore and discover captivating images across various websites.
As you embark on your browsing journey within Safari, you will encounter a diverse array of images, ranging from striking visuals to informative graphics. Whether you're exploring a photography portfolio, reading an article with embedded images, or browsing an online gallery, Safari provides a platform for you to encounter and appreciate a wide range of captivating visuals.
By opening Safari on your MacBook Air, you gain access to a world of imagery and creativity, waiting to be explored and preserved. The browser serves as your gateway to the vast landscape of the internet, where images of all kinds await your discovery. With Safari at your fingertips, you are ready to embark on the next step of saving the images that pique your interest and resonate with you.
Opening Safari is the initial step that sets the stage for the image-saving process, allowing you to immerse yourself in the visual wonders of the web and prepare to capture and preserve the images that captivate your attention. So, let's move forward to the next step and delve into the process of navigating to the image you wish to save.
Step 2: Navigate to the Image
Once Safari is open on your MacBook Air, the next step is to navigate to the specific web page containing the image you wish to save. Safari offers a seamless and intuitive browsing experience, allowing you to effortlessly explore the web and discover captivating visuals.
You can begin by entering the URL of the website directly into the address bar, or you may choose to select a bookmark from your saved favorites. Safari's user-friendly interface enables you to swiftly move between web pages, providing you with the flexibility to navigate to your desired destination with ease.
As you explore various web pages within Safari, you will encounter a diverse array of images, each with its own unique appeal and significance. Whether you're browsing a photography blog, exploring an online magazine, or visiting a social media platform, Safari empowers you to immerse yourself in a rich tapestry of visual content.
Upon reaching the web page containing the image you intend to save, take a moment to appreciate the visual elements presented to you. Whether it's a captivating photograph, an engaging illustration, or an informative infographic, Safari provides a platform for you to encounter and appreciate a wide range of captivating visuals.
Safari's responsive design ensures that the images on the web page are displayed in a visually appealing manner, allowing you to fully appreciate their details and significance. As you navigate through the web page, take the time to identify the specific image that resonates with you and that you wish to save for future reference.
By navigating to the web page containing the image, you position yourself to engage with the visual content in a meaningful way, preparing to embark on the next step of saving the image to your MacBook Air. With Safari as your gateway to the world of online imagery, you are ready to proceed to the subsequent step of saving the selected image.
Navigating to the image within Safari is a pivotal stage that allows you to immerse yourself in the visual wonders of the web and prepare to capture and preserve the images that captivate your attention. As you navigate through the web pages, you are poised to encounter a diverse array of captivating visuals, each waiting to be discovered and preserved.
Step 3: Save the Image
Once you have located the image you wish to save within Safari on your MacBook Air, the next step is to initiate the process of saving the image onto your device. Safari provides a straightforward method for saving images, allowing you to preserve captivating visuals with ease.
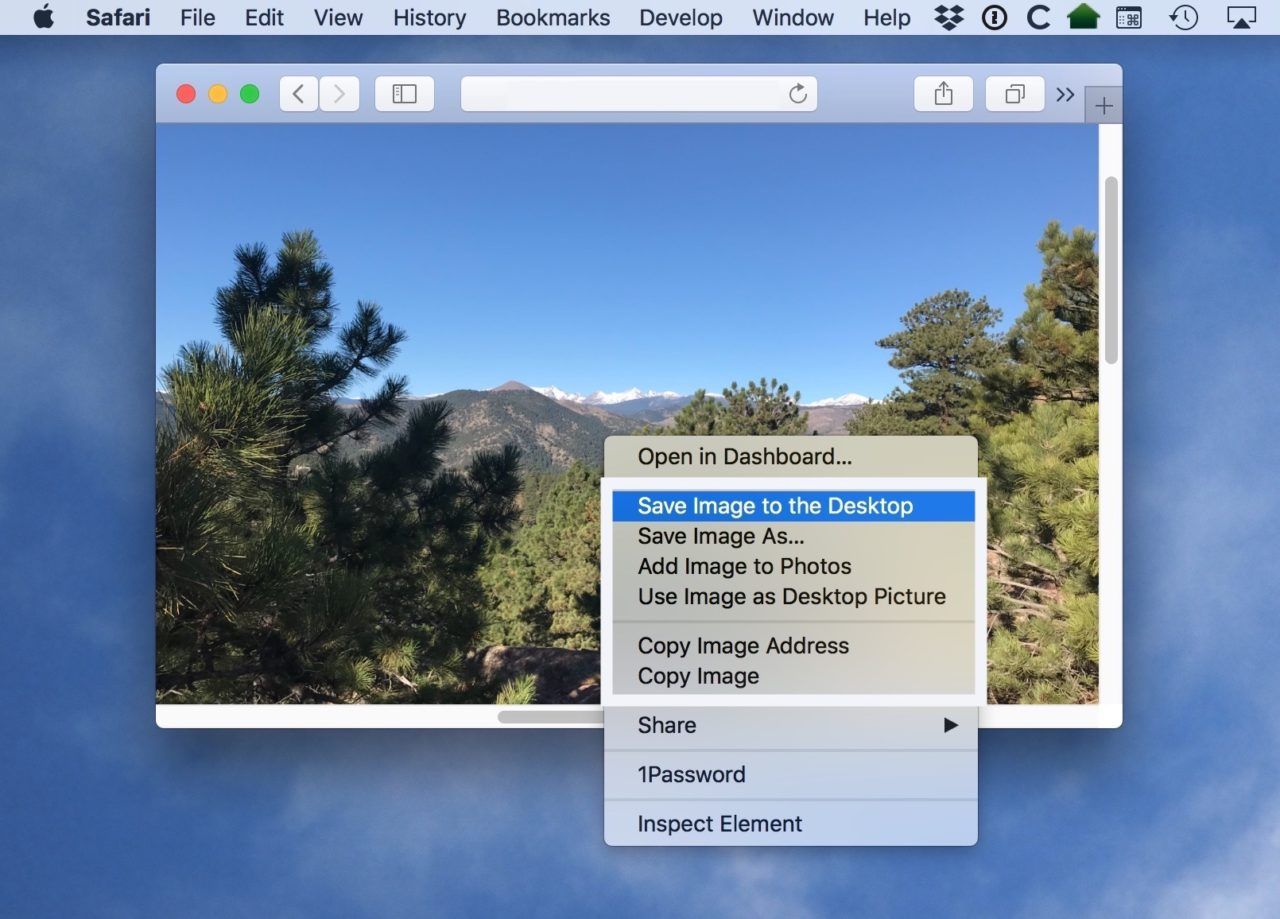
To save the image, you can perform a simple right-click (or Control-click) on the image itself. This action will prompt a contextual menu to appear, presenting you with various options related to the image. Within this menu, you will typically find the "Save Image As" or "Download Image" option, depending on the version of Safari you are using.
Upon selecting the "Save Image As" or "Download Image" option, Safari will prompt you to choose a location on your MacBook Air where the image will be saved. This step allows you to specify the destination folder for storing the image, providing you with the flexibility to organize your saved visuals according to your preferences.
After choosing the location, you can proceed to name the image file. Safari typically suggests a default file name based on the image's content or source. However, you have the freedom to rename the file according to your preference, enabling you to create a meaningful and identifiable title for the saved image.
Once you have designated the file name and confirmed the location for saving the image, you can proceed to initiate the download process. Safari will seamlessly save the image to the specified location on your MacBook Air, ensuring that the captivating visual content is preserved for your future access and enjoyment.
By following these simple steps within Safari, you can effortlessly save images from the web onto your MacBook Air, allowing you to curate a personalized collection of visuals that inspire, inform, and resonate with you. Whether it's a breathtaking landscape, a thought-provoking artwork, or a useful diagram, Safari empowers you to capture and retain the images that enrich your browsing experience.
Saving images from Safari on your MacBook Air is a valuable skill that enables you to build a repository of visual inspiration and reference materials. With the ability to seamlessly save images, you can curate a personalized gallery of visuals that reflect your interests, aspirations, and creative endeavors.
Step 4: Choose the Location
When saving an image from Safari on your MacBook Air, the process of choosing the location for storing the image is a crucial step that offers flexibility and organization. After initiating the download of the image, Safari prompts you to specify the destination folder where the image will be saved on your device.
Selecting the location allows you to strategically organize your saved images, ensuring easy access and efficient management. Your MacBook Air provides a range of storage options, including the ability to save images to specific folders within the device's internal storage or external drives, offering versatility in managing your visual content.
By choosing the location for the saved image, you can tailor the organization of your visual collection to suit your preferences and workflow. Whether you prefer to create dedicated folders for different categories of images, such as "Travel," "Art," or "Inspiration," or store them in a general "Images" folder, the flexibility provided by Safari enables you to curate a personalized and well-structured repository of visuals.
Furthermore, the option to select the location for saving the image empowers you to maintain a tidy and efficient storage system on your MacBook Air. By designating specific folders or directories, you can easily locate and retrieve saved images when needed, streamlining your browsing experience and enhancing your ability to utilize the preserved visuals for various purposes.
In addition, the process of choosing the location for the saved image fosters a sense of organization and intentionality in managing your visual resources. Whether you are saving images for personal inspiration, professional projects, or educational purposes, the ability to select the storage location ensures that your visual content is stored in a manner that aligns with your workflow and creative endeavors.
Ultimately, the step of choosing the location for saving the image within Safari on your MacBook Air empowers you to exercise control over the organization and accessibility of your visual collection. By strategically designating the storage location, you can create a well-structured repository of images that reflects your interests, aspirations, and creative pursuits, enhancing the overall browsing and image-saving experience on your MacBook Air.
Step 5: Access the Saved Image
After successfully saving an image from Safari on your MacBook Air, accessing the saved image is a seamless process that allows you to retrieve and utilize the preserved visual content. Whether you've saved an inspiring photograph, an informative diagram, or a captivating illustration, Safari empowers you to effortlessly access the images you've stored, enabling you to integrate them into your creative projects, presentations, or personal collections.
To access the saved image, you can begin by navigating to the location where the image was stored on your MacBook Air. Depending on the location you selected during the saving process, the image may be located within a specific folder, directory, or the default downloads location on your device. By accessing the designated location, you gain visibility and immediate access to the saved image, allowing you to retrieve it for various purposes.
Once you have located the saved image, you can open it using the default image viewing application on your MacBook Air. The native Preview app provides a convenient and intuitive platform for viewing and interacting with saved images, offering features such as zooming, rotating, and basic editing capabilities. By opening the image in Preview, you can fully appreciate its details, composition, and visual impact, gaining a deeper understanding of its significance and potential applications.
Furthermore, accessing the saved image enables you to seamlessly integrate it into your creative endeavors. Whether you're working on a design project, compiling a visual presentation, or simply seeking inspiration for your artistic pursuits, the ability to access the saved image positions you to leverage its visual content in a meaningful and impactful manner. By incorporating the saved image into your creative workflow, you can harness its visual appeal and communicative power to enhance your projects and express your ideas effectively.
In addition to accessing the saved image for personal use, you may also utilize it for sharing and collaboration purposes. Whether you intend to incorporate the image into a collaborative project, share it with colleagues or friends, or utilize it in a professional presentation, the accessibility of the saved image empowers you to seamlessly distribute and showcase its visual content, fostering engagement and communication within various contexts.
Ultimately, the process of accessing the saved image from Safari on your MacBook Air marks the culmination of the image-saving journey, allowing you to fully engage with and leverage the preserved visual content. By seamlessly retrieving the saved image, you position yourself to integrate it into your creative endeavors, share it with others, and derive inspiration and value from its visual impact. As you access the saved image, you embark on a new phase of creativity and expression, harnessing the power of visual content to enrich your digital experiences and endeavors.