Introduction
Google Chrome, one of the most popular web browsers worldwide, offers a plethora of extensions to enhance user experience. These extensions, also known as add-ons or plugins, provide additional functionalities, ranging from productivity tools to entertainment features. However, with the multitude of extensions available, it can be challenging to access them quickly when needed. Fortunately, Chrome allows users to pin their favorite extensions to the browser's toolbar, ensuring easy access with just a single click.
In this guide, you will learn how to pin an extension in Chrome, streamlining your browsing experience and maximizing the utility of your preferred add-ons. Whether you want to keep your email notifier, task manager, or any other essential extension within arm's reach, pinning it to the toolbar can significantly boost your productivity and convenience.
By following the simple steps outlined in this tutorial, you will be able to customize your Chrome browser with the extensions that matter most to you. Let's dive into the process of pinning an extension in Chrome and take control of your browsing experience.
Step 1: Open Chrome Web Store
To begin the process of pinning an extension in Chrome, the first step is to open the Chrome Web Store. This is the official online marketplace where users can discover, access, and install a wide range of extensions, apps, and themes for their Chrome browser. Accessing the Chrome Web Store is a straightforward process that can be accomplished in just a few clicks.
-
Launch Google Chrome: Start by opening the Google Chrome browser on your computer. You can do this by clicking on the Chrome icon on your desktop or by searching for Chrome in your computer's application menu.
-
Access the Chrome Web Store: Once Chrome is open, navigate to the Chrome Web Store by entering the following URL into the address bar: https://chrome.google.com/webstore. Alternatively, you can simply type "Chrome Web Store" into the Google search bar and click on the official link that appears in the search results.
-
Explore the Web Store: Upon reaching the Chrome Web Store, you will be greeted with a visually appealing interface that showcases various categories of extensions, apps, and themes. Take a moment to explore the featured items, top charts, and recommended collections to get a sense of the diverse offerings available.
-
Search for the Desired Extension: If you already have a specific extension in mind that you wish to pin to your Chrome toolbar, you can use the search bar located at the top of the Chrome Web Store. Simply enter the name or keywords related to the extension you're looking for, and the search results will display relevant options for you to consider.
By successfully navigating to the Chrome Web Store, you have completed the first step in the process of pinning an extension in Chrome. This sets the stage for the subsequent steps, where you will locate and pin the desired extension to your browser's toolbar, ensuring quick and convenient access to its functionalities. With the Chrome Web Store at your fingertips, you are ready to embark on the next phase of customizing your browsing experience with the extensions that best suit your needs and preferences.
Step 2: Search for the Extension
After accessing the Chrome Web Store, the next crucial step in pinning an extension in Chrome is to search for the specific extension you wish to add to your browser's toolbar. The Chrome Web Store offers a vast collection of extensions, ranging from productivity tools and ad blockers to language translators and social media enhancements. With such a diverse array of options, finding the right extension to cater to your needs is an exciting and personalized experience.
Utilizing the search bar at the top of the Chrome Web Store, you can enter keywords or the name of the extension you are seeking. This initiates a dynamic search process that scours the extensive database of extensions, swiftly presenting you with relevant results. As you type in your search query, the Chrome Web Store's intelligent search functionality provides real-time suggestions, streamlining the process of discovering the desired extension.
When searching for an extension, it's beneficial to use specific keywords related to the functionality or purpose of the extension. For instance, if you are looking for a password manager, entering terms like "password," "security," or "login" can yield targeted results. Additionally, if you already know the name of the extension you want, simply typing it into the search bar can swiftly lead you to the desired option.
As you browse through the search results, take the time to review the details provided for each extension. This includes the extension's name, icon, user ratings, and a brief description of its features. Paying attention to user ratings and reviews can offer valuable insights into the extension's performance and user satisfaction, helping you make an informed decision.
Furthermore, the Chrome Web Store allows users to filter search results based on various criteria, such as relevance, user ratings, and the date the extension was last updated. These filters can assist you in refining your search and identifying the most suitable extension for your needs.
By effectively searching for the extension that aligns with your requirements, you are one step closer to enhancing your browsing experience with the perfect add-on. The search process empowers you to explore the diverse range of extensions available in the Chrome Web Store, ensuring that you can pinpoint the ideal extension to pin to your browser's toolbar. With the search for the extension underway, you are poised to proceed to the next phase of pinning it to the Chrome toolbar, bringing its functionalities within easy reach for seamless access and utilization.
Step 3: Click on the Extension
Once you have located the desired extension in the Chrome Web Store, the next step is to click on the extension to access its detailed information and initiate the process of adding it to your Chrome browser. Clicking on the extension enables you to delve deeper into its features, user reviews, and additional details, empowering you to make an informed decision before integrating it into your browsing environment.
When you click on the extension, you will be directed to its dedicated page within the Chrome Web Store. This page serves as a comprehensive hub of information, presenting you with essential details about the extension's functionality, compatibility, and user feedback. Here, you can explore the extension's description, which outlines its primary features and benefits, providing you with valuable insights into how it can enhance your browsing experience.
Furthermore, the extension's page showcases user ratings and reviews, offering firsthand perspectives from individuals who have utilized the extension. By assessing user feedback, you can gain a deeper understanding of the extension's performance, reliability, and overall utility. Positive reviews can instill confidence in the extension's capabilities, while constructive criticism can highlight potential limitations or areas for improvement.
In addition to user feedback, the extension's page often includes screenshots or demonstration videos, allowing you to visualize how the extension functions within the Chrome browser. These visual aids offer a glimpse of the extension's interface and its impact on the browsing environment, helping you envision how it can seamlessly integrate into your daily online activities.
As you navigate the extension's page, you may also encounter additional information, such as the developer's details, the extension's version history, and any permissions it requires to operate effectively. This comprehensive overview equips you with the knowledge needed to make an informed decision about integrating the extension into your browsing ecosystem.
By clicking on the extension and immersing yourself in its dedicated page, you are actively engaging with the process of evaluating its suitability for your browsing needs. This step empowers you to gather crucial insights, assess user feedback, and visualize the extension's functionality, laying the groundwork for the final phase of pinning it to your Chrome toolbar. With a clear understanding of the extension's features and user reception, you are well-prepared to proceed to the subsequent step of seamlessly integrating it into your browsing experience.
Step 4: Pin the Extension to the Toolbar
After identifying the extension that aligns with your browsing needs and preferences, the final step involves pinning the extension to the Chrome toolbar, ensuring convenient access to its functionalities with a single click. This straightforward process allows you to customize your browsing environment and streamline your interactions with the extension, enhancing your overall productivity and user experience.
To pin the extension to the toolbar, follow these simple steps:
-
Click on the Extension Icon: Upon reaching the extension's dedicated page in the Chrome Web Store, locate the "Add to Chrome" button or a similar option that signifies the capability to integrate the extension into your browser. Clicking on this button initiates the installation process, prompting a confirmation dialog to appear, requesting permission to add the extension to your Chrome browser.
-
Grant Permission: Upon receiving the confirmation prompt, review the permissions requested by the extension to ensure that they align with your comfort level and security preferences. Chrome provides transparency regarding the permissions an extension requires, empowering users to make informed decisions about the access granted to each add-on. If you are satisfied with the permissions requested, proceed by clicking "Add Extension" in the confirmation dialog.
-
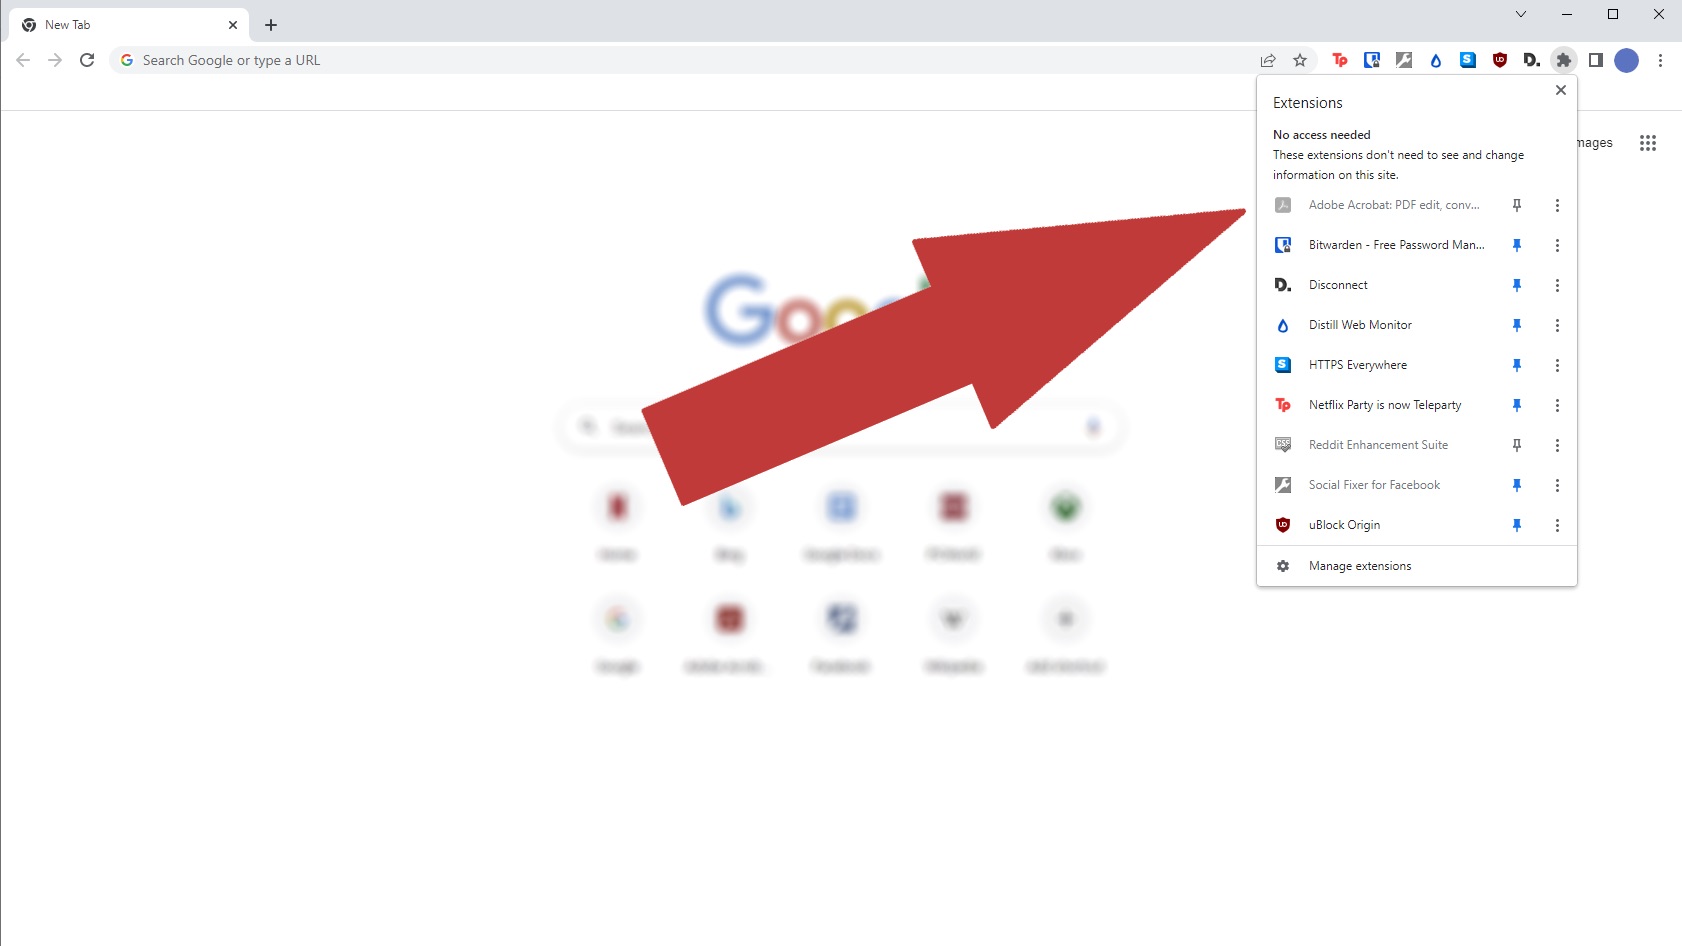
Pin the Extension: Once the extension is successfully added to your Chrome browser, its icon will typically appear in the toolbar area, adjacent to the address bar. To pin the extension for easy access, right-click on the extension's icon. A context menu will appear, presenting you with various options related to the extension. From this menu, select the "Pin" or "Pin to Toolbar" option, depending on the specific wording used by the extension. Upon selecting this option, the extension's icon will be permanently affixed to the toolbar, ensuring that it remains readily accessible whenever you use the Chrome browser.
By following these steps, you have effectively pinned the extension to the Chrome toolbar, integrating its functionalities into your browsing environment with utmost convenience. This seamless integration empowers you to harness the full potential of the extension, leveraging its features and capabilities to optimize your online activities. With the extension prominently displayed in the toolbar, you can effortlessly access its functionalities, enhancing your browsing experience and productivity.
Pinning an extension to the toolbar represents a personalized customization of your Chrome browser, allowing you to curate a tailored selection of add-ons that cater to your unique needs and preferences. This process exemplifies the flexibility and user-centric approach that Chrome offers, empowering individuals to shape their browsing experience according to their specific requirements. As you navigate the web with your newly pinned extension at your fingertips, you can enjoy enhanced efficiency and seamless access to the tools that matter most to you.
Conclusion
In conclusion, the ability to pin extensions to the Chrome toolbar presents a valuable opportunity for users to personalize their browsing experience and optimize their productivity. By following the simple yet impactful process outlined in this guide, individuals can seamlessly integrate their preferred extensions into the Chrome browser, ensuring quick and convenient access to the tools and functionalities that matter most to them.
Pinning an extension to the toolbar not only streamlines access but also serves as a testament to Chrome's user-centric approach, empowering individuals to tailor their browsing environment to suit their unique needs and preferences. This customization fosters a sense of ownership and control, allowing users to curate a selection of extensions that align with their specific workflows, interests, and online activities.
Furthermore, the process of pinning an extension involves engaging with the Chrome Web Store, a vibrant marketplace that offers a diverse array of extensions catering to a wide range of user requirements. Navigating the Chrome Web Store to discover, evaluate, and integrate extensions fosters a dynamic and personalized journey, enabling users to explore the vast landscape of add-ons and select those that resonate with their individual preferences.
The act of pinning an extension to the toolbar represents a seamless fusion of functionality and accessibility, as users can effortlessly tap into the capabilities of their preferred extensions with a single click. This integration enhances the overall browsing experience, empowering users to leverage the features of their chosen extensions to streamline tasks, enhance security, access information, and engage with content in a manner that aligns with their unique online habits.
Ultimately, the process of pinning an extension in Chrome transcends mere technical functionality; it embodies a user-centric ethos that places individual preferences and convenience at the forefront. As users navigate the web with their pinned extensions at their fingertips, they are poised to experience a heightened sense of control, efficiency, and personalization, reflecting the essence of Chrome's commitment to empowering users in their digital pursuits.