Introduction
When it comes to browsing the web, Google Chrome stands out as one of the most popular and versatile web browsers available. Its seamless integration with various file types, including PDFs, allows users to view documents directly within the browser window. However, while this feature is convenient for many, some users prefer to open PDFs in Adobe Acrobat for a more robust and feature-rich experience.
In this article, we will explore the process of changing the default PDF viewer in Chrome to ensure that PDFs open in Adobe Acrobat instead. Whether you're using a Windows PC or a Mac, we've got you covered with step-by-step instructions to make Adobe Acrobat the default PDF viewer on your device.
By the end of this guide, you'll have the knowledge and confidence to customize your browsing experience, ensuring that PDFs open in Adobe Acrobat, providing you with the full suite of tools and functionalities that Adobe offers for viewing and interacting with PDF documents. Let's dive in and take control of how PDFs are handled in your Chrome browser.
Changing Default PDF Viewer in Chrome
Changing the default PDF viewer in Chrome is a straightforward process that allows you to customize your browsing experience to suit your preferences. By default, Chrome utilizes its built-in PDF viewer to open PDF files directly within the browser. However, if you prefer to use Adobe Acrobat for its advanced features and comprehensive toolset, you can easily make it the default PDF viewer in Chrome.
To begin, open your Chrome browser and follow these simple steps:
-
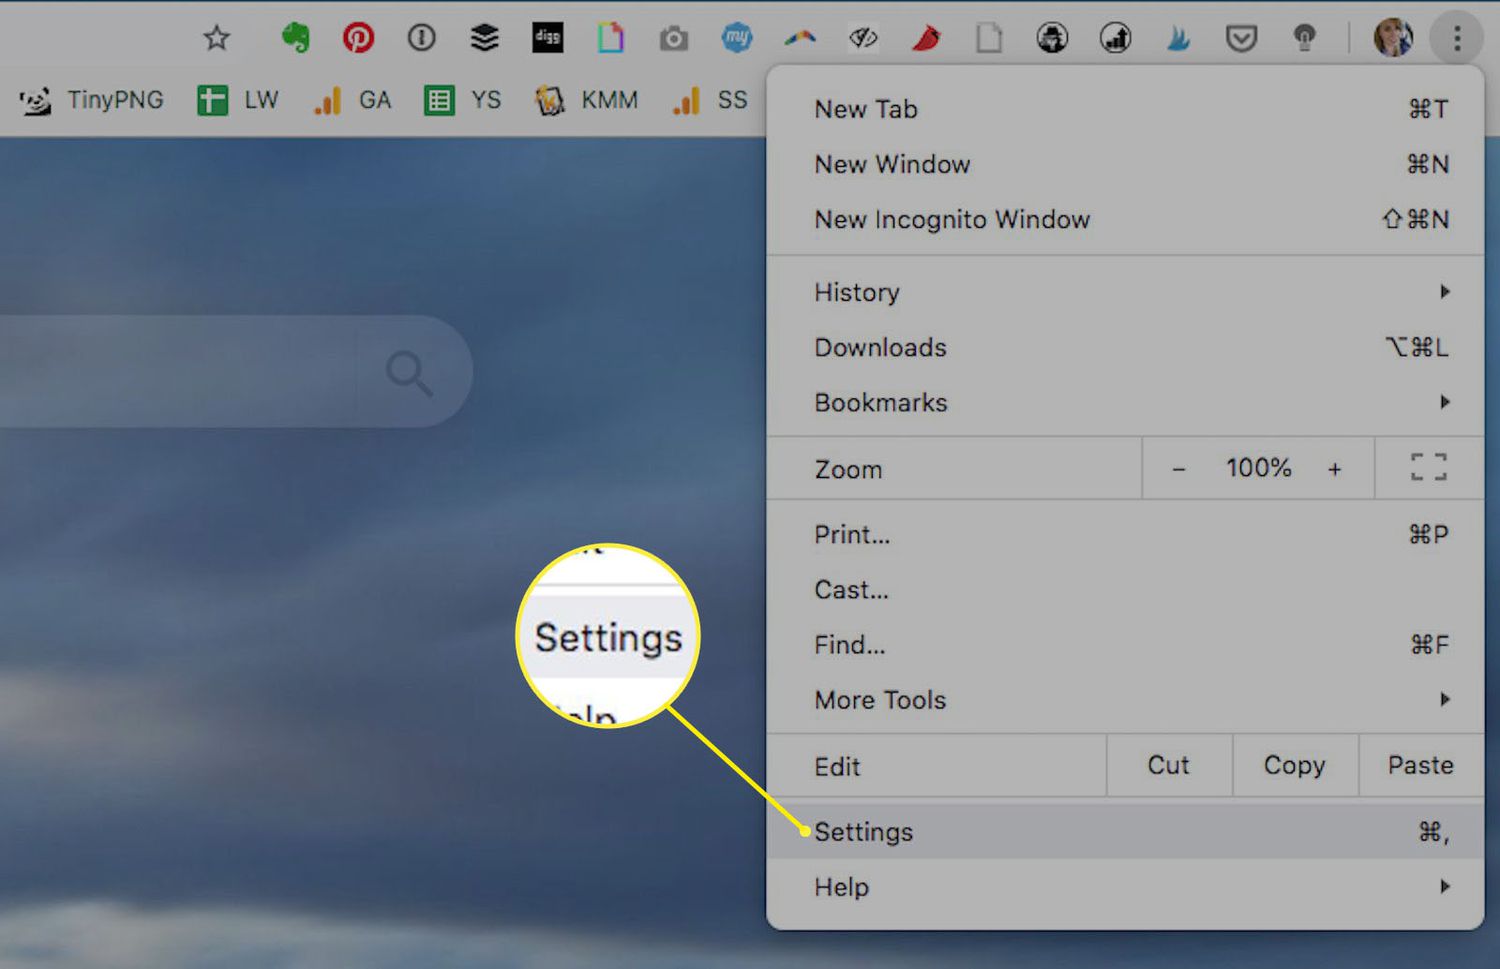
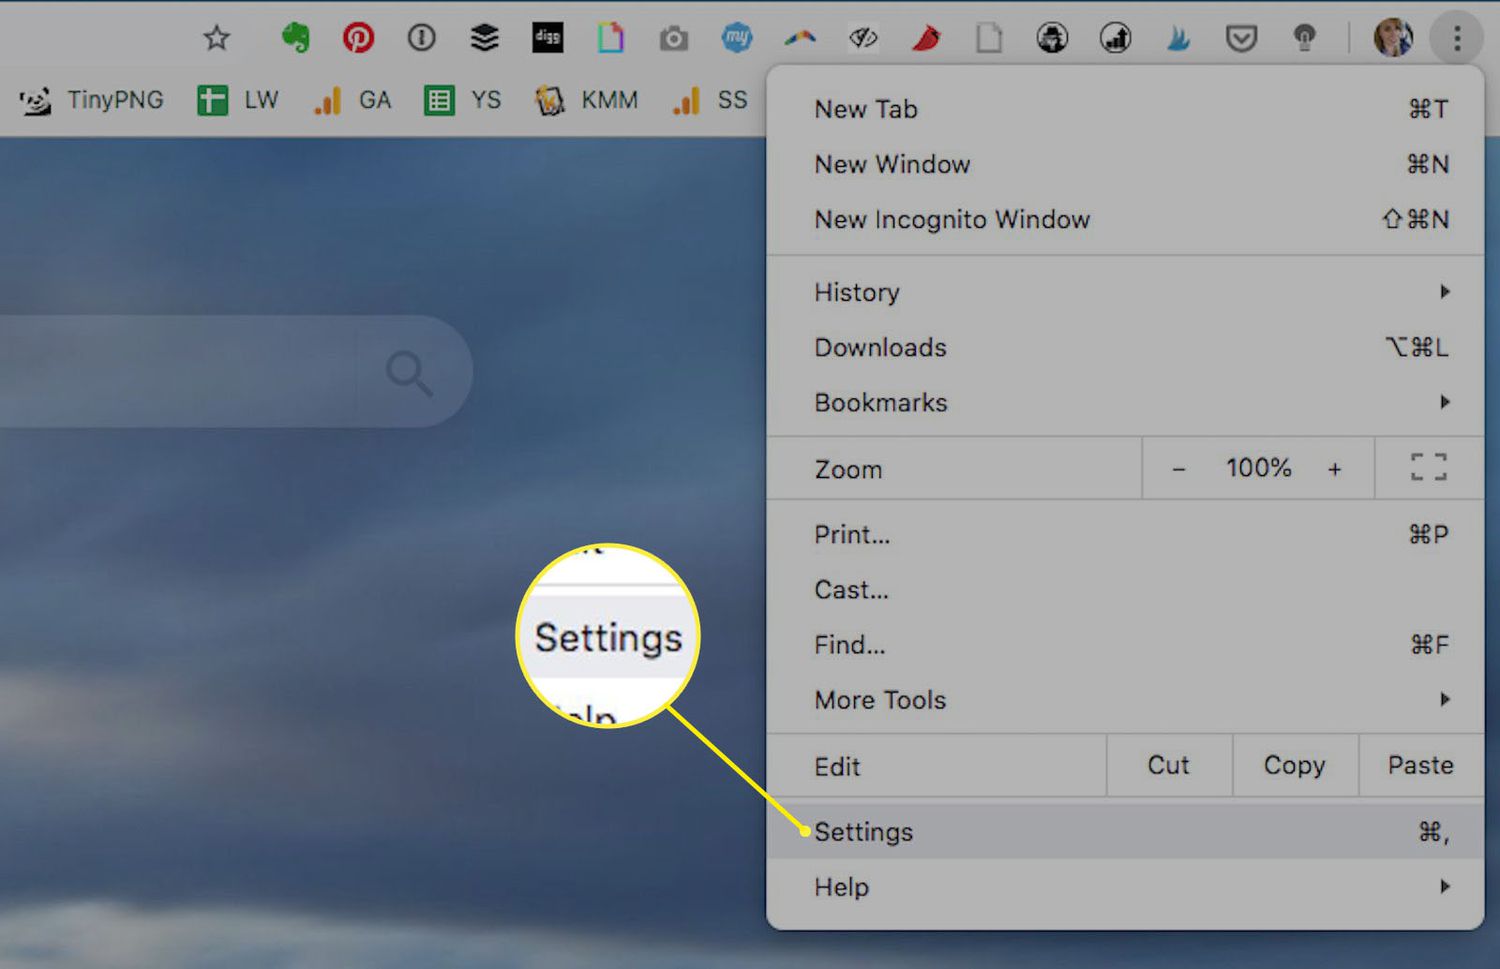
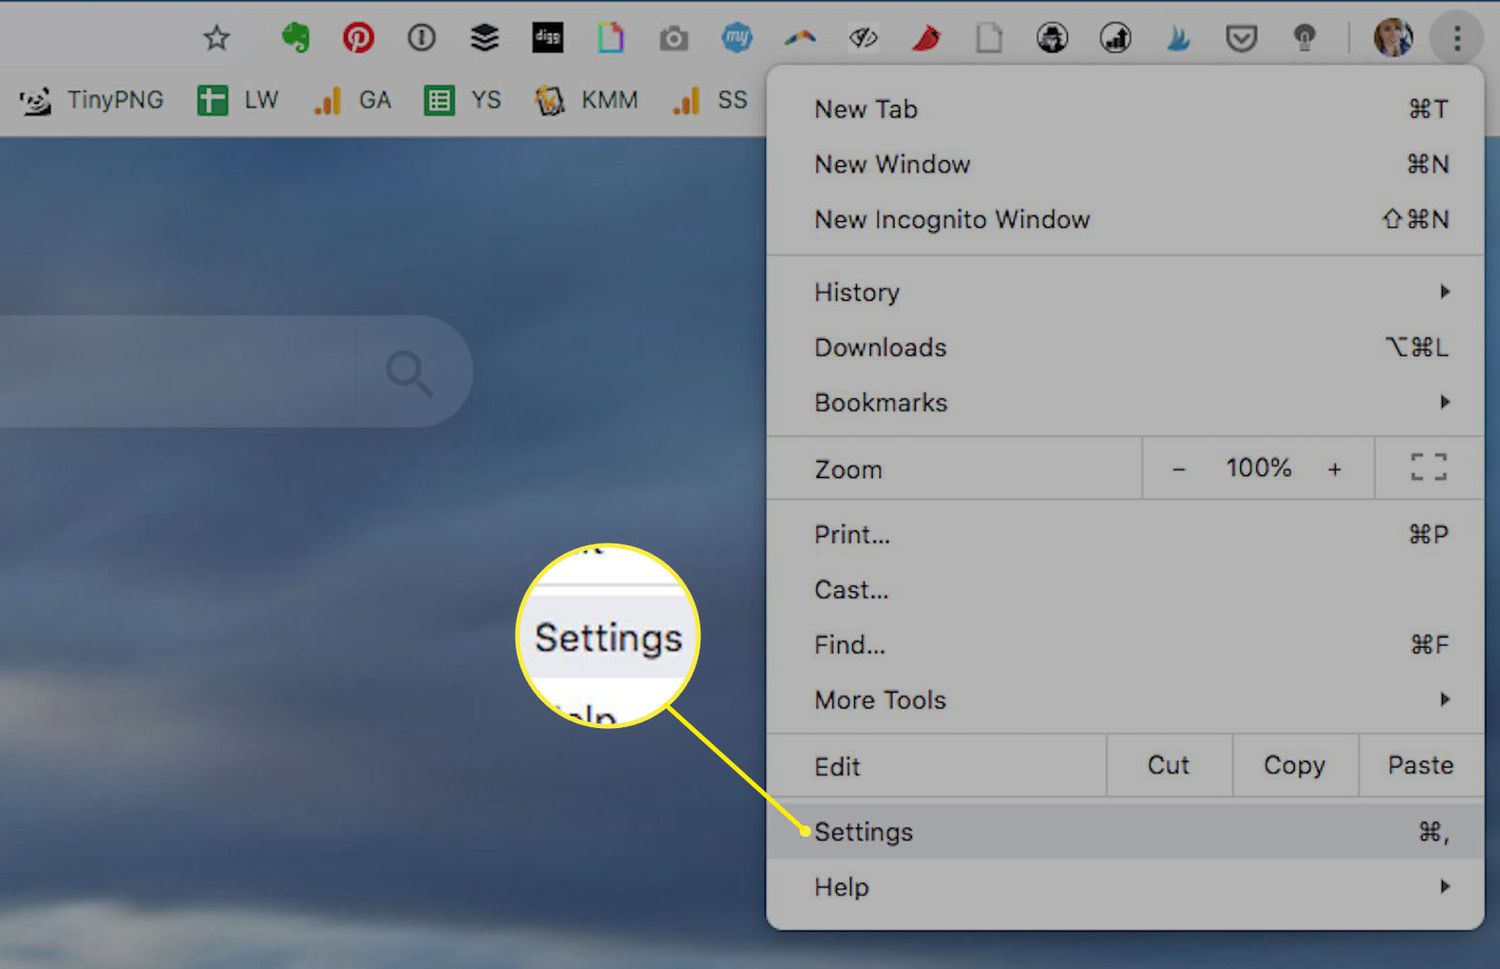
Access Chrome Settings: Click on the three-dot menu icon located in the top-right corner of the browser window. From the dropdown menu, select "Settings" to access the browser's configuration options.
-
Navigate to Advanced Settings: Within the Settings menu, scroll down and click on "Advanced" to reveal additional options.
-
Locate Content Settings: Under the "Privacy and security" section, locate and click on "Site settings." This will open a new window where you can manage various content settings for websites.
-
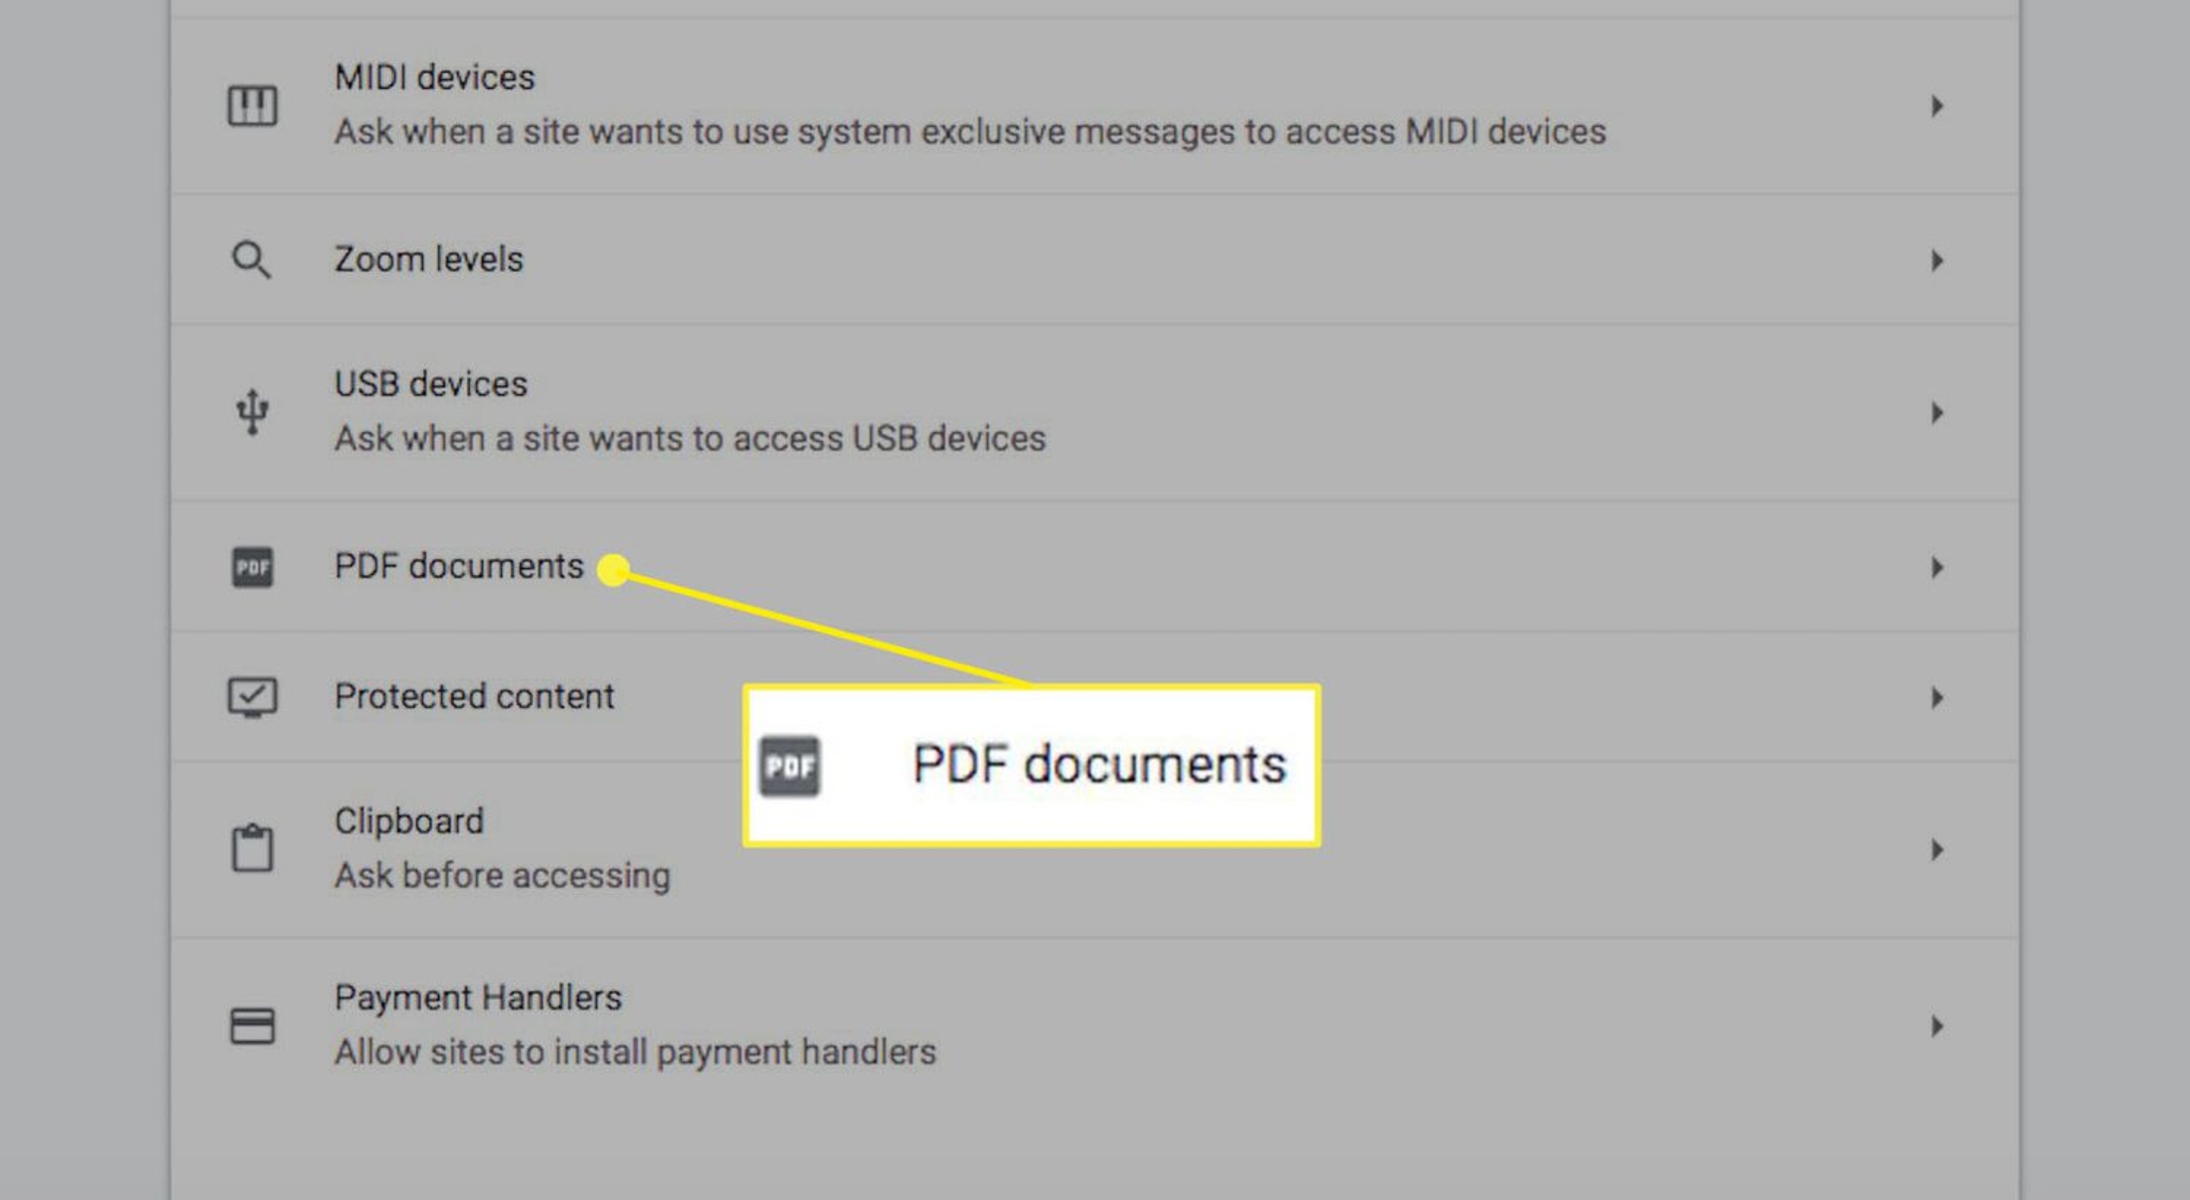
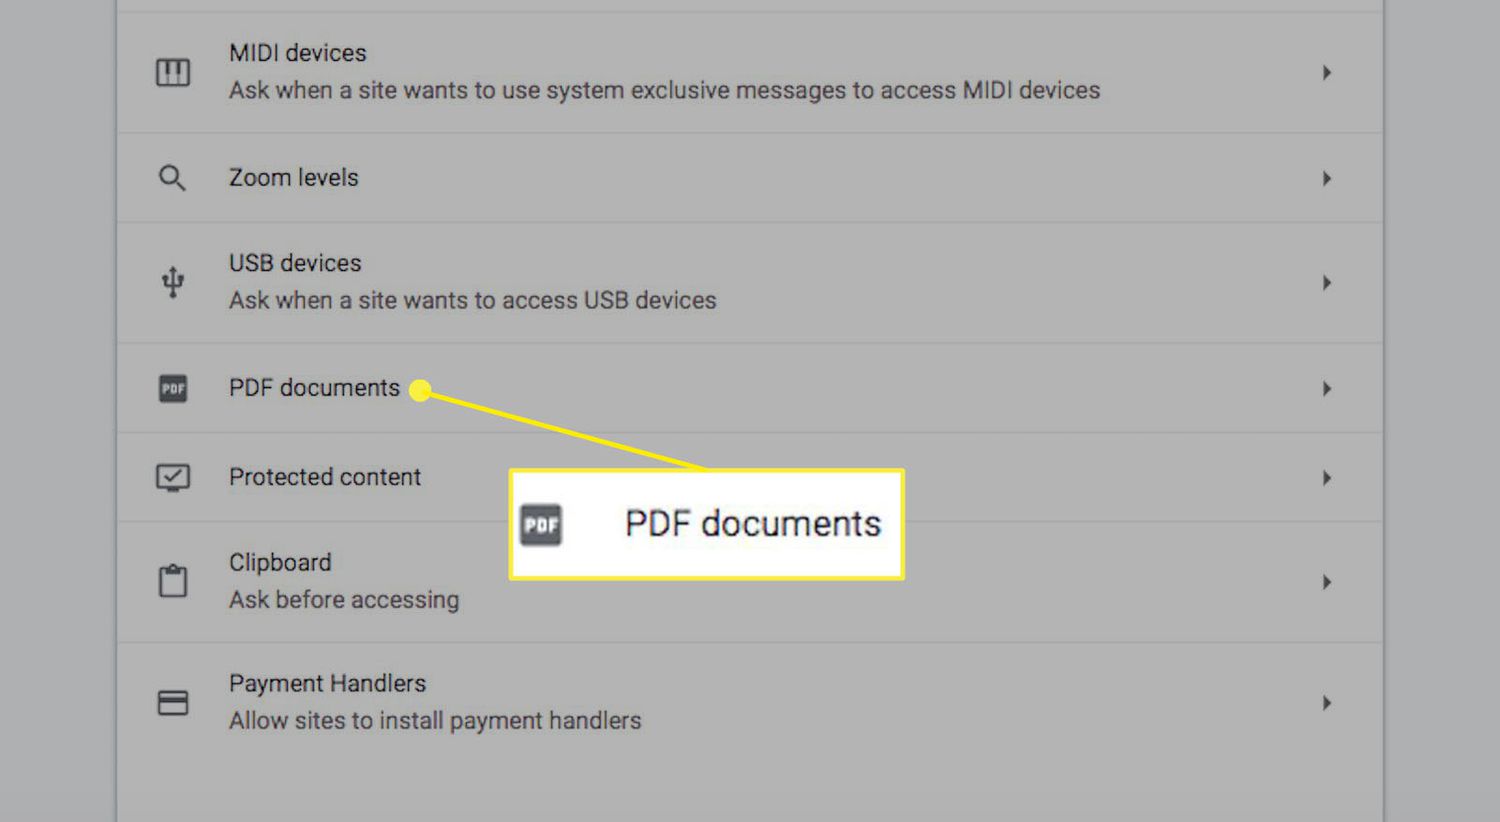
Adjust PDF Viewer Settings: Within the Site settings menu, scroll down to find the "PDF documents" option. Click on it to access the PDF viewer settings.
-
Enable or Disable Chrome PDF Viewer: Here, you have the option to enable or disable the Chrome PDF viewer. To make Adobe Acrobat the default PDF viewer, toggle off the switch next to "Download PDF files instead of automatically opening them in Chrome."
By following these steps, you have successfully changed the default PDF viewer in Chrome. From now on, when you open a PDF file in Chrome, it will be downloaded and opened in Adobe Acrobat, providing you with a more comprehensive set of tools and functionalities for viewing and interacting with PDF documents.
Customizing your default PDF viewer in Chrome allows you to tailor your browsing experience to align with your specific needs and preferences. Whether you're a business professional requiring advanced annotation and editing tools or a student who prefers the familiar interface of Adobe Acrobat, taking control of your default PDF viewer ensures that you have the best possible experience when interacting with PDF files while browsing the web.
Making Adobe Acrobat the Default PDF Viewer on Windows
If you're a Windows user and prefer to utilize Adobe Acrobat as your default PDF viewer, you can easily configure your system to ensure that PDF files open in Adobe Acrobat by default. This simple process allows you to seamlessly integrate Adobe Acrobat into your browsing experience, providing you with access to its comprehensive set of tools and functionalities for viewing and interacting with PDF documents.
To make Adobe Acrobat the default PDF viewer on your Windows PC, follow these step-by-step instructions:
-
Locate a PDF File: Begin by locating any PDF file on your Windows computer. This can be a PDF document saved on your desktop or within a folder.
-
Right-Click on the PDF File: Once you've located a PDF file, right-click on it to reveal a context menu of options.
-
Select "Open With": From the context menu, hover over the "Open with" option to reveal a list of programs that can be used to open the PDF file.
-
Choose "Choose Another App": Within the "Open with" submenu, select "Choose another app" to explore additional programs that can open the PDF file.
-
Select Adobe Acrobat: A new window will appear, presenting a list of available programs. Locate and select Adobe Acrobat from the list. Ensure that the "Always use this app to open .pdf files" option is checked.
-
Confirm Selection: After selecting Adobe Acrobat, click the "OK" button to confirm your choice. This action sets Adobe Acrobat as the default application for opening PDF files on your Windows PC.
By following these straightforward steps, you have successfully made Adobe Acrobat the default PDF viewer on your Windows computer. From this point forward, any PDF file you open will automatically launch in Adobe Acrobat, providing you with access to its advanced features and comprehensive toolset for viewing, editing, and interacting with PDF documents.
Customizing your default PDF viewer on Windows allows you to tailor your digital workflow to suit your specific needs and preferences. Whether you require advanced annotation and editing tools for professional tasks or simply prefer the familiar interface of Adobe Acrobat, taking control of your default PDF viewer ensures that you have the best possible experience when interacting with PDF files on your Windows PC.
Making Adobe Acrobat the Default PDF Viewer on Mac
If you're a Mac user who prefers the robust features and comprehensive toolset offered by Adobe Acrobat as your default PDF viewer, you can easily configure your system to ensure that PDF files open in Adobe Acrobat by default. This simple process allows you to seamlessly integrate Adobe Acrobat into your browsing experience, providing you with access to its advanced functionalities for viewing, editing, and interacting with PDF documents.
To make Adobe Acrobat the default PDF viewer on your Mac, follow these step-by-step instructions:
-
Locate a PDF File: Begin by locating any PDF file on your Mac. This can be a PDF document saved on your desktop, within a folder, or in your Downloads directory.
-
Right-Click or Control-Click on the PDF File: Once you've located a PDF file, right-click or control-click on it to reveal a contextual menu of options.
-
Select "Get Info": From the contextual menu, select "Get Info" to access the file's information and settings.
-
Expand "Open With" Section: Within the Info window, locate the "Open with" section. Click on the triangle icon next to "Open with" to expand the selection.
-
Choose Adobe Acrobat: From the expanded "Open with" section, select Adobe Acrobat from the list of available applications. To set Adobe Acrobat as the default application for opening PDF files, ensure that the "Change All" button is available and click on it. A confirmation dialog will appear.
-
Confirm Selection: In the confirmation dialog, click "Continue" to confirm your choice. This action sets Adobe Acrobat as the default application for opening PDF files on your Mac.
By following these straightforward steps, you have successfully made Adobe Acrobat the default PDF viewer on your Mac. From this point forward, any PDF file you open will automatically launch in Adobe Acrobat, providing you with access to its advanced features and comprehensive toolset for viewing, editing, and interacting with PDF documents.
Customizing your default PDF viewer on Mac allows you to tailor your digital workflow to suit your specific needs and preferences. Whether you require advanced annotation and editing tools for professional tasks or simply prefer the familiar interface of Adobe Acrobat, taking control of your default PDF viewer ensures that you have the best possible experience when interacting with PDF files on your Mac.
This simple customization empowers you to seamlessly integrate Adobe Acrobat into your digital workflow, ensuring a seamless and efficient experience when working with PDF documents on your Mac.
Conclusion
In conclusion, customizing the default PDF viewer in Google Chrome to open PDFs in Adobe Acrobat, whether on Windows or Mac, empowers users to tailor their browsing experience to align with their specific needs and preferences. By following the simple steps outlined in this guide, users can seamlessly integrate Adobe Acrobat, a feature-rich and versatile PDF viewer, into their digital workflow.
By changing the default PDF viewer in Chrome, users gain access to Adobe Acrobat's comprehensive set of tools and functionalities, including advanced annotation, editing, and interactive features. This customization ensures a seamless and efficient experience when interacting with PDF documents while browsing the web.
For Windows users, the straightforward process of making Adobe Acrobat the default PDF viewer involves a few simple clicks, allowing for a seamless integration of Adobe Acrobat into the digital workflow. This customization provides access to the full suite of features offered by Adobe Acrobat, empowering users to view, edit, and interact with PDF files effortlessly.
Similarly, Mac users can easily configure their systems to ensure that PDF files open in Adobe Acrobat by default. This customization allows for a seamless and efficient experience when working with PDF documents, providing access to Adobe Acrobat's advanced functionalities and comprehensive toolset.
By taking control of the default PDF viewer in Chrome and setting Adobe Acrobat as the preferred application for opening PDF files, users can enhance their digital workflow, whether for professional tasks, academic pursuits, or personal use. This simple yet impactful customization ensures that users have the best possible experience when interacting with PDF files, aligning their browsing experience with their specific needs and preferences.
In essence, the ability to customize the default PDF viewer in Chrome and make Adobe Acrobat the preferred application for opening PDF files empowers users to optimize their digital workflow, ensuring a seamless and efficient experience when working with PDF documents. This level of customization reflects the flexibility and versatility that Chrome offers, allowing users to tailor their browsing experience to suit their individual requirements.
By following the steps outlined in this guide, users can confidently take control of how PDFs are handled in their Chrome browser, ensuring that they have access to the advanced features and comprehensive toolset offered by Adobe Acrobat for viewing and interacting with PDF documents.


