Introduction
Have you ever found yourself accidentally closing an important tab while browsing the web? It can be frustrating, especially when you lose track of a page you were planning to revisit. Fortunately, modern web browsers like Google Chrome offer a convenient feature to prevent this mishap: the ability to lock tabs. By locking a tab, you can ensure that it remains open and easily accessible, even if you close other tabs or windows.
In this guide, we will explore the simple yet invaluable process of locking a tab in Google Chrome. Whether you're a seasoned Chrome user or just getting started with this popular browser, mastering this technique can significantly enhance your browsing experience. Once you've learned how to lock tabs, you'll have greater control over your browsing sessions, making it easier to manage multiple open tabs without the fear of accidentally closing an important page.
So, if you're ready to take your Chrome browsing to the next level and safeguard your essential tabs from accidental closure, let's dive into the step-by-step process of locking a tab in Chrome. Whether you're organizing your research, managing your favorite websites, or simply keeping track of important webpages, locking tabs can be a game-changer in your browsing routine. Let's get started!
Step 1: Open Chrome and Navigate to the Tab
When it comes to locking a tab in Google Chrome, the first step is to open the browser and navigate to the specific tab that you want to lock. This process is straightforward and can be accomplished in just a few simple clicks.
To begin, launch Google Chrome by clicking on its icon in your taskbar, desktop, or applications folder. Once the browser is open, take a moment to survey the tabs that are currently displayed. Each open tab represents a separate webpage or website that you have accessed during your browsing session.
Next, locate the tab that you wish to lock. You can do this by clicking on the tab itself, which will bring the corresponding webpage into view. If you have multiple tabs open, you may need to scroll through the tab bar to find the specific tab you want to lock. Alternatively, you can use the keyboard shortcut Ctrl + Tab (Cmd + Option + Right arrow on Mac) to cycle through the open tabs until you reach the desired one.
It's important to ensure that you have the correct tab open before proceeding to the next steps. Take a moment to verify that the content displayed in the tab aligns with your intention to lock it. Whether it's a research article, a social media page, a news website, or any other type of webpage, confirming that you are on the right tab will help prevent any confusion as you move through the locking process.
Once you have successfully navigated to the tab that you want to lock, you are ready to proceed to the next step in the process. With the tab in view, you can now initiate the actions that will lead to the tab being securely locked in your Chrome browser. This will ensure that the tab remains easily accessible and protected from accidental closure, providing you with peace of mind as you continue to browse and multitask within the browser.
With the first step completed, you are now prepared to move on to the subsequent steps that will guide you through the process of locking the tab in Google Chrome. By following these steps, you'll gain a deeper understanding of how to leverage this valuable feature to enhance your browsing experience and streamline your tab management.
Step 2: Right-click on the Tab
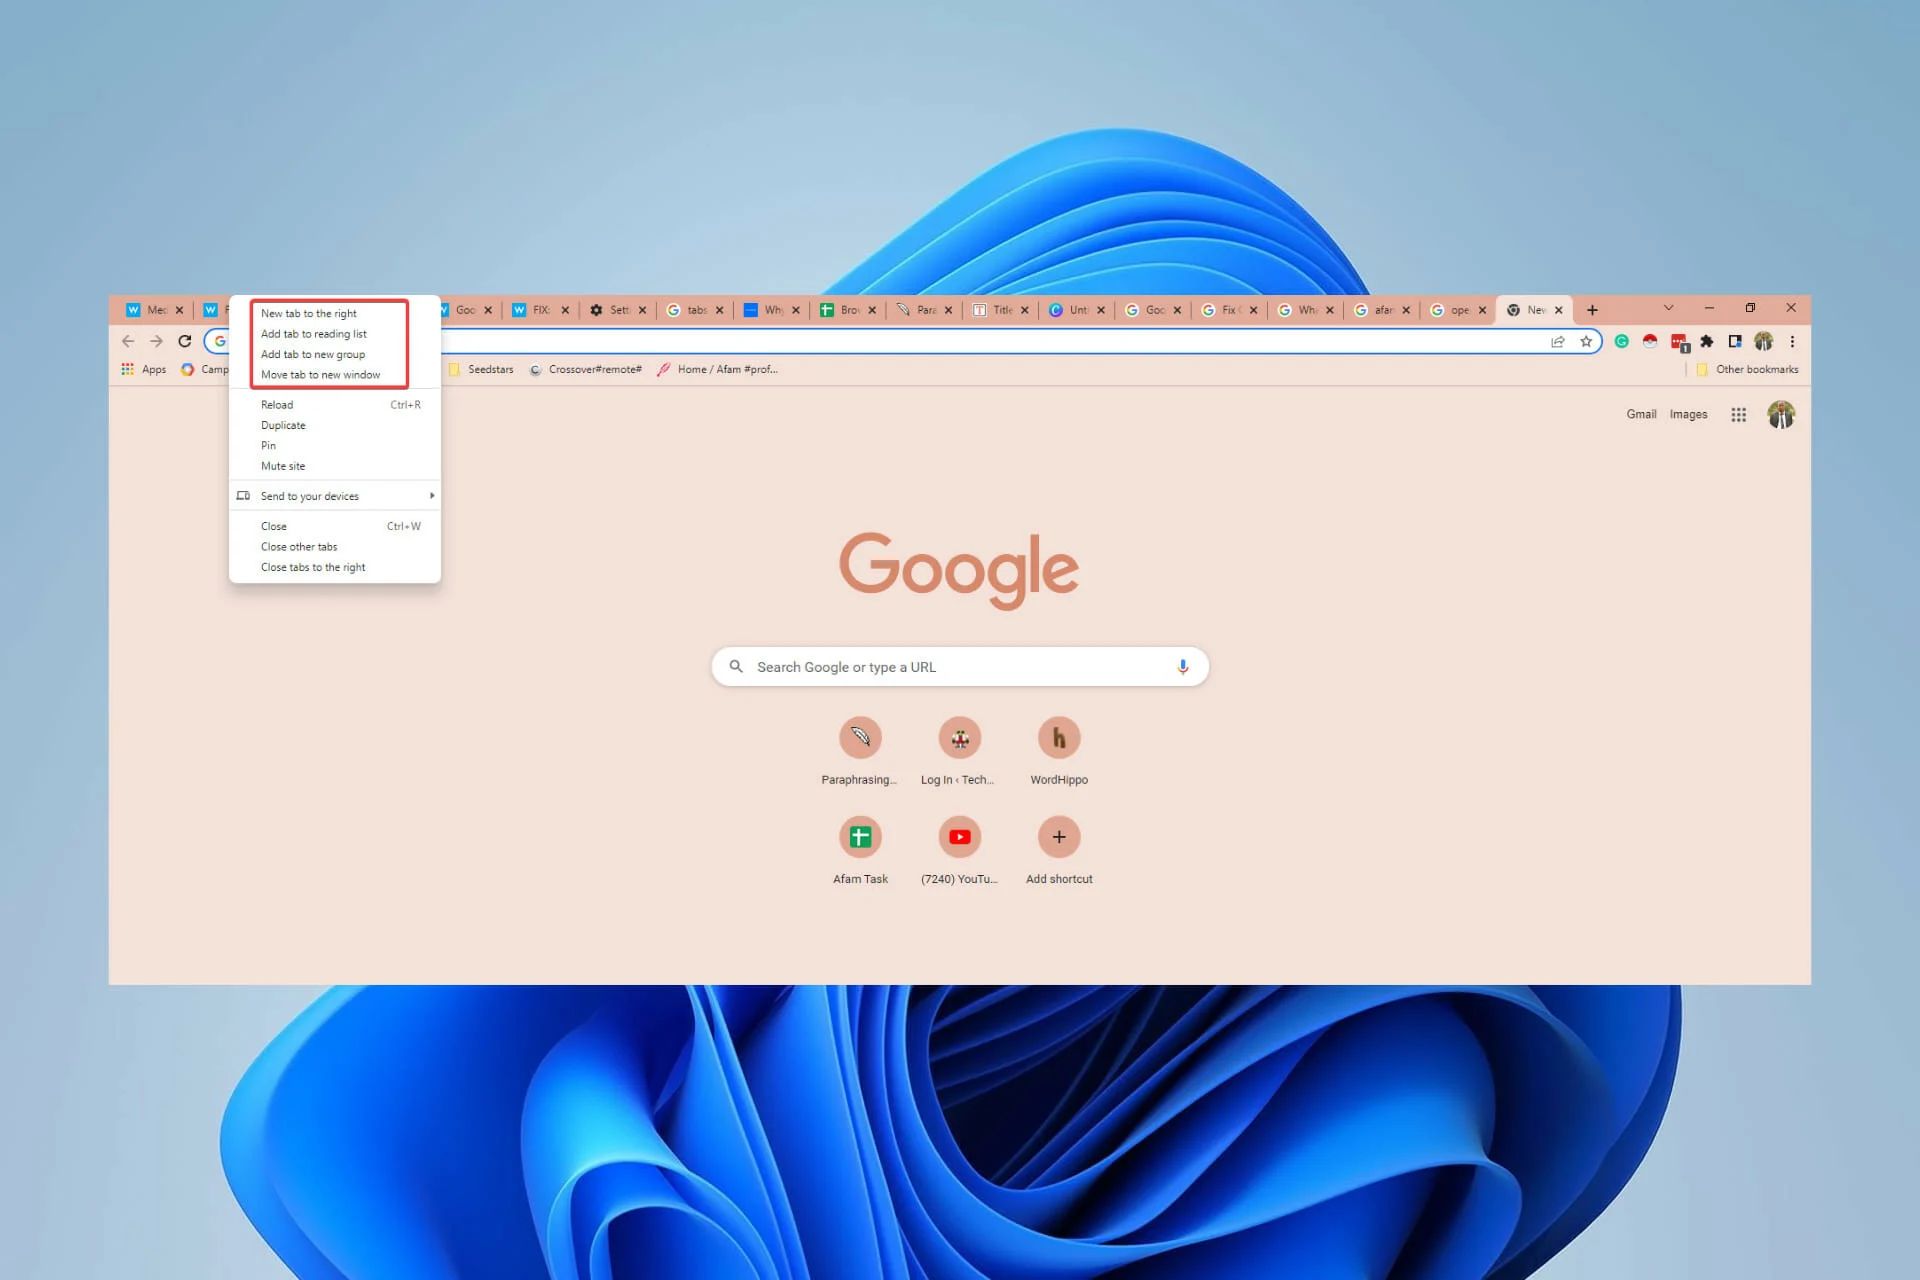
Once you have navigated to the specific tab that you want to lock, the next step in the process involves right-clicking on the tab to reveal a contextual menu with various options. This menu provides quick access to a range of tab-related functions, including the essential command for locking the tab in Google Chrome.
To initiate this step, position your cursor over the tab that you intend to lock. Then, using your mouse or trackpad, perform a right-click on the tab. This action will prompt a small menu to appear, displaying several options tailored to tab management and navigation.
Upon right-clicking on the tab, you will notice a dropdown menu that materializes directly above the tab itself. This menu is designed to offer convenient access to a selection of tab-specific commands, allowing you to perform various actions without having to navigate through the browser's main menu or settings.
Among the options presented in the dropdown menu, you will find a command labeled "Pin Tab." This command is pivotal to the process of locking a tab in Google Chrome. By selecting "Pin Tab," you effectively initiate the locking mechanism, which transforms the tab into a compact, pinned version that remains fixed in place, separate from your regular tabs.
It's important to note that the "Pin Tab" feature serves a dual purpose, as it not only locks the tab but also condenses it into a smaller, icon-based representation. This condensed format is particularly useful for tabs that you want to keep open and easily accessible while conserving space within the tab bar.
By right-clicking on the tab and choosing the "Pin Tab" option from the dropdown menu, you are taking a significant step toward securing the tab and preventing accidental closure. This simple yet powerful action ensures that the tab remains prominently displayed and readily available, regardless of the number of additional tabs you may open during your browsing session.
With the tab now pinned and effectively locked, you have successfully completed the second step in the process of locking a tab in Google Chrome. This action sets the stage for the subsequent step, where you will verify that the tab is securely locked and explore its newfound status within the browser.
Continuing with the next step will allow you to confirm the successful locking of the tab and gain a deeper understanding of how this feature can positively impact your browsing experience.
Step 3: Select "Pin Tab" from the Dropdown Menu
After right-clicking on the tab, you will be presented with a dropdown menu that offers several options for managing the tab. Among these options, you will find the crucial command labeled "Pin Tab." This command is the gateway to locking the tab in Google Chrome and plays a pivotal role in streamlining your browsing experience.
By selecting "Pin Tab" from the dropdown menu, you initiate a transformative action that not only locks the tab but also condenses it into a more compact, icon-based representation. This condensed format is designed to optimize space within the tab bar, ensuring that the locked tab remains easily accessible while occupying minimal screen real estate.
When you choose to pin a tab, you are essentially signaling to Chrome that the tab holds significant importance and should be safeguarded from accidental closure. This action serves as a visual cue, as the pinned tab becomes distinguishable from regular tabs by its condensed size and fixed position within the tab bar.
The "Pin Tab" feature offers a practical solution for managing multiple open tabs, especially when dealing with limited screen space. By condensing and locking tabs that you frequently access or need to keep open, you can effectively declutter your browsing environment and maintain a clear visual hierarchy of your tabs.
Furthermore, the pinned tab remains prominently displayed, allowing you to quickly switch to it without the risk of inadvertently closing it. This level of accessibility is particularly valuable when juggling numerous tabs and striving to stay organized during extended browsing sessions.
By selecting "Pin Tab" from the dropdown menu, you are not only locking the tab but also optimizing your tab management strategy. This simple yet impactful action empowers you to maintain control over your browsing experience, ensuring that essential tabs remain secure and easily accessible at all times.
With the tab now pinned and securely locked, you have successfully completed the third step in the process of locking a tab in Google Chrome. This action sets the stage for the subsequent step, where you will verify that the tab is indeed locked and explore its newfound status within the browser.
Continuing with the next step will allow you to confirm the successful locking of the tab and gain a deeper understanding of how this feature can positively impact your browsing experience.
Step 4: Verify the Tab is Locked
Once you have pinned the tab in Google Chrome, it's essential to verify that the tab is securely locked and that the desired changes have been applied. This step ensures that you can confidently rely on the locked tab to remain accessible and protected from accidental closure as you continue to browse and navigate through your open tabs.
To verify that the tab is indeed locked, take a moment to visually inspect the tab within the browser's interface. A locked tab will exhibit distinct visual cues that differentiate it from regular, unlocked tabs. These visual indicators serve as a clear confirmation of the tab's locked status, allowing you to quickly identify and differentiate it from other tabs.
One of the primary visual cues of a locked tab is its condensed size and fixed position within the tab bar. When a tab is pinned, it becomes smaller in width, often displaying only the favicon or a truncated title. This compact representation signifies that the tab is locked and will remain prominently displayed, regardless of the number of additional tabs you open during your browsing session.
Additionally, a locked tab is typically positioned to the left of all regular tabs within the tab bar. This fixed placement ensures that the locked tab maintains a consistent and easily accessible location, further reinforcing its status as a securely locked tab. By visually scanning the tab bar, you can quickly locate the pinned tab and confirm that it is indeed locked and readily available for your use.
Furthermore, when you hover your cursor over the locked tab, a tooltip may appear, indicating that the tab is pinned. This additional visual feedback serves as a helpful confirmation of the tab's locked status, providing reassurance that the tab has been successfully secured and is now safeguarded from accidental closure.
By verifying the tab's locked status through these visual cues, you can confidently proceed with your browsing activities, knowing that the essential tab is securely locked and easily accessible whenever you need it. This level of assurance empowers you to navigate through your open tabs with confidence, knowing that important webpages are protected and readily available for your continued use.
With the tab now verified as securely locked, you have successfully completed the final step in the process of locking a tab in Google Chrome. By confirming the tab's locked status, you have gained a deeper understanding of how this feature enhances your browsing experience and provides valuable control over your tab management.
Continuing to leverage the locked tab feature will undoubtedly streamline your browsing routine and ensure that essential webpages remain within easy reach, free from the risk of accidental closure. As you explore the benefits of locked tabs, you'll discover new opportunities to optimize your browsing environment and maintain a clear, organized workflow within Google Chrome.
Conclusion
In conclusion, mastering the art of locking tabs in Google Chrome can significantly elevate your browsing experience, providing you with greater control over your open tabs and safeguarding essential webpages from accidental closure. By following the simple yet impactful steps outlined in this guide, you have gained valuable insights into leveraging the "Pin Tab" feature to secure and optimize your tab management within the browser.
The ability to lock tabs in Chrome empowers you to keep important webpages readily accessible, even amidst a multitude of open tabs. Whether you're conducting research, managing multiple social media accounts, or monitoring vital web content, the locked tab feature ensures that crucial pages remain within easy reach, free from the risk of unintentional closure.
Furthermore, the visual cues associated with locked tabs, such as their condensed size and fixed position within the tab bar, offer a clear indication of their secured status. This visual distinction allows you to quickly identify and access locked tabs, streamlining your browsing workflow and enhancing overall productivity.
By incorporating locked tabs into your browsing routine, you can declutter your tab bar, maintain a clear visual hierarchy of open tabs, and confidently navigate through your browsing sessions without the fear of losing important webpages. This level of control and accessibility is invaluable, especially when managing diverse tasks and information sources within the browser.
As you continue to explore the capabilities of Google Chrome, integrating the practice of locking tabs will undoubtedly enhance your efficiency and organization while browsing the web. Whether you're a student conducting online research, a professional managing multiple web applications, or a casual user seeking to streamline your browsing experience, the ability to lock tabs in Chrome offers a versatile solution for optimizing tab management.
In essence, the process of locking tabs in Google Chrome represents a fundamental yet impactful feature that empowers users to maintain a clear, organized, and secure browsing environment. By embracing this feature, you can take full advantage of Chrome's capabilities, ensuring that essential webpages remain easily accessible and protected from accidental closure, ultimately enhancing your overall browsing experience.