Introduction
Have you ever encountered a situation where a web page or web application isn't functioning as expected, and you need to dig deeper to understand what's happening behind the scenes? Chrome Developer Tools can be your best friend in such scenarios. One of the most valuable features of Chrome Developer Tools is the ability to access and download console logs, which can provide crucial insights into the behavior of a web page or application.
Console logs are a record of messages, errors, and warnings that are generated by JavaScript code running on a web page. These logs can be immensely helpful for developers and website administrators in diagnosing issues, debugging code, and monitoring the performance of a website. Whether you're a seasoned developer or a curious individual looking to explore the inner workings of a web page, learning how to download console logs from Chrome can be a valuable skill.
In this guide, we'll walk through the step-by-step process of accessing and saving console logs using Chrome Developer Tools. By the end of this tutorial, you'll be equipped with the knowledge to effortlessly retrieve console logs and leverage them to gain a deeper understanding of web page behavior and JavaScript execution. So, let's dive in and unravel the mysteries hidden within the console logs of Chrome!
Step 1: Open Chrome Developer Tools
To begin the process of accessing and downloading console logs from Chrome, the first step is to open Chrome Developer Tools. This powerful set of web authoring and debugging tools is built directly into the Google Chrome browser, providing developers and users with a wide array of features to inspect, debug, and optimize web pages and applications.
There are several ways to open Chrome Developer Tools, catering to different user preferences and workflows. Here are the primary methods to access this indispensable toolkit:
-
Using Keyboard Shortcuts: A quick and convenient way to open Chrome Developer Tools is by using keyboard shortcuts. For Windows and Linux users, pressing
Ctrl + Shift + IorF12will launch the Developer Tools window. Mac users can achieve the same by pressingCmd + Option + I. -
Right-Click Menu: Another straightforward method is to right-click on any element within the web page and select "Inspect" from the context menu. This action will open the Developer Tools panel, with the "Elements" tab activated by default.
-
Using the Chrome Menu: Users can also access Chrome Developer Tools through the Chrome menu. Simply click on the three-dot menu icon in the top-right corner of the browser window, navigate to "More Tools," and then select "Developer Tools."
Upon successfully initiating any of these methods, the Chrome Developer Tools panel will appear, providing a comprehensive suite of tools and functionalities for inspecting and analyzing web pages. The next step in the process is to navigate to the "Console" tab within the Developer Tools interface, where the console logs are accessible for viewing and saving.
By mastering the art of opening Chrome Developer Tools, users can effortlessly tap into a wealth of capabilities that empower them to dissect and comprehend the inner workings of web pages and applications. This foundational step sets the stage for delving deeper into the realm of console logs and harnessing their potential to unravel the mysteries of web page behavior and JavaScript execution.
Step 2: Navigate to the Console Tab
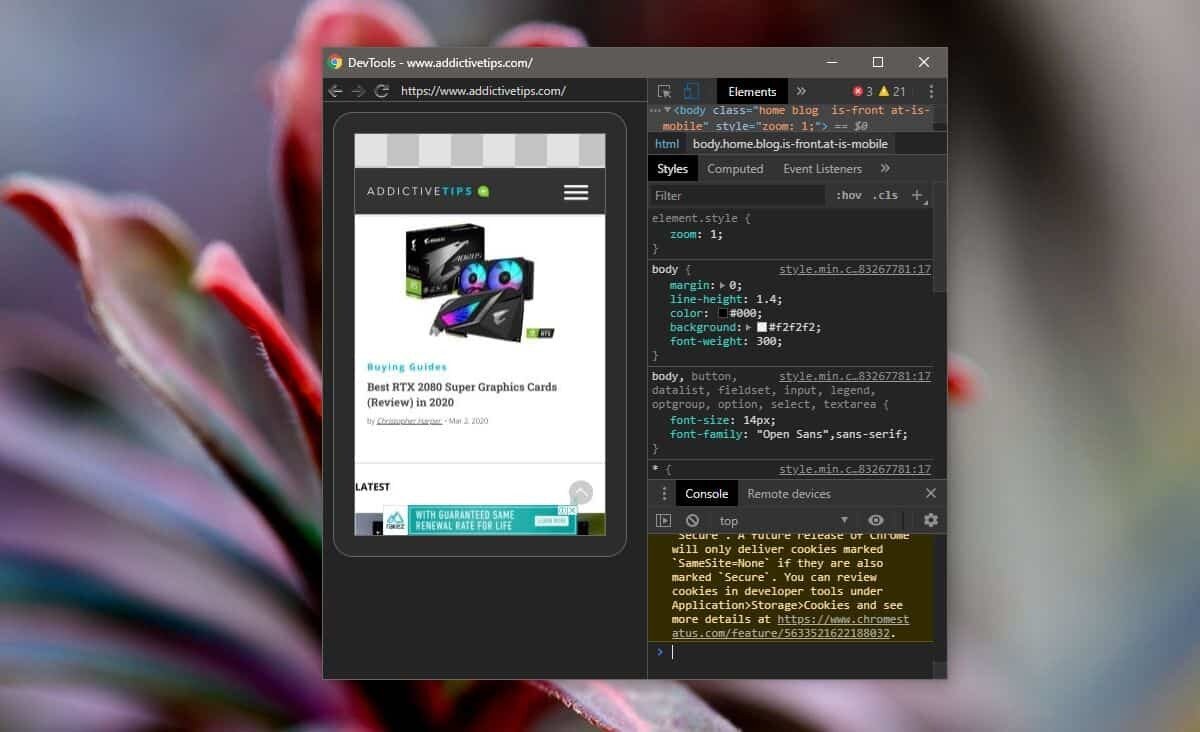
After successfully opening Chrome Developer Tools, the next crucial step in the process of accessing and downloading console logs is to navigate to the "Console" tab within the Developer Tools interface. The Console tab serves as the gateway to a treasure trove of valuable information, including JavaScript errors, log messages, network status, and more. By mastering the navigation to the Console tab, users gain the ability to monitor and capture real-time interactions and events occurring within the web page or application.
Upon opening Chrome Developer Tools, users will encounter a series of tabs at the top of the Developer Tools panel, each representing a distinct aspect of web page inspection and debugging. To access the Console tab, simply click on the "Console" tab among the available options. This action will transition the Developer Tools interface to the Console tab, where a command line interface and a wealth of diagnostic information await exploration.
The Console tab is a multifaceted tool that provides insights into various aspects of web page behavior and JavaScript execution. It serves as a central hub for displaying log messages, errors, warnings, and information generated by JavaScript code running on the web page. Additionally, the Console tab offers a JavaScript console, enabling users to interact with the page's JavaScript environment, execute custom scripts, and evaluate expressions in real time.
By navigating to the Console tab, users gain the ability to observe real-time logging of JavaScript events, track network requests and responses, diagnose JavaScript errors, and interact with the JavaScript environment of the web page. Furthermore, the Console tab facilitates the downloading and saving of console logs, empowering users to capture and analyze a comprehensive record of JavaScript activities and interactions.
Mastering the navigation to the Console tab within Chrome Developer Tools is a pivotal skill that equips users with the capability to harness the full potential of console logs. This foundational step sets the stage for seamlessly capturing and leveraging console logs to gain profound insights into the behavior and performance of web pages and applications. With the Console tab as the gateway, users are poised to embark on a journey of discovery and enlightenment, unraveling the intricacies of JavaScript execution and web page dynamics.
Step 3: Save Console Logs
Once you have navigated to the Console tab within Chrome Developer Tools and gained access to the wealth of diagnostic information and JavaScript interactions, the next crucial step is to save console logs for further analysis and reference. Saving console logs enables you to capture a snapshot of the JavaScript activities, messages, errors, and warnings generated by the web page, providing a valuable record that can be instrumental in debugging, performance optimization, and troubleshooting.
Chrome Developer Tools offers a straightforward and efficient method for saving console logs, empowering users to preserve the invaluable insights and diagnostic information displayed within the Console tab. To save console logs, follow these simple steps:
-
Right-Click and Select "Save as": Within the Console tab of Chrome Developer Tools, right-click anywhere within the console area to reveal a context menu. From the context menu, select the "Save as" option. This action prompts a file dialog, allowing you to specify the location and filename for the saved console log file.
-
Choose File Format: Upon selecting the "Save as" option, you have the flexibility to choose the file format for the saved console log. Chrome Developer Tools offers the option to save console logs in various formats, including plain text (TXT) and JavaScript Object Notation (JSON). The choice of file format depends on your specific requirements and the intended use of the console log data.
-
Specify File Location and Name: After choosing the desired file format, specify the location where you want to save the console log file and provide a meaningful filename that reflects the context and purpose of the saved logs. This step ensures that the console log file is organized and easily retrievable for future reference and analysis.
By following these simple steps, you can effortlessly save console logs from Chrome Developer Tools, preserving a comprehensive record of JavaScript interactions, errors, and messages for in-depth analysis and troubleshooting. The saved console log file serves as a valuable resource for developers, administrators, and analysts, offering a historical perspective on the behavior and performance of the web page or application.
Saving console logs from Chrome Developer Tools empowers you to build a repository of diagnostic information, enabling you to revisit and review JavaScript activities, track the occurrence of errors and warnings, and gain insights into the runtime behavior of web pages. This capability is instrumental in diagnosing issues, identifying performance bottlenecks, and understanding the intricacies of JavaScript execution within web applications.
Mastering the art of saving console logs from Chrome Developer Tools equips you with a powerful tool for capturing and preserving critical diagnostic information, fostering a deeper understanding of web page behavior and JavaScript interactions. With the ability to save console logs at your fingertips, you are poised to elevate your debugging and analysis capabilities, unlocking the potential to unravel complex web page dynamics and optimize the performance of JavaScript-powered applications.
Conclusion
In conclusion, mastering the process of downloading console logs from Chrome Developer Tools is a valuable skill that empowers developers, administrators, and curious individuals to gain profound insights into the behavior and performance of web pages and applications. The ability to access, navigate, and save console logs provides a window into the inner workings of JavaScript code running on a web page, offering a wealth of diagnostic information, error messages, and real-time interactions.
By following the step-by-step guide outlined in this tutorial, you have acquired the knowledge and proficiency to seamlessly retrieve console logs and leverage them for a myriad of purposes. Opening Chrome Developer Tools serves as the gateway to a comprehensive suite of web authoring and debugging tools, enabling you to inspect, analyze, and optimize web pages with ease. Navigating to the Console tab within Developer Tools grants you access to a rich tapestry of JavaScript activities, errors, and network status, laying the foundation for capturing and saving console logs.
Saving console logs from Chrome Developer Tools equips you with a valuable resource for diagnosing issues, debugging code, and monitoring the performance of web pages. The ability to preserve a historical record of JavaScript interactions and errors empowers you to revisit and analyze the runtime behavior of web applications, facilitating the identification of performance bottlenecks and the resolution of complex issues.
Furthermore, the saved console logs serve as a repository of diagnostic information, enabling you to gain insights into the intricacies of JavaScript execution, track the occurrence of errors and warnings, and understand the real-time interactions occurring within web pages. This capability is instrumental in troubleshooting issues, optimizing code performance, and enhancing the overall user experience of web applications.
As you embark on your journey of exploring and harnessing the power of console logs, remember that the knowledge and skills you have acquired are invaluable assets in your quest to unravel the mysteries hidden within the console logs of Chrome. Whether you are a seasoned developer seeking to fine-tune the performance of a web application or an inquisitive individual delving into the world of web development, the ability to download console logs from Chrome Developer Tools empowers you to gain a deeper understanding of JavaScript execution and web page dynamics.
In essence, the journey of mastering console logs is a continuous exploration, offering endless opportunities to gain insights, optimize performance, and unravel the intricacies of web page behavior. Armed with the knowledge and skills acquired in this tutorial, you are well-equipped to embark on this journey with confidence and curiosity, leveraging console logs as a powerful tool for understanding, diagnosing, and optimizing the dynamic world of web development.