Learning how to record a screen is an important skill nowadays. Because the internet is a free-for-all source of information, plenty of users look to it for quick answers and discussions. Written responses are the traditional response, but nowadays there is also a variety of video content and tutorials to help people out. This highlights the need for creating informative content to post online. Screen recording itself isn’t rocket science. However, the process is much easier thanks to specialized software that takes care of each step of the creative process. For any task that requires capturing on-screen activity, screen recorders are definitely the way to go.

Screen recording is not the same as taking a screenshot of your computer. The latter is just a simple process of capturing a photo of all the contents of your screen during that moment. Although taking screenshots is part of screen recording, it’s much more than that. Screen recording is the process of taking a video and audio of your screen for an educational or personal purpose. Most screen recorders are also often capable of tapping your webcam. They also make it possible to add narration to the video using the computer’s microphone.
Most of the materials captured using screen recorders get posted on the internet. Professional bloggers, YouTube hosts, and educators all use this type of content. Even ordinary users sometimes screen-record for work purposes. Even if you haven’t had such a requirement before, knowing how to record your screen can help you one way or another. And if you want to boost your productivity further, we’ve got this article about the best productivity apps to get things done.
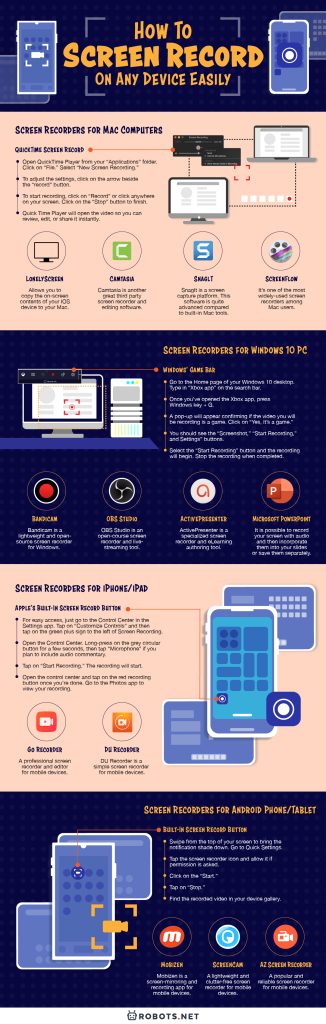
How to Screen-Record on Desktop/Laptop

Most people are familiar with video downloader software. If downloading videos is something you do on a regular basis, you can check out this article on how to download videos without any software. You might be equally interested in the different ways to download videos from Reddit and Tumblr videos.
However, downloader software is usually limited to copying online content for offline use. They do not usually have features for screen capture. Thus, it seems absolutely necessary to download a separate screen capture software to get this job done. Screen recorders are particularly useful for creating your own tutorials, tech reviews, and how-to guides. They’re also great for capturing content for offline viewing.
There is actually plenty of screen capture software available. This type of software is usually enough to capture video, audio, and images of your screen. Each software also offers unique features to help you out further. Most offer editing tools or help with posting the materials. There are also built-in tutorials to help you out with the screenshot process. In any case, here are some of the best screen recorders available for your computer type. We will also provide a brief guide on how to screen-record using each program.
In any case, up next are some of the best screen recorders available for every computer type, be it a Mac, Windows, or Linux PC. We will also provide a brief guide on how to screen-record using each program.
Screen Recorders for Mac Computers
Mac users have a built-in QuickTime Player software, used for playing video clips. However, it also has a screen recorder feature that you may use to capture on-screen activity. Nonetheless, Mac users who want a professional screen capture software have plenty of other options. Downloadable screen recorders usually have added editing and uploading features to facilitate the entire process of creating content. The steps for capturing on-screen video varies per type of software, but it usually takes just a few steps to complete.
QuickTime Screen Record
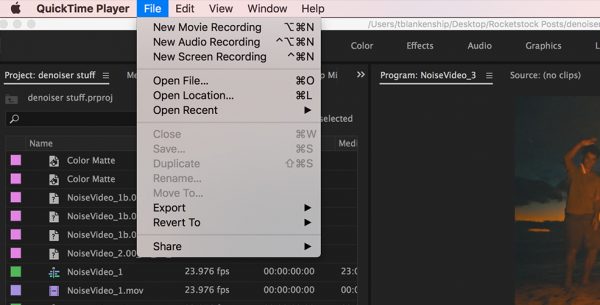
QuickTime Screen Record is the default screen recording app on any Mac OS computer. It’s already installed so you don’t need to go looking for other applications. But of course, you can if you want to. QuickTime lets you record your whole screen or just a portion you select. Here’s how to record your screen using QuickTime Screen Record:
- Open QuickTime Player from your “Applications” folder. Click on “File.” Select “New Screen Recording,” which will open the on-screen controls.
- To adjust the settings, click on the arrow beside the “record” button.
- To start recording, click on “Record” or click anywhere on your screen. You can also drag the recorder to an area that you want to record before clicking on the record button. Click on the black “Stop” button to finish.
- Quick Time Player will open the video so you can review, edit, or share it instantly.
LonelyScreen

LonelyScreen is a screen-mirroring software and screen recorder for iOS devices. This software allows you to copy the on-screen contents of your IOS device to your Mac. You can also screen-record on one device and save the file on the other. This also allows you to play games, watch movies, or present using a larger platform from your iOS devices. A notable feature is its ability to screen-capture iPhone gameplay, app demo, or video. Here’s how to screen-record using LonelyScreen:
- Download and install the program from the Lonely Screen Download page.
- Open your iPhone’s “Control Center” and tap on “AirPlay.”
- From the options, find “LonelyScreen” and select it. Afterward, tap on “Mirroring.” The LonelyScreen window will now display your iOS screen.
- On your computer, launch the “Free Screen Capturer.” To limit the recording to a certain portion of the screen, just use the mouse to draw and set the bounds.
Camtasia
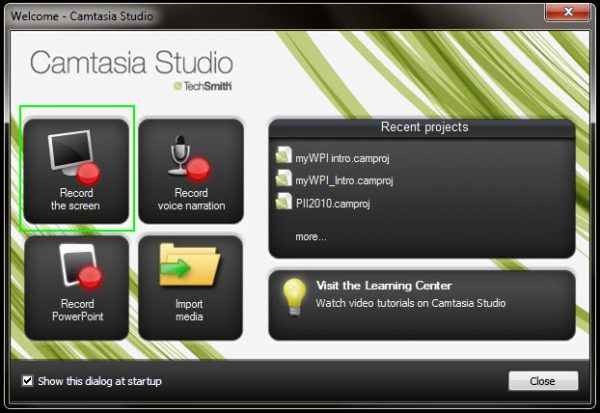
Camtasia is another great third-party screen recorder and editing software. This is a great tool for professional video-making. This can be for the purpose of tutorials, demos, training videos, and more. Users of the app have the benefit of pre-made animation and effects to choose from. The platform is often used for YouTube videos, how-to videos, and webcam recordings. Here’s how to screen-record using Camtasia:
- Navigate to the top of the toolbar and click on “Record.” You may also press F9 on your keyboard. This is set to record the entire screen, but you can customize the screen capture size under Settings.
- Once finished, click on the Camtasia recorder icon again to end the session, or simply press F10. Afterward, click on the “Stop” button. You may do the recording all over again by clicking on “Delete” to start over.
- To remove the extra content at the beginning or at the end of a recording, drag the end of the clip “in.”
Snaglt
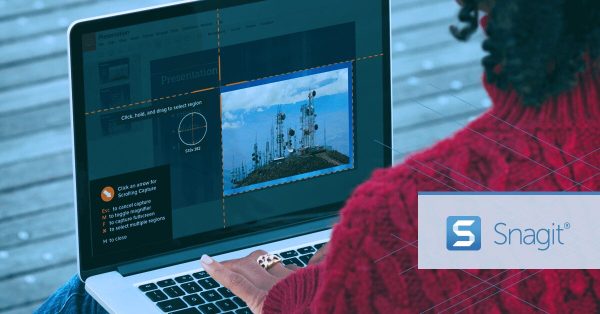
SnagIt is a screen capture platform. This software is quite advanced compared to built-in Mac tools. It’s also best used for more than simply recording. They designed SnagIt specifically to create custom how-to guides, tutorials, and quick videos. The program is able to screen capture any process on your computer screen. It’s can also capture the audio of your explanation while the video is being taken. Here’s how to screen-record using SnagIt:
- Download and install the program.
- Open the web page, word document, or video that you want to snag. The software is able to take a picture or video of any part of your screen, or the whole thing.
- Click on the “SnagIt” button at the top of the screen on the menu bar. If the software isn’t open, open it first and find the icon.
- Select the video toolbar to capture a video. Your general screen should dim. Meanwhile, you might notice a lighter portion. This indicates the scope of your screen to record. Adjust the portion of the screen you select to the right portion. The software also takes an automatic screenshot when you press the camera button.
- Press the “Capture” button to start. Wait for the countdown and then complete your desired actions on the screen. Also, make sure that your audio is on if you intend to include narration.
- Press on “Stop” once finished. Your screen capture should automatically load onto the software editor. From this point, you can make adjustments and add effects to the video.
ScreenFlow
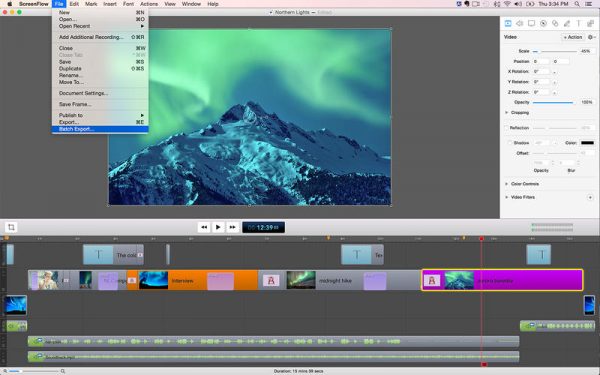
ScreenFlow is a screen capture and video editor software. It’s one of the most widely-used screen recorders among Mac users. The software is jam-packed with features for photo editing, screen recording, and sharing. You can use ScreenFlow to create any self-help material or online content. This includes tutorial videos, how-to videos, or even marketing videos. Here’s how to screen record using ScreenFlow:
- Download and install the software.
- Click on “New Recording” on the left-hand side of the main interface.
- Select the screen to record. Choose the camera input if you want to include a video of yourself as well. Customize audio and video settings.
- Press the red circular “Record” button to begin. A countdown will initiate before the software actually begins recording. Press the stop recording button or SHIFT+CMD+2 to stop recording. Your recording is automatically added to the media library. You can drag the video to the editor to trim excess clips and to add special effects.
Screen Recorders for Windows 10 PC
There are various ways to screen-capture video, audio, and photos using your Windows 10 PC. The program doesn’t have a software just for this purpose. But the lesser-known Xbox Game Bar is a viable alternative for simple screen capture. There are also professional software programs available for advanced video editing and audio supplements. Here are some examples:
Windows’ Game Bar

Not a lot of people may know this, but Windows 10 computers have a hidden screen capture tool. It’s hidden under the game bar of the already-installed Xbox software. You can find the screen recording tool in the game bar specifically to record gameplay. Nonetheless, it can also be used to screen capture web pages, documents, and software. Here’s how to screen-record using the game bar:
- Go to the Home page of your Windows 10 desktop. Type in “Xbox app” on the search bar.
- Once you’ve opened the Xbox app, press Windows key + G. The Windows key is next to the Alt button on the left-hand side of the keyboard.
- A pop-up will appear confirming if the video you will be recording is a game. Click on “Yes, it’s a game.”
- You should see the “Screenshot,” “Start Recording,” and Settings” buttons.
- Select the “Start Recording” button and the recording will begin. Stop the recording when completed. All recordings are saved to the C/Users/Videos/Captures folder. We also recommend for you to zip your files into one folder if you will be sending them through email.
Microsoft PowerPoint
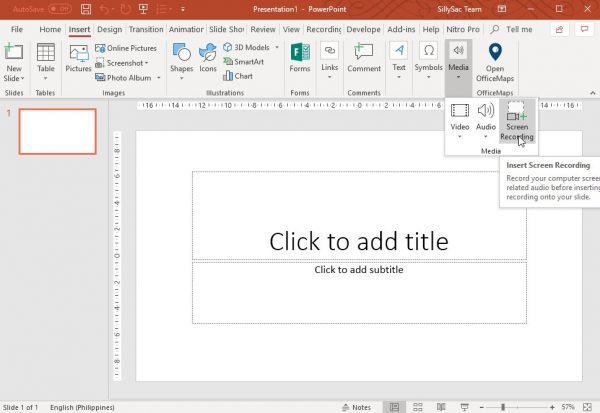
Not many people are aware that PowerPoint also has this feature. It is possible to record your screen with audio and then incorporate them into your slides or save them separately. Make sure you have a good sound card, speakers, and mic. Here’s how to screen-record using Microsoft PowerPoint:
- Create and finalize your presentation.
- Select the Slide Show toolbar from the horizontal toolbar.
- Select “Record Slide Show” to open the slides in the Recording window. You can also find the start, pause, and stop buttons here.
- Click on the bright red “Start Recording” button in the top-left corner. There will be a countdown before the recording. Use your direction keys to navigate the slide show. You can also use pointer tools below the slide.
- Click on the “Stop” button once you’re done. A pop-up will appear to confirm if you agree with the presentation timings. Select “Yes.” Save the recording to a folder on your computer.
- And once the screen capture process is over, you can view your downloaded materials using the best media players available.
ActivePresenter
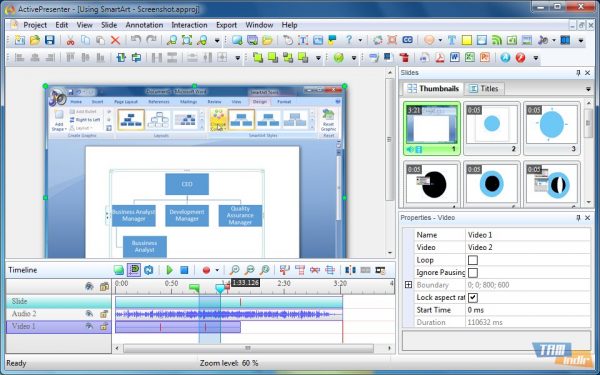
ActivePresenter is a specialized screen recorder and eLearning authoring tool. The software allows users to quickly capture the screen. You can create eLearning materials and other online content in just simple steps. The software is also used for editing audio and video, and software simulation. You can import external files into the software for editing purposes as well. Here’s how to screen-record using ActivePresenter:
- Download and install the program.
- Launch the Start page. Select “Record Video.” You will see a blue rectangle on the home screen indicating the capture area. The Record Video Project dialogue containing recording options should also be visible.
- Drag the blue rectangle to determine the area to be recorded. You can also adjust the size of the rectangle using the drop-down options in the toolbox.
- Tick on the box with the “Lock to application.” This lets the blue rectangle follow where the recorded application moves.
- Click on the “REC” button to start a new project. You can also simultaneously record a webcam by clicking on the Webcam symbol. Click on the “REC” button again once you’re done.
Open Broadcaster Software (OBS) Studio
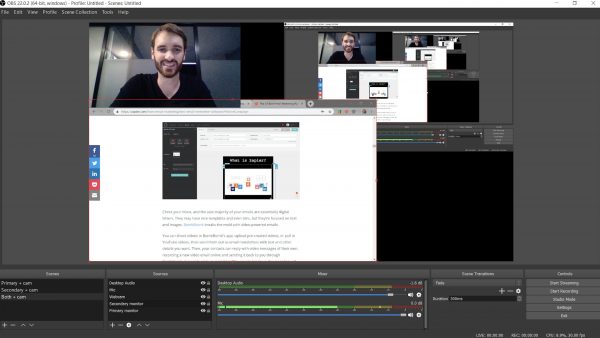
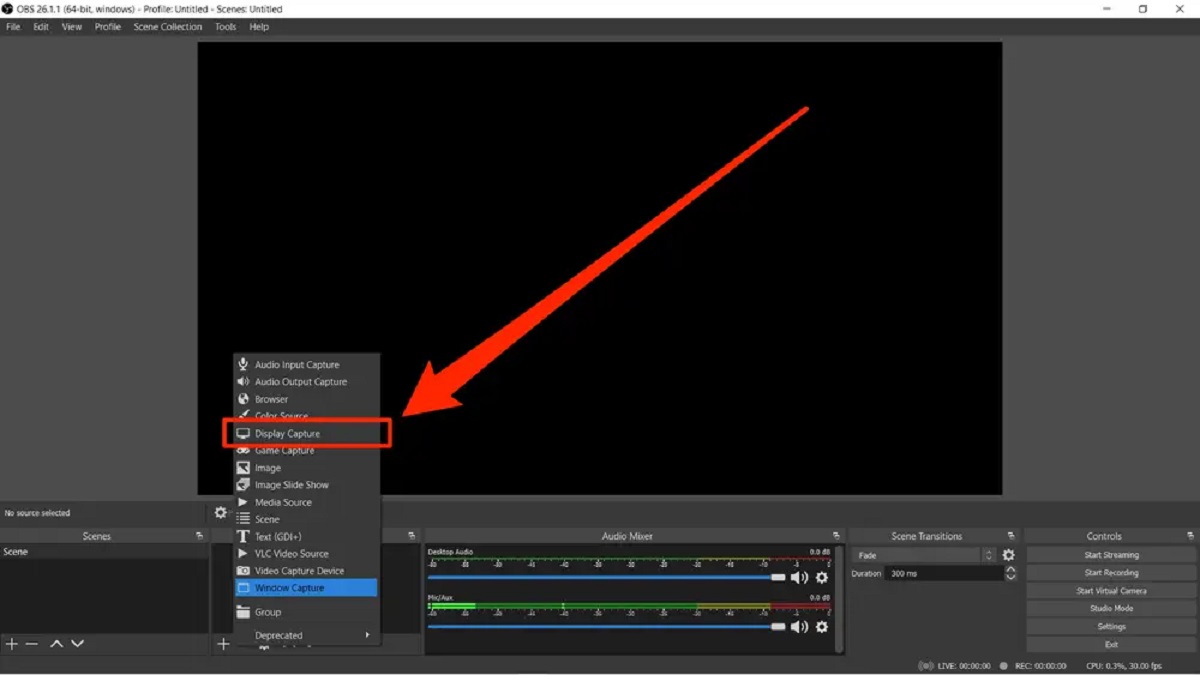
OBS Studio is an open-course screen recorder and live-streaming tool. OBS developers optimized the software for gaming screen capture. Nonetheless, its functions are not exclusive to gaming purposes. It’s also possible to add in still images to the clips. The software is also compatible with major streaming services. This includes Twitch, YouTube, and DailyMotion. Users can upload videos from the software to these websites directly. Here’s how to screen-capture using OBS Studio:
- Download and install OBS. You will see two panels on the left-hand side. There will be a pre-selected scene but no source.
- Click the + button at the bottom of the panel labeled “Sources.” Note that the default Scene is selected or highlighted.
- Select “Screen Capture” on Linux or Display Capture on Mac and Windows.
- Click “OK” on the two pop-up notifications that appear.
- Click on the Settings button on the right side of the interface. Select the “Output” tab. Take note of the Recording Path field. This is where you will find your recorded video.
- Click on the “Start Recording” button to begin recording. Click on “Stop Recording” once you’re done.
Bandicam
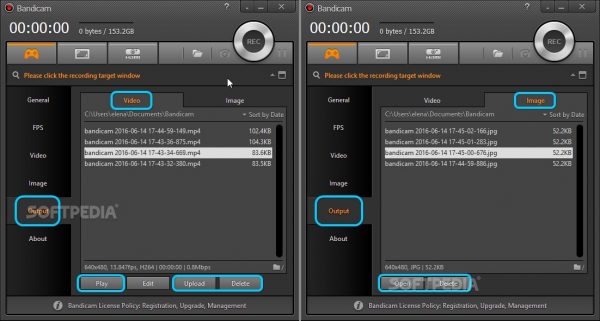
Bandicam is a lightweight and open-source screen recorder for Windows. The software is able to capture anything on the PC screen. This may be a web page, webcam video, or streaming video. It’s also able to capture DirectX or OpenGL gameplay. The software settings are pre-configured. This makes screen capture much easier. Recordings can be saved in either AVI or MP4 formats. You can also screenshot anything on your desktop. Here’s how to screen-capture using Bandicam:
- Download and install Bandicam.
- Click on the “Screen Options” button on the upper left-hand corner of the interface.
- Click on “Rectangle on a screen” from the menu. Drag the rectangle to your desired size if you selected the latter option.
- Click on the “REC” button when you’re ready to record. Click on the “REC” button again once you’re done.
Screen Recorders for Linux
Linux is not as popular as Windows and Mac, but some people like it because it’s free and open-sourced. Linux doesn’t come with a built-in screen recorder. In this case, users of Linux OS would need to install third-party screen recorders. If you are a Linux user, there are screen recorder apps that can help you out. Here are some examples:
RecordMyDesktop
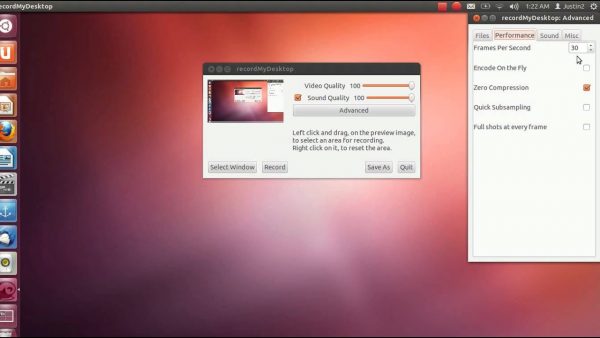
RecordMyDesktop is a program that can record Linux desktop sessions. The program has two main parts. One is a command-line toolset that performs the task of capturing and encoding. The other is an interface that exposes the program functionality in a graphic manner. The program is able to adapt to areas on the screen with significant movement. The program also has the ability to record audio through different audio serves. Here’s how to screen-record using RecordMyDesktop:
- Download and install the software.
- After opening the program, click on Record from the bottom portion of the interface.
- Click on the “Advanced” tab. Select “Misc.”
- Make sure to leave the “Outline Capture Area” and “Reset Capture Area” unchecked.
- Close the “Advanced” toolbar. Click Record on the main toolbar to start recording.
Kazam

Kazam is a reliable and easy to use screen recorder for Linux. The software has the ability to record the entire screen or part of the screen. The newest version can even record mouse clicks and key presses. It can simultaneously capture audio from the speakers or microphone of the computer. Keyboard shortcuts are also present for quickly pausing and resuming recording. Here’s how to screen-record using Kazam:
- Download and install the software.
- Place a checkmark next to the items that you would like to capture during recording. This includes mouse cursor, sound from speakers, sound from microphone, key presses, etc.
- Click on the “Capture” button at the bottom part of the page. A countdown will initiate before the recording starts. Once the recording starts, the Kazam interface is minimized to the taskbar. Click on “Pause recording” or “Finish recording” if you want to cancel or stop the recording.
Peek
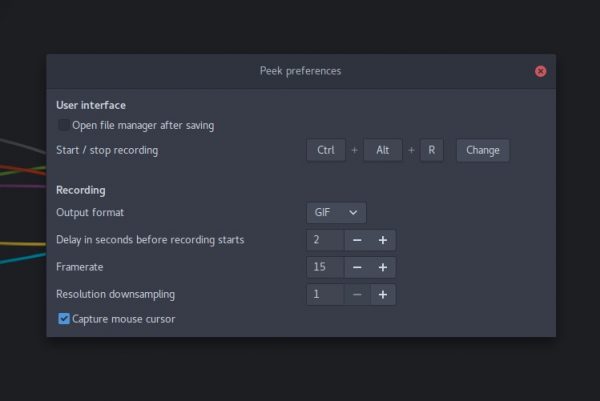
Peek is a screen capture software for Linux. The software focuses on the single task of creating screencasts of an area of the screen and export them as GIFs. The intention is for creating simple animated GIF files. It can also directly record screen activity to WebM or MP4 format. Unfortunately, the lack of sound capture capabilities is limiting. Nonetheless, you can still use it to make high-quality screencasts. Additionally, it doesn’t have any time limits or watermarks over the resulting videos. Here’s how to screen-record using Peek:
- Download and install the software.
- From the system tray, click on the Peek icon and then “New Recording.”
- Adjust the window to fit the part of the screen to be recorded.
- Click on “Record.” Click “Stop” once you’re done.
Green Recorder
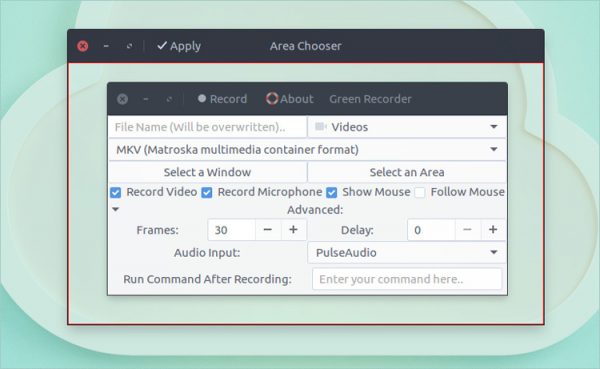
Green Recorder is a simple screen recorder for Linux. It supports audio and video recording on most of the Linux desktop environments. This includes Unity, Gnome, and Cinnamon. The software has very simple buttons for quick navigation and recording. It also supports multiple output formats. They have added a play button on the main menu, which allows users to watch a recorded video. Here’s how to screen record using Green Recorder:
- Download and install the software.
- Select a capture option. Resize the window to fit the area of the screen you want to capture. Choose the audio input source from the list. Select the video format and the file name.
- Click on the “Record” button to start recording. Click “Stop” once you’re done.
How to Screen-Record on Mobile Devices
There are plenty of applications and mobile software. There’s also plenty of opportunity there to create video tutorials and how-to videos. Unfortunately, the standard tools for computers don’t work for mobile devices. Thankfully, there is plenty of mobile screen capture software to do the task. Developers have made these programs with a smaller interface and easy-to click buttons. All you need to do is to install the application on your device and start recording.
Screen Recorders for iPhone/iPad

There are a variety of screen recorders made for Apple devices. These can be downloaded straight off of the App Store. These programs were designed as mobile applications instead of full-blown software. There’s really not much of a difference in terms of functionality.
Apple’s Built-In Screen Record Button
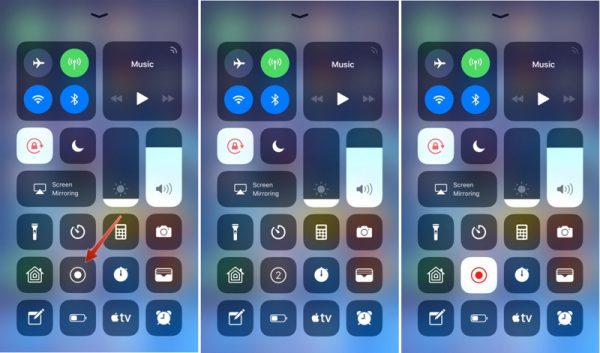
Apple tablets and phones have a pre-installed screen capture tool. The screen recording tool is hidden under the Settings toolbar. It’s specially made for recording on-screen actions in the form of video and audio. You can also use it to capture the navigation of web pages and documents. Here’s how to screen-record using the built-in screen recorder:
- For easy access, you can add the screen recorder to your Control Center first. Just go to the Control Center in the Settings app. Tap on “Customize Controls” and then tap on the green plus sign to the left of Screen Recording. This should make the Recording button appear on your Control Center.
- Swipe up from the bottom of your screen to access the Control Center. Long-press on the grey circular button for a few seconds, then tap “Microphone” if you plan to include audio commentary.
- Tap on “Start Recording.” The recording will start after three seconds.
- Open the control center and tap on the red recording button once you’re done. Go to the Photos app to view your recording.
Go Recorder
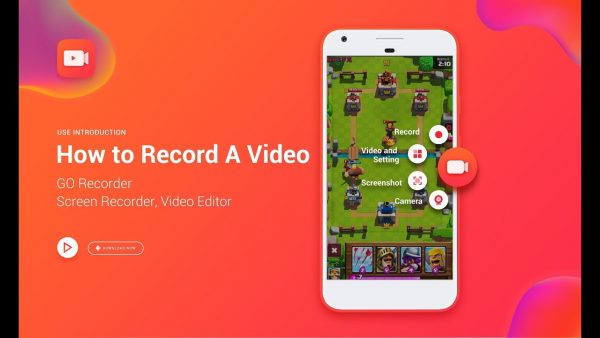
Go Recorder is a professional screen recorder and editor for mobile devices. The software can record on-screen activity complete with audio. The software has an additional feature called Face Cam. This feature allows users to include their reaction to recordings. The software also has a full-fledged editing suite. Here’s how to screen-record using Go Record:
- Download and install the app.
- Go to the Settings app. Click on “Control Center.”
- Click on the green plus sign to the left of “Screen Recording.” This should make the Recording button appear on the customized panel.
- Open “Go Record” on your iPhone or iPad. Select either “Face Cam” or “Commentary.”
- Select “New Project.”
- Click on “Go Record” to start recording.
DU Recorder
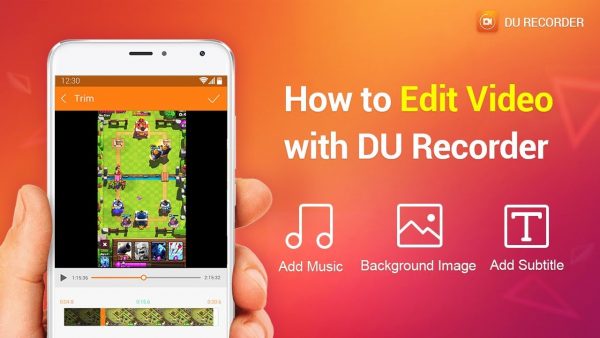
DU Recorder is a simple screen recorder for mobile devices. Creating high-quality screencasts are very easy. It also has a wide selection of options for customizing video properties. It also makes it possible to edit the video. Examples include trimming and combining video clips into one. It’s also possible to add audio or music to your videos. Here’s how to screen record using DU Recorder:
- Download and install the app. A DU Recorder icon should appear on your Home screen.
- Open the app and look for the “Videos and Settings” option.
- Customize video resolution and video quality. You can toggle “Record audio” on if you will speak while in the process of recording.
- Click on the orange video recorder toolbar again. Click on the red circular “Record” button to begin recording. The camera button also captures a video of you on the screen while it’s recording.
Screen Recorders for Android Phone/Tablet
Screen recording is just as easy for the majority of Android users. There are even more options when it comes to screen recording. Some brands of mobile phones and tablets even have their own screen recording app. For those without built-in screen recorders, there are plenty of downloadable mobile apps. These mobile apps record anything from gaming videos, video calls, live shows, and more.
Built-In Screen Record Button
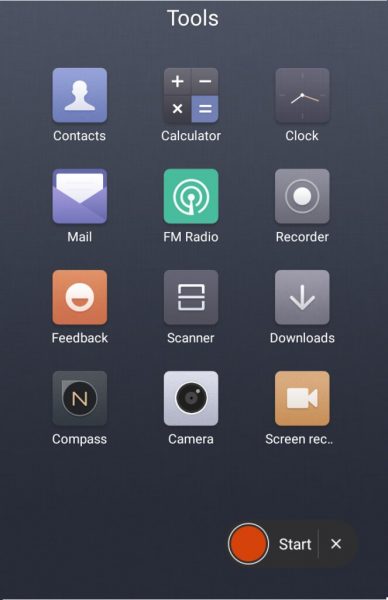
Most Android devices have built-in screen recorders. The process is almost the same for most devices. Here’s how to screen-record using the built-in screen recorder:
- Swipe from the top of your screen to bring the notification shade down. Go to Quick Settings.
- Tap the screen recorder icon and allow it if permission is asked.
- Click on the “Start.”
- Tap on “Stop.”
- Find the recorded video in your device gallery.
AZ Screen Recorder
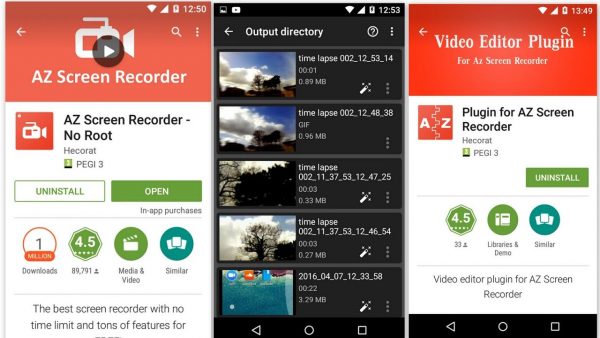
AZ Screen Recorder is a popular and reliable screen recorder for mobile devices. Aside from taking videos, you can also take screenshots and record live. There’s also a video editor feature to improve your screen recordings. The program provides an easy and convenient way to record screen videos. The app runs on Android 5.0 devices and up. Here’s how to screen-record using AZ Screen Recorder:
- Download and install the software. A circular AZ Screen Recorder icon should appear on your Home screen.
- Click on the AZ icon and open Settings. Customize control options and video configuration settings. Note that all settings have a default that you can change. Exit settings.
- Click on the AZ toolbar again. Select the video toolbar followed by the red circular “Record” button. Pull down the notification toolbar and click on the “Stop” button to stop recording.
ScreenCam
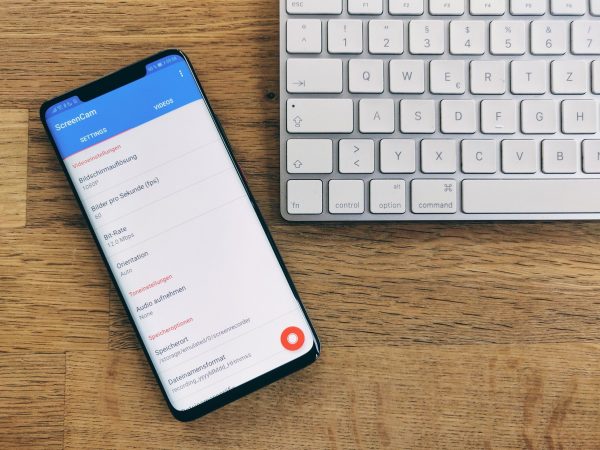
ScreenCam is a lightweight and clutter-free screen recorder for mobile devices. The software lets you choose between multiple audio sources, including internal audio. You can also set multiple resolutions for the videos you record. It’s also possible to export your videos to multiple platforms. It makes for easy transfer over the internet or a CD. The user interface is also simple and very easy to use. Here’s how to screen-record using ScreenCam:
- Download and install the software.
- Go to the Settings tab. Customize video and audio settings as you see fit.
- Click on the green “Record” button on the lower right-hand corner to begin recording. Pull down the notification toolbar and click on the “Stop” button to stop recording.
Mobizen
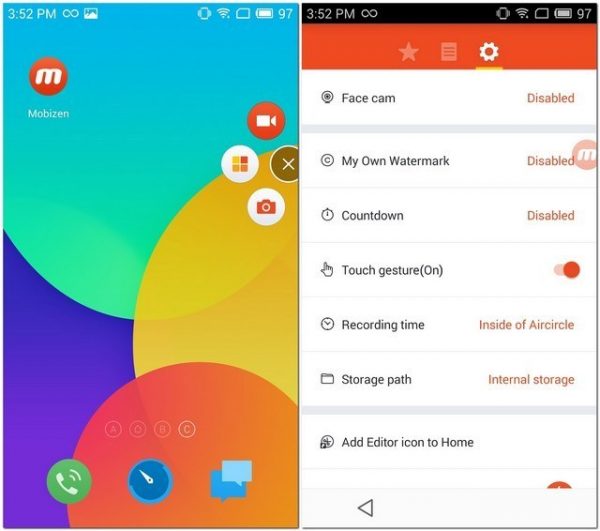
Mobizen is a screen-mirroring and recording app for mobile devices. The software works by reflecting the contents of your phone or handheld device to your PC. This feature is best used for presentations and mobile gameplay using the PC. You can take videos from your mobile screen and save them onto the PC. Here’s how to screen-record using Mobizen:
- Download and install the software. A circular Mobizen toolbar should appear on your Home screen.
- Click on the toolbar and then open Settings. Customize control options and video configuration settings. Exit settings once you’re done.
- Click on the Mobizen toolbar from your Home screen. Click on the “Record” button. A pop-up notification should appear informing you of how to stop recording. Click “OK”.
- To stop recording, pull down the notification toolbar and click on the Stop button.
Final Thoughts on How to Screen-Record Easily

Gone are the days when wordy instructional emails and help desk articles governed the internet. Nowadays, people have come up with a much more efficient solution: video tutorials and e-learning. The online self-help platform appears to be highly effective. This is first in terms of delivering a message in a way that people can easily understand. They also emphasize the importance of visual communication in imparting knowledge and information. Video tutorials, for example, are able to reach a wider audience than written material. This is because they are highly accessible and very easy to understand. It’s highly surprising then that people turn to these quick tutorials for help.
Screen recorders are also very useful for creating online self-help materials. The software and mobile apps we’ve included in this article usually have the same features and functions. They’ve been designed for easy access and use, so there’s really no need for a manual of some sort. And once you’re able to figure out how one software works, you will be able to navigate other software just as easily.
Regardless of whether you are an active blogger or just a curious individual, knowing how to screen-record is an important skill. It’s a great skill and a stepping stone for sharing your knowledge with the friend. Most websites have a section dedicated to lectures and eLearning materials. Most people like to create casual self-help guides on the latest games, technology, and software. More serious individuals could make commentary on documents and web pages. These are just suggestions, but there are plenty more that have not yet been explored. Certainly, there’s no limit to what you can do when you know how to screen record.