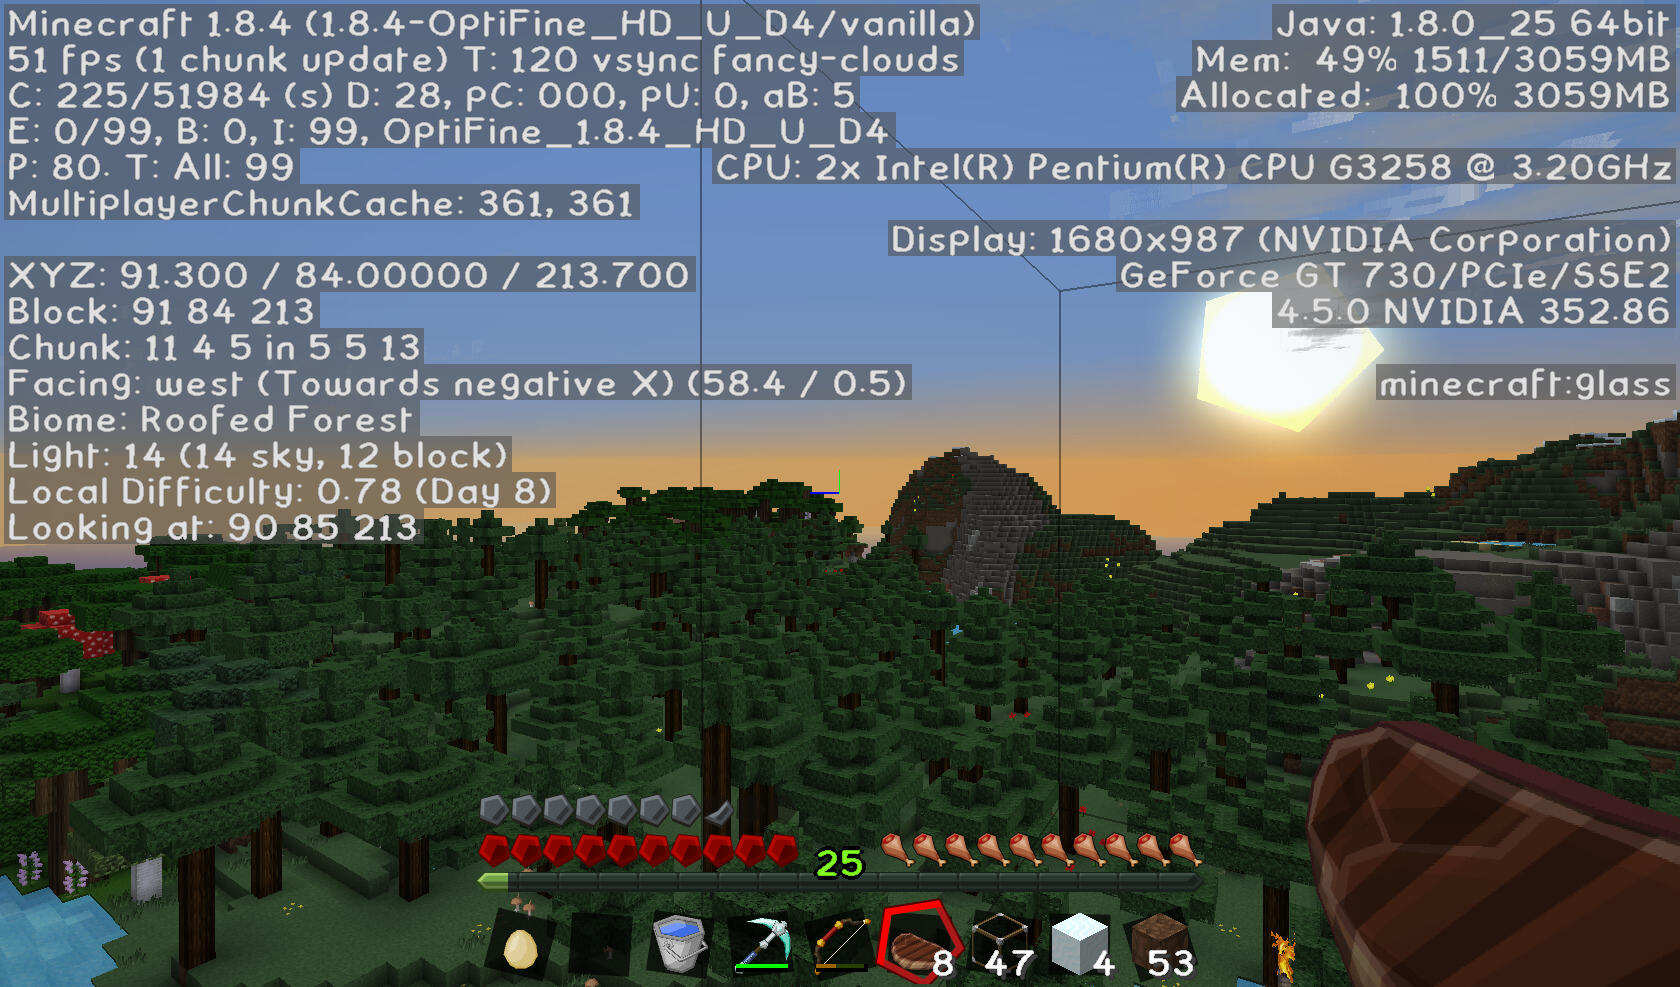
Introduction
In the world of Minecraft, players are constantly looking for ways to enhance their gaming experience and make it more visually appealing. One way to achieve this is by downloading and installing shaders. Shaders are graphical modifications that can drastically improve the graphics of Minecraft, giving it a more realistic and immersive feel.
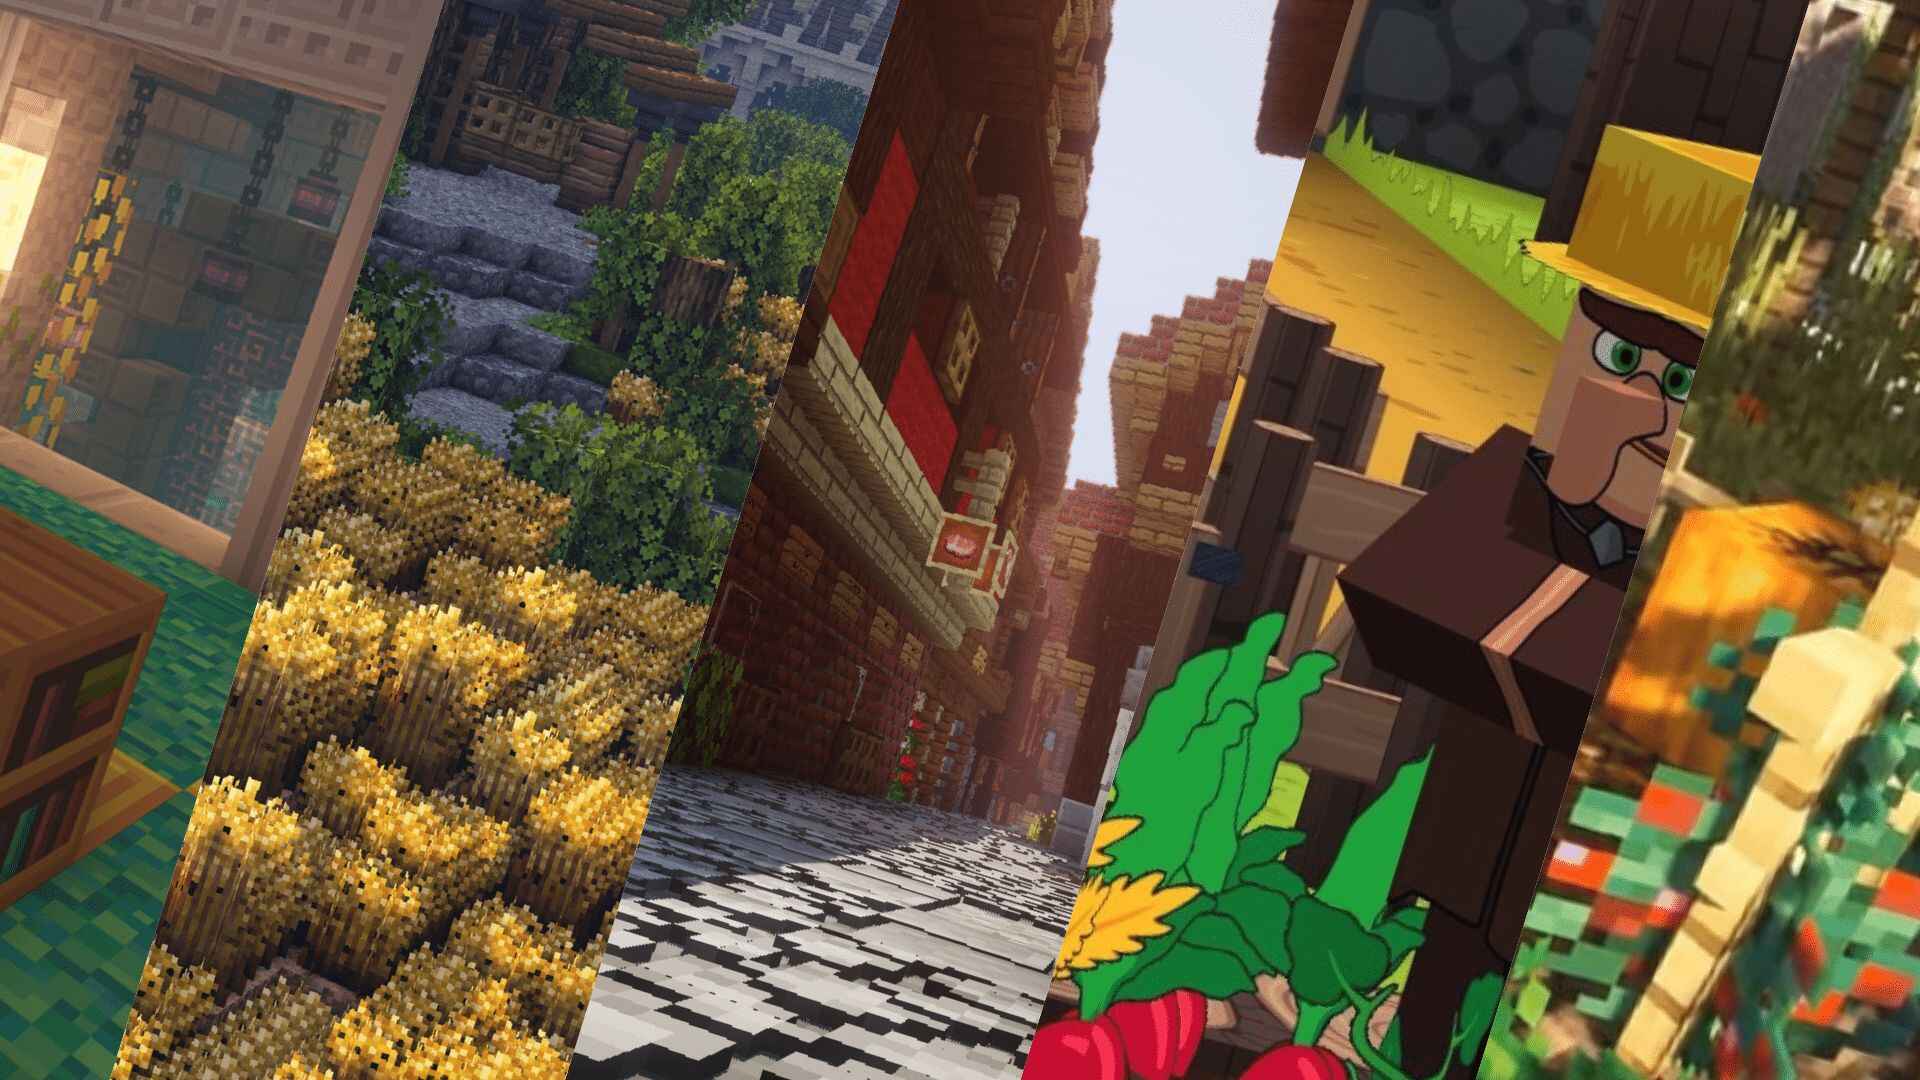
Playing Minecraft with shaders can transform the blocky landscapes into stunningly realistic environments, with enhanced lighting, shadows, and reflections. These visual enhancements can completely change the way you perceive the game, adding a new level of depth and realism to your adventures.
However, downloading and installing shaders for Minecraft Java requires a few steps, including checking system requirements, installing the OptiFine mod, and selecting and installing a shader pack. If you’re unsure where to start or how to go about it, don’t worry! This guide will walk you through the process, making it easy for you to enjoy the beauty of shaders in Minecraft Java.
Before we dive into the steps, it’s important to note that shaders can be quite demanding on your system’s resources. They require a powerful graphics card and sufficient RAM to run smoothly. So, make sure to check the system requirements outlined in the first step to ensure that your computer can handle running shaders without any issues.
Now, let’s get started with the step-by-step process of downloading and installing shaders for Minecraft Java!
What are shaders?
Shaders are graphical modifications that can be applied to Minecraft to enhance its visual aesthetics. They are programs written in a shading language, such as GLSL (OpenGL Shading Language), that manipulate the way light interacts with objects in the game. By altering lighting, shadows, reflections, and other visual elements, shaders can completely transform the appearance of Minecraft.
Shaders work by modifying the game’s rendering pipeline, which is responsible for creating and displaying the graphics on your screen. By implementing advanced rendering techniques, shaders can produce stunning effects like realistic lighting, water reflections, dynamic shadows, and motion blur.
One of the primary goals of shaders is to create a more immersive and lifelike experience for players. With shaders, Minecraft’s blocky landscapes are transformed into visually captivating environments that resemble real-life scenes. The lighting becomes more dynamic, with soft shadows that simulate the behavior of light in the real world. Water surfaces glisten with reflections and refractions, giving them a sense of depth and realism.
Shaders can also add visual effects like depth of field, which simulates the way our eyes focus on objects at different distances. This effect can create a more cinematic and immersive gameplay experience. Additionally, shaders can enhance the colors and textures of Minecraft, making them more vibrant and detailed.
It’s important to note that shaders are not officially supported by Minecraft or Mojang, the game’s developer. They are created by third-party developers and enthusiasts who have a deep understanding of the game’s graphics engine. Shaders are typically developed as mods or add-ons that can be installed alongside Minecraft to enable the enhanced graphics.
Overall, shaders are a powerful tool for transforming Minecraft’s visuals and creating a more immersive and visually stunning gaming experience. Whether you’re looking to capture beautiful screenshots, create breathtaking videos, or simply enjoy the game in a whole new light, shaders can take your Minecraft adventures to the next level.
How do shaders enhance Minecraft graphics?
Shaders enhance Minecraft graphics by implementing advanced rendering techniques that go beyond the default graphics settings of the game. These techniques manipulate lighting, shadows, reflections, and other visual elements to create a more realistic and visually appealing environment.
One of the key ways shaders enhance Minecraft graphics is through dynamic lighting. The default lighting in Minecraft is static, meaning that it doesn’t change based on the position of the sun or other light sources. Shaders introduce dynamic lighting, which simulates the behavior of light in the real world. This means that as the sun rises and sets, the lighting in the game will change accordingly, casting realistic shadows and creating a more immersive atmosphere.
Shaders also improve the quality and realism of shadows in Minecraft. With shaders enabled, shadows become softer and more defined, depending on the intensity of the light source. This adds depth and a sense of realism to the game, as objects cast accurate and realistic shadows based on their position in relation to the light.
Reflections are another aspect of Minecraft’s graphics that shaders enhance. With shaders, bodies of water, such as lakes, rivers, and oceans, reflect the surrounding environment, including the sky, trees, and structures. This creates stunning visual effects, making the water appear more realistic and immersive. Shaders can also produce realistic reflections on other surfaces, such as glass and shiny objects, adding to the overall visual appeal of the game.
Shaders also introduce various visual effects that enhance the graphics of Minecraft. These effects can include motion blur, depth of field, and ambient occlusion. Motion blur adds a sense of movement and realism to the game by blurring the image slightly when there is fast motion, simulating how our eyes perceive motion in the real world. Depth of field selectively blurs objects in the foreground or background to draw focus to the main subject, adding depth and a cinematic touch to Minecraft’s visuals. Ambient occlusion creates more depth and realism by darkening areas where objects meet, simulating the way light is blocked and scattered in real-world environments.
Overall, shaders enhance Minecraft graphics by incorporating advanced rendering techniques that transform the game’s visuals. From dynamic lighting and realistic shadows to captivating reflections and visual effects, shaders elevate Minecraft’s graphics to new heights, providing a more immersive and visually stunning gameplay experience.
Step 1: Check system requirements
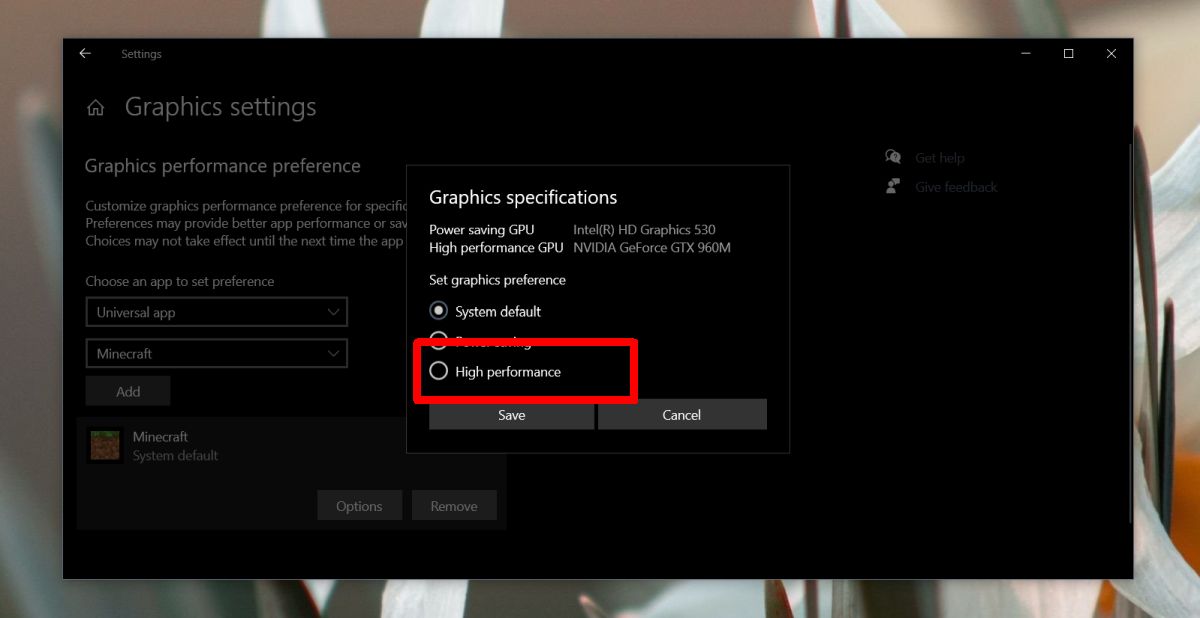
Before diving into the world of shaders in Minecraft, it’s important to ensure that your computer meets the necessary system requirements. Shaders can be resource-intensive and may require a powerful graphics card and sufficient RAM to run smoothly.
To check the system requirements for running shaders, follow the steps below:
- Verify that your computer meets the minimum requirements for Minecraft. These requirements can be found on the official Minecraft website or the game’s documentation. It’s essential to have a compatible version of Minecraft Java Edition installed on your computer.
- Ensure that you have a dedicated graphics card that supports OpenGL 2.0 or higher. Shaders rely heavily on the graphics card for rendering, so it’s important to have a GPU that can handle the additional workload. Check your graphics card specifications to confirm its compatibility with shaders.
- Check your computer’s RAM capacity. Shaders can be memory-intensive, and having sufficient RAM is crucial for smooth performance. Ensure that you have at least 4GB or more of RAM available for Minecraft with shaders.
- Verify that you have the latest graphics card drivers installed. Outdated or incompatible drivers can cause issues when running shaders. Visit the website of your graphics card manufacturer and download the latest drivers for your specific model.
By checking and meeting the system requirements, you can ensure that your computer is capable of running shaders for Minecraft Java Edition. It’s important to note that not all computers will be able to handle shaders, especially those with integrated graphics or lower-end specifications.
If your computer does not meet the minimum requirements, consider upgrading your hardware or exploring other graphical enhancements available within Minecraft, such as texture packs or resource packs, which may offer visual improvements without the same performance demands as shaders.
Once you have confirmed that your system meets the requirements, you are ready to move on to the next step: downloading and installing the OptiFine mod, which will enable shaders in Minecraft Java Edition.
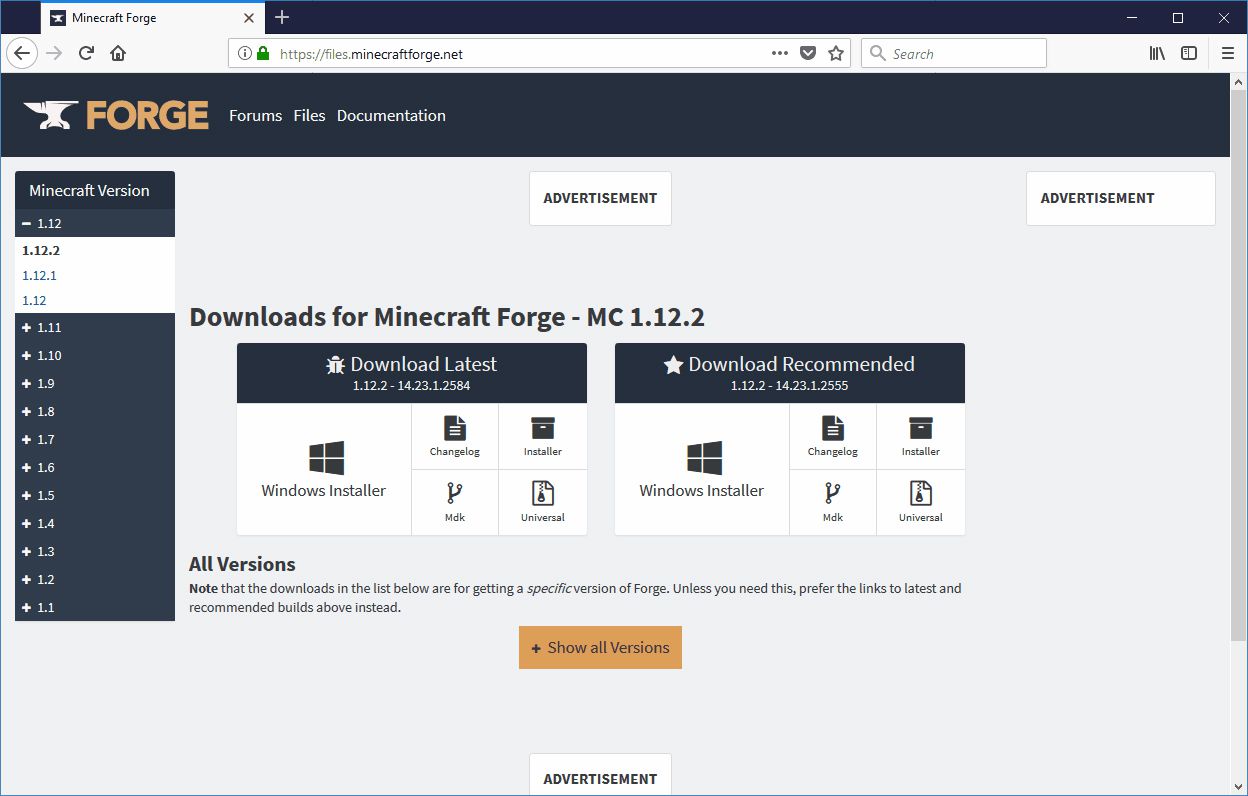
Step 2: Download and install OptiFine
OptiFine is a mod for Minecraft that not only improves the game’s performance but also adds support for shaders. Before you can install and use shaders in Minecraft Java Edition, you’ll need to download and install OptiFine.
Follow these steps to download and install OptiFine:
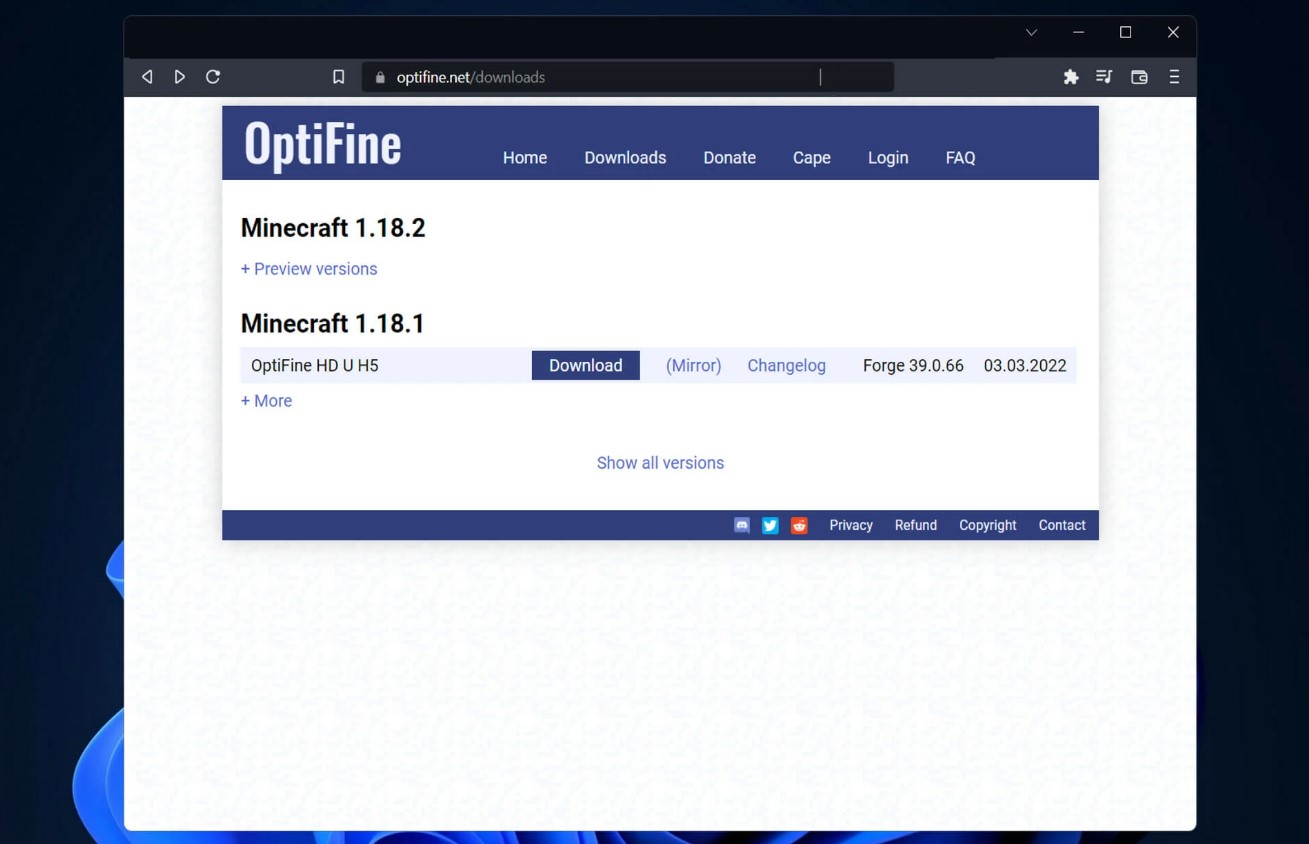
- Visit the official OptiFine website (https://optifine.net/downloads) and navigate to the downloads section.
- Make sure to download the correct version of OptiFine that is compatible with your version of Minecraft. OptiFine offers different versions for various Minecraft releases such as 1.17, 1.16.5, etc. Choose the version that matches the Minecraft version you have installed.
- Once you’ve downloaded the OptiFine JAR file, locate it on your computer. Double-click on the JAR file to start the installation process.
- The OptiFine installer will open. Select “Install” and wait for the installation process to complete. This may take a few moments.
- After the installation is finished, launch the Minecraft Launcher on your computer and click on the “Installations” tab.
- Create a new installation by clicking on the “New” button. Give your new installation a name and select the OptiFine version you installed from the dropdown menu.
- Click on “Create” to create the new OptiFine installation.
Once you’ve completed these steps, you now have OptiFine installed on your computer and ready to enable shaders in Minecraft Java Edition. OptiFine not only improves the game’s performance but also provides additional graphics settings and shader options within Minecraft.
In the next step, we’ll guide you through finding a reliable shader pack website and choosing a shader pack that suits your preferences.
Step 3: Find a reliable shader pack website
In order to download shaders for Minecraft Java Edition, you’ll need to find a reliable website that hosts shader packs. There are several websites dedicated to providing a collection of shader packs for Minecraft.
Follow these steps to find a reliable shader pack website:
- Search for “Minecraft shader packs” in your preferred search engine. This will yield a list of websites that offer a variety of shader packs for Minecraft.
- Take note of popular shader pack websites that appear in your search results. These websites often have an extensive selection of shader packs to choose from.
- Read reviews or feedback from other Minecraft players to gauge the reliability and quality of the shader pack websites. Look for websites that have positive reviews and a good reputation within the Minecraft community.
- Consider checking Minecraft forums or community websites for recommendations on reliable shader pack websites. The Minecraft community is a great resource for finding trusted sources.
- Ensure that the website you choose offers a safe and secure download experience, free of malware or other malicious content. Avoid websites that appear suspicious or require unnecessary personal information.
It’s important to note that shader packs are created by different developers and enthusiasts, so the quality and performance may vary from pack to pack. Exploring multiple shader pack websites will give you a wider selection to choose from and increase your chances of finding the perfect shader pack for your Minecraft experience.
Once you’ve identified a reliable shader pack website, you can proceed to the next step of selecting and downloading a shader pack that suits your preferences.
Step 4: Choose and download a shader pack
With OptiFine installed and a reliable shader pack website identified, it’s time to choose and download a shader pack for Minecraft Java Edition. The shader pack you choose will determine the specific visual effects and enhancements applied to your Minecraft game.
Follow these steps to choose and download a shader pack:
- Visit the reliable shader pack website you identified in the previous step.
- Browse through the available shader packs on the website. Most shader pack websites categorize their packs based on different features or styles, such as realism, fantasy, or vibrant colors. Take your time to explore the options and find a shader pack that captures your desired visual style.
- Read the description and check the preview images or videos provided for each shader pack. This will give you a better idea of how the shaders will enhance the graphics in Minecraft.
- Consider the performance impact of each shader pack. Some shader packs may have more demanding requirements and can put a strain on your computer’s resources. If you have a lower-end system, look for shader packs that are optimized for better performance.
- Select the shader pack you want to download by clicking on the appropriate download button or link.
- Depending on your browser and computer settings, you may be prompted to save the shader pack zip file to a specific location on your computer. Choose a location that is easy to remember and access later.
- Wait for the shader pack zip file to finish downloading. The download time may vary depending on the size of the shader pack and your internet connection speed.
Congratulations! You have successfully chosen and downloaded a shader pack for Minecraft Java Edition. In the next steps, we will guide you through the process of running Minecraft with OptiFine and installing the downloaded shader pack.
Step 5: Open the Minecraft Launcher
Before you can enable shaders in Minecraft Java Edition, you need to open the Minecraft Launcher. The Minecraft Launcher is the application that allows you to launch and manage your Minecraft game installations.
Follow these steps to open the Minecraft Launcher:
- Locate the Minecraft Launcher icon on your desktop or in your computer’s applications folder.
- Double-click on the Minecraft Launcher icon to launch the application.
- If prompted, enter your Minecraft account credentials (username and password) and click on the “Play” button to log in to the launcher. If you are already logged in, you will be taken to the main launcher screen.
The Minecraft Launcher provides access to different Minecraft game versions, installations, and settings. It is here that you will be able to select and run Minecraft with OptiFine and shaders enabled.
Once the Minecraft Launcher is open, you’re ready to move on to the next step: running Minecraft with OptiFine installed.
Step 6: Run Minecraft with OptiFine
Now that you have the Minecraft Launcher open, it’s time to run Minecraft with OptiFine installed. OptiFine enables the use of shaders and provides additional graphics settings within the game.
Follow these steps to run Minecraft with OptiFine:
- In the Minecraft Launcher, locate the installation with OptiFine that you created in “Step 2: Download and install OptiFine.”
- Select the OptiFine installation by clicking on the dropdown menu next to the “Play” button, then choose the OptiFine installation you created.
- Click on the “Play” button to launch Minecraft with OptiFine.
- The game will start loading, and you will be taken to the Minecraft main menu once it finishes.
Running Minecraft with OptiFine allows you to take advantage of the improved performance and graphics settings provided by the mod. It prepares the game for the installation and use of shader packs.
Now that you have successfully launched Minecraft with OptiFine, you’re ready to proceed to the next steps, where we will guide you through accessing the shader settings in Minecraft. This will allow you to select and apply the downloaded shader pack.
Step 7: Open the “Options” menu in Minecraft
In order to access the shader settings and apply the downloaded shader pack, you need to open the “Options” menu in Minecraft. The “Options” menu is where you can customize various settings and configurations for your Minecraft gameplay.
Follow these steps to open the “Options” menu:
- Ensure that Minecraft with OptiFine is running and you are at the main menu.
- Look for the “Options” button located at the bottom-right corner of the main menu screen.
- Click on the “Options” button. This will open a menu with various settings and customization options for Minecraft.
The “Options” menu provides a wide range of settings that you can adjust to personalize your Minecraft experience. From here, you can tweak gameplay settings, control audio and video settings, and configure various other options to suit your preferences.
Now that you have successfully opened the “Options” menu, you’re one step closer to applying the shader pack. In the next step, we will guide you through accessing the “Shaders” option within the “Video Settings” menu.
Step 8: Click on “Video Settings” and then “Shaders”
After opening the “Options” menu in Minecraft, you need to navigate to the “Video Settings” menu to access the shader options. From there, you can apply and configure the shader pack you have downloaded.
Follow these steps to access the “Shaders” option:
- In the “Options” menu, locate and click on the “Video Settings” button. This will open a submenu containing various video-related settings.
- Within the “Video Settings” menu, look for the “Shaders…” button. Click on it to access the shader options.
By clicking on the “Video Settings” and then “Shaders” buttons, you will be able to access the dedicated shader settings within Minecraft. This is where you can enable, disable, and configure the shader pack you have downloaded.
Now that you have successfully accessed the “Shaders” option, you’re ready to proceed to the next step, where we will guide you through opening the “Shaders Folder” on your computer.
Step 9: Click on “Shaders Folder” to open the file directory
In order to install the downloaded shader pack into Minecraft, you need to open the “Shaders Folder” which is the file directory where the shader pack files are stored. By accessing this folder, you will be able to move the downloaded shader pack file into the appropriate location for Minecraft to recognize.
Follow these steps to open the “Shaders Folder” and access the file directory:
- In the “Shaders” menu, located within the “Video Settings” submenu, you will see a button labeled “Shaders Folder.” Click on it to open the file directory.
Clicking on the “Shaders Folder” button will open the folder where all the shader pack files are stored on your computer. This allows you to manage and add new shader packs to Minecraft.
Once the “Shaders Folder” opens, you can proceed to the next step: moving the downloaded shader pack file into the folder.
Step 10: Move the downloaded shader pack file to the Shaders folder
After opening the “Shaders Folder,” you will need to move the downloaded shader pack file into this folder. By doing so, you will make the shader pack available for selection within Minecraft.
Follow these steps to move the downloaded shader pack file:
- Open a separate window or file manager on your computer.
- Navigate to the location where the shader pack file was downloaded. This is typically the folder where your downloads are saved.
- Locate the downloaded shader pack file, which is usually in a compressed file format such as a ZIP file.
- Select the shader pack file and copy or cut it.
- Return to the “Shaders Folder” that you opened in the previous step.
- Paste the copied shader pack file into the “Shaders Folder” by right-clicking and selecting “Paste,” or by using the keyboard shortcut Ctrl+V (Windows) or Command+V (Mac).
By moving the downloaded shader pack file into the “Shaders Folder,” you have successfully installed the shader pack into Minecraft. This makes it accessible for selection within the game.
Now that the shader pack is in the appropriate folder, you’re ready to proceed to the final step: selecting and applying the shader pack in Minecraft to enjoy the enhanced graphics.
Step 11: Select the shader pack in Minecraft
With the shader pack successfully installed in the “Shaders Folder,” the final step is to select and apply the shader pack within Minecraft. By doing so, you will be able to enjoy the enhanced and immersive graphics that shaders provide.
Follow these steps to select the shader pack in Minecraft:
- Go back to Minecraft and make sure you are in the main menu.
- Click on the “Options” button located at the bottom-right corner of the main menu screen.
- In the “Options” menu, click on “Video Settings” to access the video-related settings.
- Within the “Video Settings” menu, click on the “Shaders…” button again.
- In the “Shaders” menu, you will now see a list of available shader packs that are installed in the “Shaders Folder.”
- Click on the name of the shader pack you want to use to select it.
- Once the shader pack is selected, you can preview it by clicking on the “Preview” button. This will give you an idea of how the shader pack will alter the visuals in the game.
- If you are satisfied with the preview, click on the “Done” button to apply the shader pack.
After selecting and applying the shader pack, Minecraft will reload with the new graphical enhancements. You will now be able to experience the beautiful lighting, realistic shadows, and other visual effects provided by the shader pack you have chosen.
Enjoy exploring Minecraft with your newly applied shader pack and immerse yourself in the enhanced graphics that shaders offer!
Conclusion
Congratulations! You have successfully learned how to download and install shaders for Minecraft Java Edition. By following the steps outlined in this guide, you can now enjoy a visually stunning and immersive gaming experience.
Shaders add a new dimension to Minecraft by enhancing its graphics, introducing dynamic lighting, realistic shadows, reflections, and other visual effects. These graphical modifications bring the game to life, transforming its blocky world into a beautifully detailed and vibrant environment.
Remember to always check your system requirements before attempting to use shaders. Shaders can be resource-intensive, so ensure that your computer has a compatible graphics card and sufficient RAM to handle the additional workload.
In the process, you installed the OptiFine mod, an essential component for enabling shaders and improving Minecraft’s performance. You also found a reliable shader pack website, selected and downloaded a shader pack that suited your preferences, and installed it into Minecraft through the “Shaders Folder.”
Finally, you accessed the “Options” and “Video Settings” menus in Minecraft to enable and select the shader pack you installed, allowing you to experience the enhanced graphics firsthand.
Now, with your newly applied shader pack, you are ready to embark on Minecraft adventures like never before. Get ready to explore stunning landscapes, marvel at realistic lighting and reflections, and immerse yourself in the captivating visuals that shaders provide.
Enjoy your enhanced Minecraft experience, and may your gaming journeys be filled with awe-inspiring beauty and endless creativity!