System Requirements
Before you can download and install a PlayStation 2 (PS2) emulator on your PC, it’s important to ensure that your system meets the necessary requirements. The performance of the emulator and the smooth running of PS2 games depend on having the right specifications. Here are the minimum and recommended system requirements you need to consider:
Minimum System Requirements:
- Operating System: Windows 7 (or later) / macOS / Linux
- Processor: Intel Core 2 Duo or AMD equivalent
- Memory (RAM): 2GB
- Graphics Card: DirectX 11 compatible
- Storage: 10GB of free space
Note that these are the bare minimum requirements for running a PS2 emulator. While it may be possible to run some games with these specifications, you may experience slow performance or compatibility issues.
Recommended System Requirements:
- Operating System: Windows 10 / macOS 10.13 or newer / Ubuntu 16.04 or newer
- Processor: Intel Core i5 or AMD equivalent
- Memory (RAM): 8GB
- Graphics Card: DirectX 12 compatible
- Storage: SSD with 20GB of free space
By meeting the recommended system requirements, you can ensure smoother gameplay and better emulation quality. The emulator will be capable of handling a wider range of PS2 games without major performance issues.
It’s worth mentioning that the system requirements may vary depending on the specific emulator you choose. Always refer to the documentation provided by the emulator developer for the accurate system requirements.
Now that you know the system requirements, let’s move on to the next step: downloading the PS2 emulator.
Step 1: Download the PS2 Emulator
The first step in playing PS2 games on your PC is to download a reliable PS2 emulator. There are several emulators available online, but one of the most popular and trusted options is PCSX2. Here’s how you can download the emulator:
- Open your web browser and go to the official PCSX2 website.
- Navigate to the Downloads section and click on the latest stable release for your operating system (Windows, macOS, or Linux).
- Once the download is complete, locate the installer file (usually in your Downloads folder) and run it.
- Follow the on-screen instructions to start the installation process. You may be asked to choose the installation location and select any additional components you want to install.
- Once the installation is complete, launch the PCSX2 emulator.
Congratulations! You have successfully downloaded and installed the PS2 emulator on your PC. With the emulator in place, you can now proceed to the next step: downloading the PS2 BIOS.
Note: It’s essential to download emulators and BIOS files from trusted sources to avoid malware or pirated content. Always use official websites or reputable sources recommended by the emulator community.
Now that you have the emulator installed, it’s time to move on to the next step: downloading the PS2 BIOS files.
Step 2: Install the PS2 Emulator
Now that you have downloaded the PS2 emulator, it’s time to install it on your PC. Follow these steps to complete the installation:
- Locate the installer file you downloaded in the previous step (usually in your Downloads folder) and run it.
- Choose the installation location for the emulator. The default location is usually fine, but you can select a different location if desired.
- Read and accept the terms and conditions of the installation.
- Select any additional components or plugins you want to install. These can enhance the emulator’s features and performance.
- Click on the “Install” button and wait for the installation process to complete.
- Once the installation is finished, you can launch the PS2 emulator from the desktop shortcut or the Start menu.
After installing the PS2 emulator, you will have access to a range of features and settings that will allow you to customize your gaming experience. It’s highly recommended to explore the emulator’s options and configurations to optimize performance according to your system’s capabilities.
Remember that the installation process may vary slightly depending on the emulator you choose. Always refer to the documentation provided by the emulator developer for specific installation instructions.
With the PS2 emulator successfully installed on your PC, the next step is to download the PS2 BIOS files, which are necessary for running PS2 games. Let’s move on to the next step.
Step 3: Download PS2 BIOS
In order to run PS2 games on your emulator, you will need to download the PS2 BIOS files. The BIOS files are essential for the emulator to function properly and to ensure compatibility with PS2 games. Follow these steps to download the PS2 BIOS:
- Visit a trusted source or official website that offers PS2 BIOS files for download. Be cautious and avoid downloading BIOS files from unauthorized or unofficial sources.
- Look for the specific BIOS file recommended by the emulator you are using. Different emulators may require different versions of the BIOS file, so make sure to choose the correct one.
- Download the BIOS file and save it to a location on your PC that you can easily access, such as the “Documents” or “Downloads” folder.
- Extract the BIOS file from the downloaded archive using an extraction tool like WinRAR or 7-Zip. Make sure to remember the location where the extracted BIOS file is saved.
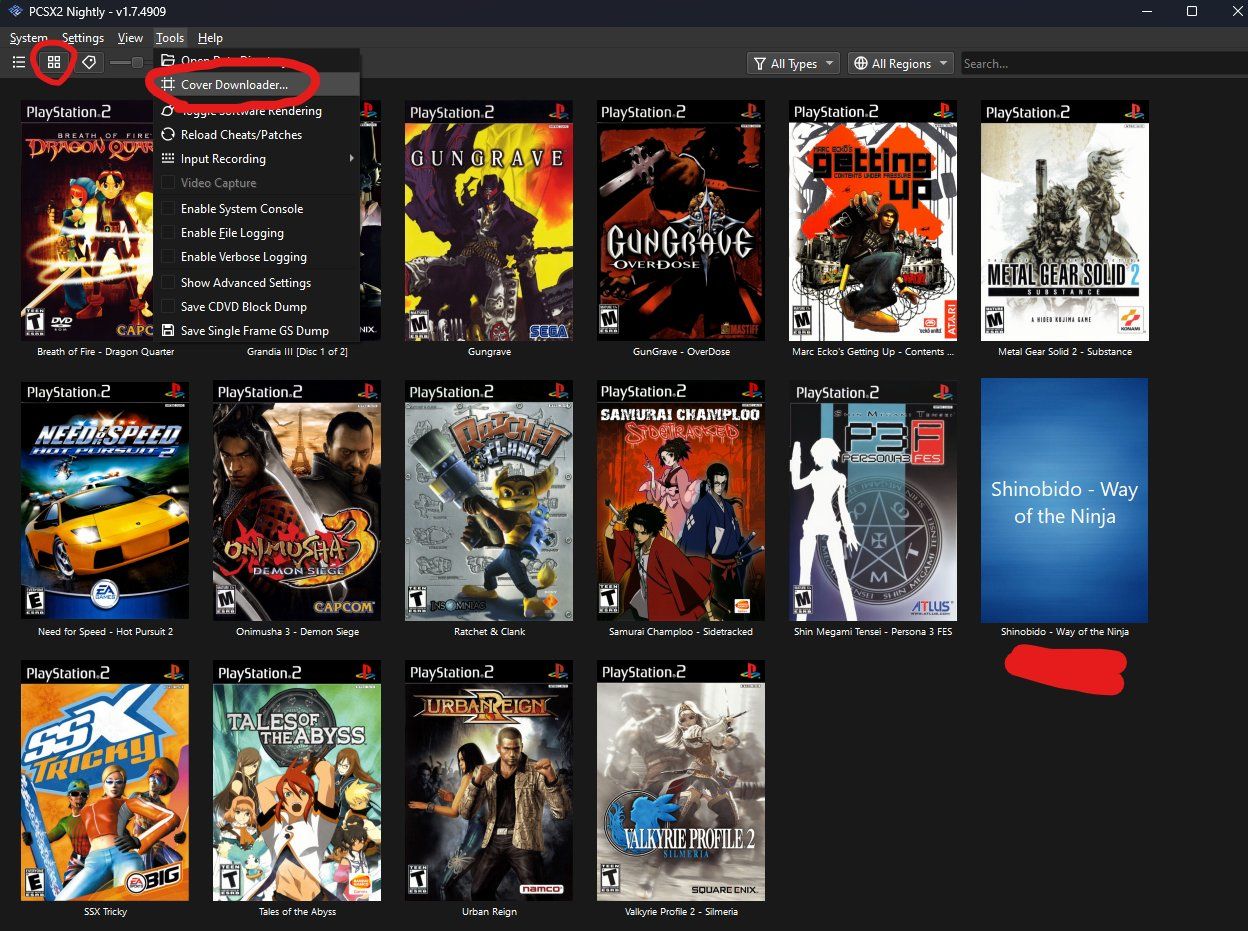
- Open your PS2 emulator and navigate to the “Configuration” or “Settings” menu.
- Locate the BIOS settings and select the option to browse for the BIOS file.
- Navigate to the location where you saved the extracted BIOS file and select it.
- Save the BIOS file configuration and restart your emulator for the changes to take effect.
It is crucial to remember that BIOS files are copyrighted material, and it is illegal to distribute or download them without proper authorization. Make sure to use legitimate sources when obtaining the PS2 BIOS files.
Now that you have successfully downloaded the PS2 BIOS files and configured them in your emulator, you are one step closer to playing PS2 games on your PC. The next step is to configure the PS2 emulator for optimal performance and compatibility. Let’s move on to step 4.
Step 4: Configure the PS2 Emulator
Configuring the PS2 emulator is an essential step to ensure the best performance and compatibility when playing PS2 games on your PC. Follow these steps to configure the emulator:
- Open the PS2 emulator on your PC.
- Navigate to the “Configuration” or “Settings” menu.
- Adjust the graphical settings based on your system’s capabilities. You can choose the resolution, enable shader effects, and adjust other visual settings to enhance the graphics of the game.
- Configure the controller settings. You can either use a keyboard or connect a game controller to your PC for a more authentic gaming experience.
- Set up the audio settings according to your preferences. Adjust the volume levels, choose the audio output device, and configure any additional audio options available.
- Explore the additional settings of the emulator. Look for options related to game-specific settings, save states, and cheat codes.
- Once you have adjusted all the settings, save the configuration.
It’s important to note that the optimal settings for the PS2 emulator can vary depending on your system’s hardware capabilities and the specific game you want to play. Experiment with the settings to find the balance between visual quality and performance that works best for you.
Additionally, the emulator may have specific configurations or plugins that enhance compatibility with certain games. Consult the emulator’s documentation or online forums for game-specific recommendations and tweaks.
With the PS2 emulator properly configured, you are now ready to add PS2 game ISO files to the emulator. Move on to step 5 to learn how to do this.
Step 5: Add PS2 Game ISO Files
Now that you have configured the PS2 emulator, the next step is to add PS2 game ISO files to the emulator. Follow these steps to add games to your emulator:
- Make sure you have a PS2 game ISO file on your computer. ISO files are digital copies of PS2 game discs that can be easily obtained through various sources.
- Create a dedicated folder on your computer where you will store your PS2 game ISO files. This can be any location of your choice.
- Open the PS2 emulator on your PC.
- Navigate to the “CDVD” or “ISO” menu within the emulator.
- Select the option to “Browse” or “Open” and locate the folder where you stored your PS2 game ISO files.
- Select the desired game ISO file and click on “Open” to add it to the emulator.
- The emulator will now load the game from the ISO file, and you should be able to play it on your PC.
Note that some emulators may also support the use of physical PS2 game discs. If you have the original game discs, you may be able to insert them into your computer’s disc drive and play them directly through the emulator.
It’s important to ensure that you own the original copies of the games you are adding to the emulator. Piracy is illegal and not supported by this guide.
With your PS2 game ISO files added to the emulator, you are now ready to play PS2 games on your PC. Keep in mind that the performance and compatibility of each game may vary, so some games may require additional troubleshooting or specific settings.
Now that you have learned how to add PS2 game ISO files, let’s move on to the final step: playing PS2 games on your PC.
Step 6: Play PS2 Games on your PC
Congratulations! You have reached the final step of playing PS2 games on your PC. Now that you have configured the emulator and added PS2 game ISO files, you can start enjoying your favorite PS2 games. Here’s how to play PS2 games on your PC:
- Launch the PS2 emulator on your PC.
- Navigate to the “File” or “ISO” menu within the emulator.
- Select the game you want to play from the list of added ISO files.
- Click on the game to start loading it.
- The emulator will begin running the game, and you should see the game’s title screen or intro video.
- Use your keyboard or connected game controller to play the game, just like you would on a traditional PlayStation 2 console.
During gameplay, you can use various emulator features such as save states, which allow you to save your progress at any point in the game and load it later. Additionally, you may have access to cheat codes and other gameplay customization options within the emulator.
Ensure that your system meets the recommended system requirements for a smooth gaming experience. If you encounter any performance issues or glitches while playing PS2 games, you may need to experiment with different emulator configurations or seek support from the emulator community.
Remember to legally obtain PS2 game ISO files and respect the copyright of game developers. Engaging in piracy is illegal and not supported by this guide.
Now that you know how to play PS2 games on your PC, it’s time to dive into the world of nostalgia and enjoy your favorite PlayStation 2 titles right at your fingertips.
Conclusion
In conclusion, playing PlayStation 2 (PS2) games on your PC is an exciting way to relive nostalgic gaming experiences. With the help of a PS2 emulator and the steps outlined in this guide, you can easily set up and enjoy your favorite PS2 games on your computer. Remember to follow the legal guidelines and obtain PS2 game ISO files from authorized sources.
We started by ensuring that your system meets the necessary requirements to run the PS2 emulator smoothly. These requirements are crucial for optimal performance and compatibility. Then, we proceeded with downloading and installing the PS2 emulator of your choice on your PC.
Afterwards, we discussed the importance of downloading the PS2 BIOS files from trusted sources and configuring them within the emulator. These BIOS files are essential for the emulator to function properly and ensure compatibility with PS2 games.
We then detailed how to configure the PS2 emulator for the best performance and gameplay experience. Adjusting graphical and audio settings, as well as controller configurations and additional settings, can greatly enhance your gaming experience.
Next, we learned how to add PS2 game ISO files to the emulator, whether they are downloaded files or physical game discs. This step is crucial for you to have access to your desired PS2 game library.
Finally, we explored the last step of actually playing PS2 games on your PC. Launching the emulator, selecting the game, and using your keyboard or game controller allows you to immerse yourself in the world of PS2 gaming on your computer.
By following these steps, you can unlock a vast library of PS2 games right on your PC, relive cherished memories, and explore games that you may have missed out on. Enjoy the nostalgia and have fun playing your favorite PS2 games!