Introduction
Welcome to the exciting world of Plutonium BO2! If you’re a fan of the classic first-person shooter Call of Duty: Black Ops II and you’re looking to take your gaming experience to the next level, then Plutonium BO2 is the answer. In this article, we will guide you through the step-by-step process of downloading and installing Plutonium BO2 on your computer.
Plutonium BO2 offers an enhanced multiplayer experience, with dedicated servers and additional features that aren’t available in the original game. It’s a community-driven project that aims to revive the multiplayer aspect of Black Ops II and provide a platform for players to connect and enjoy the game together.
Before we dive into the installation process, let’s go over a few key things you need to know. First, make sure your computer meets the system requirements for Plutonium BO2. You’ll need a Windows operating system (Windows 7 or later) and a decent internet connection. Additionally, it’s important to understand that Plutonium BO2 is a fan-made modification and is not affiliated with or endorsed by the original creators of the game.
Now that you have an overview of what Plutonium BO2 is and the basic requirements, let’s get started with the installation process. By following the steps outlined in this guide, you’ll be able to enjoy the nostalgic and action-packed gameplay of Black Ops II with the added enhancements of Plutonium BO2.
So, grab your weapons, gear up, and let’s embark on this exciting journey to download and install Plutonium BO2. Get ready to join a vibrant community of players, compete in thrilling multiplayer matches, and relive the excitement of Call of Duty: Black Ops II. Let’s begin!
What is Plutonium BO2?
Plutonium BO2 is a fan-made modification of the popular first-person shooter game, Call of Duty: Black Ops II. It is a project developed by a dedicated community of gamers who wanted to revive the multiplayer aspect of the game and provide players with an enhanced gaming experience.
Unlike the original version of Black Ops II, which had its official servers shut down, Plutonium BO2 offers dedicated servers that allow players to connect and play with others from around the world. This means that you can still enjoy the multiplayer mode of the game and engage in exciting battles with a vibrant and active community.
One of the major advantages of Plutonium BO2 is the addition of new features and improvements that were not present in the original game. These include advanced modding capabilities, custom game modes, and the ability to host and join private servers. Not only does this provide players with more options and flexibility, but it also extends the replay value of the game.
Plutonium BO2 also supports anti-cheat measures to ensure fair gameplay. The developers have implemented a robust anti-cheat system to detect and prevent cheating, ensuring a level playing field for all players.
In addition to the multiplayer mode, Plutonium BO2 also includes support for the custom zombies game mode. This allows players to battle hordes of the undead in unique and challenging scenarios, adding another layer of excitement to the overall gaming experience.
It’s important to note that Plutonium BO2 is a fan-made project and is not affiliated with or endorsed by the original creators of Call of Duty: Black Ops II. It is a passion project driven by a dedicated community that aims to keep the multiplayer aspect of the game alive and provide players with an enjoyable and enhanced gaming experience.
So, if you’re a fan of Call of Duty: Black Ops II and you’re looking to rediscover the excitement of the multiplayer mode, Plutonium BO2 is the perfect choice. Join the community, engage in intense battles, and experience the thrill of one of the most beloved first-person shooters of all time.
System Requirements
Before you dive into downloading and installing Plutonium BO2, it’s important to ensure that your computer meets the necessary system requirements. Here are the minimum and recommended specifications:
Minimum Requirements:
– Operating System: Windows 7 or later
– Processor: Intel Core i3-530 @ 2.93 GHz / AMD Phenom II X4 810 @ 2.60 GHz or equivalent
– Memory: 4 GB RAM
– Graphics: NVIDIA GeForce GTS 450 / ATI Radeon HD 5870 or equivalent
– DirectX: Version 11
– Network: Broadband internet connection
– Storage: 16 GB available space
– Sound Card: DirectX-compatible
Recommended Requirements:
– Operating System: Windows 10
– Processor: Intel Core i5-2500K @ 3.30 GHz / AMD FX-8120 @ 3.10 GHz or equivalent
– Memory: 8 GB RAM
– Graphics: NVIDIA GeForce GTX 760 / AMD Radeon R9 270X or equivalent
– DirectX: Version 11
– Network: Broadband internet connection
– Storage: 16 GB available space
– Sound Card: DirectX-compatible
It’s important to note that these specifications are the minimum requirements to run Plutonium BO2 smoothly. If your computer falls below these specifications, you may still be able to run the game, but you may experience performance issues or lag during gameplay. To ensure the best possible experience, it’s recommended to meet or exceed the recommended requirements.
In addition to the hardware requirements, it’s crucial to have a stable and reliable internet connection. Since Plutonium BO2 relies heavily on online multiplayer, a fast and consistent internet connection is necessary to enjoy smooth gameplay and avoid connectivity issues.
Taking the time to check your system’s specifications and make any necessary upgrades will help ensure a seamless gaming experience when playing Plutonium BO2. So, before you proceed with the download and installation process, double-check that your computer meets or exceeds the system requirements mentioned above.
Step 1: Downloading the Plutonium BO2 Installer
To begin the process of installing Plutonium BO2, the first step is to download the Plutonium BO2 Installer. Follow these steps to download the installer:
1. Open your preferred web browser on your computer.
2. Do a search for “Plutonium BO2 download” or visit the official Plutonium BO2 website.
3. Look for the download section on the website homepage or designated download page.
4. Click on the download link/button for the Plutonium BO2 Installer. The file will usually be in .exe format.
5. Depending on your browser settings, you may be prompted to choose a download location or the file may automatically download to your default Downloads folder.
It’s important to note that downloading the Plutonium BO2 Installer from the official website ensures that you’re getting a legitimate and trusted source. Avoid downloading the installer from unofficial or third-party websites to prevent the risk of downloading malware or counterfeit files.
Once the download is complete, you’re ready to move on to the next step of the installation process. Keep the downloaded Plutonium BO2 Installer file in a location that you can easily access later. We’ll use this file in the upcoming steps to install Plutonium BO2 on your computer.
Remember to exercise caution while downloading files from the internet. Ensure that you have a reliable antivirus program installed and keep it updated to scan any downloaded files for potential threats.
With the Plutonium BO2 Installer successfully downloaded, you’re one step closer to diving into the exhilarating multiplayer world of Plutonium BO2. In the next step, we’ll guide you through the process of installing Plutonium BO2 on your computer.
Step 2: Installing Plutonium BO2
Now that you have downloaded the Plutonium BO2 Installer, it’s time to install Plutonium BO2 on your computer. Follow these steps to complete the installation process:
1. Locate the Plutonium BO2 Installer file that you downloaded in the previous step. It is typically saved in your Downloads folder or the location you specified during the download.
2. Double-click on the installer file to run it. If prompted by your computer’s security settings, click “Run” or “Yes” to allow the installation process to begin.
3. The installer will launch, presenting you with the Plutonium BO2 installation wizard. Follow the on-screen prompts and instructions to proceed with the installation.
4. Read and accept the End-User License Agreement (EULA) if prompted. It’s essential to review the terms and conditions before proceeding.
5. Choose the installation destination for Plutonium BO2. The default location is typically the Program Files folder on your system drive. If you prefer a different location, click “Browse” and select the desired installation folder.
6. The installer will begin copying the necessary files to your computer. This process may take a few minutes, so be patient and avoid interrupting the installation.
7. Once the installation is complete, you will see a confirmation message indicating that Plutonium BO2 has been successfully installed on your computer.
Congratulations! You have successfully installed Plutonium BO2 on your computer. Now you’re just steps away from joining the multiplayer action and enjoying the enhanced gaming experience that Plutonium BO2 offers.
Before you jump into the game, it’s important to proceed with the next steps, which include creating a Plutonium BO2 account and configuring the necessary settings. These steps are crucial to ensure a seamless and optimized gaming experience. So, let’s move on to step 3 to get everything set up and ready for action.
Step 3: Creating a Plutonium BO2 Account
In order to fully enjoy the features and multiplayer experience of Plutonium BO2, you will need to create a Plutonium BO2 account. This account will allow you to connect with other players, join multiplayer matches, and take advantage of various community features. To create a Plutonium BO2 account, follow the steps below:
1. Launch the Plutonium BO2 application on your computer.
2. On the login screen, click on the “Register” or “Create Account” button. This will take you to the registration page.
3. Fill in the required fields in the registration form. You’ll typically be asked to provide a username, a valid email address, and a password. It’s important to choose a unique, secure password and provide a valid email address to ensure the security and recovery of your account.
4. Once you’ve filled in the necessary information, click on the “Register” or “Create Account” button to submit your registration.
5. Check your email inbox for a verification email from Plutonium BO2. Click on the verification link provided in the email to confirm your account. If you don’t see the email, check your spam or junk folder.
6. After clicking the verification link, you’ll be redirected to a confirmation page indicating that your account has been successfully verified.
7. Return to the Plutonium BO2 login screen and enter your newly created username and password to log in.
Congratulations! You have successfully created a Plutonium BO2 account. This account will be your gateway to the vibrant community of Plutonium BO2 players. From here, you can explore various multiplayer modes, join matches, and interact with other players.
It’s important to note that your Plutonium BO2 account is separate from any other Call of Duty accounts you may have. This means you’ll need to create a new account specific to Plutonium BO2 to access its features and multiplayer gameplay.
Keep your Plutonium BO2 account credentials safe and secure. Do not share your account information with others to prevent unauthorized access to your account and to ensure the integrity of your gaming experience.
Now that you have successfully created a Plutonium BO2 account, you’re ready to move on to the next step: configuring the necessary settings to optimize your gaming experience. Let’s proceed to step 4 to get everything set up just right.
Step 4: Configuring Plutonium BO2
Now that you have created a Plutonium BO2 account, it’s time to configure the necessary settings to optimize your gaming experience. These settings will help customize your gameplay and ensure that Plutonium BO2 runs smoothly on your computer. Follow the steps below to configure Plutonium BO2:
1. Launch the Plutonium BO2 application on your computer and log in with your Plutonium BO2 account credentials.
2. Once you’re logged in, you’ll be taken to the main menu. From here, click on the “Settings” or “Options” tab to access the configuration options.
3. In the settings menu, you’ll find various categories such as Graphics, Audio, Controls, and Gameplay. Take some time to explore these options and customize them according to your preferences.
4. In the Graphics settings, you can adjust the resolution, texture quality, and other graphical settings to optimize performance and visuals. Depending on your computer’s specifications, you may need to adjust these settings to ensure smooth gameplay.
5. The Audio settings allow you to adjust the volume levels of different in-game audio elements, such as music, voices, and effects. Customize these settings to create an immersive and enjoyable audio experience.
6. In the Controls settings, you can remap and configure your keyboard and mouse controls to your liking. Adjust the sensitivity, invert the mouse axis if necessary, and assign keybindings that suit your playstyle.
7. The Gameplay settings offer options to customize various gameplay mechanics, such as HUD elements, hitmarker sounds, and more. Experiment with these settings to find the configuration that feels most comfortable for you.
Remember to save your settings before exiting the configuration menu. Once you’ve customized all the necessary options, you’re ready to dive into the action-packed world of Plutonium BO2.
It’s important to note that every player has different preferences, so take the time to adjust the settings according to your own comfort level and hardware capabilities. Don’t hesitate to experiment with different configurations until you find the perfect balance of performance and visual quality.
By configuring Plutonium BO2 to your liking, you’re ensuring an optimal gaming experience tailored to your preferences. Now that you have completed the configuration process, it’s time to move on to the next steps: downloading the game files and installing them on your computer. Let’s proceed to step 5 to get everything set up for gameplay.
Step 5: Downloading the Game Files
With Plutonium BO2 configured and ready, the next step is to download the necessary game files. These files are essential for running Plutonium BO2 and accessing the multiplayer modes. Follow these steps to download the game files:
1. Open the Plutonium BO2 application on your computer and log in with your Plutonium BO2 account credentials.
2. Once you’re logged in, you’ll be in the main menu. Look for an option that says “Download Game Files” or something similar. Click on it to begin the download process.
3. The download process will vary depending on your internet connection speed and the size of the game files. Allow the download to complete before proceeding to the installation step.
4. It’s important to download the game files from the official Plutonium BO2 website or trusted sources. Downloading game files from unofficial or unauthorized sources poses the risk of malware or counterfeit files.
During the download process, it’s crucial to have a stable and reliable internet connection. If your connection is interrupted or you experience any issues, try restarting the download or contact the Plutonium BO2 support team for assistance.
Once the game files have been successfully downloaded, you’re ready to move on to the next step: installing the downloaded game files on your computer. This will allow you to start playing Plutonium BO2 and join the multiplayer action.
Keep in mind that the size of the game files may vary, so ensure that you have sufficient storage space on your computer. It’s also recommended to have a backup of your game files in case of any unexpected issues or the need to reinstall.
Now that you have successfully downloaded the game files, let’s proceed to step 6, where we will guide you through the process of installing the game files and getting everything set up for gameplay.
Step 6: Installing the Game Files
Now that you have downloaded the game files for Plutonium BO2, it’s time to install them on your computer. This step is crucial as it will enable you to launch and play the game. Follow these steps to install the game files:
1. Locate the downloaded game files on your computer. The files are typically saved in the folder where you chose to download them or in your default downloads folder.
2. Extract the downloaded game files if they are compressed in a .zip or .rar format. Right-click on the file and select the “Extract” or “Extract Here” option. Make sure to choose a location where you want to install the game files.
3. Once the files are extracted, navigate to the location where you extracted them. You should see a folder containing the game files.
4. Double-click on the folder to enter its contents. Look for an executable file with a name like “Plutonium BO2.exe” or something similar.
5. Double-click on the executable file to start the installation process. You may be prompted by your computer’s security settings to allow the installation to proceed. Click “Run” or “Yes” to proceed.
6. The installation process will begin, and you may be presented with a series of prompts or options. Follow the on-screen instructions to complete the installation. It may take several minutes for the installation to finish.
7. Once the installation is complete, you will receive a confirmation message indicating that the game files have been successfully installed on your computer.
Congratulations! You have successfully installed the game files for Plutonium BO2. This brings you one step closer to diving into action-packed multiplayer matches and enjoying the enhanced gaming experience.
It’s important to note that if you encounter any issues during the installation process, such as error messages or missing files, it’s recommended to seek support from the Plutonium BO2 community or the support team for assistance. They can provide guidance and help troubleshoot any installation-related problems.
With the game files installed, you’re almost ready to jump into the world of Plutonium BO2. The next step is to launch the game and prepare for exciting gameplay. Let’s proceed to step 7 to launch Plutonium BO2 and begin the adventure.
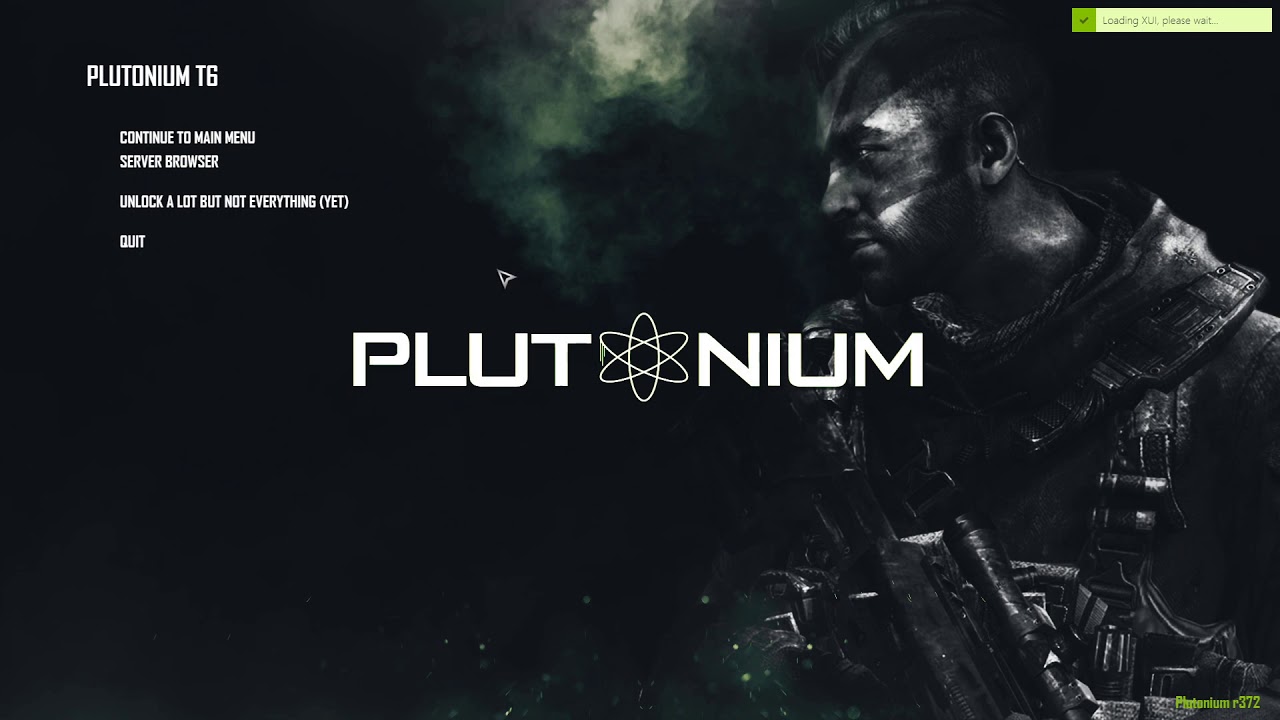
Step 7: Launching Plutonium BO2
Now that you have successfully installed the game files for Plutonium BO2, it’s time to launch the game and dive into the thrilling multiplayer experience. Follow these steps to launch Plutonium BO2:
1. Locate the Plutonium BO2 application on your computer. The application is usually an executable file named “Plutonium BO2.exe” or something similar.
2. Double-click on the Plutonium BO2 executable file to launch the game.
3. The game will start, and you will be presented with the main menu. Here, you’ll find various options such as “Play Online,” “Zombies,” and “Settings.”
4. If you’re ready to jump into online multiplayer matches, click on the “Play Online” option. This will connect you to the Plutonium BO2 servers and allow you to join multiplayer games.
5. If you prefer the custom zombies game mode, select the “Zombies” option. This will take you to the custom zombies menu, where you can choose different maps and game modes to play.
6. Make sure to check your internet connection before launching Plutonium BO2. A stable and reliable internet connection is necessary for smooth gameplay and to access the multiplayer features.
7. Once you select your desired game mode, you’ll be matched with other players and can start enjoying the exciting gameplay of Plutonium BO2.
It’s important to note that you will need to log in with your Plutonium BO2 account credentials to access the multiplayer features. Enter your username and password when prompted to log in and connect with the Plutonium BO2 community.
With Plutonium BO2 launched, you’re ready to embark on an exhilarating adventure filled with intense battles and thrilling multiplayer matches. Enjoy the enhanced features, dedicated servers, and engaging gameplay that Plutonium BO2 has to offer.
If you encounter any issues while launching the game or during gameplay, don’t hesitate to reach out to the Plutonium BO2 support team or consult the community forums for assistance. They can provide guidance and help resolve any technical or gameplay-related problems.
Now that you have successfully launched Plutonium BO2, get ready to immerse yourself in the action and have an unforgettable gaming experience. Enjoy the excitement and camaraderie of multiplayer matches as you unleash your skills and dominate the battlefield in Plutonium BO2!
Troubleshooting Common Issues
While installing and launching Plutonium BO2 should typically go smoothly, you may encounter some common issues along the way. Here are a few troubleshooting steps to help you resolve these issues:
1. Connectivity Issues: If you’re experiencing connection problems while trying to log in or join multiplayer matches, check your internet connection. Make sure you have a stable internet connection and try restarting your router. You can also try disabling any firewall or antivirus software temporarily to see if they are causing any disruptions.
2. Game Crashes: If the game crashes during launch or while playing, ensure that your computer meets the minimum system requirements. Update your graphics drivers and DirectX to the latest versions. You can also try running the game in compatibility mode or as an administrator. If the issue persists, consider seeking assistance from the Plutonium BO2 support team or community forums.
3. Audio or Visual Issues: If you’re experiencing audio or visual glitches, verify that you have the latest audio and graphics drivers installed. Check your in-game settings for any misconfigurations, such as incorrect audio output or display resolution. Adjust the settings accordingly and restart the game.
4. Controller or Keyboard Issues: If you’re using a controller or keyboard and facing issues with inputs, verify that your input devices are properly connected. Check the keybindings in the game settings to ensure they are mapped correctly. Additionally, make sure your controller or keyboard is compatible with Plutonium BO2 and is supported by the game.
5. Server Connection Problems: If you’re unable to connect to Plutonium BO2 servers or experiencing lag during gameplay, ensure that your internet connection is stable. Try connecting to different servers or regions to see if the problem persists. You can also check the Plutonium BO2 website or social media channels for any server maintenance or outage information.
If you’re still unable to resolve the issue or encountering a different problem, consider reaching out to the Plutonium BO2 support team. They can provide you with specific troubleshooting steps based on your situation.
Remember to provide detailed information about the problem you are facing, including any error messages or specific circumstances that occurred before the issue arose. This will help the support team better understand and address the problem.
By addressing common issues and finding effective solutions, you can ensure a smooth gaming experience and fully enjoy the features and multiplayer aspects of Plutonium BO2.
Now that you’re equipped with troubleshooting knowledge, you can overcome any challenges that may arise and immerse yourself in the exciting world of Plutonium BO2.
Conclusion
Congratulations! You have successfully completed all the steps to download, install, and configure Plutonium BO2 on your computer. By following this guide, you are now ready to embark on an exciting journey filled with multiplayer battles and enhanced gaming experiences.
Plutonium BO2 offers a fantastic opportunity for fans of Call of Duty: Black Ops II to relive the thrill of the game’s multiplayer mode. With dedicated servers, new features, and a vibrant community, Plutonium BO2 brings a fresh and revitalized multiplayer experience to players.
Throughout the installation process, you learned how to download the Plutonium BO2 Installer, create a Plutonium BO2 account, configure the necessary settings, and overcome common troubleshooting issues that may arise. These steps ensure that you have everything set up for optimized gameplay.
As you venture into the world of Plutonium BO2, remember to be respectful and abide by the community guidelines. Engage with fellow players, participate in multiplayer matches, and enjoy the camaraderie that comes with being part of a passionate gaming community.
It’s important to note that Plutonium BO2 is a fan-made project and is not affiliated with or endorsed by the original creators of Call of Duty: Black Ops II. The dedicated efforts of the Plutonium BO2 community have allowed gamers to continue enjoying the multiplayer aspect of the game long after the official servers were shut down.
So, grab your weapons, team up with friends, and dive into the action-packed multiplayer battles that await you in Plutonium BO2. Explore the various game modes, compete against skilled opponents, and create unforgettable gaming moments.
Should you encounter any issues or have any questions along the way, remember that the Plutonium BO2 support team and community forums are there to assist you. They are filled with experienced players who are ready to offer guidance and help you through any challenges you may face.
Thank you for choosing Plutonium BO2, and enjoy your gaming experience! It’s time to unleash your skills, strategize with your team, and dominate the battlefield in the world of Plutonium BO2. Have an incredible time playing and make the most out of this exhilarating gaming adventure!