Introduction
If you own a Canon camera and want to transfer your pictures to your computer, you’ve come to the right place. With the advancement of technology, it has become easier than ever to capture high-quality images using digital cameras. However, once you have taken those stunning photos, you may want to share, edit, or store them on your computer for safekeeping or further enhancement. This is where the process of downloading pictures from your Canon camera to your computer becomes essential.
Downloading pictures from your Canon camera to your computer allows you to free up space on your camera’s memory card and gives you more control over organizing and accessing your photos. Whether you’re a professional photographer, an amateur hobbyist, or just someone who enjoys capturing beautiful moments, knowing how to transfer your pictures is a valuable skill.
In this article, we will guide you through the step-by-step process of downloading pictures from your Canon camera to your computer. You will learn how to install the necessary software, connect your camera to your computer, and select and save your pictures. By following these simple steps, you will be able to effortlessly transfer your cherished memories from your camera to your computer.
So, whether you want to create stunning photo albums, edit your images, or simply backup your photos, read on to discover how to download pictures from your Canon camera to your computer.
Step 1: Install the Canon software
The first step in downloading pictures from your Canon camera to your computer is to install the necessary Canon software. This software is essential as it allows your computer to recognize and communicate with your camera, enabling the smooth transfer of photos.
To begin, locate the CD or DVD that came with your Canon camera. This disc usually contains the software needed for transferring pictures. If you don’t have the installation disc, you can visit the Canon website and download the software from there.
Insert the installation disc into your computer’s CD/DVD drive, and a setup wizard should automatically launch. Follow the on-screen instructions to install the Canon software. If the setup wizard doesn’t start automatically, you can manually open the disc and look for a setup file to initiate the installation process.
During the installation, you may be prompted to select the specific software components you want to install. Typical options include the Canon Camera Window, EOS Utility, and Image Transfer Utility. It’s recommended to install all the available components to fully utilize the features and functionalities provided by the Canon software.
After selecting the desired components, click “Next” to continue the installation. The software will then be installed on your computer, and you may be prompted to restart your computer once the installation is complete. It’s important to follow any additional instructions or prompts that appear during the installation process to ensure a successful installation.
Once the Canon software is installed, you’re ready to move on to the next step: connecting your Canon camera to your computer.
Step 2: Connect the Canon camera to the computer
Now that you have installed the Canon software on your computer, it’s time to connect your Canon camera to your computer. The connection allows the software to detect your camera and establish a communication link for transferring pictures.
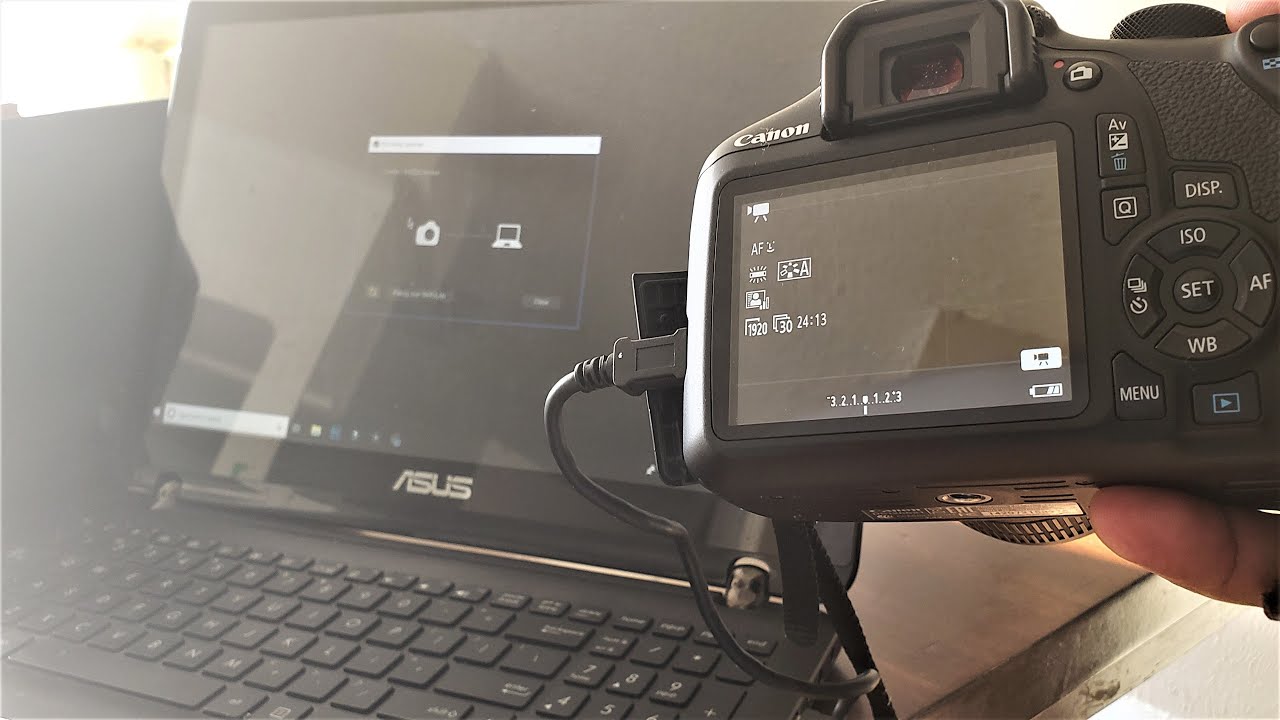
Start by locating the USB cable that came with your Canon camera. This cable is typically included in the camera package and has a USB connector on one end and a port that fits into your camera on the other end.
Connect one end of the USB cable to your Canon camera’s USB port, which is usually found on the side or the bottom of the camera, depending on the model. Make sure the cable is securely plugged in to ensure a stable connection.
Next, take the other end of the USB cable and insert it into an available USB port on your computer. It’s recommended to use a USB port directly on your computer instead of using a USB hub or an external device, as this can ensure a faster and more reliable connection.
Once the USB cable is connected to both your Canon camera and your computer, turn on your camera. Some camera models have a dedicated power button, while others may require you to set the camera to the “play” or “view images” mode. Check your camera’s manual if you’re unsure about the specific steps for turning on your camera.
As soon as your camera is powered on, your computer should detect the connected device and launch the Canon software automatically. If the software doesn’t open automatically, you can manually launch it by selecting the corresponding program from the installed software on your computer.
With the Canon software launched and your camera connected, you’re now ready to proceed to the next step: selecting and downloading your pictures.
Step 3: Launch the Canon software
Once your Canon camera is connected to your computer, it’s time to launch the Canon software. This software provides you with the necessary tools and interface to transfer, manage, and organize your pictures.
If the Canon software doesn’t automatically launch when you connect your camera, you can manually open it by clicking on the program’s icon on your desktop or navigating to it through your computer’s Start menu.
When the Canon software opens, you will likely see a welcome screen or a home screen that displays various options and features. Take a moment to familiarize yourself with the software’s interface and navigation. Depending on the version of the software you have installed, the layout and options may vary slightly.
The Canon software typically provides you with the ability to import, view, and manage your pictures. You should be able to see a list or thumbnail view of the pictures currently stored on your camera’s memory card.
Select the option to import or transfer pictures from your camera to your computer. The exact location of this option may vary depending on the software version, but it is usually clearly labeled. You may also have the option to select specific pictures or import them all at once.
Before proceeding with the transfer, you may be asked to specify a destination folder on your computer where the pictures will be saved. Choose a location that is easy to remember and accessible for future use.
Once you have made your selection, start the transfer process by clicking on the appropriate button or option. The software will then copy the selected pictures from your camera to your specified location on your computer.
Depending on the number and size of the pictures being transferred, the process may take a few moments. You can monitor the progress through a progress bar or other indicators provided by the Canon software.
With the pictures successfully transferred to your computer, you’re now ready to move on to the next step: organizing and saving your pictures.
Step 4: Select and download pictures
Now that you have launched the Canon software and your camera is connected to your computer, it’s time to select and download the pictures you want to transfer. The Canon software provides you with various options for selecting and managing your pictures, allowing you to choose the ones you wish to download.
Depending on the version of the Canon software you are using, you may have different ways to select the pictures. One common method is to browse through the thumbnails or the list view of the images and manually select the ones you want to download. Simply click on the checkboxes or select the individual images to mark them for download.
Alternatively, you may have the option to select all the pictures at once, especially if you want to transfer all the images from your camera to your computer.
Once you have selected the desired pictures, look for a button or an option that initiates the download process. This may be labeled as “Download,” “Transfer,” or something similar.
Clicking on the download button will start the transfer process, and the selected pictures will be copied from your camera to the destination folder specified earlier during the software setup.
It’s important to note that the time it takes to download the pictures will depend on the number and size of the images, as well as the transfer speed of your USB connection.
During the download process, it’s recommended to avoid disconnecting the USB cable or turning off your camera or computer. Doing so can interrupt the transfer and potentially result in data loss or corruption of the transferred files.
Once the download is complete, you can verify the transferred pictures by navigating to the destination folder on your computer. You should see the successfully downloaded images in that location.
With the pictures downloaded, it’s time to move on to the next step: organizing and saving them on your computer.
Step 5: Organize and save the pictures on your computer
After downloading your pictures from the Canon camera to your computer, it’s important to organize and save them in a systematic way. Proper organization ensures easy access, efficient management, and hassle-free retrieval of your precious photos.
Start by creating a dedicated folder or directory on your computer where you want to store the downloaded pictures. You can choose a name that reflects the event, location, or date of the photos to make it easier to identify them later.
Open the folder where the downloaded pictures are saved and make any necessary adjustments or edits. You can rearrange the photos, rename them, or even create subfolders to further categorize your collection.
If you have specific sorting preferences, the Canon software usually provides tools for organizing your pictures. You can sort them by date, file type, or even assign keywords and tags to facilitate quick searches in the future.
Consider creating backup copies of your pictures to ensure their safety and prevent any loss or damage. You can use external hard drives, cloud storage services, or even burn them onto DVDs to have multiple copies in different locations.
Depending on your preference, you may also want to consider editing your photos to enhance their quality or make them more visually appealing. The Canon software may offer basic editing features like cropping, adjusting brightness and contrast, or even adding filters. Explore these options to make your pictures truly stand out.
Once you have organized and edited your pictures to your satisfaction, it’s important to regularly back up your collection. Technology can be unpredictable, and an accidental format or system crash could potentially result in permanent data loss. By maintaining backups, you can protect your cherished memories for years to come.
Remember to periodically clean up your camera’s memory card to free up space for new pictures. Once you have confirmed that the pictures are successfully transferred and backed up, you can safely delete them from the camera’s memory card using the Canon software or by formatting the memory card directly from your camera.
With your pictures now organized, edited, and safely stored on your computer, you can easily access and share them with others. Whether you decide to create digital albums, print them out, or showcase them on social media, you can enjoy your Canon camera’s captured moments in the best possible way.
Step 6: Disconnect the Canon camera from the computer
Once you have successfully transferred and organized your pictures on your computer, it’s time to safely disconnect your Canon camera from the computer. Properly disconnecting the camera ensures that no data is corrupted and that both your camera and computer remain in good working condition.
Before disconnecting the USB cable, make sure that any ongoing transfers or processes involving your camera have been completed. This includes closing any open files, confirming that all pictures have been successfully transferred, and ensuring that the Canon software is closed.
To safely disconnect your Canon camera, first, locate the “Safely Remove Hardware” icon on your computer’s taskbar. This icon typically resembles a USB connector with a green checkmark or an arrow pointing upward.
Click on the icon to open the list of connected devices. Look for the entry that corresponds to your Canon camera and select it with a single click.
A notification or prompt may appear, indicating that it is safe to remove the connected device. This notification confirms that all data transfers and operations involving the camera have been completed, and it is now okay to disconnect it.
Once you have received the confirmation, gently remove the USB cable from both your Canon camera and your computer’s USB port. Handle the cable and the camera with care to avoid any accidental damage.
Now that your Canon camera is safely disconnected from your computer, you can power off your camera or put it back into its regular shooting mode, depending on your preference.
Remember to store your camera and its accessories in a safe and protected place when not in use. This helps maintain their longevity and keeps them ready for your next photography adventure.
By following these steps, you have successfully downloaded pictures from your Canon camera to your computer, organized and saved them, and disconnected your camera safely. You can now enjoy easy access to your photos and cherish your captured memories for years to come.
Conclusion
Transferring pictures from your Canon camera to your computer is a simple yet essential process that allows you to conveniently access, manage, and preserve your precious memories. By following the step-by-step guide outlined in this article, you can easily download your pictures, organize them, and safely disconnect your camera.
Installing the Canon software and connecting your camera to your computer were the initial steps to start the transfer process. The Canon software provides you with the necessary tools and interface to select, download, and manage your pictures effortlessly.
Once your pictures are downloaded, organizing and saving them play a crucial role in maintaining a well-structured photo collection. Creating dedicated folders, adding keywords or tags, and regularly backing up your pictures ensures easy accessibility and protection against potential data loss.
With your pictures properly organized, you can also consider editing them to enhance their quality or add creative touches. The Canon software often provides basic editing features that allow you to make adjustments, crop images, or apply filters to make your pictures truly captivating.
Finally, disconnecting your Canon camera from the computer requires a cautious approach to prevent any data corruption or damage to both devices. Safely removing the USB connection and ensuring that all transfers and processes are completed before disconnecting is crucial for the overall longevity and functionality of your camera and computer.
Mastering the process of downloading pictures from your Canon camera to your computer opens up a world of possibilities for sharing, printing, or further editing your photos. Besides, it also allows you to free up space on your camera’s memory card to continue capturing new moments.
Remember, practice makes perfect. As you become more familiar with the process, you’ll quickly find your own rhythm and discover additional features and functionalities offered by the Canon software to enhance your photography experience.
So, grab your Canon camera, connect it to your computer, and take the first step towards unlocking the full potential of your captured images. Enjoy the journey of turning your memorable moments into lifelong treasures.